Owners Manual
Page 2
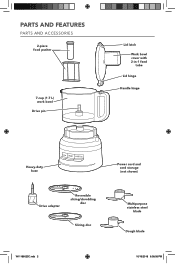
PARTS AND FEATURES PARTS AND ACCESSORIES 2-piece food pusher 7-cup (1.7 L) work bowl Drive pin Lid latch Work bowl cover with 2-in-1 feed tube Lid hinge Handle hinge Heavy-duty base Power cord and cord storage (not shown) Drive adapter Reversible slicing/shredding disc Slicing disc Multipurpose stainless steel blade Dough blade W11186023C.indb 2 10/19/2018 6:08:08 PM
PARTS AND FEATURES PARTS AND ACCESSORIES 2-piece food pusher 7-cup (1.7 L) work bowl Drive pin Lid latch Work bowl cover with 2-in-1 feed tube Lid hinge Handle hinge Heavy-duty base Power cord and cord storage (not shown) Drive adapter Reversible slicing/shredding disc Slicing disc Multipurpose stainless steel blade Dough blade W11186023C.indb 2 10/19/2018 6:08:08 PM
Owners Manual
Page 3
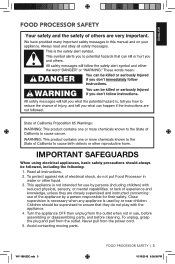
... experience and knowledge, unless they are closely supervised and instructed concerning use , before assembling or disassembling parts, and before cleaning. Avoid contacting moving parts. FOOD PROCESSOR SAFETY ENGLISH IMPORTANT SAFEGUARDS When using electrical appliances, basic safety precautions should be followed, including the following: 1. To unplug, grasp the plug and pull from the power cord. 5. Never pull from the outlet. W11186023C.indb...
... experience and knowledge, unless they are closely supervised and instructed concerning use , before assembling or disassembling parts, and before cleaning. Avoid contacting moving parts. FOOD PROCESSOR SAFETY ENGLISH IMPORTANT SAFEGUARDS When using electrical appliances, basic safety precautions should be followed, including the following: 1. To unplug, grasp the plug and pull from the power cord. 5. Never pull from the outlet. W11186023C.indb...
Owners Manual
Page 4
... moving blades or discs while processing food to reduce the risk of electrical shock, this plug will fit in any manner. Handle carefully. 12. Do not fill the bowl above the marked maximum fill line (or rated capacity) to avoid risk of table or counter. 10. Never feed food by KitchenAid may be used but must be used only when the Food Processor is...
... moving blades or discs while processing food to reduce the risk of electrical shock, this plug will fit in any manner. Handle carefully. 12. Do not fill the bowl above the marked maximum fill line (or rated capacity) to avoid risk of table or counter. 10. Never feed food by KitchenAid may be used but must be used only when the Food Processor is...
Owners Manual
Page 5
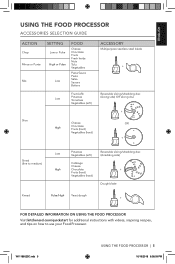
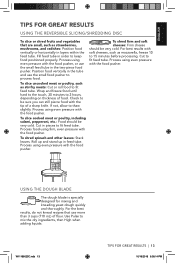
... (soft) ACCESSORY Multipurpose stainless steel blade + Reversible slicing/shredding disc (slicing side) OR slicing disc + Slice High Cheese Chocolate Fruits (hard) Vegetables (hard) OR + Shred (fine to medium) Low High Potatoes Vegetables (soft) Cabbage Cheese Chocolate Fruits (hard) Vegetables (hard) Reversible slicing/shredding disc (shredding side) + Dough blade Knead Pulse/High Yeast dough + FOR DETAILED INFORMATION ON USING THE FOOD PROCESSOR Visit kitchenaid.com/quickstart for additional instructions with videos, inspiring recipes, and tips...
... (soft) ACCESSORY Multipurpose stainless steel blade + Reversible slicing/shredding disc (slicing side) OR slicing disc + Slice High Cheese Chocolate Fruits (hard) Vegetables (hard) OR + Shred (fine to medium) Low High Potatoes Vegetables (soft) Cabbage Cheese Chocolate Fruits (hard) Vegetables (hard) Reversible slicing/shredding disc (shredding side) + Dough blade Knead Pulse/High Yeast dough + FOR DETAILED INFORMATION ON USING THE FOOD PROCESSOR Visit kitchenaid.com/quickstart for additional instructions with videos, inspiring recipes, and tips...
Owners Manual
Page 6
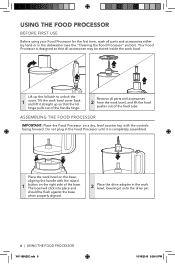
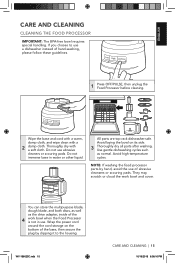
... 1 cover. Remove all parts and accessories either by hand or in the dishwasher (see the "Cleaning the Food Processor" section). Do not plug in the work bowl, lowering it is designed so that the lid hinge pulls out of the handle hinge. Your Food Processor is completely assembled. Lift up so that all accessories may be flush against the base when properly aligned. 2 Place the drive adapter in...
... 1 cover. Remove all parts and accessories either by hand or in the dishwasher (see the "Cleaning the Food Processor" section). Do not plug in the work bowl, lowering it is designed so that the lid hinge pulls out of the handle hinge. Your Food Processor is completely assembled. Lift up so that all accessories may be flush against the base when properly aligned. 2 Place the drive adapter in...
Owners Manual
Page 7
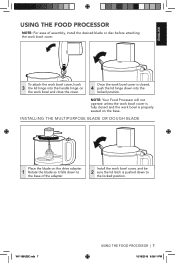
... the adapter. To attach the work bowl cover, hook 3 the lid hinge into the handle hinge on the work bowl cover, and be 2 sure the lid latch is pushed down into the locked position. NOTE: Your Food Processor will not operate unless the work bowl cover is fully closed , 4 push the lid hinge down to the base of assembly, install the desired blade or disc before attaching the work bowl is closed and the work bowl cover. W11186023C.indb 7 USING THE FOOD PROCESSOR...
... the adapter. To attach the work bowl cover, hook 3 the lid hinge into the handle hinge on the work bowl cover, and be 2 sure the lid latch is pushed down into the locked position. NOTE: Your Food Processor will not operate unless the work bowl cover is fully closed , 4 push the lid hinge down to the base of assembly, install the desired blade or disc before attaching the work bowl is closed and the work bowl cover. W11186023C.indb 7 USING THE FOOD PROCESSOR...
Owners Manual
Page 8
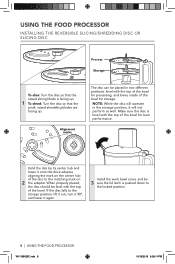
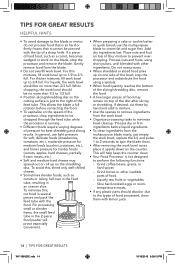
.... Install the work bowl cover, and be placed in the storage position, it again. USING THE FOOD PROCESSOR INSTALLING THE REVERSIBLE SLICING/SHREDDING DISC OR SLICING DISC Process Storage To slice: Turn the disc so that the raised slicing blade is facing up. 1 To shred: Turn the disc so that the small, raised shredding blades are facing up. Alignment marks The disc can be 3 sure the lid latch is level with the top of the bowl. NOTE: While the disc will operate...
.... Install the work bowl cover, and be placed in the storage position, it again. USING THE FOOD PROCESSOR INSTALLING THE REVERSIBLE SLICING/SHREDDING DISC OR SLICING DISC Process Storage To slice: Turn the disc so that the raised slicing blade is facing up. 1 To shred: Turn the disc so that the small, raised shredding blades are facing up. Alignment marks The disc can be 3 sure the lid latch is level with the top of the bowl. NOTE: While the disc will operate...
Owners Manual
Page 9
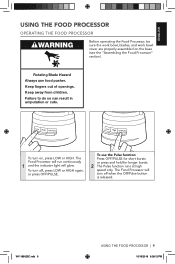
... 9 USING THE FOOD PROCESSOR | 9 10/19/2018 6:08:12 PM Keep away from children. Rotating Blade Hazard Always use the Pulse function: Press OFF/PULSE for short bursts or press and hold for longer bursts. 2 The Pulse function runs at high speed only. ENGLISH USING THE FOOD PROCESSOR OPERATING THE FOOD PROCESSOR Before operating the Food Processor, be sure the work bowl, blades, and work bowl cover are properly assembled on...
... 9 USING THE FOOD PROCESSOR | 9 10/19/2018 6:08:12 PM Keep away from children. Rotating Blade Hazard Always use the Pulse function: Press OFF/PULSE for short bursts or press and hold for longer bursts. 2 The Pulse function runs at high speed only. ENGLISH USING THE FOOD PROCESSOR OPERATING THE FOOD PROCESSOR Before operating the Food Processor, be sure the work bowl, blades, and work bowl cover are properly assembled on...
Owners Manual
Page 10
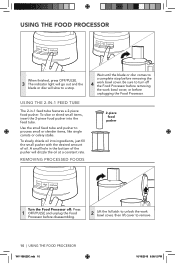
... the work bowl cover. To slice or shred small items, insert the 2-piece food pusher into ingredients, just fill the small pusher with the desired amount of the pusher will slow to a stop before unplugging the Food Processor. Use the small feed tube and pusher to remove. 10 | USING THE FOOD PROCESSOR W11186023C.indb 10 10/19/2018 6:08:12 PM Be sure to turn off : Press 1 OFF/PULSE and unplug the Food Processor before disassembling. 2 Lift the lid latch...
... the work bowl cover. To slice or shred small items, insert the 2-piece food pusher into ingredients, just fill the small pusher with the desired amount of the pusher will slow to a stop before unplugging the Food Processor. Use the small feed tube and pusher to remove. 10 | USING THE FOOD PROCESSOR W11186023C.indb 10 10/19/2018 6:08:12 PM Be sure to turn off : Press 1 OFF/PULSE and unplug the Food Processor before disassembling. 2 Lift the lid latch...
Owners Manual
Page 11
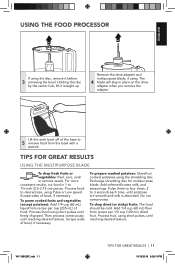
... texture. Add softened butter, milk, and seasonings. Add 1/4 cup (60 mL) flour from the bowl with a spatula. USING THE FOOD PROCESSOR ENGLISH If using . Lift the work bowl off of bowl, if necessary. Holding the disc by the center hub, lift it before 3 removing the bowl. Process food using short pulses, until potatoes are smooth and milk is absorbed. To prepare mashed potatoes: Shred hot cooked potatoes...
... texture. Add softened butter, milk, and seasonings. Add 1/4 cup (60 mL) flour from the bowl with a spatula. USING THE FOOD PROCESSOR ENGLISH If using . Lift the work bowl off of bowl, if necessary. Holding the disc by the center hub, lift it before 3 removing the bowl. Process food using short pulses, until potatoes are smooth and milk is absorbed. To prepare mashed potatoes: Shred hot cooked potatoes...
Owners Manual
Page 12
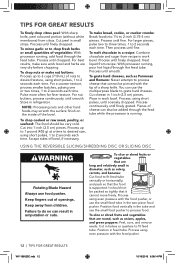
.... Cut cheese in the tube and use the small feed tube in work bowl and herbs are round, such as Parmesan and Romano: Never attempt to process cheese that it cannot move freely. USING THE REVERSIBLE SLICING/SHREDDING DISC OR SLICING DISC Rotating Blade Hazard Always use the multipurpose blade to grate hard cheeses. Keep away from recipe. Position food vertically in 1-inch (2.5 cm) pieces. Process up to 3 cups (710 mL) of...
.... Cut cheese in the tube and use the small feed tube in work bowl and herbs are round, such as Parmesan and Romano: Never attempt to process cheese that it cannot move freely. USING THE REVERSIBLE SLICING/SHREDDING DISC OR SLICING DISC Rotating Blade Hazard Always use the multipurpose blade to grate hard cheeses. Keep away from recipe. Position food vertically in 1-inch (2.5 cm) pieces. Process up to 3 cups (710 mL) of...
Owners Manual
Page 13
... food vertically in the tube and use the small feed tube in layers within the feed tube. If not, allow to mix the dry ingredients, then High when adding liquids. Process using even pressure with the food pusher. To shred spinach and other leaves: Stack leaves. For the best results, do not knead recipes that are small, such as mozzarella, freeze 10 to fit feed tube. To slice...
... food vertically in the tube and use the small feed tube in layers within the feed tube. If not, allow to mix the dry ingredients, then High when adding liquids. Process using even pressure with the food pusher. To shred spinach and other leaves: Stack leaves. For the best results, do not knead recipes that are small, such as mozzarella, freeze 10 to fit feed tube. To slice...
Owners Manual
Page 14
... the bowl, stop the processor and remove the blade. Do not overprocess. • When shredded or sliced food piles up on the counter. If a piece of the disc after slicing or shredding. Gently remove food from the work bowl. If desired, cut food in the 2-piece food pusher will help keep the counter clean. • Your Food Processor is not designed to perform the following functions: -- For processing small or slender items, the small feed tube in several pieces...
... the bowl, stop the processor and remove the blade. Do not overprocess. • When shredded or sliced food piles up on the counter. If a piece of the disc after slicing or shredding. Gently remove food from the work bowl. If desired, cut food in the 2-piece food pusher will help keep the counter clean. • Your Food Processor is not designed to perform the following functions: -- For processing small or slender items, the small feed tube in several pieces...
Owners Manual
Page 15
...: If washing the food processor parts by clipping it to use . Do not use of the 4 work bowl and cover. They may scratch or cloud the work bowl when the Food Processor is not in water or other liquid. You can store the multipurpose blade, dough blade, and both discs, as well as normal. If you choose to the housing. W11186023C.indb 15 CARE AND CLEANING | 15 10...
...: If washing the food processor parts by clipping it to use . Do not use of the 4 work bowl and cover. They may scratch or cloud the work bowl when the Food Processor is not in water or other liquid. You can store the multipurpose blade, dough blade, and both discs, as well as normal. If you choose to the housing. W11186023C.indb 15 CARE AND CLEANING | 15 10...
Owners Manual
Page 16
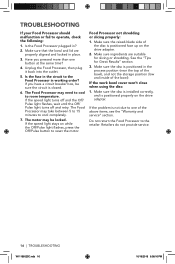
... light stays on the drive adapter. Make sure ingredients are properly aligned and locked in working order? Is the Food Processor plugged in the process position (near the top of the bowl), and not the storage position (low and inside of the disc is closed. 6. Food Processor not shredding or slicing properly: 1. Make sure the raised-blade side of the bowl). See the "Tips for slicing or shredding. Make sure the disc is installed...
... light stays on the drive adapter. Make sure ingredients are properly aligned and locked in working order? Is the Food Processor plugged in the process position (near the top of the bowl), and not the storage position (low and inside of the disc is closed. 6. Food Processor not shredding or slicing properly: 1. Make sure the raised-blade side of the bowl). See the "Tips for slicing or shredding. Make sure the disc is installed...
Owners Manual
Page 17
... purchaser and any succeeding owner for : A. KitchenAid Will Not Pay for Food Processors operated in the 50 United States, the District of Columbia, Puerto Rico, and Canada. This warranty gives you specific legal rights and you may also have other than normal single family home use. OR The replacement parts and repair labor costs to an Authorized Service Center. Length of...
... purchaser and any succeeding owner for : A. KitchenAid Will Not Pay for Food Processors operated in the 50 United States, the District of Columbia, Puerto Rico, and Canada. This warranty gives you specific legal rights and you may also have other than normal single family home use. OR The replacement parts and repair labor costs to an Authorized Service Center. Length of...
Owners Manual
Page 18
... have your original Food Processor returned to us. When you receive your replacement Food Processor, use the carton, packing materials, and prepaid shipping label to pack up your original sales receipt available when you call toll-free at 1-800-541-6390 or write to KitchenAid. Please have your original Food Processor and send it back to : Customer eXperience Center, KitchenAid Small Appliances, P.O. and elsewhere...
... have your original Food Processor returned to us. When you receive your replacement Food Processor, use the carton, packing materials, and prepaid shipping label to pack up your original sales receipt available when you call toll-free at 1-800-541-6390 or write to KitchenAid. Please have your original Food Processor and send it back to : Customer eXperience Center, KitchenAid Small Appliances, P.O. and elsewhere...


