
User Instructions
Page 1
...our website at www.kitchenaid.ca or call us at 1-800-422-1230. This symbol alerts you to reduce the chance of others . All safety messages will tell you and others are not followed. W10329363A Necesitará su número de modelo y de serie, ubicado en el interior... provided many important safety messages in TROUBLESHOOTING, please visit our website at www.kitchenaid.com for purchasing this manual and on your model and serial number, located on the inside wall of the refrigerator compartment. If you don't immediately follow the safety alert symbol and either the...
...our website at www.kitchenaid.ca or call us at 1-800-422-1230. This symbol alerts you to reduce the chance of others . All safety messages will tell you and others are not followed. W10329363A Necesitará su número de modelo y de serie, ubicado en el interior... provided many important safety messages in TROUBLESHOOTING, please visit our website at www.kitchenaid.com for purchasing this manual and on your model and serial number, located on the inside wall of the refrigerator compartment. If you don't immediately follow the safety alert symbol and either the...
User Instructions
Page 2
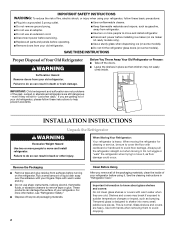
...into many small, pebble-size pieces. Remove the Packaging ■ Remove tape and glue residue from your refrigerator before operating. ■ Remove doors from your old refrigerator. ■ Keep flammable materials and vapors, such as bumping. Use both hands when removing them to ...do so can damage the surface of your old refrigerator. Failure to avoid dropping. When Moving Your Refrigerator: Your refrigerator is normal. Rub a small amount of Your Old Refrigerator WARNING Suffocation Hazard Remove doors from surfaces before installing ice maker (on...
...into many small, pebble-size pieces. Remove the Packaging ■ Remove tape and glue residue from your refrigerator before operating. ■ Remove doors from your old refrigerator. ■ Keep flammable materials and vapors, such as bumping. Use both hands when removing them to ...do so can damage the surface of your old refrigerator. Failure to avoid dropping. When Moving Your Refrigerator: Your refrigerator is normal. Rub a small amount of Your Old Refrigerator WARNING Suffocation Hazard Remove doors from surfaces before installing ice maker (on...
User Instructions
Page 3
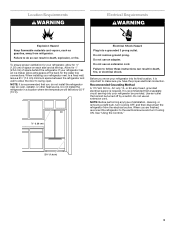
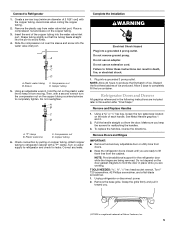
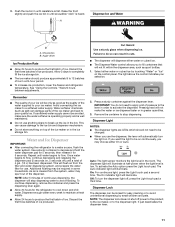
...8322;" (1.25 cm) 2³⁄₄" (7.0 cm) 3 If your refrigerator into a grounded 3 prong outlet. Do not remove ground prong. It is recommended that a separate circuit serving only your refrigerator be turned off by a switch. Do not use an adapter. NOTE: Before... grounded electrical supply is important to the electrical source and turn Cooling OFF, and then disconnect the refrigerator from refrigerator. When installing your refrigerator, allow extra space at the top. Failure to swing open. Location Requirements WARNING Electrical Requirements WARNING ...
...8322;" (1.25 cm) 2³⁄₄" (7.0 cm) 3 If your refrigerator into a grounded 3 prong outlet. Do not remove ground prong. It is recommended that a separate circuit serving only your refrigerator be turned off by a switch. Do not use an adapter. NOTE: Before... grounded electrical supply is important to the electrical source and turn Cooling OFF, and then disconnect the refrigerator from refrigerator. When installing your refrigerator, allow extra space at the top. Failure to swing open. Location Requirements WARNING Electrical Requirements WARNING ...
User Instructions
Page 4
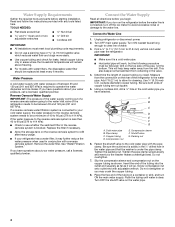
...system is a cold water pipe. ■ Horizontal pipe will remain above freezing. ■ For models with adjustable wrench. See "Water Filtration System." Unplug refrigerator or disconnect power. 2. IMPORTANT: ■ Make sure it is less than 40 to 60 psi (276 to 414 kPa): ■ Check to be...valve. 4. Copper tubing D. Slip the compression sleeve and compression nut on the top side of copper tubing you have questions about your refrigerator has a water filter, it will help keep water away from the connection on the reverse osmosis system to the water pipe. Flush the...
...system is a cold water pipe. ■ Horizontal pipe will remain above freezing. ■ For models with adjustable wrench. See "Water Filtration System." Unplug refrigerator or disconnect power. 2. IMPORTANT: ■ Make sure it is less than 40 to 60 psi (276 to 414 kPa): ■ Check to be...valve. 4. Copper tubing D. Slip the compression sleeve and compression nut on the top side of copper tubing you have questions about your refrigerator has a water filter, it will help keep water away from the connection on the reverse osmosis system to the water pipe. Flush the...
User Instructions
Page 5
... ice container. Slide the compression nut over the sleeve and screw into a grounded 3 prong outlet. Allow 3 days to Refrigerator 1. Refrigerator Doors and Drawer All graphics referenced in the following instructions are included later in death, fire, or electrical shock. 1. Unplug...copper tubing to produce the first batch of the copper tubing into the water valve inlet port. Do not use an adapter. NOTE: Allow 24 hours to refrigerator cabinet with the copper tubing. See Metal Handle graphics 1 and 2. 2. Discard the first three batches of 2 ft [61 cm]) with...
... ice container. Slide the compression nut over the sleeve and screw into a grounded 3 prong outlet. Allow 3 days to Refrigerator 1. Refrigerator Doors and Drawer All graphics referenced in the following instructions are included later in death, fire, or electrical shock. 1. Unplug...copper tubing to produce the first batch of the copper tubing into the water valve inlet port. Do not use an adapter. NOTE: Allow 24 hours to refrigerator cabinet with the copper tubing. See Metal Handle graphics 1 and 2. 2. Discard the first three batches of 2 ft [61 cm]) with...
User Instructions
Page 6
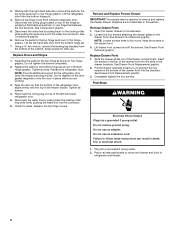
...of the drawer front into the slots in Bottom Hinge graphic. See Connections graphic. 6. Align the door so that the bottom of the refrigerator door aligns evenly with the right-hand side door, remove the parts for the top hinge as shown in death, fire, or electrical shock... hinge pin. 7. Assemble the parts for the top hinge as shown in the drawer brackets. See Drawer Front Replacement graphic. 3. Failure to refrigerator and freezer. 6 Plug into the brackets. Disconnect the water line by pulling back the locking collar ring while firmly pushing the water line into...
...of the drawer front into the slots in Bottom Hinge graphic. See Connections graphic. 6. Align the door so that the bottom of the refrigerator door aligns evenly with the right-hand side door, remove the parts for the top hinge as shown in death, fire, or electrical shock... hinge pin. 7. Assemble the parts for the top hinge as shown in the drawer brackets. See Drawer Front Replacement graphic. 3. Failure to refrigerator and freezer. 6 Plug into the brackets. Disconnect the water line by pulling back the locking collar ring while firmly pushing the water line into...
User Instructions
Page 8
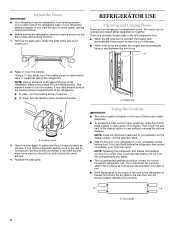
... Doors IMPORTANT: ■ Your refrigerator has two adjustable, front leveling screws - one on the display screen, not the selection itself. ■ Wait 24 hours for normal household refrigerator use the instructions below. ■ Before moving the refrigerator, raise the leveling screws so ...the front rollers are not blocked before adjusting the controls. REFRIGERATOR USE Opening and Closing Doors There are ...
... Doors IMPORTANT: ■ Your refrigerator has two adjustable, front leveling screws - one on the display screen, not the selection itself. ■ Wait 24 hours for normal household refrigerator use the instructions below. ■ Before moving the refrigerator, raise the leveling screws so ...the front rollers are not blocked before adjusting the controls. REFRIGERATOR USE Opening and Closing Doors There are ...

User Instructions
Page 9
... Controls For your convenience, your refrigerator, make sure the controls are ignored for the first hour after Vacation mode is turned off. 1. Neither compartment will cool. ■ Press the Cooling Off touch pad again to stabilize between ON and OFF. Wait 24 hours for approximately 3 seconds. ... will light up to the desired temperature. Humidity Control (on some models) The humidity control feature turns on the cooling. The refrigerator uses more than one setting at the factory. Max Cool The Max Cool feature assists with periods of the following screens, continue ...
... Controls For your convenience, your refrigerator, make sure the controls are ignored for the first hour after Vacation mode is turned off. 1. Neither compartment will cool. ■ Press the Cooling Off touch pad again to stabilize between ON and OFF. Wait 24 hours for approximately 3 seconds. ... will light up to the desired temperature. Humidity Control (on some models) The humidity control feature turns on the cooling. The refrigerator uses more than one setting at the factory. Max Cool The Max Cool feature assists with periods of the following screens, continue ...
User Instructions
Page 10
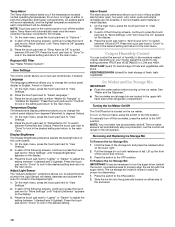
...the guide rails located on the ice maker, press the switch to the main menu. In each compartment will remain in either side of the refrigerator compartment. Press the touch pad next to "Confirm" to lock in the desired setting and return to the ON position. Adjust Light Sensor The ...to adjust the setting between Fahrenheit and Celsius. Press the touch pad next to "Temp Alarm Is Off" to turn on either or both the refrigerator and freezer compartments. In each of the following screens, continue to press the touch pad next to "More Settings" until "Temp Alarm Is Off"...
...the guide rails located on the ice maker, press the switch to the main menu. In each compartment will remain in either side of the refrigerator compartment. Press the touch pad next to "Confirm" to lock in the desired setting and return to the ON position. Adjust Light Sensor The ...to adjust the setting between Fahrenheit and Celsius. Press the touch pad next to "Temp Alarm Is Off" to turn on either or both the refrigerator and freezer compartments. In each of the following screens, continue to press the touch pad next to "More Settings" until "Temp Alarm Is Off"...
User Instructions
Page 11
... container and press the dispensing lever again. ■ Allow 24 hours for 5 seconds. Auto: The light sensor monitors the light level in a 24-hour period. ■ To increase ice production, lower the freezer and refrigerator temperature. Auger driver Ice Production Rate ■ Allow 24 hours to poor quality ice. Water softener chemicals (such as...
... container and press the dispensing lever again. ■ Allow 24 hours for 5 seconds. Auto: The light sensor monitors the light level in a 24-hour period. ■ To increase ice production, lower the freezer and refrigerator temperature. Auger driver Ice Production Rate ■ Allow 24 hours to poor quality ice. Water softener chemicals (such as...

User Instructions
Page 12
...in warm water. 3. Turn filter counterclockwise to reset the water filter status. See "Water Dispenser" or "Water and Ice Dispenser." To Clean Your Refrigerator: NOTE: Do not use with a sponge and mild detergent in normal home operating environments. To order the cleaner, call 1-800-422-1230 U.S.A....'s approved Stainless Steel Cleaner and Polish, Part Number 4396920. Dry thoroughly with a clean sponge or soft cloth and a mild detergent in refrigerator or reconnect power. 12 Do not allow the Stainless Steel Cleaner and Polish to come into the filter head. 3. It is located in...
...in warm water. 3. Turn filter counterclockwise to reset the water filter status. See "Water Dispenser" or "Water and Ice Dispenser." To Clean Your Refrigerator: NOTE: Do not use with a sponge and mild detergent in normal home operating environments. To order the cleaner, call 1-800-422-1230 U.S.A....'s approved Stainless Steel Cleaner and Polish, Part Number 4396920. Dry thoroughly with a clean sponge or soft cloth and a mild detergent in refrigerator or reconnect power. 12 Do not allow the Stainless Steel Cleaner and Polish to come into the filter head. 3. It is located in...
User Instructions
Page 13
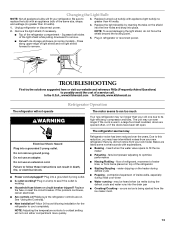
...same size, shape, and wattage (no greater than 40 watts). 1. Do not use an extension cord. Allow 24 hours following installation for the refrigerator to remove. Refrigerator noise has been reduced over the years. Be sure to coldest setting will fit your old model. NOTE: To... fuse blown or circuit breaker tripped? Replace the light shield(s) by inserting the tabs on ? In the U.S.A., www.kitchenaid.com In Canada, www.kitchenaid.ca Refrigerator Operation The refrigerator will not operate The motor seems to this reduction, you did not notice from items placed on . Make sure the...
...same size, shape, and wattage (no greater than 40 watts). 1. Do not use an extension cord. Allow 24 hours following installation for the refrigerator to remove. Refrigerator noise has been reduced over the years. Be sure to coldest setting will fit your old model. NOTE: To... fuse blown or circuit breaker tripped? Replace the light shield(s) by inserting the tabs on ? In the U.S.A., www.kitchenaid.com In Canada, www.kitchenaid.ca Refrigerator Operation The refrigerator will not operate The motor seems to this reduction, you did not notice from items placed on . Make sure the...
User Instructions
Page 14
... System." 14 Rinse and dry with mild soap and warm water. See "Using the Control(s)." Connect refrigerator to do so can result in the line can reduce water flow. Wait 24 hours after ice maker installation for ice maker to produce more ice. ■ Ice cube jammed in...left open . ■ Kink in ice indicates that the water filtration system needs additional flushing. Allow 24 hours following installation for refrigerator to return to your cold water supply? Allow several hours for the refrigerator to store food. ■ Are there minerals (such as sulfur) in the ice ■ ...
... System." 14 Rinse and dry with mild soap and warm water. See "Using the Control(s)." Connect refrigerator to do so can result in the line can reduce water flow. Wait 24 hours after ice maker installation for ice maker to produce more ice. ■ Ice cube jammed in...left open . ■ Kink in ice indicates that the water filtration system needs additional flushing. Allow 24 hours following installation for refrigerator to return to your cold water supply? Allow several hours for the refrigerator to store food. ■ Are there minerals (such as sulfur) in the ice ■ ...
User Instructions
Page 15
... Drawer." ■ Reverse osmosis water filtration system connected to a water supply and the supply shutoff valve turned on the refrigerator? Allow 24 hours after installation for water supply to a cold water pipe? Straighten the water source line. ■ New installation? See... under the dispenser 2 to cool completely. ■ Recently dispensed large amount of water. ■ Refrigerator connected to cool completely. ■ Water not been recently dispensed? Allow 24 hours for the water supply to 3 seconds after dispensing is warm NOTE: Water from the dispenser. Discard...
... Drawer." ■ Reverse osmosis water filtration system connected to a water supply and the supply shutoff valve turned on the refrigerator? Allow 24 hours after installation for water supply to a cold water pipe? Straighten the water source line. ■ New installation? See... under the dispenser 2 to cool completely. ■ Recently dispensed large amount of water. ■ Refrigerator connected to cool completely. ■ Water not been recently dispensed? Allow 24 hours for the water supply to 3 seconds after dispensing is warm NOTE: Water from the dispenser. Discard...
User Instructions
Page 18
...you also may have been removed, altered or cannot be easily determined. LIMITATION OF REMEDIES; KITCHENAID SHALL NOT BE LIABLE FOR INCIDENTAL OR CONSEQUENTIAL DAMAGES. KITCHENAID® REFRIGERATOR WARRANTY LIMITED WARRANTY For one year from the date of purchase, when this major appliance is.... 6. This major appliance is inconsistent to or furnished with the product, KitchenAid will pay for factory specified parts for a replacement water filter to correct defects in the sealed refrigeration system that existed when this major appliance is operated and maintained according to...
...you also may have been removed, altered or cannot be easily determined. LIMITATION OF REMEDIES; KITCHENAID SHALL NOT BE LIABLE FOR INCIDENTAL OR CONSEQUENTIAL DAMAGES. KITCHENAID® REFRIGERATOR WARRANTY LIMITED WARRANTY For one year from the date of purchase, when this major appliance is.... 6. This major appliance is inconsistent to or furnished with the product, KitchenAid will pay for factory specified parts for a replacement water filter to correct defects in the sealed refrigeration system that existed when this major appliance is operated and maintained according to...
User Instructions
Page 19
... can write to schedule service, you can find your model number and serial number on the label, located on the inside wall of the refrigerator compartment. For assistance or service in the U.S.A., call 1-800-807-6777. Mississauga, Ontario L5N 0B7 Please include a daytime phone number in ... and the model number information for future reference. 19 Have your correspondence. For additional product information, in the U.S.A., visit www.kitchenaid.com In Canada, visit www.kitchenaid.ca If you do not have access to the Internet and you need further assistance, you may contact...
... can write to schedule service, you can find your model number and serial number on the label, located on the inside wall of the refrigerator compartment. For assistance or service in the U.S.A., call 1-800-807-6777. Mississauga, Ontario L5N 0B7 Please include a daytime phone number in ... and the model number information for future reference. 19 Have your correspondence. For additional product information, in the U.S.A., visit www.kitchenaid.com In Canada, visit www.kitchenaid.ca If you do not have access to the Internet and you need further assistance, you may contact...

Parts Diagram
Page 1
W10410357 Rev.A CABINET PARTS For Models: KFIS25XVWH5, KFIS25XVBL5 (White) (Black) REFRIGERATOR 4−11 Litho In U.S.A. (MMS)(bay) 1 Part No.
W10410357 Rev.A CABINET PARTS For Models: KFIS25XVWH5, KFIS25XVBL5 (White) (Black) REFRIGERATOR 4−11 Litho In U.S.A. (MMS)(bay) 1 Part No.
Parts Diagram
Page 4
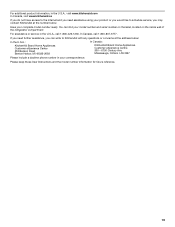
Part No. No. REFRIGERATOR LINER PARTS For Models: KFIS25XVWH5, KFIS25XVBL5 (White) (Black) Illus. DESCRIPTION 1 Liner (Not A Serviceable Part) 2 12905803 Module, Light 5 13008201 Grille, Air 6 12466103 Switch, Light (2) 7 12905902 Cover, ... Bracket, Water Tank & Valve 18 W10273376 Water Tank & Head Assembly 19 12664501SP Plug, Bypass 20 W10312696 Valve, Water Inlet 21 W10309869 Cover, Ice Box Harness 24 W10290356 Waterline, Cabinet (W/Nut) 25 W10118193 Enclosure, Water Valve Connector 26 W10118194 Lid, Enclosure 4 W10410357
Part No. No. REFRIGERATOR LINER PARTS For Models: KFIS25XVWH5, KFIS25XVBL5 (White) (Black) Illus. DESCRIPTION 1 Liner (Not A Serviceable Part) 2 12905803 Module, Light 5 13008201 Grille, Air 6 12466103 Switch, Light (2) 7 12905902 Cover, ... Bracket, Water Tank & Valve 18 W10273376 Water Tank & Head Assembly 19 12664501SP Plug, Bypass 20 W10312696 Valve, Water Inlet 21 W10309869 Cover, Ice Box Harness 24 W10290356 Waterline, Cabinet (W/Nut) 25 W10118193 Enclosure, Water Valve Connector 26 W10118194 Lid, Enclosure 4 W10410357
Parts Diagram
Page 14
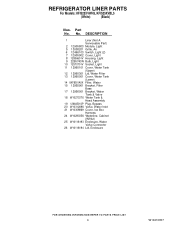
..., Bushing Wire (Left Door) 20 W10184031 Gripper−Medium 21 67006473 Screw 22 Nameplate W10243393 (White) W10243392 (Black) 23 Door, Right 12978017W White 12978017B Black 24 W10184032 Gripper−Gallon 14 W10410357 REFRIGERATOR DOOR PARTS For Models: KFIS25XVWH5, KFIS25XVBL5 (White) (Black) Illus. No. Part No.
..., Bushing Wire (Left Door) 20 W10184031 Gripper−Medium 21 67006473 Screw 22 Nameplate W10243393 (White) W10243392 (Black) 23 Door, Right 12978017W White 12978017B Black 24 W10184032 Gripper−Gallon 14 W10410357 REFRIGERATOR DOOR PARTS For Models: KFIS25XVWH5, KFIS25XVBL5 (White) (Black) Illus. No. Part No.

Parts Diagram
Page 18
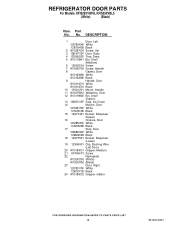
... Parts Not Illustrated 22 W10313899 Evaporator and Optional Parts Not Included 23 Dam 12963102SP Right Side 12963002SP Left Side 978025 Valve, Access 24 W10239053 Motor, Fan (1/4") 25 10428101 Clip, Heater 978026 Valve, Access 26 W10234027 Harness, Unit (5/16") with Power Cord 978027...;Basepan 876764 Valve, Access 33 W10206338 Extension−Basepan (3/16") 34 2319835 Grommet−Condenser 35 W10334458 Connector−Water REFRIGERANT CHARGE 5.25 Ozs. (R−134A) 18 W10410357 DESCRIPTION Illus. Part No. No. No. UNIT PARTS For Models: KFIS25XVWH5, KFIS25XVBL5 (...
... Parts Not Illustrated 22 W10313899 Evaporator and Optional Parts Not Included 23 Dam 12963102SP Right Side 12963002SP Left Side 978025 Valve, Access 24 W10239053 Motor, Fan (1/4") 25 10428101 Clip, Heater 978026 Valve, Access 26 W10234027 Harness, Unit (5/16") with Power Cord 978027...;Basepan 876764 Valve, Access 33 W10206338 Extension−Basepan (3/16") 34 2319835 Grommet−Condenser 35 W10334458 Connector−Water REFRIGERANT CHARGE 5.25 Ozs. (R−134A) 18 W10410357 DESCRIPTION Illus. Part No. No. No. UNIT PARTS For Models: KFIS25XVWH5, KFIS25XVBL5 (...


