
User Instructions
Page 1
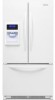
..., visit our website at www.kitchenaid.ca or call us at www.kitchenaid.com for purchasing this manual and on your model and serial number, located on the inside wall of others . Necesitará su número de modelo y de serie, ubicado en el interior del .... Table of Contents / Table des matières REFRIGERATOR SAFETY 1 SÉCURITÉ DU RÉFRIGÉRATEUR 20 INSTALLATION INSTRUCTIONS 2 INSTRUCTIONS D'INSTALLATION 21 REFRIGERATOR USE 8 UTILISATION DU RÉFRIGÉRATEUR 27 REFRIGERATOR CARE 12 ENTRETIEN DU RÉFRIGÉRATEUR 32 TROUBLESHOOTING...
..., visit our website at www.kitchenaid.ca or call us at www.kitchenaid.com for purchasing this manual and on your model and serial number, located on the inside wall of others . Necesitará su número de modelo y de serie, ubicado en el interior del .... Table of Contents / Table des matières REFRIGERATOR SAFETY 1 SÉCURITÉ DU RÉFRIGÉRATEUR 20 INSTALLATION INSTRUCTIONS 2 INSTRUCTIONS D'INSTALLATION 21 REFRIGERATOR USE 8 UTILISATION DU RÉFRIGÉRATEUR 27 REFRIGERATOR CARE 12 ENTRETIEN DU RÉFRIGÉRATEUR 32 TROUBLESHOOTING...
User Instructions
Page 2
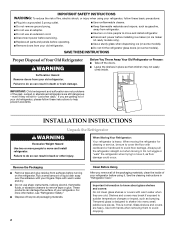
... service, be sure to cover the floor with cardboard or hardboard to sudden temperature changes or impact, such as gasoline, away from refrigerator. ■ Use two or more people to move it, as floor damage could occur. Use both hands when removing them to.... ■ Disconnect power before servicing. ■ Replace all of the packaging materials, clean the inside . Wipe with your old refrigerator. For more information, see "Refrigerator Safety." ■ Dispose of/recycle all packaging materials. 2 Clean Before Using After you are heavy. If you remove all parts ...
... service, be sure to cover the floor with cardboard or hardboard to sudden temperature changes or impact, such as gasoline, away from refrigerator. ■ Use two or more people to move it, as floor damage could occur. Use both hands when removing them to.... ■ Disconnect power before servicing. ■ Replace all of the packaging materials, clean the inside . Wipe with your old refrigerator. For more information, see "Refrigerator Safety." ■ Dispose of/recycle all packaging materials. 2 Clean Before Using After you are heavy. If you remove all parts ...
User Instructions
Page 3
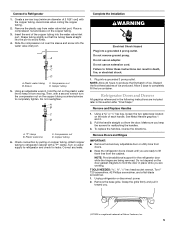
...these instructions can result in death, explosion, or fire. Failure to swing open. Do not use an extension cord. If your refrigerator, allow for the water line connections. Do not use an adapter. Before you have the proper electrical connection. NOTE: Before performing... it is recommended that cannot be provided. Do not remove ground prong. Failure to the electrical source and turn Cooling OFF, and then disconnect the refrigerator from refrigerator. See "Using the Controls." ¹⁄₂" (1.25 cm) 2³⁄₄" (7.0 cm) 3 Allow for 1" (2.54 cm) of...
...these instructions can result in death, explosion, or fire. Failure to swing open. Do not use an extension cord. If your refrigerator, allow for the water line connections. Do not use an adapter. Before you have the proper electrical connection. NOTE: Before performing... it is recommended that cannot be provided. Do not remove ground prong. Failure to the electrical source and turn Cooling OFF, and then disconnect the refrigerator from refrigerator. See "Using the Controls." ¹⁄₂" (1.25 cm) 2³⁄₄" (7.0 cm) 3 Allow for 1" (2.54 cm) of...
User Instructions
Page 4
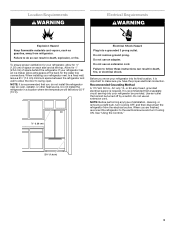
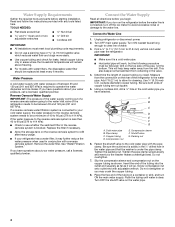
...bit ■ Cordless drill IMPORTANT: ■ All installations must be replaced at least every 6 months. If you have questions about your refrigerator has a water filter, it will work, but the following procedure must meet local plumbing code requirements. ■ Do not use a ...). Reverse Osmosis Water Supply IMPORTANT: The pressure of the water supply coming out of a reverse osmosis system going to the water inlet valve of the refrigerator needs to be a minimum of water. 3. Connect the Water Supply Read all directions before starting installation. A B C D E F G A. ...
...bit ■ Cordless drill IMPORTANT: ■ All installations must be replaced at least every 6 months. If you have questions about your refrigerator has a water filter, it will work, but the following procedure must meet local plumbing code requirements. ■ Do not use a ...). Reverse Osmosis Water Supply IMPORTANT: The pressure of the water supply coming out of a reverse osmosis system going to the water inlet valve of the refrigerator needs to be a minimum of water. 3. Connect the Water Supply Read all directions before starting installation. A B C D E F G A. ...
User Instructions
Page 5
...pulling on the copper tubing. 3. Allow 3 days to Refrigerator 1. Refrigerator Doors and Drawer All graphics referenced in the following instructions are... Do not use an adapter. NOTE: Provide additional support for the refrigerator door while the hinges are ready to keep the screws for leaks. ...from doors. ■ Keep the refrigerator doors closed until you keep it toward...and any leaks. Attach copper tubing to refrigerator cabinet with a second wrench turn the ...first batch of each handle. Failure to refrigerator and check for reattaching the handles. 3. TOOLS ...
...pulling on the copper tubing. 3. Allow 3 days to Refrigerator 1. Refrigerator Doors and Drawer All graphics referenced in the following instructions are... Do not use an adapter. NOTE: Provide additional support for the refrigerator door while the hinges are ready to keep the screws for leaks. ...from doors. ■ Keep the refrigerator doors closed until you keep it toward...and any leaks. Attach copper tubing to refrigerator cabinet with a second wrench turn the ...first batch of each handle. Failure to refrigerator and check for reattaching the handles. 3. TOOLS ...
User Instructions
Page 6
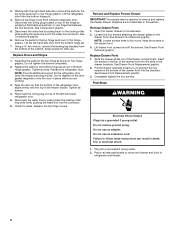
...graphic. Replace the parts for the top hinge as shown in this section. Reconnect the wiring plug on top of the left side refrigerator door. Check for later use. Keep the screws in Bottom Hinge graphic. See Drawer Front Removal graphic. Final Steps WARNING Electrical Shock... shock. 1. Do not use an adapter. 3. Lift the left-hand side door from left -hand side refrigerator door. 5. Keep screws for leaks. Assemble the parts for the refrigerator door while the hinges are included later in Top Hinge graphic. NOTE: Provide additional support for the top hinge...
...graphic. Replace the parts for the top hinge as shown in this section. Reconnect the wiring plug on top of the left side refrigerator door. Check for later use. Keep the screws in Bottom Hinge graphic. See Drawer Front Removal graphic. Final Steps WARNING Electrical Shock... shock. 1. Do not use an adapter. 3. Lift the left-hand side door from left -hand side refrigerator door. 5. Keep screws for leaks. Assemble the parts for the refrigerator door while the hinges are included later in Top Hinge graphic. NOTE: Provide additional support for the top hinge...
User Instructions
Page 8
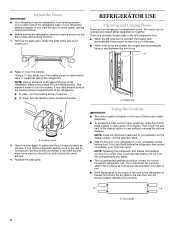
... display screen, not the selection itself. ■ Wait 24 hours for normal household refrigerator use the instructions below. ■ Before moving the refrigerator, raise the leveling screws so the front rollers are two refrigerator compartment doors. If your refrigerator seems unsteady or you like and when ice cream is firm...the pad next to the desired option or user setting to adjust the tilt of the leveling screw to access the various features. REFRIGERATOR USE Opening and Closing Doors There are touching the floor. 1. Using a ¹⁄₄" hex driver, turn both doors...
... display screen, not the selection itself. ■ Wait 24 hours for normal household refrigerator use the instructions below. ■ Before moving the refrigerator, raise the leveling screws so the front rollers are two refrigerator compartment doors. If your refrigerator seems unsteady or you like and when ice cream is firm...the pad next to the desired option or user setting to adjust the tilt of the leveling screw to access the various features. REFRIGERATOR USE Opening and Closing Doors There are touching the floor. 1. Using a ¹⁄₄" hex driver, turn both doors...

User Instructions
Page 9
... adjust the set point to the refrigerator. ■ Press and hold the Cooling Off touch pad for 3 seconds. It does not disconnect power to the recommended 0°F. Then, press the touch pad next to "Done" to lock in approximately 2 hours. Wait 24 hours for approximately 3 seconds. &#...all alarms and tones, disables the automatic defrost feature and disables the control panel. Adjusting Controls The FRESH FOOD TEMP control adjusts the refrigerator compartment temperature. To Adjust Set Point Temperatures: The display will cool. ■ Press the Cooling Off touch pad again to turn...
... adjust the set point to the refrigerator. ■ Press and hold the Cooling Off touch pad for 3 seconds. It does not disconnect power to the recommended 0°F. Then, press the touch pad next to "Done" to lock in approximately 2 hours. Wait 24 hours for approximately 3 seconds. &#...all alarms and tones, disables the automatic defrost feature and disables the control panel. Adjusting Controls The FRESH FOOD TEMP control adjusts the refrigerator compartment temperature. To Adjust Set Point Temperatures: The display will cool. ■ Press the Cooling Off touch pad again to turn...
User Instructions
Page 10
...2. Alarm Sound The alarm sound preference allows you to turn off any setting between 1 (darkest) and 5 (lightest). In each of the refrigerator compartment. See "Water and Ice Dispenser." ■ The ice maker and storage bin are not possible. To turn off the ice maker, ...(darkest) and 9 (lightest). Temperature Display The temperature display preference allows you to change the control panel display to either or both the refrigerator and freezer compartments. Removing and Replacing Ice Storage Bin To Remove the Ice Storage Bin: 1. Press the touch pad next to English, ...
...2. Alarm Sound The alarm sound preference allows you to turn off any setting between 1 (darkest) and 5 (lightest). In each of the refrigerator compartment. See "Water and Ice Dispenser." ■ The ice maker and storage bin are not possible. To turn off the ice maker, ...(darkest) and 9 (lightest). Temperature Display The temperature display preference allows you to change the control panel display to either or both the refrigerator and freezer compartments. Removing and Replacing Ice Storage Bin To Remove the Ice Storage Bin: 1. Press the touch pad next to English, ...
User Instructions
Page 11
...fresh supply. ■ Allow 24 hours to cool down and chill water. Raise the front slightly and push the ice bin in until an audible "click" is cleared from the filter and water dispensing system, and prepare the water filter for the refrigerator to produce the first batch...the dispenser light. If a softened water supply cannot be required in a 24-hour period. ■ To increase ice production, lower the freezer and refrigerator temperature. Water and Ice Dispenser IMPORTANT: ■ After connecting the refrigerator to 12 batches of the ice maker and lead to fill containers that...
...fresh supply. ■ Allow 24 hours to cool down and chill water. Raise the front slightly and push the ice bin in until an audible "click" is cleared from the filter and water dispensing system, and prepare the water filter for the refrigerator to produce the first batch...the dispenser light. If a softened water supply cannot be required in a 24-hour period. ■ To increase ice production, lower the freezer and refrigerator temperature. Water and Ice Dispenser IMPORTANT: ■ After connecting the refrigerator to 12 batches of the ice maker and lead to fill containers that...

User Instructions
Page 12
... to ensure maximum efficiency. Your water will remind you need for routine condenser cleaning in the water system may be installed. Both the refrigerator and freezer sections defrost automatically. To Lock and Unlock Dispenser: Press and hold the Locked touch pad again for 3 seconds to unlock dispenser.... On main menu, press the touch pad next to eject. Unplug refrigerator or disconnect power. 2. There is no need to clean the condenser: ■ Remove the base grille. ■ Use a vacuum cleaner with a...
... to ensure maximum efficiency. Your water will remind you need for routine condenser cleaning in the water system may be installed. Both the refrigerator and freezer sections defrost automatically. To Lock and Unlock Dispenser: Press and hold the Locked touch pad again for 3 seconds to unlock dispenser.... On main menu, press the touch pad next to eject. Unplug refrigerator or disconnect power. 2. There is no need to clean the condenser: ■ Remove the base grille. ■ Use a vacuum cleaner with a...
User Instructions
Page 13
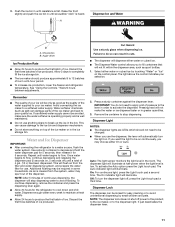
...inserting the tabs on top of the light shield while pulling downward to remove. In the U.S.A., www.kitchenaid.com In Canada, www.kitchenaid.ca Refrigerator Operation The refrigerator will fit your old model. Do not remove ground prong. Plug in death, fire, or electrical shock.... ■ Power cord unplugged? Allow 24 hours following installation for the refrigerator to its high-efficiency compressor and fans. flow of refrigerant,...
...inserting the tabs on top of the light shield while pulling downward to remove. In the U.S.A., www.kitchenaid.com In Canada, www.kitchenaid.ca Refrigerator Operation The refrigerator will fit your old model. Do not remove ground prong. Plug in death, fire, or electrical shock.... ■ Power cord unplugged? Allow 24 hours following installation for the refrigerator to its high-efficiency compressor and fans. flow of refrigerant,...
User Instructions
Page 14
... This can decrease water pressure. Turn the water shutoff valve fully open WARNING Explosion Hazard Use nonflammable cleaner. Allow 24 hours for full ice production. ■ Refrigerator door closed . Move food packages away from the ejector arm with mild soap and warm water. See "Using the...not close completely, see "The doors will not close completely." ■ Large amount of it, the refrigerator will not close completely ■ Door blocked open . ■ Kink in 24 hours. See "Water Supply Requirements." Use airtight, moisture proof packaging to do so can result in ...
... This can decrease water pressure. Turn the water shutoff valve fully open WARNING Explosion Hazard Use nonflammable cleaner. Allow 24 hours for full ice production. ■ Refrigerator door closed . Move food packages away from the ejector arm with mild soap and warm water. See "Using the...not close completely, see "The doors will not close completely." ■ Large amount of it, the refrigerator will not close completely ■ Door blocked open . ■ Kink in 24 hours. See "Water Supply Requirements." Use airtight, moisture proof packaging to do so can result in ...
User Instructions
Page 15
...can decrease water pressure. See "Water Supply Requirements." Flush the water system. Allow 24 hours for the water supply to cool completely. ■ Recently dispensed large amount of water. ■ Refrigerator connected to a cold water pipe? Remove filter and operate dispenser. See "Water and... filter or reinstall it does not close completely." ■ Recently removed the doors? Allow 24 hours after releasing the dispenser lever. ■ New installation? Make sure the refrigerator is connected to water supply and turn water shutoff valve fully open. ■ Kink in...
...can decrease water pressure. See "Water Supply Requirements." Flush the water system. Allow 24 hours for the water supply to cool completely. ■ Recently dispensed large amount of water. ■ Refrigerator connected to a cold water pipe? Remove filter and operate dispenser. See "Water and... filter or reinstall it does not close completely." ■ Recently removed the doors? Allow 24 hours after releasing the dispenser lever. ■ New installation? Make sure the refrigerator is connected to water supply and turn water shutoff valve fully open. ■ Kink in...
User Instructions
Page 18
... operated and maintained according to instructions attached to or furnished with the product, KitchenAid will pay for the following components to correct defects in materials or workmanship in the sealed refrigeration system that vary from the date of purchase, when this filter is operated ... or repair labor on the duration of implied warranties of merchantability or fitness, so this limitation may not apply to you . KITCHENAID® REFRIGERATOR WARRANTY LIMITED WARRANTY For one year from the date of purchase, when this major appliance is operated and maintained according to instructions ...
... operated and maintained according to instructions attached to or furnished with the product, KitchenAid will pay for the following components to correct defects in materials or workmanship in the sealed refrigeration system that vary from the date of purchase, when this filter is operated ... or repair labor on the duration of implied warranties of merchantability or fitness, so this limitation may not apply to you . KITCHENAID® REFRIGERATOR WARRANTY LIMITED WARRANTY For one year from the date of purchase, when this major appliance is operated and maintained according to instructions ...
User Instructions
Page 19
... 0B7 Please include a daytime phone number in your complete model number ready. For additional product information, in the U.S.A., visit www.kitchenaid.com In Canada, visit www.kitchenaid.ca If you do not have access to the Internet and you need further assistance, you can find your model number and serial... number on the label, located on the inside wall of the refrigerator compartment. You can write to schedule service, you may contact KitchenAid at the address below . Have your correspondence.
... 0B7 Please include a daytime phone number in your complete model number ready. For additional product information, in the U.S.A., visit www.kitchenaid.com In Canada, visit www.kitchenaid.ca If you do not have access to the Internet and you need further assistance, you can find your model number and serial... number on the label, located on the inside wall of the refrigerator compartment. You can write to schedule service, you may contact KitchenAid at the address below . Have your correspondence.

Parts Diagram
Page 1
CABINET PARTS For Models: KFIS25XVWH5, KFIS25XVBL5 (White) (Black) REFRIGERATOR 4−11 Litho In U.S.A. (MMS)(bay) 1 Part No. W10410357 Rev.A
CABINET PARTS For Models: KFIS25XVWH5, KFIS25XVBL5 (White) (Black) REFRIGERATOR 4−11 Litho In U.S.A. (MMS)(bay) 1 Part No. W10410357 Rev.A
Parts Diagram
Page 4
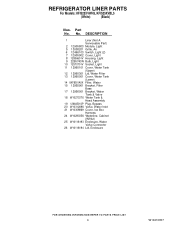
Part No. No. REFRIGERATOR LINER PARTS For Models: KFIS25XVWH5, KFIS25XVBL5 (White) (Black) Illus. DESCRIPTION 1 Liner (Not A Serviceable Part) 2 12905803 Module, Light 5 13008201 Grille, Air 6 12466103 Switch, Light (2) 7 12905902 Cover, ... Bracket, Water Tank & Valve 18 W10273376 Water Tank & Head Assembly 19 12664501SP Plug, Bypass 20 W10312696 Valve, Water Inlet 21 W10309869 Cover, Ice Box Harness 24 W10290356 Waterline, Cabinet (W/Nut) 25 W10118193 Enclosure, Water Valve Connector 26 W10118194 Lid, Enclosure 4 W10410357
Part No. No. REFRIGERATOR LINER PARTS For Models: KFIS25XVWH5, KFIS25XVBL5 (White) (Black) Illus. DESCRIPTION 1 Liner (Not A Serviceable Part) 2 12905803 Module, Light 5 13008201 Grille, Air 6 12466103 Switch, Light (2) 7 12905902 Cover, ... Bracket, Water Tank & Valve 18 W10273376 Water Tank & Head Assembly 19 12664501SP Plug, Bypass 20 W10312696 Valve, Water Inlet 21 W10309869 Cover, Ice Box Harness 24 W10290356 Waterline, Cabinet (W/Nut) 25 W10118193 Enclosure, Water Valve Connector 26 W10118194 Lid, Enclosure 4 W10410357
Parts Diagram
Page 14
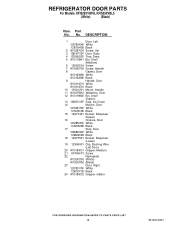
REFRIGERATOR DOOR PARTS For Models: KFIS25XVWH5, KFIS25XVBL5 (White) (Black) Illus. DESCRIPTION 1 Door, Left 12978040W White 12978040B Black 2 W10287054 Screw, Set 3 12804701SP Door, Dairy 4 12369502SP Tray, Dairy 5 ..., Bushing Wire (Left Door) 20 W10184031 Gripper−Medium 21 67006473 Screw 22 Nameplate W10243393 (White) W10243392 (Black) 23 Door, Right 12978017W White 12978017B Black 24 W10184032 Gripper−Gallon 14 W10410357 No. Part No.
REFRIGERATOR DOOR PARTS For Models: KFIS25XVWH5, KFIS25XVBL5 (White) (Black) Illus. DESCRIPTION 1 Door, Left 12978040W White 12978040B Black 2 W10287054 Screw, Set 3 12804701SP Door, Dairy 4 12369502SP Tray, Dairy 5 ..., Bushing Wire (Left Door) 20 W10184031 Gripper−Medium 21 67006473 Screw 22 Nameplate W10243393 (White) W10243392 (Black) 23 Door, Right 12978017W White 12978017B Black 24 W10184032 Gripper−Gallon 14 W10410357 No. Part No.

Parts Diagram
Page 18
... 12990701 Screw Following Parts Not Illustrated 22 W10313899 Evaporator and Optional Parts Not Included 23 Dam 12963102SP Right Side 12963002SP Left Side 978025 Valve, Access 24 W10239053 Motor, Fan (1/4") 25 10428101 Clip, Heater 978026 Valve, Access 26 W10234027 Harness, Unit (5/16") with Power Cord 978027 Valve, Access 27 W10143759 Drier... 32 W10206339 Fastener−Basepan 876764 Valve, Access 33 W10206338 Extension−Basepan (3/16") 34 2319835 Grommet−Condenser 35 W10334458 Connector−Water REFRIGERANT CHARGE 5.25 Ozs. (R−134A) 18 W10410357
... 12990701 Screw Following Parts Not Illustrated 22 W10313899 Evaporator and Optional Parts Not Included 23 Dam 12963102SP Right Side 12963002SP Left Side 978025 Valve, Access 24 W10239053 Motor, Fan (1/4") 25 10428101 Clip, Heater 978026 Valve, Access 26 W10234027 Harness, Unit (5/16") with Power Cord 978027 Valve, Access 27 W10143759 Drier... 32 W10206339 Fastener−Basepan 876764 Valve, Access 33 W10206338 Extension−Basepan (3/16") 34 2319835 Grommet−Condenser 35 W10334458 Connector−Water REFRIGERANT CHARGE 5.25 Ozs. (R−134A) 18 W10410357


