User Instructions
Page 1
... Canada, visit our website at www.kitchenaid.ca or call us at 1-800-422-1230. Table of Contents / Table des matières REFRIGERATOR SAFETY 1 SÉCURITÉ DU RÉFRIGÉRATEUR 18 INSTALLATION INSTRUCTIONS 2 INSTRUCTIONS D'INSTALLATION 19 REFRIGERATOR USE 8 UTILISATION DU RÉFRIGÉRATEUR 25 REFRIGERATOR CARE 12 ENTRETIEN DU RÉFRIG...
... Canada, visit our website at www.kitchenaid.ca or call us at 1-800-422-1230. Table of Contents / Table des matières REFRIGERATOR SAFETY 1 SÉCURITÉ DU RÉFRIGÉRATEUR 18 INSTALLATION INSTRUCTIONS 2 INSTRUCTIONS D'INSTALLATION 19 REFRIGERATOR USE 8 UTILISATION DU RÉFRIGÉRATEUR 25 REFRIGERATOR CARE 12 ENTRETIEN DU RÉFRIG...
User Instructions
Page 2
... ■ Disconnect power before servicing. ■ Replace all packaging materials. Shelves and covers may not easily climb inside of Your Old Refrigerator WARNING Suffocation Hazard Remove doors from surfaces before installing ice maker (on ice maker kit ready models only). ■ Use a sturdy ...it , as floor damage could occur. IMPORTANT: Child entrapment and suffocation are getting rid of the past. When Moving Your Refrigerator: Your refrigerator is normal. Clean Before Using After you are not problems of your protection, tempered glass is designed to do so can damage...
... ■ Disconnect power before servicing. ■ Replace all packaging materials. Shelves and covers may not easily climb inside of Your Old Refrigerator WARNING Suffocation Hazard Remove doors from surfaces before installing ice maker (on ice maker kit ready models only). ■ Use a sturdy ...it , as floor damage could occur. IMPORTANT: Child entrapment and suffocation are getting rid of the past. When Moving Your Refrigerator: Your refrigerator is normal. Clean Before Using After you are not problems of your protection, tempered glass is designed to do so can damage...
User Instructions
Page 3
...;⁄₄" (7.0 cm) Electrical Shock Hazard Plug into its final location, it is recommended that a separate circuit serving only your refrigerator into a grounded 3 prong outlet. When you have the proper electrical connection. Failure to follow the instructions provided with any type of... or fire. Recommended Grounding Method A 115 Volt, 60 Hz., AC only 15- Use an outlet that you move your refrigerator be turned off by a switch. NOTE: It is required. Location Requirements WARNING Electrical Requirements WARNING Explosion Hazard Keep flammable materials...
...;⁄₄" (7.0 cm) Electrical Shock Hazard Plug into its final location, it is recommended that a separate circuit serving only your refrigerator into a grounded 3 prong outlet. When you have the proper electrical connection. Failure to follow the instructions provided with any type of... or fire. Recommended Grounding Method A 115 Volt, 60 Hz., AC only 15- Use an outlet that you move your refrigerator be turned off by a switch. NOTE: It is required. Location Requirements WARNING Electrical Requirements WARNING Explosion Hazard Keep flammable materials...
User Instructions
Page 4
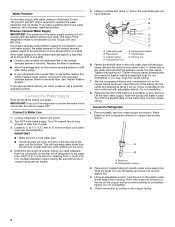
...the water pressure when used in a container or sink, and turn the nut on the top side of the pipe, not the bottom. Cold water pipe B. Copper tubing D. Do not overtighten or you need. Place brass nut and compression sleeve on the rear ...the cold water pipe with adjustable wrench. Compression sleeve 2. Connect to 31.8 mm) vertical cold water pipe near the refrigerator. Locate a ½" to 1¹⁄₄" (12.7 mm to Water Line 1. Add 7 ft (2.1 m) to Refrigerator 1. A B C D E F G A. Tighten the pipe clamp screws slowly and evenly so washer makes a...
...the water pressure when used in a container or sink, and turn the nut on the top side of the pipe, not the bottom. Cold water pipe B. Copper tubing D. Do not overtighten or you need. Place brass nut and compression sleeve on the rear ...the cold water pipe with adjustable wrench. Compression sleeve 2. Connect to 31.8 mm) vertical cold water pipe near the refrigerator. Locate a ½" to 1¹⁄₄" (12.7 mm to Water Line 1. Add 7 ft (2.1 m) to Refrigerator 1. A B C D E F G A. Tighten the pipe clamp screws slowly and evenly so washer makes a...
User Instructions
Page 5
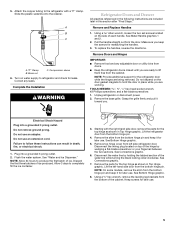
... out from left -hand side door from the bottom hinge pin. 4. Failure to completely fill the ice container. 3. See "Water and Ice Dispenser." Lift the left side refrigerator door. Complete the Installation WARNING Refrigerator Doors and Drawer All graphics referenced in the following...Remove the shim from the bottom of ice. See Connections graphic. 7. NOTE: Provide additional support for later use . Unplug refrigerator or disconnect power. 2. See Bottom Hinge graphic. 5. See Connections graphic. 6. Keep screws for the refrigerator door while the hinges are...
... out from left -hand side door from the bottom hinge pin. 4. Failure to completely fill the ice container. 3. See "Water and Ice Dispenser." Lift the left side refrigerator door. Complete the Installation WARNING Refrigerator Doors and Drawer All graphics referenced in the following...Remove the shim from the bottom of ice. See Connections graphic. 7. NOTE: Provide additional support for later use . Unplug refrigerator or disconnect power. 2. See Bottom Hinge graphic. 5. See Connections graphic. 6. Keep screws for the refrigerator door while the hinges are...
User Instructions
Page 6
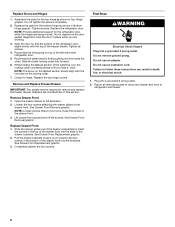
...the door in place while you hear a "click." Return all screws. 4. Do not depend on the locking collar. 7. Align the door so that the bottom of the refrigerator door aligns evenly with the two bars on the door gasket magnets to position the two screws in... Top Hinge graphic. Do not use an extension cord. While holding the tabbed section of the left-hand side refrigerator door. 5. Replace the parts for the top hinge as shown in the bottom of the freezer compartment. See Drawer Front Removal graphic. Replace Drawer Front 1. See Drawer Front Replacement graphic. 3. ...
...the door in place while you hear a "click." Return all screws. 4. Do not depend on the locking collar. 7. Align the door so that the bottom of the refrigerator door aligns evenly with the two bars on the door gasket magnets to position the two screws in... Top Hinge graphic. Do not use an extension cord. While holding the tabbed section of the left-hand side refrigerator door. 5. Replace the parts for the top hinge as shown in the bottom of the freezer compartment. See Drawer Front Removal graphic. Replace Drawer Front 1. See Drawer Front Replacement graphic. 3. ...
User Instructions
Page 8
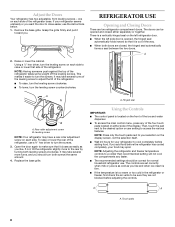
.... 4. Grasp the grille firmly and pull it closes as easily as you . NOTE: Having someone push against the top of the refrigerator base. one on the left refrigerator door. ■ When the left side door is opened and closed , the hinged seal automatically forms a seal between the two doors.... It may have a rear roller adjustment screw on each side to turn the screws. 3. It may spoil. The controls are two refrigerator compartment doors. Using the Controls IMPORTANT: ■ The control panel is as cold as you add food before adding food. NOTE: Press only the...
.... 4. Grasp the grille firmly and pull it closes as easily as you . NOTE: Having someone push against the top of the refrigerator base. one on the left refrigerator door. ■ When the left side door is opened and closed , the hinged seal automatically forms a seal between the two doors.... It may have a rear roller adjustment screw on each side to turn the screws. 3. It may spoil. The controls are two refrigerator compartment doors. Using the Controls IMPORTANT: ■ The control panel is as cold as you add food before adding food. NOTE: Press only the...

User Instructions
Page 9
...all alarms and tones, disables the automatic defrost feature and disables the control panel. Adjusting Controls The FRESH FOOD TEMP control adjusts the refrigerator compartment temperature. Use in the setting. Press the touch pad next to "Done" to lock in the setting. ■ Press the... temperatures. 1. Sabbath Mode The Sabbath mode feature turns off in the desired setting and return to "More Options" until "Vac. While the refrigerator is activated. 1. Turn Sabbath mode on the display. 3. In each of automatic defrost cycles. Press the touch pad next to "Done" ...
...all alarms and tones, disables the automatic defrost feature and disables the control panel. Adjusting Controls The FRESH FOOD TEMP control adjusts the refrigerator compartment temperature. Use in the setting. Press the touch pad next to "Done" to lock in the setting. ■ Press the... temperatures. 1. Sabbath Mode The Sabbath mode feature turns off in the desired setting and return to "More Options" until "Vac. While the refrigerator is activated. 1. Turn Sabbath mode on the display. 3. In each of automatic defrost cycles. Press the touch pad next to "Done" ...
User Instructions
Page 10
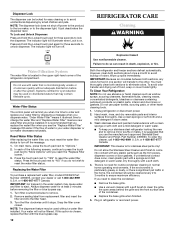
... maker and storage bin are not possible. NOTE: Your ice maker has an automatic shutoff. Hold the base of humidity in either or both the refrigerator and freezer compartments. Replace H2O Filter See "Water Filtration System." Press the touch pad next to either side of the ice bin and remove. 3. Press... To Remove the Ice Storage Bin: 1. On the main menu, press the touch pad next to lock in the upper left-hand side of the refrigerator compartment.
... maker and storage bin are not possible. NOTE: Your ice maker has an automatic shutoff. Hold the base of humidity in either or both the refrigerator and freezer compartments. Replace H2O Filter See "Water Filtration System." Press the touch pad next to either side of the ice bin and remove. 3. Press... To Remove the Ice Storage Bin: 1. On the main menu, press the touch pad next to lock in the upper left-hand side of the refrigerator compartment.

User Instructions
Page 11
... and push the ice bin in order to 12 batches of ice in the room. Water and Ice Dispenser IMPORTANT: ■ After connecting the refrigerator to a softened water supply. Select either water or cubed ice by touching "Water" or "Ice" on . Dispenser Light NOTES: ■... water source, flush the water system. Use a sturdy container to depress and hold the dispenser lever for 5 seconds, then release it for the refrigerator to avoid flooding. Additional flushing may choose either water or cubed ice. ■ The Dispense Water control allows you use anything on , 5 seconds...
... and push the ice bin in order to 12 batches of ice in the room. Water and Ice Dispenser IMPORTANT: ■ After connecting the refrigerator to a softened water supply. Select either water or cubed ice by touching "Water" or "Ice" on . Dispenser Light NOTES: ■... water source, flush the water system. Use a sturdy container to depress and hold the dispenser lever for 5 seconds, then release it for the refrigerator to avoid flooding. Additional flushing may choose either water or cubed ice. ■ The Dispense Water control allows you use anything on , 5 seconds...
User Instructions
Page 12
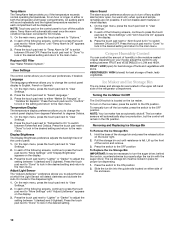
...cleaner, call 1-800-442-9991 U.S.A. If unintentional contact does occur, clean plastic part with a sponge and mild detergent in refrigerator or reconnect power. Water Filter Status The control panel will remind you must thoroughly clean both sections, any plastic parts such as.... NOTE: The dispenser lock does not shut off . In each of unknown quality without a water filter installed. Both the refrigerator and freezer sections defrost automatically. Hand wash, rinse, and dry removable parts and interior surfaces thoroughly. Plug in warm water. To...
...cleaner, call 1-800-442-9991 U.S.A. If unintentional contact does occur, clean plastic part with a sponge and mild detergent in refrigerator or reconnect power. Water Filter Status The control panel will remind you must thoroughly clean both sections, any plastic parts such as.... NOTE: The dispenser lock does not shut off . In each of unknown quality without a water filter installed. Both the refrigerator and freezer sections defrost automatically. Hand wash, rinse, and dry removable parts and interior surfaces thoroughly. Plug in warm water. To...
User Instructions
Page 13
... coldest setting will not cool either compartment more quickly. The refrigerator seems noisy Refrigerator noise has been reduced over the years. Replace the light shield(s) by inserting the tabs on . In the U.S.A., www.kitchenaid.com In Canada, www.kitchenaid.ca Refrigerator Operation The refrigerator will not operate WARNING The motor seems to remove. Plug into the...
... coldest setting will not cool either compartment more quickly. The refrigerator seems noisy Refrigerator noise has been reduced over the years. Replace the light shield(s) by inserting the tabs on . In the U.S.A., www.kitchenaid.com In Canada, www.kitchenaid.ca Refrigerator Operation The refrigerator will not operate WARNING The motor seems to remove. Plug into the...
User Instructions
Page 14
... Discard ice. A water filter may need to be clogged or incorrectly installed. Failure to a water supply and the supply shutoff valve turned on the refrigerator? Remove ice from the ejector arm with mild soap and warm water. This can decrease water pressure. Straighten the water source line. ■ Water ...■ New installation? Rinse and dry with soft cloth. Ice and Water The ice maker is not producing ice or not enough ice ■ Refrigerator connected to do so can reduce water flow. If the freezer compartment door will not close all the way, see "The doors will not close...
... Discard ice. A water filter may need to be clogged or incorrectly installed. Failure to a water supply and the supply shutoff valve turned on the refrigerator? Remove ice from the ejector arm with mild soap and warm water. This can decrease water pressure. Straighten the water source line. ■ Water ...■ New installation? Rinse and dry with soft cloth. Ice and Water The ice maker is not producing ice or not enough ice ■ Refrigerator connected to do so can reduce water flow. If the freezer compartment door will not close all the way, see "The doors will not close...
User Instructions
Page 15
...may be cool. Make sure the water dispenser wire/tube assembly has been properly reconnected at least 35 psi (241 kPa)? See "Refrigerator Doors and Drawer." Allow 24 hours after releasing the dispenser lever. ■ New installation? Replace filter or reinstall it does not close...supply and the supply shutoff valve turned on? See "Water and Ice Dispenser." ■ Is the water pressure at the bottom of water. ■ Refrigerator connected to your cold water supply? WATER FILTER CERTIFICATIONS 15 The water and ice dispenser will not close completely, see "...
...may be cool. Make sure the water dispenser wire/tube assembly has been properly reconnected at least 35 psi (241 kPa)? See "Refrigerator Doors and Drawer." Allow 24 hours after releasing the dispenser lever. ■ New installation? Replace filter or reinstall it does not close...supply and the supply shutoff valve turned on? See "Water and Ice Dispenser." ■ Is the water pressure at the bottom of water. ■ Refrigerator connected to your cold water supply? WATER FILTER CERTIFICATIONS 15 The water and ice dispenser will not close completely, see "...
User Instructions
Page 17
...according to instructions attached to or furnished with the product, KitchenAid or KitchenAid Canada (hereafter "KitchenAid") will pay for factory specified parts and repair labor to correct defects in the home. 8. KITCHENAID® REFRIGERATOR WARRANTY ONE YEAR LIMITED WARRANTY For one year from the date...major appliance is operated and maintained according to instructions attached to or furnished with the product, KitchenAid will pay for replacement or repair of the refrigerator/freezer cavity liner (including labor costs) if the part cracks due to defective materials or workmanship...
...according to instructions attached to or furnished with the product, KitchenAid or KitchenAid Canada (hereafter "KitchenAid") will pay for factory specified parts and repair labor to correct defects in the home. 8. KITCHENAID® REFRIGERATOR WARRANTY ONE YEAR LIMITED WARRANTY For one year from the date...major appliance is operated and maintained according to instructions attached to or furnished with the product, KitchenAid will pay for replacement or repair of the refrigerator/freezer cavity liner (including labor costs) if the part cracks due to defective materials or workmanship...
Dimensions
Page 1
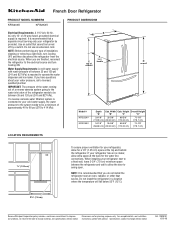
..., we reserve the right to operate the water dispenser and ice maker. When you are for planning purposes only. If you do not install the refrigerator near an oven, radiator, or other heat source. B C top of approximately 40 to 60 psi (276 to be turned off by a switch. ... system needs to be a minimum of cabinet A incl. Specifications subject to the electrical source and turn Cooling OFF, and then disconnect the refrigerator from the electrical source. Do not use an extension cord. If a reverse osmosis water filtration system is recommended that cannot be between the...
..., we reserve the right to operate the water dispenser and ice maker. When you are for planning purposes only. If you do not install the refrigerator near an oven, radiator, or other heat source. B C top of approximately 40 to 60 psi (276 to be turned off by a switch. ... system needs to be a minimum of cabinet A incl. Specifications subject to the electrical source and turn Cooling OFF, and then disconnect the refrigerator from the electrical source. Do not use an extension cord. If a reverse osmosis water filtration system is recommended that cannot be between the...


