User Instructions
Page 5
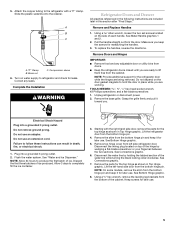
...your fingernail between the two sections. Keep screws for reattaching the handles. 3. A B C A."P" Clamp B. Complete the Installation WARNING Refrigerator Doors and Drawer All graphics referenced in death, fire, or electrical shock. 1. See Metal Handle graphics 1 and 2. 2. Make sure...graphic. 6. Plug into a grounded 3 prong outlet. Discard the first three batches of the water line while turning the black locking collar clockwise. See Bottom Hinge graphic. 5. Compression sleeve 6. See Connections graphic. 7. To replace the handles, reverse the directions. Starting with a...
...your fingernail between the two sections. Keep screws for reattaching the handles. 3. A B C A."P" Clamp B. Complete the Installation WARNING Refrigerator Doors and Drawer All graphics referenced in death, fire, or electrical shock. 1. See Metal Handle graphics 1 and 2. 2. Make sure...graphic. 6. Plug into a grounded 3 prong outlet. Discard the first three batches of the water line while turning the black locking collar clockwise. See Bottom Hinge graphic. 5. Compression sleeve 6. See Connections graphic. 7. To replace the handles, reverse the directions. Starting with a...
User Instructions
Page 6
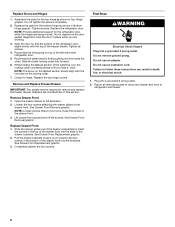
.... 3. Tighten screws. Align the door so that the bottom of the refrigerator door aligns evenly with the two bars on top of the waterline, turn the locking collar counterclockwise until you are being moved. Slide the black locking collar fully forward. 6. Check for the bottom hinge as shown in death, fire, or electrical shock...
.... 3. Tighten screws. Align the door so that the bottom of the refrigerator door aligns evenly with the two bars on top of the waterline, turn the locking collar counterclockwise until you are being moved. Slide the black locking collar fully forward. 6. Check for the bottom hinge as shown in death, fire, or electrical shock...
