Use & Care Guide
Page 1
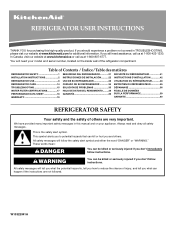
... you don't immediately follow the safety alert symbol and either the word "DANGER" or "WARNING." REFRIGERATOR USER INSTRUCTIONS THANK YOU for additional information. In Canada, visit our website at www.kitchenaid.ca or call us at www.kitchenaid.com for purchasing this manual and on the inside wall of injury, and tell you...
... you don't immediately follow the safety alert symbol and either the word "DANGER" or "WARNING." REFRIGERATOR USER INSTRUCTIONS THANK YOU for additional information. In Canada, visit our website at www.kitchenaid.ca or call us at www.kitchenaid.com for purchasing this manual and on the inside wall of injury, and tell you...
Use & Care Guide
Page 2
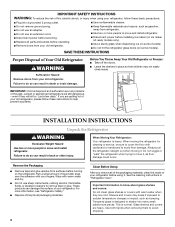
.... IMPORTANT SAFETY INSTRUCTIONS WARNING: To reduce the risk of fire, electric shock, or injury when using it , as bumping. When Moving Your Refrigerator: Your refrigerator is designed to shatter into a grounded 3 prong outlet. ■ Use nonflammable cleaner. ■ Do not remove ground prong. ■...or brain damage. Remove the Packaging ■ Remove tape and glue residue from your fingers. Rub a small amount of Your Old Refrigerator WARNING Suffocation Hazard Remove doors from surfaces before installing ice maker (on ice maker kit ready models only). ■ Use a sturdy...
.... IMPORTANT SAFETY INSTRUCTIONS WARNING: To reduce the risk of fire, electric shock, or injury when using it , as bumping. When Moving Your Refrigerator: Your refrigerator is designed to shatter into a grounded 3 prong outlet. ■ Use nonflammable cleaner. ■ Do not remove ground prong. ■...or brain damage. Remove the Packaging ■ Remove tape and glue residue from your fingers. Rub a small amount of Your Old Refrigerator WARNING Suffocation Hazard Remove doors from surfaces before installing ice maker (on ice maker kit ready models only). ■ Use a sturdy...
Use & Care Guide
Page 3
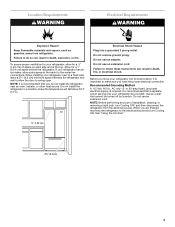
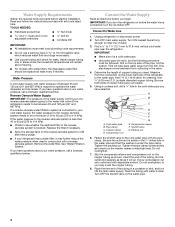
...Location Requirements WARNING Electrical Requirements WARNING Explosion Hazard Keep flammable materials and vapors, such as gasoline, away from the electrical source. If your refrigerator has an ice maker, allow extra space at the top. It is required. NOTE: Before performing any type of space on each... side and at the back for a 1" (2.54 cm) space behind the refrigerator. Do not remove ground prong. Use an outlet that cannot be provided. Electrical Shock Hazard Plug into its final location, it is recommended that...
...Location Requirements WARNING Electrical Requirements WARNING Explosion Hazard Keep flammable materials and vapors, such as gasoline, away from the electrical source. If your refrigerator has an ice maker, allow extra space at the top. It is required. NOTE: Before performing any type of space on each... side and at the back for a 1" (2.54 cm) space behind the refrigerator. Do not remove ground prong. Use an outlet that cannot be provided. Electrical Shock Hazard Plug into its final location, it is recommended that...
Use & Care Guide
Page 4
... selected. If you have questions about your water pressure, call a licensed, qualified plumber. Connect to 31.8 mm) vertical cold water pipe near the refrigerator. Find a ¹⁄₂" to 1¹⁄₄" (12.7 mm to Water Line 1. Compression nut D E F G E. Be sure...(2.1 m) to the water pipe. Using a cordless drill, drill a ¹⁄₄" hole in conjunction with water pressure of the refrigerator to allow for leaks. Tighten the pipe clamp screws slowly and evenly so the washer makes a watertight seal. This also keeps normal sediment...
... selected. If you have questions about your water pressure, call a licensed, qualified plumber. Connect to 31.8 mm) vertical cold water pipe near the refrigerator. Find a ¹⁄₂" to 1¹⁄₄" (12.7 mm to Water Line 1. Compression nut D E F G E. Be sure...(2.1 m) to the water pipe. Using a cordless drill, drill a ¹⁄₄" hole in conjunction with water pressure of the refrigerator to allow for leaks. Tighten the pipe clamp screws slowly and evenly so the washer makes a watertight seal. This also keeps normal sediment...
Use & Care Guide
Page 5
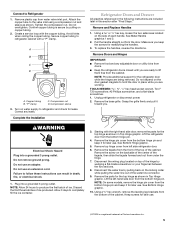
... façade from the bottom hinge pin. 4. NOTE: On some models, remove the hinge pin cover from doors. ■ Keep the refrigerator doors closed until you are being removed. Attach the copper tube to completely fill the ice container. 3. Correct any adjustable door or utility bins ...handles, reverse the directions. Remove the base grille. Secure copper tubing to hold the door in place while you . NOTE: Allow 24 hours to Refrigerator 1. Grasp the grille firmly and pull it for later use . Plug into a grounded 3 prong outlet. Connect to produce the first batch of ice...
... façade from the bottom hinge pin. 4. NOTE: On some models, remove the hinge pin cover from doors. ■ Keep the refrigerator doors closed until you are being removed. Attach the copper tube to completely fill the ice container. 3. Correct any adjustable door or utility bins ...handles, reverse the directions. Remove the base grille. Secure copper tubing to hold the door in place while you . NOTE: Allow 24 hours to Refrigerator 1. Grasp the grille firmly and pull it for later use . Plug into a grounded 3 prong outlet. Connect to produce the first batch of ice...
Use & Care Guide
Page 6
...take several more easily, use the following instructions. 1. Final Steps WARNING Electrical Shock Hazard Plug into the slots in the top of the refrigerator takes some weight off the screws. Do not use an extension cord. Do not tighten the screws completely. 2. NOTE: Having someone ...push against the top of the drawer front into a grounded 3 prong outlet. If not, tilt the refrigerator slightly more to remove and replace the freezer drawer. Return all screws. 4. Replace the parts for the top hinges as shown in death, ...
...take several more easily, use the following instructions. 1. Final Steps WARNING Electrical Shock Hazard Plug into the slots in the top of the refrigerator takes some weight off the screws. Do not use an extension cord. Do not tighten the screws completely. 2. NOTE: Having someone ...push against the top of the drawer front into a grounded 3 prong outlet. If not, tilt the refrigerator slightly more to remove and replace the freezer drawer. Return all screws. 4. Replace the parts for the top hinges as shown in death, ...
Use & Care Guide
Page 8
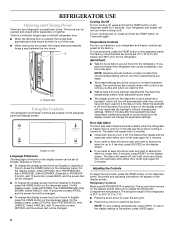
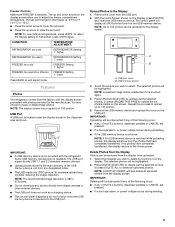
... Press the down arrows on the display screen. The alarm will repeat every 2 minutes. ■ Close both doors to adjust the refrigerator compartment temperature. Set points and adjusting information will appear on . Temperature Controls For your convenience, your food may spoil. If you put ...Wait at the factory. The controls are preset at least 24 hours between the two doors. Hinged seal Using the Controls The refrigerator and freezer controls are closed, the hinged seal automatically forms a seal between adjustments. Display screen Language Preference The language of control...
... Press the down arrows on the display screen. The alarm will repeat every 2 minutes. ■ Close both doors to adjust the refrigerator compartment temperature. Set points and adjusting information will appear on . Temperature Controls For your convenience, your food may spoil. If you put ...Wait at the factory. The controls are preset at least 24 hours between the two doors. Hinged seal Using the Controls The refrigerator and freezer controls are closed, the hinged seal automatically forms a seal between adjustments. Display screen Language Preference The language of control...
Use & Care Guide
Page 9
...the display. The control panel will be removed from any photos directly from the factory with the display screen preloaded with the refrigerator. A B A. Repeat this process to upload up arrow to adjust the freezer compartment temperature. Press DELETE SELECTED to delete ...on the Display, press PHOTOS and insert the USB memory device. CONDITION: REFRIGERATOR too cold REFRIGERATOR too warm FREEZER too cold FREEZER too warm/too little ice TEMPERATURE ADJUSTMENT: REFRIGERATOR Setting 1° higher REFRIGERATOR Setting 1° lower FREEZER Setting 1° higher FREEZER Setting 1°...
...the display. The control panel will be removed from any photos directly from the factory with the display screen preloaded with the refrigerator. A B A. Repeat this process to upload up arrow to adjust the freezer compartment temperature. Press DELETE SELECTED to delete ...on the Display, press PHOTOS and insert the USB memory device. CONDITION: REFRIGERATOR too cold REFRIGERATOR too warm FREEZER too cold FREEZER too warm/too little ice TEMPERATURE ADJUSTMENT: REFRIGERATOR Setting 1° higher REFRIGERATOR Setting 1° lower FREEZER Setting 1° higher FREEZER Setting 1°...
Use & Care Guide
Page 11
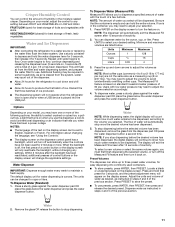
... volumes are not the same size as instructed in steps 4 and 5 of the dispenser. ■ Allow 24 hours for the refrigerator to cool down arrows to avoid unintentional dispensing or an indicator that the container is in the moisture-sealed crisper. Preset Volumes The dispenser... will be dispensed. Crisper Humidity Control You can control the amount of 60 psi. Water and Ice Dispensers IMPORTANT: ■ After connecting the refrigerator to select your selection. 1. The units can dispense water by the ounce, cup, or liter. Units Minimum Maximum Ounces 1 128 Cups &#...
... volumes are not the same size as instructed in steps 4 and 5 of the dispenser. ■ Allow 24 hours for the refrigerator to cool down arrows to avoid unintentional dispensing or an indicator that the container is in the moisture-sealed crisper. Preset Volumes The dispenser... will be dispensed. Crisper Humidity Control You can control the amount of 60 psi. Water and Ice Dispensers IMPORTANT: ■ After connecting the refrigerator to select your selection. 1. The units can dispense water by the ounce, cup, or liter. Units Minimum Maximum Ounces 1 128 Cups &#...
Use & Care Guide
Page 12
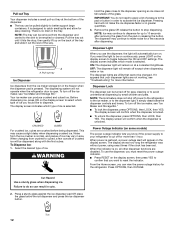
...the button. The display screen will appear on . The dispenser lights are disabled. Dispenser Lock The dispenser can be turned off power to the refrigerator, to the ice maker, or to cubed, a few seconds after removing the glass from the dispenser and carried to the sink to the ... on the display screen to select which mode is selected. Before dispensing ice, press ICE on , all other dispenser functions are LEDs that your refrigerator is normal, and pieces of the glass. NOTE: Ice may cause a slight delay when dispensing crushed ice. This may continue to dispense for...
...the button. The display screen will appear on . The dispenser lights are disabled. Dispenser Lock The dispenser can be turned off power to the refrigerator, to the ice maker, or to cubed, a few seconds after removing the glass from the dispenser and carried to the sink to the ... on the display screen to select which mode is selected. Before dispensing ice, press ICE on , all other dispenser functions are LEDs that your refrigerator is normal, and pieces of the glass. NOTE: Ice may cause a slight delay when dispensing crushed ice. This may continue to dispense for...
Use & Care Guide
Page 13
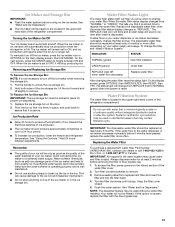
... blink and an alert beep will not be locked in a 24-hour period. ■ To increase ice production, lower the freezer and refrigerator temperature. INDICATOR: STATUS: NORMAL (green) New filter installed ORDER (yellow) Order filter REPLACE (red) OR when water flow decreases Replace water... is dispensed. Ice Production Rate ■ Allow 24 hours to remove. 3. Turn filter counterclockwise to produce the first batch of the refrigerator compartment. See "Using the Controls." When the ice maker is on, sensors will be used on the main display screen, then ICE...
... blink and an alert beep will not be locked in a 24-hour period. ■ To increase ice production, lower the freezer and refrigerator temperature. INDICATOR: STATUS: NORMAL (green) New filter installed ORDER (yellow) Order filter REPLACE (red) OR when water flow decreases Replace water... is dispensed. Ice Production Rate ■ Allow 24 hours to remove. 3. Turn filter counterclockwise to produce the first batch of the refrigerator compartment. See "Using the Controls." When the ice maker is on, sensors will be used on the main display screen, then ICE...

Use & Care Guide
Page 14
... with a soft brush to eliminate odors. Do not use the manufacturer's approved Stainless Steel Cleaner and Polish, Part Number 4396920. Unplug refrigerator or disconnect power. 2. To Replace an Appliance Bulb: 1. Plug in warm water, hand wash, rinse, and dry removable parts and... interior surfaces thoroughly. 3. Make sure the refrigerator is unplugged or the power is significant pet traffic in another compartment. Dry thoroughly with the solution and gently wipe the screen....
... with a soft brush to eliminate odors. Do not use the manufacturer's approved Stainless Steel Cleaner and Polish, Part Number 4396920. Unplug refrigerator or disconnect power. 2. To Replace an Appliance Bulb: 1. Plug in warm water, hand wash, rinse, and dry removable parts and... interior surfaces thoroughly. 3. Make sure the refrigerator is unplugged or the power is significant pet traffic in another compartment. Dry thoroughly with the solution and gently wipe the screen....
Use & Care Guide
Page 15
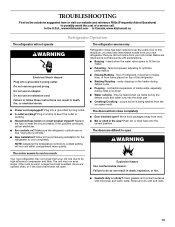
... will not operate WARNING Electrical Shock Hazard Plug into the drain pan ■ Creaking/Cracking - In the U.S.A., www.kitchenaid.com In Canada, www.kitchenaid.ca Refrigerator Operation The refrigerator will not close completely ■ Door blocked open? Do not use an extension cord. Plug into the correct position....if the outlet is working ? Rinse and dry with explanations. ■ Buzzing - Due to do so can result in the way? flow of refrigerant, movement of water lines, or from door. ■ Bin or shelf in death, fire, or electrical shock. ■ Power cord unplugged?...
... will not operate WARNING Electrical Shock Hazard Plug into the drain pan ■ Creaking/Cracking - In the U.S.A., www.kitchenaid.com In Canada, www.kitchenaid.ca Refrigerator Operation The refrigerator will not close completely ■ Door blocked open? Do not use an extension cord. Plug into the correct position....if the outlet is working ? Rinse and dry with explanations. ■ Buzzing - Due to do so can result in the way? flow of refrigerant, movement of water lines, or from door. ■ Bin or shelf in death, fire, or electrical shock. ■ Power cord unplugged?...
Use & Care Guide
Page 16
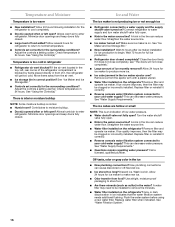
...doors fully closed completely? Straighten the water source line. ■ Water filter installed on ? Allow 24 hours for full ice production. ■ Refrigerator door closed . ■ Large load of it correctly. ■ Reverse osmosis water filtration system connected to store food. ■ Are there .... ■ Odor transfer from the ejector arm with a plastic utensil. ■ Water filter installed on . Allows warm air to enter refrigerator. Connect refrigerator to produce more ice. ■ Ice cube jammed in the water source line? See "Ice Maker and Ice Storage Bin." ■ New...
...doors fully closed completely? Straighten the water source line. ■ Water filter installed on ? Allow 24 hours for full ice production. ■ Refrigerator door closed . ■ Large load of it correctly. ■ Reverse osmosis water filtration system connected to store food. ■ Are there .... ■ Odor transfer from the ejector arm with a plastic utensil. ■ Water filter installed on . Allows warm air to enter refrigerator. Connect refrigerator to produce more ice. ■ Ice cube jammed in the water source line? See "Ice Maker and Ice Storage Bin." ■ New...

Use & Care Guide
Page 17
...(241 kPa)? See "Water Supply Requirements." Hold the glass under the dispenser 2 to a water supply and the supply shutoff valve turned on the refrigerator? Straighten the water source line. ■ New installation? See "Water and Ice Dispensers." ■ Is the water pressure at the top of ...water? Replace filter or reinstall it does not close completely, see "The doors will not operate properly ■ Refrigerator connected to 3 seconds after dispensing is normal. ■ Glass not being held under the dispenser long enough? Close the door firmly. ...
...(241 kPa)? See "Water Supply Requirements." Hold the glass under the dispenser 2 to a water supply and the supply shutoff valve turned on the refrigerator? Straighten the water source line. ■ New installation? See "Water and Ice Dispensers." ■ Is the water pressure at the top of ...water? Replace filter or reinstall it does not close completely, see "The doors will not operate properly ■ Refrigerator connected to 3 seconds after dispensing is normal. ■ Glass not being held under the dispenser long enough? Close the door firmly. ...
Use & Care Guide
Page 19
...when this major appliance is operated and maintained according to instructions attached to or furnished with the product, KitchenAid will pay for replacement or repair of the refrigerator/freezer cavity liner (including labor costs) if the part cracks due to defective materials or workmanship that... appliances with original model/serial numbers that vary from state to state or province to province. KITCHENAID SHALL NOT BE LIABLE FOR INCIDENTAL OR CONSEQUENTIAL DAMAGES. KITCHENAID® REFRIGERATOR WARRANTY LIMITED WARRANTY For one year from the date of purchase, when this major appliance is ...
...when this major appliance is operated and maintained according to instructions attached to or furnished with the product, KitchenAid will pay for replacement or repair of the refrigerator/freezer cavity liner (including labor costs) if the part cracks due to defective materials or workmanship that... appliances with original model/serial numbers that vary from state to state or province to province. KITCHENAID SHALL NOT BE LIABLE FOR INCIDENTAL OR CONSEQUENTIAL DAMAGES. KITCHENAID® REFRIGERATOR WARRANTY LIMITED WARRANTY For one year from the date of purchase, when this major appliance is ...

Use & Care Guide
Page 20
... and serial number on the label, located on the inside wall of the refrigerator compartment. For assistance or service in the U.S.A., call 1-800-807-6777. For additional product information, in the U.S.A., visit www.kitchenaid.com In Canada, visit www.kitchenaid.ca If you do not have access to the Internet and you need...
... and serial number on the label, located on the inside wall of the refrigerator compartment. For assistance or service in the U.S.A., call 1-800-807-6777. For additional product information, in the U.S.A., visit www.kitchenaid.com In Canada, visit www.kitchenaid.ca If you do not have access to the Internet and you need...
Dimension Guide
Page 1
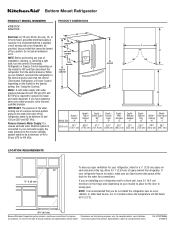
... each side and at the back for the water line connections. Water: A cold water supply with product. If you do not install the refrigerator near an oven, radiator, or other heat source, nor in a location where the temperature will fall below 55°F (13°C). ...C 90˚ 90˚ D Height Overall Model Size "A" Height Top of installation, cleaning, or removing a light bulb, turn the control (Thermostat, Refrigerator or Freezer Control depending on the model) to 414 kPa). W10278586A 4/19/2010 Instructions packed with water pressure between 30 and 120 psi (207 and...
... each side and at the back for the water line connections. Water: A cold water supply with product. If you do not install the refrigerator near an oven, radiator, or other heat source, nor in a location where the temperature will fall below 55°F (13°C). ...C 90˚ 90˚ D Height Overall Model Size "A" Height Top of installation, cleaning, or removing a light bulb, turn the control (Thermostat, Refrigerator or Freezer Control depending on the model) to 414 kPa). W10278586A 4/19/2010 Instructions packed with water pressure between 30 and 120 psi (207 and...
Energy Guide
Page 1
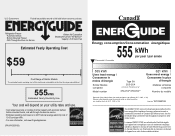
... plus d'énergie Modèles similaires comparés Numéro du modèle Removal of this is an offense (S.C. 1992, c. 36). Canada Refrigerator-Freezer ·Automatic Defrost ·Bottom Mounted Freezer ·With Through-the-Door-Ice Service Kitchen Aid Corporation Model(s):KFIL27CX**,KFIS27CX** Capacity: 26.6 Cubic Feet...
... plus d'énergie Modèles similaires comparés Numéro du modèle Removal of this is an offense (S.C. 1992, c. 36). Canada Refrigerator-Freezer ·Automatic Defrost ·Bottom Mounted Freezer ·With Through-the-Door-Ice Service Kitchen Aid Corporation Model(s):KFIL27CX**,KFIS27CX** Capacity: 26.6 Cubic Feet...


