
Use & Care Guide
Page 2
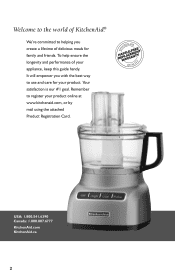
Your satisfaction is our #1 goal. We're committed to register your product. Remember to helping you with the best way to the world of KitchenAid®. To help ensure the longevity and performance of delicious meals for your product online at www.kitchenaid.com, or by mail using the attached Product Registration Card. USA: 1.800.541.6390 Canada: 1.800.807.6777 KitchenAid.com KitchenAid.ca 2 It will empower you create a lifetime of your appliance, keep this guide handy. Welcome to use and care for family and friends.
Your satisfaction is our #1 goal. We're committed to register your product. Remember to helping you with the best way to the world of KitchenAid®. To help ensure the longevity and performance of delicious meals for your product online at www.kitchenaid.com, or by mail using the attached Product Registration Card. USA: 1.800.541.6390 Canada: 1.800.807.6777 KitchenAid.com KitchenAid.ca 2 It will empower you create a lifetime of your appliance, keep this guide handy. Welcome to use and care for family and friends.
Use & Care Guide
Page 3
...5 PARTS AND FEATURES 6 ACCESSORIES Included Accessories 7 Accessories Selection Guide 8 PREPARING THE FOOD PROCESSOR FOR FIRST USE 9 SETTING UP YOUR FOOD PROCESSOR Attaching the Work Bowl 10 Attaching the Work Bowl Cover 10 Installing the Adjustable Slicing Disc 11 Installing the Reversible Shredding Disc 11 Installing the Multipurpose Blade 12 Using the 2-in-1 Feed Tube 12 USING YOUR FOOD PROCESSOR Before Use...13 Maximum Liquid Level 13 Using the Low/High Speed Control 13 Using the Pulse Control 13 Removing Processed Foods 14 CLEANING THE FOOD PROCESSOR 15 FOOD PROCESSING TIPS...
...5 PARTS AND FEATURES 6 ACCESSORIES Included Accessories 7 Accessories Selection Guide 8 PREPARING THE FOOD PROCESSOR FOR FIRST USE 9 SETTING UP YOUR FOOD PROCESSOR Attaching the Work Bowl 10 Attaching the Work Bowl Cover 10 Installing the Adjustable Slicing Disc 11 Installing the Reversible Shredding Disc 11 Installing the Multipurpose Blade 12 Using the 2-in-1 Feed Tube 12 USING YOUR FOOD PROCESSOR Before Use...13 Maximum Liquid Level 13 Using the Low/High Speed Control 13 Using the Pulse Control 13 Removing Processed Foods 14 CLEANING THE FOOD PROCESSOR 15 FOOD PROCESSING TIPS...
Use & Care Guide
Page 4
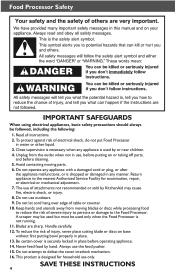
... blade or discs on or taking off parts, and before operating appliance. 14. Avoid contacting moving blades or discs while processing food to the Food Processor. Do not use the food pusher. 15. Blades are sharp. Do not attempt to the nearest Authorized Service Facility for household use of electrical shock, do not put Food Processor in place. 13. Close supervision is dropped or damaged in place before cleaning...
... blade or discs on or taking off parts, and before operating appliance. 14. Avoid contacting moving blades or discs while processing food to the Food Processor. Do not use the food pusher. 15. Blades are sharp. Do not attempt to the nearest Authorized Service Facility for household use of electrical shock, do not put Food Processor in place. 13. Close supervision is dropped or damaged in place before cleaning...
Use & Care Guide
Page 5
... & Product Registration Always keep a copy of the itemized sales receipt showing the date of purchase of in any way. English Food Processor Safety Electrical Requirements Volts: 120 V.A.C. This card does not verify your personal records: Model Number Serial Number Date Purchased Store Name 5 If it still does not .... Proof of purchase will enable us to contact you use your Food Processor, please fill out and mail your Food Processor. Please complete the following for your warranty. Do not modify the plug in -warranty service. If the plug does not fit fully in the outlet...
... & Product Registration Always keep a copy of the itemized sales receipt showing the date of purchase of in any way. English Food Processor Safety Electrical Requirements Volts: 120 V.A.C. This card does not verify your personal records: Model Number Serial Number Date Purchased Store Name 5 If it still does not .... Proof of purchase will enable us to contact you use your Food Processor, please fill out and mail your Food Processor. Please complete the following for your warranty. Do not modify the plug in -warranty service. If the plug does not fit fully in the outlet...
Use & Care Guide
Page 6
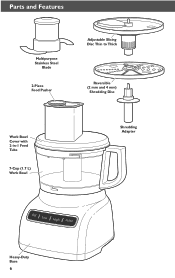
Parts and Features Multipurpose Stainless Steel Blade 2-Piece Food Pusher Adjustable Slicing Disc Thin to Thick Reversible (2 mm and 4 mm) Shredding Disc Work Bowl Cover with 2-in-1 Feed Tube 7-Cup (1.7 L) Work Bowl Shredding Adapter Heavy-Duty Base 6
Parts and Features Multipurpose Stainless Steel Blade 2-Piece Food Pusher Adjustable Slicing Disc Thin to Thick Reversible (2 mm and 4 mm) Shredding Disc Work Bowl Cover with 2-in-1 Feed Tube 7-Cup (1.7 L) Work Bowl Shredding Adapter Heavy-Duty Base 6

Use & Care Guide
Page 7
...), remove the narrow pusher and use the narrow feed tube. Drive Adapter The drive adapter is reversible to 1/4 inch (6 mm) for continuous processing, or a smaller opening for slicing most any food. Accessories Included Accessories 7-Cup (2.0 L) Work Bowl (KFP07WBOB) The durable, large work bowl provides capacity for additional details on the base. High/Low/Pulse/Control Two speeds and Pulse provide precise control to select a large feed tube opening depending on the task. Work Bowl Cover with 2-in-1 Feed Tube...
...), remove the narrow pusher and use the narrow feed tube. Drive Adapter The drive adapter is reversible to 1/4 inch (6 mm) for continuous processing, or a smaller opening for slicing most any food. Accessories Included Accessories 7-Cup (2.0 L) Work Bowl (KFP07WBOB) The durable, large work bowl provides capacity for additional details on the base. High/Low/Pulse/Control Two speeds and Pulse provide precise control to select a large feed tube opening depending on the task. Work Bowl Cover with 2-in-1 Feed Tube...
Use & Care Guide
Page 8
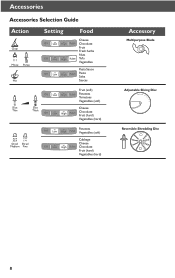
Accessories Accessories Selection Guide Action Setting Food Accessory Cheese Multipurpose Blade Chocolate Chop Fruit Fresh herbs Nuts Tofu Vegetables Mince Puree Pasta Sauce Pesto Salsa Mix Sauces Slice Slice Thin Thick Fruit (soft) Potatoes Tomatoes Vegetables (soft) Cheese Chocolate Fruit (hard) Vegetables (hard) Adjustable Slicing Disc Shred Shred Medium Fine Potatoes Vegetables (soft) Cabbage Cheese Chocolate Fruit (hard) Vegetables (hard) Reversible Shredding Disc 8
Accessories Accessories Selection Guide Action Setting Food Accessory Cheese Multipurpose Blade Chocolate Chop Fruit Fresh herbs Nuts Tofu Vegetables Mince Puree Pasta Sauce Pesto Salsa Mix Sauces Slice Slice Thin Thick Fruit (soft) Potatoes Tomatoes Vegetables (soft) Cheese Chocolate Fruit (hard) Vegetables (hard) Adjustable Slicing Disc Shred Shred Medium Fine Potatoes Vegetables (soft) Cabbage Cheese Chocolate Fruit (hard) Vegetables (hard) Reversible Shredding Disc 8
Use & Care Guide
Page 9
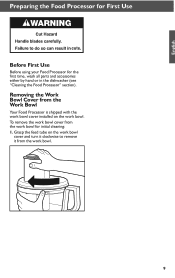
To remove the work bowl cover from the work bowl. 9 Removing the Work Bowl Cover from the Work Bowl Your Food Processor is shipped with the work bowl cover installed on the work bowl cover and turn it clockwise to remove it from the work bowl. Grasp the feed tube on the work bowl for the first time, wash all parts and accessories either by hand or in the dishwasher (see "Cleaning the Food Processor" section). English Preparing the Food Processor for First Use Before First Use Before using your Food Processor for initial cleaning: 1.
To remove the work bowl cover from the work bowl. 9 Removing the Work Bowl Cover from the Work Bowl Your Food Processor is shipped with the work bowl cover installed on the work bowl cover and turn it clockwise to remove it from the work bowl. Grasp the feed tube on the work bowl for the first time, wash all parts and accessories either by hand or in the dishwasher (see "Cleaning the Food Processor" section). English Preparing the Food Processor for First Use Before First Use Before using your Food Processor for initial cleaning: 1.
Use & Care Guide
Page 10
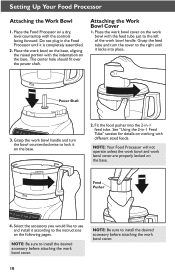
... power shaft. Place the work bowl cover on the work bowl with the feed tube just to the right until it according to install the desired accessory before attaching the work bowl cover are properly locked on working with different sized foods. See "Using the 2-in -1 feed tube. Select the accessory you would like to use and install it is completely assembled. 2. Attaching the Work Bowl Cover 1. NOTE: Be sure to the instructions on a dry, level countertop with the indentation on the base...
... power shaft. Place the work bowl cover on the work bowl with the feed tube just to the right until it according to install the desired accessory before attaching the work bowl cover are properly locked on working with different sized foods. See "Using the 2-in -1 feed tube. Select the accessory you would like to use and install it is completely assembled. 2. Attaching the Work Bowl Cover 1. NOTE: Be sure to the instructions on a dry, level countertop with the indentation on the base...
Use & Care Guide
Page 11
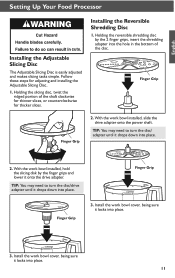
... Setting Up Your Food Processor Installing the Adjustable Slicing Disc The Adjustable Slicing Disc is easily adjusted and makes slicing tasks simple. Holding the reversible shredding disc by the finger grips and lower it onto the drive adapter. With the work bowl installed, slide the drive adapter onto the power shaft. TIP: You may need to turn the disc/drive adapter until it drops down into place. Follow these steps for thicker slices. With the work bowl installed, hold the slicing disk...
... Setting Up Your Food Processor Installing the Adjustable Slicing Disc The Adjustable Slicing Disc is easily adjusted and makes slicing tasks simple. Holding the reversible shredding disc by the finger grips and lower it onto the drive adapter. With the work bowl installed, slide the drive adapter onto the power shaft. TIP: You may need to turn the disc/drive adapter until it drops down into place. Follow these steps for thicker slices. With the work bowl installed, hold the slicing disk...
Use & Care Guide
Page 12
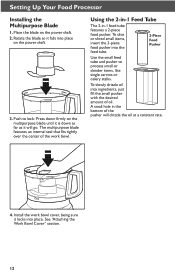
... -1 feed tube features a 2-piece food pusher. Rotate the blade so it locks into ingredients, just fill the small pusher with the desired amount of the pusher will go. Push to process small or slender items, like single carrots or celery stalks. To slowly drizzle oil into place. Place the blade on the power shaft. 3. Install the work bowl. Setting Up Your Food Processor Installing the Multipurpose Blade 1. See "Attaching the Work Bowl Cover" section. 12 Using the 2-in-1 Feed Tube...
... -1 feed tube features a 2-piece food pusher. Rotate the blade so it locks into ingredients, just fill the small pusher with the desired amount of the pusher will go. Push to process small or slender items, like single carrots or celery stalks. To slowly drizzle oil into place. Place the blade on the power shaft. 3. Install the work bowl. Setting Up Your Food Processor Installing the Multipurpose Blade 1. See "Attaching the Work Bowl Cover" section. 12 Using the 2-in-1 Feed Tube...

Use & Care Guide
Page 13
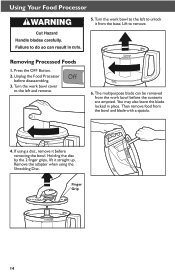
... Food Processor base (see "Setting Up Your Food Processor"). Just press and hold the PULSE Button to start processing at high speed, and release it to a complete stop within a few seconds. 3. The Food Processor will run continuously and the indicator light will stop before removing the work bowl and cover are properly assembled on the work bowl indicates the maximum level of processing. The indicator light will go out and the blade or disc...
... Food Processor base (see "Setting Up Your Food Processor"). Just press and hold the PULSE Button to start processing at high speed, and release it to a complete stop within a few seconds. 3. The Food Processor will run continuously and the indicator light will stop before removing the work bowl and cover are properly assembled on the work bowl indicates the maximum level of processing. The indicator light will go out and the blade or disc...
Use & Care Guide
Page 14
.... Finger Grip 14 Turn the work bowl to remove. Remove the adapter when using a disc, remove it straight up. Lift to the left and remove. 6. The multipurpose blade can be removed from the bowl and blade with a spatula. 4. Unplug the Food Processor before removing the bowl. You may also leave the blade locked in place. Turn the work bowl cover to the left to unlock it from the base. Removing Processed Foods 1. If using the Shredding Disc. Using Your Food Processor 5. Press the OFF...
.... Finger Grip 14 Turn the work bowl to remove. Remove the adapter when using a disc, remove it straight up. Lift to the left and remove. 6. The multipurpose blade can be removed from the bowl and blade with a spatula. 4. Unplug the Food Processor before removing the bowl. You may also leave the blade locked in place. Turn the work bowl cover to the left to unlock it from the base. Removing Processed Foods 1. If using the Shredding Disc. Using Your Food Processor 5. Press the OFF...
Use & Care Guide
Page 15
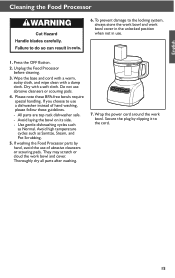
... the Food Processor before cleaning. 3. Do not use of hand washing, please follow these BPA-free bowls require special handling. Avoid laying the bowl on its side. -- Wipe the base and cord with a warm, sudsy cloth, and wipe clean with a soft cloth. If you choose to use . 1. Use gentle dishwashing cycles such as Sanitize, Steam, and Pot Scrubbing. 5. Wrap the power cord around the work bowl cover...
... the Food Processor before cleaning. 3. Do not use of hand washing, please follow these BPA-free bowls require special handling. Avoid laying the bowl on its side. -- Wipe the base and cord with a warm, sudsy cloth, and wipe clean with a soft cloth. If you choose to use . 1. Use gentle dishwashing cycles such as Sanitize, Steam, and Pot Scrubbing. 5. Wrap the power cord around the work bowl cover...

Use & Care Guide
Page 16
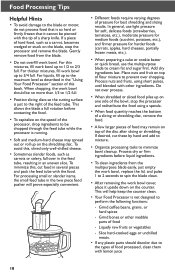
... bowl. To chop nuts or make nut butters: Process up to 1 pound (455 g) at a time to desired size, using short pulses, 1 to 3 seconds each time. Pulse more often for multipurpose blade. To melt chocolate in 1 to 2-inch (3.75-5 cm) pieces. Then process continuously until fine. To chop dried (or sticky) fruits: The food should be added through the feed tube while the processor is absorbed. Process...
... bowl. To chop nuts or make nut butters: Process up to 1 pound (455 g) at a time to desired size, using short pulses, 1 to 3 seconds each time. Pulse more often for multipurpose blade. To melt chocolate in 1 to 2-inch (3.75-5 cm) pieces. Then process continuously until fine. To chop dried (or sticky) fruits: The food should be added through the feed tube while the processor is absorbed. Process...
Use & Care Guide
Page 17
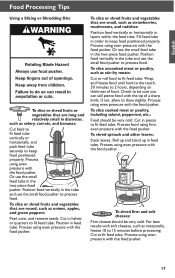
... fit feed tube. To slice or shred fruits and vegetables that are round, such as onions, apples, and green peppers: Peel, core, and remove seeds. To slice uncooked meat or poultry, such as stir-fry meats: Cut or roll food to 15 minutes before processing. For best results with the tip of food. English Food Processing Tips Using a Slicing or Shredding Disc To slice or shred fruits...
... fit feed tube. To slice or shred fruits and vegetables that are round, such as onions, apples, and green peppers: Peel, core, and remove seeds. To slice uncooked meat or poultry, such as stir-fry meats: Cut or roll food to 15 minutes before processing. For best results with the tip of food. English Food Processing Tips Using a Slicing or Shredding Disc To slice or shred fruits...
Use & Care Guide
Page 18
.... To avoid this book. For thin mixtures, fill work bowl should discolor due to the right of food processed, clean them with the food. Slice hard-cooked eggs or unchilled meats. • If any plastic parts should be chopped through the feed tube while the processor is just to the types of the feed tube. For liquids, fill up on the blade, stop the processor and redistribute the food using short pulses...
.... To avoid this book. For thin mixtures, fill work bowl should discolor due to the right of food processed, clean them with the food. Slice hard-cooked eggs or unchilled meats. • If any plastic parts should be chopped through the feed tube while the processor is just to the types of the feed tube. For liquids, fill up on the blade, stop the processor and redistribute the food using short pulses...
Use & Care Guide
Page 19
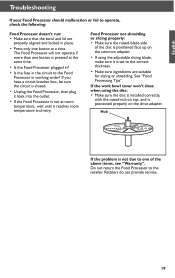
.... • If the Food Processor is positioned face up on the drive adapter. Do not return the Food Processor to the Food Processor in the circuit to the retailer. Food Processor not shredding or slicing properly: • Make sure the raised-blade side of the above items, see "Warranty". See "Food Processing Tips" If the work bowl cover won't close when using the disc: • Make sure the disc is installed correctly, with the...
.... • If the Food Processor is positioned face up on the drive adapter. Do not return the Food Processor to the Food Processor in the circuit to the retailer. Food Processor not shredding or slicing properly: • Make sure the raised-blade side of the above items, see "Warranty". See "Food Processing Tips" If the work bowl cover won't close when using the disc: • Make sure the disc is installed correctly, with the...
Use & Care Guide
Page 20
... of purchase. Hassle-Free Replacement of your Food Processor to an Authorized Service Center. Any shipping or handling costs to deliver your Food Processor. Repairs when Food Processor is used in materials and workmanship. C. IF THIS PRODUCT FAILS TO WORK AS WARRANTED, CUSTOMER'S SOLE AND EXCLUSIVE REMEDY SHALL BE REPAIR OR REPLACEMENT ACCORDING TO THE TERMS OF THIS LIMITED WARRANTY. Warranty KitchenAid® Food Processor Warranty for the 50...
... of purchase. Hassle-Free Replacement of your Food Processor to an Authorized Service Center. Any shipping or handling costs to deliver your Food Processor. Repairs when Food Processor is used in materials and workmanship. C. IF THIS PRODUCT FAILS TO WORK AS WARRANTED, CUSTOMER'S SOLE AND EXCLUSIVE REMEDY SHALL BE REPAIR OR REPLACEMENT ACCORDING TO THE TERMS OF THIS LIMITED WARRANTY. Warranty KitchenAid® Food Processor Warranty for the 50...
Use & Care Guide
Page 21
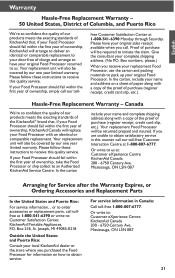
... unable to receive this quality service. For service information in this quality service. Or write to order accessories or replacement parts, call . Please follow these instructions to initiate the claim. Your replacement Food Processor will be required to receive this manner call our toll-free Customer Interaction Centre at : Customer eXperience Centre KitchenAid Canada 200 - 6750 Century Ave. If your Food Processor should fail within the...
... unable to receive this quality service. For service information in this quality service. Or write to order accessories or replacement parts, call . Please follow these instructions to initiate the claim. Your replacement Food Processor will be required to receive this manner call our toll-free Customer Interaction Centre at : Customer eXperience Centre KitchenAid Canada 200 - 6750 Century Ave. If your Food Processor should fail within the...


