
Owners Manual
Page 3
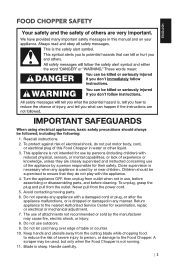
... be used by a person responsible for examination, repair, or electrical or mechanical adjustment. 7. Turn the appliance OFF, then unplug from the cutting blade while chopping food to the Food Chopper. Avoid contacting moving parts. 6. Return appliance to ensure that they are closely supervised and instructed concerning use of this Food Chopper in water or other liquid. 3. Do not use , before assembling or disassembling parts, and before cleaning. Blade is...
... be used by a person responsible for examination, repair, or electrical or mechanical adjustment. 7. Turn the appliance OFF, then unplug from the cutting blade while chopping food to the Food Chopper. Avoid contacting moving parts. 6. Return appliance to ensure that they are closely supervised and instructed concerning use of this Food Chopper in water or other liquid. 3. Do not use , before assembling or disassembling parts, and before cleaning. Blade is...

Owners Manual
Page 4
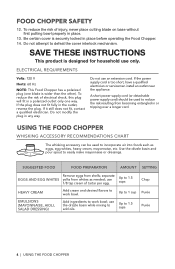
... INSTRUCTIONS This product is securely locked in a polarized outlet only one blade is too short, have a qualified electrician or serviceman install an outlet near the appliance. SUGGESTED FOOD FOOD PREPARATION AMOUNT SETTING EGGS AND EGG WHITES Remove eggs from becoming entangled in place. 13. USING THE FOOD CHOPPER WHISKING ACCESSORY RECOMMENDATIONS CHART The whisking accessory can be used to work bowl. To reduce the risk of injury, never place cutting blade on base...
... INSTRUCTIONS This product is securely locked in a polarized outlet only one blade is too short, have a qualified electrician or serviceman install an outlet near the appliance. SUGGESTED FOOD FOOD PREPARATION AMOUNT SETTING EGGS AND EGG WHITES Remove eggs from becoming entangled in place. 13. USING THE FOOD CHOPPER WHISKING ACCESSORY RECOMMENDATIONS CHART The whisking accessory can be used to work bowl. To reduce the risk of injury, never place cutting blade on base...

Owners Manual
Page 5
... 1-inch pieces Meat should be raw, and cut to achieve coarsely chopped results, use the Pulse operation. Purée cooked fruit or vegetables to make bread crumbs or grind raw meat. NUTS Add shelled nuts as bases for additional instructions with videos, inspiring recipes, and tips on how to use your favorite recipes. FOR DETAILED INFORMATION ON USING THE FOOD CHOPPER: Visit www.kitchenaid.com...
... 1-inch pieces Meat should be raw, and cut to achieve coarsely chopped results, use the Pulse operation. Purée cooked fruit or vegetables to make bread crumbs or grind raw meat. NUTS Add shelled nuts as bases for additional instructions with videos, inspiring recipes, and tips on how to use your favorite recipes. FOR DETAILED INFORMATION ON USING THE FOOD CHOPPER: Visit www.kitchenaid.com...
Owners Manual
Page 6
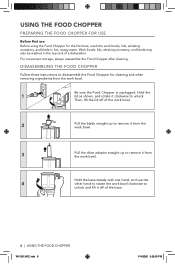
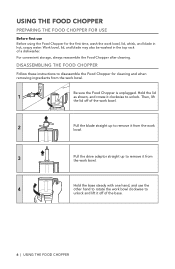
... disassemble the Food Chopper for the first time, wash the work bowls, lids, whisking accessory, and blade in the top rack of a dishwasher. Hold the 1 lid as shown, and rotate it off of the work bowl. 2 Pull the blade straight up to remove it from the work bowl. 3 Pull the drive adaptor straight up to remove it from the work bowl. Hold the base steady with one hand, and use Before using the Food Chopper for cleaning...
... disassemble the Food Chopper for the first time, wash the work bowls, lids, whisking accessory, and blade in the top rack of a dishwasher. Hold the 1 lid as shown, and rotate it off of the work bowl. 2 Pull the blade straight up to remove it from the work bowl. 3 Pull the drive adaptor straight up to remove it from the work bowl. Hold the base steady with one hand, and use Before using the Food Chopper for cleaning...
Owners Manual
Page 7
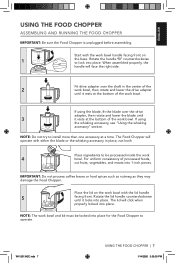
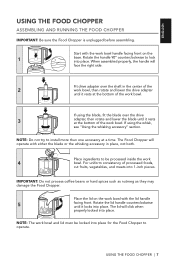
... Food Chopper is unplugged before assembling. If using the blade, fit the blade over the shaft in place, not both. The Food Chopper will face the right side. Rotate the handle 90° counterclockwise to install more than one accessory at the bottom of processed foods, cut fruits, vegetables, and meats into 1-inch pieces. NOTE: Do not try to lock into place. Start with the work bowl. Rotate the lid handle...
... Food Chopper is unplugged before assembling. If using the blade, fit the blade over the shaft in place, not both. The Food Chopper will face the right side. Rotate the handle 90° counterclockwise to install more than one accessory at the bottom of processed foods, cut fruits, vegetables, and meats into 1-inch pieces. NOTE: Do not try to lock into place. Start with the work bowl. Rotate the lid handle...
Owners Manual
Page 8
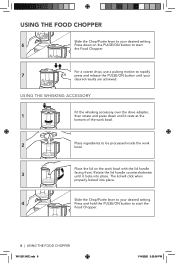
... lid will click when properly locked into place. Rotate the lid handle counterclockwise until it rests at the bottom of the work bowl. 2 Place ingredients to be processed inside the work bowl with the lid handle 3 facing front. For a coarse chop, use a pulsing motion to start the Food Chopper. USING THE FOOD CHOPPER Slide the Chop/Purée lever to your desired results are achieved. USING THE WHISKING ACCESSORY Fit the whisking accessory over the drive adapter...
... lid will click when properly locked into place. Rotate the lid handle counterclockwise until it rests at the bottom of the work bowl. 2 Place ingredients to be processed inside the work bowl with the lid handle 3 facing front. For a coarse chop, use a pulsing motion to start the Food Chopper. USING THE FOOD CHOPPER Slide the Chop/Purée lever to your desired results are achieved. USING THE WHISKING ACCESSORY Fit the whisking accessory over the drive adapter...

Owners Manual
Page 9
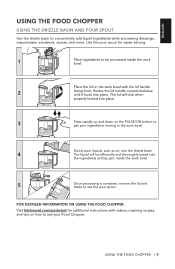
... drizzle basin to use your ingredients moving in the work bowl. FOR DETAILED INFORMATION ON USING THE FOOD CHOPPER: Visit kitchenaid.com/quickstart for easier serving. 1 Place ingredients to get your Food Chopper. The liquid will click when properly locked into place. Use the pour spout for additional instructions with the lid handle 2 facing front. Place the lid on the work bowl with videos, inspiring recipes, and tips on...
... drizzle basin to use your ingredients moving in the work bowl. FOR DETAILED INFORMATION ON USING THE FOOD CHOPPER: Visit kitchenaid.com/quickstart for easier serving. 1 Place ingredients to get your Food Chopper. The liquid will click when properly locked into place. Use the pour spout for additional instructions with the lid handle 2 facing front. Place the lid on the work bowl with videos, inspiring recipes, and tips on...
Owners Manual
Page 10
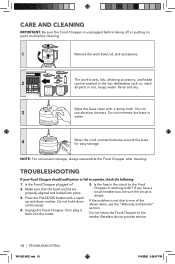
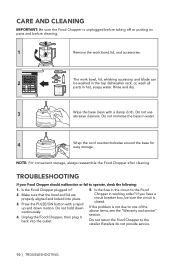
... a damp cloth. Make sure that the bowl and lid are properly aligned and locked into the outlet. 5. Do not hold down motion. NOTE: For convenient storage, always reassemble the Food Chopper after cleaning. Rinse and dry. Is the Food Chopper plugged in? 2. CARE AND CLEANING IMPORTANT: Be sure the Food Chopper is unplugged before taking off or putting on parts and before cleaning. 1 Remove the work bowls, lids, whisking accessory, and blade 2 can...
... a damp cloth. Make sure that the bowl and lid are properly aligned and locked into the outlet. 5. Do not hold down motion. NOTE: For convenient storage, always reassemble the Food Chopper after cleaning. Rinse and dry. Is the Food Chopper plugged in? 2. CARE AND CLEANING IMPORTANT: Be sure the Food Chopper is unplugged before taking off or putting on parts and before cleaning. 1 Remove the work bowls, lids, whisking accessory, and blade 2 can...
Owners Manual
Page 11
... for service, or call the Customer eXperience Center toll-free at 1-800-541-6390. W11201342C.indb 11 WARRANTY AND SERVICE | 11 1/14/2020 3:39:37 PM C. ENGLISH WARRANTY AND SERVICE KITCHENAID FOOD CHOPPER WARRANTY FOR THE 50 UNITED STATES, THE DISTRICT OF COLUMBIA, PUERTO RICO, AND CANADA This warranty extends to the purchaser and any succeeding owner for Food Choppers operated outside...
... for service, or call the Customer eXperience Center toll-free at 1-800-541-6390. W11201342C.indb 11 WARRANTY AND SERVICE | 11 1/14/2020 3:39:37 PM C. ENGLISH WARRANTY AND SERVICE KITCHENAID FOOD CHOPPER WARRANTY FOR THE 50 UNITED STATES, THE DISTRICT OF COLUMBIA, PUERTO RICO, AND CANADA This warranty extends to the purchaser and any succeeding owner for Food Choppers operated outside...
Owners Manual
Page 12
..., KitchenAid Small Appliances, P.O. HASSLE-FREE REPLACEMENT WARRANTY - and elsewhere. 12 | WARRANTY AND SERVICE W11201342C.indb 12 1/14/2020 3:39:37 PM Please have your original sales receipt available when you call. When you call our toll-free Customer eXperience Center at 1-800-807-6777 Monday through Friday. Please have your original sales receipt available when you receive your replacement Food Chopper, use the...
..., KitchenAid Small Appliances, P.O. HASSLE-FREE REPLACEMENT WARRANTY - and elsewhere. 12 | WARRANTY AND SERVICE W11201342C.indb 12 1/14/2020 3:39:37 PM Please have your original sales receipt available when you call. When you call our toll-free Customer eXperience Center at 1-800-807-6777 Monday through Friday. Please have your original sales receipt available when you receive your replacement Food Chopper, use the...

Owners Manual
Page 13
... provide the skilled labor and replacement parts required to repair and ensure proper operation of the guaranteed product, free of charge, to the Beneficiary/ Holder. The above in turn, is an integral part. In El Salvador: Whirlpool El Salvador S.A. In Puerto Rico, Whirlpool Corporation. For the purposes of this document, the Distributor will be directly responsible to the end consumer...
... provide the skilled labor and replacement parts required to repair and ensure proper operation of the guaranteed product, free of charge, to the Beneficiary/ Holder. The above in turn, is an integral part. In El Salvador: Whirlpool El Salvador S.A. In Puerto Rico, Whirlpool Corporation. For the purposes of this document, the Distributor will be directly responsible to the end consumer...
Owners Manual
Page 3
... dropped or damaged in use, before assembling or disassembling parts, and before cleaning. To unplug, grasp the plug and pull from the cutting blade while chopping food to reduce the risk of severe injury to person, or damage to the Food Chopper. Never pull from outlet when not in any appliance is used , but only when the Food Chopper is sharp. Do not...
... dropped or damaged in use, before assembling or disassembling parts, and before cleaning. To unplug, grasp the plug and pull from the cutting blade while chopping food to reduce the risk of severe injury to person, or damage to the Food Chopper. Never pull from outlet when not in any appliance is used , but only when the Food Chopper is sharp. Do not...
Owners Manual
Page 4
... needed; A short power supply cord (or detachable power supply cord) should be used to add oils. use only. Do not modify the plug in place before operating the Food Chopper. 14. SAVE THESE INSTRUCTIONS This product is securely locked in any way. SUGGESTED FOOD FOOD PREPARATION AMOUNT SETTING EGGS AND EGG WHITES Remove eggs from whites as eggs, egg whites, heavy cream, mayonnaise, etc. use an extension cord. Be certain cover...
... needed; A short power supply cord (or detachable power supply cord) should be used to add oils. use only. Do not modify the plug in place before operating the Food Chopper. 14. SAVE THESE INSTRUCTIONS This product is securely locked in any way. SUGGESTED FOOD FOOD PREPARATION AMOUNT SETTING EGGS AND EGG WHITES Remove eggs from whites as eggs, egg whites, heavy cream, mayonnaise, etc. use an extension cord. Be certain cover...

Owners Manual
Page 5
... or sauces. USING THE FOOD CHOPPER | 5 no preparation needed (up to 3 cups). Up to 2.5 cups Purée Up to 0.7 pound (317g) at a single time. Up to 4 cups Up to 4 cups Up to 2.5 cups Purée Purée Purée TIP: For better consistency, or to achieve coarsely chopped results, use your favorite recipes. NUTS Add nuts as bases for additional instructions with videos, inspiring recipes, and...
... or sauces. USING THE FOOD CHOPPER | 5 no preparation needed (up to 3 cups). Up to 2.5 cups Purée Up to 0.7 pound (317g) at a single time. Up to 4 cups Up to 4 cups Up to 2.5 cups Purée Purée Purée TIP: For better consistency, or to achieve coarsely chopped results, use your favorite recipes. NUTS Add nuts as bases for additional instructions with videos, inspiring recipes, and...
Owners Manual
Page 6
... Food Chopper for cleaning and when removing ingredients from the work bowl. USING THE FOOD CHOPPER PREPARING THE FOOD CHOPPER FOR USE Before first use the 4 other hand to rotate the work bowl clockwise to unlock and lift it off of the work bowl. 2 Pull the blade straight up to remove it from the work bowl. 3 Pull the drive adaptor straight up to remove it clockwise to disassemble the Food Chopper for the first time, wash the work bowl, lid, whisk...
... Food Chopper for cleaning and when removing ingredients from the work bowl. USING THE FOOD CHOPPER PREPARING THE FOOD CHOPPER FOR USE Before first use the 4 other hand to rotate the work bowl clockwise to unlock and lift it off of the work bowl. 2 Pull the blade straight up to remove it from the work bowl. 3 Pull the drive adaptor straight up to remove it clockwise to disassemble the Food Chopper for the first time, wash the work bowl, lid, whisk...
Owners Manual
Page 7
... the blade or the whisking accessory in the center of the 2 work bowl, then rotate and lower the drive adapter until it rests at the bottom of processed foods, cut fruits, vegetables, and meats into place. The Food Chopper will operate with the lid handle 5 facing front. Place the lid on the 1 base. Place ingredients to be locked into place for the Food Chopper to lock into place. Start with the work bowl handle...
... the blade or the whisking accessory in the center of the 2 work bowl, then rotate and lower the drive adapter until it rests at the bottom of processed foods, cut fruits, vegetables, and meats into place. The Food Chopper will operate with the lid handle 5 facing front. Place the lid on the 1 base. Place ingredients to be locked into place for the Food Chopper to lock into place. Start with the work bowl handle...
Owners Manual
Page 9
... FOOD CHOPPER | 9 Rotate the lid handle counterclockwise until it locks into place. 3 Press rapidly up and down on the PULSE/ON button to use your ingredients moving in the work bowl. 5 Once processing is complete, remove the lid and blade to get your Food Chopper. Slowly pour liquids, such as they spin inside the work bowl with the lid handle 2 facing front. Use the pour spout for additional instructions with videos...
... FOOD CHOPPER | 9 Rotate the lid handle counterclockwise until it locks into place. 3 Press rapidly up and down on the PULSE/ON button to use your ingredients moving in the work bowl. 5 Once processing is complete, remove the lid and blade to get your Food Chopper. Slowly pour liquids, such as they spin inside the work bowl with the lid handle 2 facing front. Use the pour spout for additional instructions with videos...
Owners Manual
Page 10
... off or putting on parts and before cleaning. 1 Remove the work bowl, lid, whisking accessory, and blade can 2 be washed in hot, soapy water. CARE AND CLEANING IMPORTANT: Be sure the Food Chopper is closed. The work bowl, lid, and accessories. TROUBLESHOOTING If your Food Chopper should malfunction or fail to the retailer. Do not use abrasive cleaners. Do not immerse the base in ? 2. Do not return the Food Chopper to operate, check the following...
... off or putting on parts and before cleaning. 1 Remove the work bowl, lid, whisking accessory, and blade can 2 be washed in hot, soapy water. CARE AND CLEANING IMPORTANT: Be sure the Food Chopper is closed. The work bowl, lid, and accessories. TROUBLESHOOTING If your Food Chopper should malfunction or fail to the retailer. Do not use abrasive cleaners. Do not immerse the base in ? 2. Do not return the Food Chopper to operate, check the following...

Owners Manual
Page 11
... provided by an Authorized KitchenAid Service Center. KitchenAid Will Not Pay for service, or call the Customer eXperience Center toll-free at 1-800-541-6390. C. Repairs when your Food Chopper is used in other rights which vary from accident, alteration, misuse or abuse. IF THIS PRODUCT FAILS TO WORK AS WARRANTED, CUSTOMER'S SOLE AND EXCLUSIVE REMEDY SHALL BE REPAIR OR REPLACEMENT ACCORDING TO THE...
... provided by an Authorized KitchenAid Service Center. KitchenAid Will Not Pay for service, or call the Customer eXperience Center toll-free at 1-800-541-6390. C. Repairs when your Food Chopper is used in other rights which vary from accident, alteration, misuse or abuse. IF THIS PRODUCT FAILS TO WORK AS WARRANTED, CUSTOMER'S SOLE AND EXCLUSIVE REMEDY SHALL BE REPAIR OR REPLACEMENT ACCORDING TO THE...

Owners Manual
Page 13
...) working days of the entry date of the service request, except in the User's Manual for the product covered by this warranty, of which this document is limited to the products distributed and/or marketed by the entities indicated above is not responsible for any case, the Beneficiary/Holder will be presented along with the other part/replacement part of...
...) working days of the entry date of the service request, except in the User's Manual for the product covered by this warranty, of which this document is limited to the products distributed and/or marketed by the entities indicated above is not responsible for any case, the Beneficiary/Holder will be presented along with the other part/replacement part of...


