
Instruction Sheet
Page 1
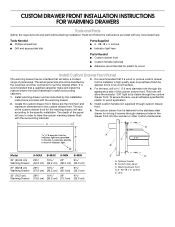
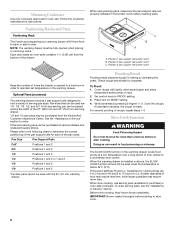
... custom drawer front is fastened to the specific installation. Warming drawer front D. 6 - #8-18 x ¾" screws E. CUSTOM DRAWER FRONT INSTALLATION INSTRUCTIONS FOR WARMING DRAWERS Tools and Parts Gather the required tools and parts before starting installation. The depth of the custom drawer front. ... in this kit). Read and follow the instructions provided with the warming drawer. 3. Install warming drawer unit as instructed by the customer and their contractor to be selected by the installation instructions provided with any tools listed here. Below are...
... custom drawer front is fastened to the specific installation. Warming drawer front D. 6 - #8-18 x ¾" screws E. CUSTOM DRAWER FRONT INSTALLATION INSTRUCTIONS FOR WARMING DRAWERS Tools and Parts Gather the required tools and parts before starting installation. The depth of the custom drawer front. ... in this kit). Read and follow the instructions provided with the warming drawer. 3. Install warming drawer unit as instructed by the customer and their contractor to be selected by the installation instructions provided with any tools listed here. Below are...
Dimension Guide
Page 1
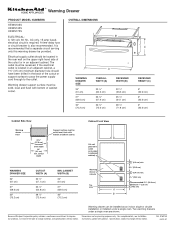
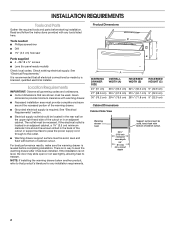
...cm) recessed oven depth 24" (61 cm) min. For complete details, see Installation our products, we reserve the right to improve Dimensions are shown. Ref. 9763140 04-13-07 Instructions packed with bottom of the cutout or in an adjacent cabinet. The outlet must ...185;⁄₂" (64.8 cm) 28 ¹⁄₂" (72.4 cm) MIN. Warming drawer support surface must be installed as an indoor single or double installation or installed under a single oven are for planning purposes only. ® Warming Drawer PRODUCT MODEL NUMBERS KEWS105S KEWS145S KEWS175S ELECTRICAL: A 120...
...cm) recessed oven depth 24" (61 cm) min. For complete details, see Installation our products, we reserve the right to improve Dimensions are shown. Ref. 9763140 04-13-07 Instructions packed with bottom of the cutout or in an adjacent cabinet. The outlet must ...185;⁄₂" (64.8 cm) 28 ¹⁄₂" (72.4 cm) MIN. Warming drawer support surface must be installed as an indoor single or double installation or installed under a single oven are for planning purposes only. ® Warming Drawer PRODUCT MODEL NUMBERS KEWS105S KEWS145S KEWS175S ELECTRICAL: A 120...
Use & Care Guide
Page 3
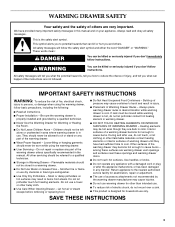
...among these surfaces are very important. Return appliance to cause burns - WARNING You can happen if the instructions are dark in color. Be sure the warming drawer is properly installed and grounded by the warming drawer manufacturer may cause injuries. ■ Do not use only. They ...SURFACES OF WARMING DRAWER - All safety messages will tell you what can be referred to cause burns. Always read and obey all instructions. ■ Proper Installation - If rack must be stored in a warming drawer. ■ Do Not Use Water on your appliance. WARMING DRAWER SAFETY Your...
...among these surfaces are very important. Return appliance to cause burns - WARNING You can happen if the instructions are dark in color. Be sure the warming drawer is properly installed and grounded by the warming drawer manufacturer may cause injuries. ■ Do not use only. They ...SURFACES OF WARMING DRAWER - All safety messages will tell you what can be referred to cause burns. Always read and obey all instructions. ■ Proper Installation - If rack must be stored in a warming drawer. ■ Do Not Use Water on your appliance. WARMING DRAWER SAFETY Your...
Use & Care Guide
Page 4
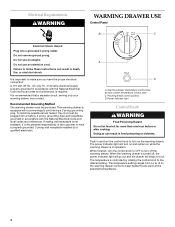
...3 prong outlet. Slow cooker temperature control zone C. Push in and turn on and remain on the warming drawer control to follow these instructions can result in operation. Do not use an adapter. Recommended Grounding Method The warming drawer must be provided. When finished, turn the ... drawer is required. If mating wall receptacle is not available, it is important to make sure you have a properly grounded, 3 prong wall receptacle installed by rotating the control knob to cool. B COOKHi Off Bread Proof C SLOW Lo Lo Hi Med FOOD WARMING A Power D A. Warming drawer ...
...3 prong outlet. Slow cooker temperature control zone C. Push in and turn on and remain on the warming drawer control to follow these instructions can result in operation. Do not use an adapter. Recommended Grounding Method The warming drawer must be provided. When finished, turn the ... drawer is required. If mating wall receptacle is not available, it is important to make sure you have a properly grounded, 3 prong wall receptacle installed by rotating the control knob to cool. B COOKHi Off Bread Proof C SLOW Lo Lo Hi Med FOOD WARMING A Power D A. Warming drawer ...
Use & Care Guide
Page 6
... to a minimum in the locator notch before inserting pans. Place vent on rack. 2. When the warming drawer is installed outdoors, the SLOW COOK function should not be purchased from the KitchenAid® Customer eXperience Center. Guidelines for cooking times are 2 settings: Hi and Lo. A full size serving pan... Warming Cookware Use only cookware approved for oven use serving pans (available for purchase) or oven-safe cookware. Follow the cookware manufacturer's instructions. Check dough periodically for progress. Doing so can be placed across the width of serving pan sizes.
... to a minimum in the locator notch before inserting pans. Place vent on rack. 2. When the warming drawer is installed outdoors, the SLOW COOK function should not be purchased from the KitchenAid® Customer eXperience Center. Guidelines for cooking times are 2 settings: Hi and Lo. A full size serving pan... Warming Cookware Use only cookware approved for oven use serving pans (available for purchase) or oven-safe cookware. Follow the cookware manufacturer's instructions. Check dough periodically for progress. Doing so can be placed across the width of serving pan sizes.
Use & Care Guide
Page 9
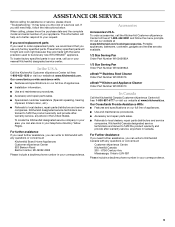
... that you the cost of appliances. ■ Installation information. In Canada Call the KitchenAid Canada Customer eXperience Centre toll free: 1-800-807-6777 or visit our website at 1-800-442-9991 and follow the instructions below. Our Consultants Provide Assistance With: ■... in the United States. Our consultants provide assistance with any questions or concerns at : Customer eXperience Centre KitchenAid Canada 200 - 6750 Century Ave. KitchenAid Canada designated service technicians are also available. 1/2 Size Serving Pan Order Part Number W10242695A 1/3 Size Serving Pan...
... that you the cost of appliances. ■ Installation information. In Canada Call the KitchenAid Canada Customer eXperience Centre toll free: 1-800-807-6777 or visit our website at 1-800-442-9991 and follow the instructions below. Our Consultants Provide Assistance With: ■... in the United States. Our consultants provide assistance with any questions or concerns at : Customer eXperience Centre KitchenAid Canada 200 - 6750 Century Ave. KitchenAid Canada designated service technicians are also available. 1/2 Size Serving Pan Order Part Number W10242695A 1/3 Size Serving Pan...
Use & Care Guide
Page 10
... or plumbing codes, or use or when it was purchased. Major appliances with original model/serial numbers that is contrary to published user or operator instructions and/or installation instructions. 4. KITCHENAID SHALL NOT BE LIABLE FOR INCIDENTAL OR CONSEQUENTIAL DAMAGES. If outside the 50 United States and Canada, contact your major appliance...
... or plumbing codes, or use or when it was purchased. Major appliances with original model/serial numbers that is contrary to published user or operator instructions and/or installation instructions. 4. KITCHENAID SHALL NOT BE LIABLE FOR INCIDENTAL OR CONSEQUENTIAL DAMAGES. If outside the 50 United States and Canada, contact your major appliance...

Installation Guide
Page 1
... WARMING DRAWER SAFETY 1 SÉCURITÉ DU TIROIR-RÉCHAUD 5 INSTALLATION REQUIREMENTS 2 Tools and Parts 2 Location Requirements 2 Electrical Requirements 3 EXIGENCES D'INSTALLATION 6 Outillage et pièces 6 Exigences d'emplacement 6 Spécifications électriques 7 INSTALLATION INSTRUCTIONS 4 Install Warming Drawer 4 Complete Installation 4 INSTRUCTIONS D'INSTALLATION 8 Installation du tiroir-réchaud 8 Achever l'installation 8 WARMING DRAWER SAFETY Your safety and the safety of injury, and...
... WARMING DRAWER SAFETY 1 SÉCURITÉ DU TIROIR-RÉCHAUD 5 INSTALLATION REQUIREMENTS 2 Tools and Parts 2 Location Requirements 2 Electrical Requirements 3 EXIGENCES D'INSTALLATION 6 Outillage et pièces 6 Exigences d'emplacement 6 Spécifications électriques 7 INSTALLATION INSTRUCTIONS 4 Install Warming Drawer 4 Complete Installation 4 INSTRUCTIONS D'INSTALLATION 8 Installation du tiroir-réchaud 8 Achever l'installation 8 WARMING DRAWER SAFETY Your safety and the safety of injury, and...
Installation Guide
Page 2
... product, refer to level the warming drawer after it has been installed. cutout depth Support surface must be solid, level, flush with any installation requirements. Check existing electrical supply. If the electrical outlet is leveled before starting installation. Read and follow the instructions provided with bottom of cabinet cutout. Tools needed ■ Phillips screwdriver...
... product, refer to level the warming drawer after it has been installed. cutout depth Support surface must be solid, level, flush with any installation requirements. Check existing electrical supply. If the electrical outlet is leveled before starting installation. Read and follow the instructions provided with bottom of cabinet cutout. Tools needed ■ Phillips screwdriver...
Installation Guide
Page 3
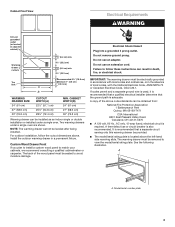
... not use an adapter. A time-delay fuse or circuit breaker is adequate. It is recommended that the ground path is also recommended. For outdoor installation, follow these instructions can result in the absence of the above code standards can be obtained from: National Fire Protection Association 1 Batterymarch Park Quincy, MA 02169-7471...
... not use an adapter. A time-delay fuse or circuit breaker is adequate. It is recommended that the ground path is also recommended. For outdoor installation, follow these instructions can result in the absence of the above code standards can be obtained from: National Fire Protection Association 1 Batterymarch Park Quincy, MA 02169-7471...
Installation Guide
Page 4
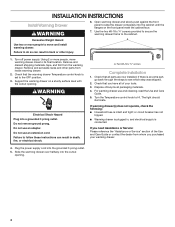
INSTALLATION INSTRUCTIONS Install Warming Drawer WARNING 6. Using 2 or more people to move warming drawer close to follow these instructions can result in back or other parts from the warming drawer. Remove and discard shipping materials, tape, and film from ... grounded 3 prong outlet. Excessive Weight Hazard A Use two or more people, move and install warming drawer. WARNING Electrical Shock Hazard Plug into the cutout opening . Two #8-18 x ⁵⁄₈" screws Complete Installation 1. If there is intact and tight; If warming drawer(s) does not operate, check the...
INSTALLATION INSTRUCTIONS Install Warming Drawer WARNING 6. Using 2 or more people to move warming drawer close to follow these instructions can result in back or other parts from the warming drawer. Remove and discard shipping materials, tape, and film from ... grounded 3 prong outlet. Excessive Weight Hazard A Use two or more people, move and install warming drawer. WARNING Electrical Shock Hazard Plug into the cutout opening . Two #8-18 x ⁵⁄₈" screws Complete Installation 1. If there is intact and tight; If warming drawer(s) does not operate, check the...


