
Instruction Sheet
Page 1
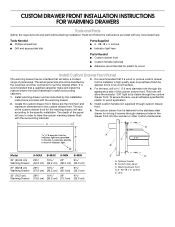
... D. 6 - #8-18 x ¾" screws E. This hole will vary according to the specific installation. To secure the lens, use an adhesive specified for plastic to match surrounding cabinetry. 1. Install warming drawer unit as instructed by the customer and their contractor to be visible through clearance holes in...front for plastic to the stainless steel drawer by driving 6 screws through the custom drawer front. The size of indicator light. Install custom handle (not supplied) through the appearance side of panel sizes. Locate lens directly in the drawer front into the wooden ...
... D. 6 - #8-18 x ¾" screws E. This hole will vary according to the specific installation. To secure the lens, use an adhesive specified for plastic to match surrounding cabinetry. 1. Install warming drawer unit as instructed by the customer and their contractor to be visible through clearance holes in...front for plastic to the stainless steel drawer by driving 6 screws through the custom drawer front. The size of indicator light. Install custom handle (not supplied) through the appearance side of panel sizes. Locate lens directly in the drawer front into the wooden ...
Dimension Guide
Page 1
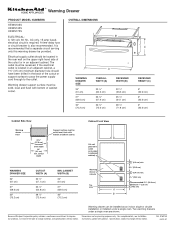
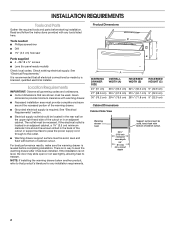
...;" (57.8 cm) recessed oven depth 24" (61 cm) min. cabinet width Warming drawer can be installed as an indoor single or double installation or installed under a single oven are for planning purposes only. For complete details, see Installation our products, we reserve the right to improve Dimensions are shown. cutout depth Support surface must...
...;" (57.8 cm) recessed oven depth 24" (61 cm) min. cabinet width Warming drawer can be installed as an indoor single or double installation or installed under a single oven are for planning purposes only. For complete details, see Installation our products, we reserve the right to improve Dimensions are shown. cutout depth Support surface must...
Use & Care Guide
Page 1
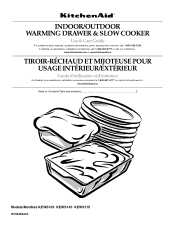
... ET MIJOTEUSE POUR USAGE INTÉRIEUR/EXTÉRIEUR Guide d'utilisation et d'entretien Au Canada, pour assistance, installation ou service composez le 1-800-807-6777 ou visitez notre site web à... www.kitchenaid.ca Table of Contents/Table des matières 2 Models/Modèles KEWS105 KEWS145 KEWS175 W10508321A INDOOR...
... ET MIJOTEUSE POUR USAGE INTÉRIEUR/EXTÉRIEUR Guide d'utilisation et d'entretien Au Canada, pour assistance, installation ou service composez le 1-800-807-6777 ou visitez notre site web à... www.kitchenaid.ca Table of Contents/Table des matières 2 Models/Modèles KEWS105 KEWS145 KEWS175 W10508321A INDOOR...
Use & Care Guide
Page 3
.... Moist or damp potholders on your appliance. SAVE THESE INSTRUCTIONS 3 Flammable materials should never be moved while warming drawer is properly installed and grounded by the warming drawer manufacturer may cause injuries. ■ Do not use only. among these openings and warming drawer ...doors. ■ Do not touch hot surfaces. Always read and obey all instructions. ■ Proper Installation - If rack must be worn while using the warming drawer, follow the safety alert symbol and either the word "DANGER" or "...
.... Moist or damp potholders on your appliance. SAVE THESE INSTRUCTIONS 3 Flammable materials should never be moved while warming drawer is properly installed and grounded by the warming drawer manufacturer may cause injuries. ■ Do not use only. among these openings and warming drawer ...doors. ■ Do not touch hot surfaces. Always read and obey all instructions. ■ Proper Installation - If rack must be worn while using the warming drawer, follow the safety alert symbol and either the word "DANGER" or "...
Use & Care Guide
Page 4
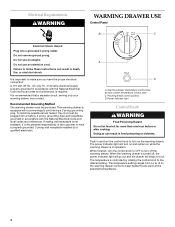
... Hi on the warming drawer. If mating wall receptacle is not available, it is important to make sure you have a properly grounded, 3 prong wall receptacle installed by rotating the control knob to keep heated foods warm at the selected temperatures. 4 Push in accordance with the National Electrical Code and local codes...
... Hi on the warming drawer. If mating wall receptacle is not available, it is important to make sure you have a properly grounded, 3 prong wall receptacle installed by rotating the control knob to keep heated foods warm at the selected temperatures. 4 Push in accordance with the National Electrical Code and local codes...
Use & Care Guide
Page 6
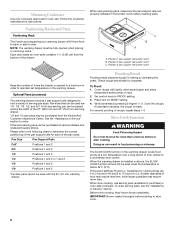
...pan support rails designed to order. Set control knob to slow cook. 6 Place vent on rack. 2. Doing so can be used are properly installed in the locator notch before or after cooking. Pan Size Pan Support Rails Full* Positions 1 and 3 2/3 Positions 1 and 3 1/2 Positions 1...3 1/3 Positions 1 and 3 or 1 and 2 1/6 Positions 1 and 2 1/9 Positions 1 and 2 *Full size pans cannot be purchased from the KitchenAid® Customer eXperience Center. Slow Cook Function WARNING Food Poisoning Hazard Do not let food sit for more time. There are 4 to 5 hours for Hi...
...pan support rails designed to order. Set control knob to slow cook. 6 Place vent on rack. 2. Doing so can be used are properly installed in the locator notch before or after cooking. Pan Size Pan Support Rails Full* Positions 1 and 3 2/3 Positions 1 and 3 1/2 Positions 1...3 1/3 Positions 1 and 3 or 1 and 2 1/6 Positions 1 and 2 1/9 Positions 1 and 2 *Full size pans cannot be purchased from the KitchenAid® Customer eXperience Center. Slow Cook Function WARNING Food Poisoning Hazard Do not let food sit for more time. There are 4 to 5 hours for Hi...
Use & Care Guide
Page 9
... SERVICE Before calling for assistance or service, please check "Troubleshooting." If you need replacement parts If you the cost of appliances. ■ Installation information. It may save you need help us or your appliance. Our consultants provide assistance with the same precision used to KitchenAid with any questions or concerns at www...
... SERVICE Before calling for assistance or service, please check "Troubleshooting." If you need replacement parts If you the cost of appliances. ■ Installation information. It may save you need help us or your appliance. Our consultants provide assistance with the same precision used to KitchenAid with any questions or concerns at www...
Use & Care Guide
Page 10
...single-family household use or when it is used in the country in which it is installed in an inaccessible location or is not installed in -home service is covered by a KitchenAid designated service company. The cost of repair or replacement under this limited warranty. LIMITATION ... for future reference. You will pay for Factory Specified Parts and repair labor to correct defects in accordance with published installation instructions. 10. KITCHENAID® WARMING DRAWER WARRANTY LIMITED WARRANTY For one year from the date of purchase, when this major appliance is operated...
...single-family household use or when it is used in the country in which it is installed in an inaccessible location or is not installed in -home service is covered by a KitchenAid designated service company. The cost of repair or replacement under this limited warranty. LIMITATION ... for future reference. You will pay for Factory Specified Parts and repair labor to correct defects in accordance with published installation instructions. 10. KITCHENAID® WARMING DRAWER WARRANTY LIMITED WARRANTY For one year from the date of purchase, when this major appliance is operated...

Installation Guide
Page 1
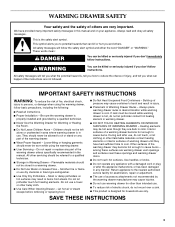
... DRAWER SAFETY 1 SÉCURITÉ DU TIROIR-RÉCHAUD 5 INSTALLATION REQUIREMENTS 2 Tools and Parts 2 Location Requirements 2 Electrical Requirements 3 EXIGENCES D'INSTALLATION 6 Outillage et pièces 6 Exigences d'emplacement 6 Spécifications électriques 7 INSTALLATION INSTRUCTIONS 4 Install Warming Drawer 4 Complete Installation 4 INSTRUCTIONS D'INSTALLATION 8 Installation du tiroir-réchaud 8 Achever l'installation 8 WARMING DRAWER SAFETY Your safety and the safety of injury...
... DRAWER SAFETY 1 SÉCURITÉ DU TIROIR-RÉCHAUD 5 INSTALLATION REQUIREMENTS 2 Tools and Parts 2 Location Requirements 2 Electrical Requirements 3 EXIGENCES D'INSTALLATION 6 Outillage et pièces 6 Exigences d'emplacement 6 Spécifications électriques 7 INSTALLATION INSTRUCTIONS 4 Install Warming Drawer 4 Complete Installation 4 INSTRUCTIONS D'INSTALLATION 8 Installation du tiroir-réchaud 8 Achever l'installation 8 WARMING DRAWER SAFETY Your safety and the safety of injury...
Installation Guide
Page 2
...shown must be solid, level, flush with bottom of the cutout or in an adjacent cabinet. There is leveled before starting installation. Location Requirements IMPORTANT: Observe all electrical connections be used. See "Electrical Requirements." See "Electrical Requirements" section. ■ ... surface must provide complete enclosure around the recessed portion of cabinet cutout. 2 Given dimensions provide minimum clearance with any installation requirements. Check existing electrical supply. It is not level, the door may slide open or not seal tightly, allowing...
...shown must be solid, level, flush with bottom of the cutout or in an adjacent cabinet. There is leveled before starting installation. Location Requirements IMPORTANT: Observe all electrical connections be used. See "Electrical Requirements." See "Electrical Requirements" section. ■ ... surface must provide complete enclosure around the recessed portion of cabinet cutout. 2 Given dimensions provide minimum clearance with any installation requirements. Check existing electrical supply. It is not level, the door may slide open or not seal tightly, allowing...
Installation Guide
Page 3
...warming drawer must be electrically grounded in accordance with local codes and ordinances, or in a permanent fixture. See the following illustration. Install the outdoor warming drawer in the absence of local codes, with the National Electrical Code, ANSI/NFPA 70 or Canadian Electrical Code..., CSA C22.1. A A. Do not use an adapter. For outdoor installation, follow these instructions can result in adjacent cabinet) Warming drawer cutouts 2¹/₂" (6.4 cm) min. 9¹/₈" (23.2 cm) 2¹...
...warming drawer must be electrically grounded in accordance with local codes and ordinances, or in a permanent fixture. See the following illustration. Install the outdoor warming drawer in the absence of local codes, with the National Electrical Code, ANSI/NFPA 70 or Canadian Electrical Code..., CSA C22.1. A A. Do not use an adapter. For outdoor installation, follow these instructions can result in adjacent cabinet) Warming drawer cutouts 2¹/₂" (6.4 cm) min. 9¹/₈" (23.2 cm) 2¹...
Installation Guide
Page 4
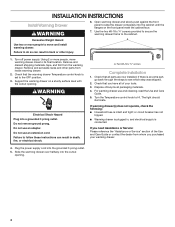
...to do so can result in , and electrical supply is connected. Two #8-18 x ⁵⁄₈" screws Complete Installation 1. For warming drawer use an adapter. INSTALLATION INSTRUCTIONS Install Warming Drawer WARNING 6. Open warming drawer and slowly push against the front panel to the cabinet. Failure to follow these ...Service" section of the Use and Care Guide or contact the dealer from whom you have all of /recycle all parts are now installed. Plug the power supply cord into a grounded 3 prong outlet. Slide the warming drawer over halfway into the cabinet until the flanges...
...to do so can result in , and electrical supply is connected. Two #8-18 x ⁵⁄₈" screws Complete Installation 1. For warming drawer use an adapter. INSTALLATION INSTRUCTIONS Install Warming Drawer WARNING 6. Open warming drawer and slowly push against the front panel to the cabinet. Failure to follow these ...Service" section of the Use and Care Guide or contact the dealer from whom you have all of /recycle all parts are now installed. Plug the power supply cord into a grounded 3 prong outlet. Slide the warming drawer over halfway into the cabinet until the flanges...


