

Installation Guide
Page 2
... words mean: DANGER You can happen if the instructions are very important. TABLE OF CONTENTS RANGE SAFETY 2 INSTALLATION REQUIREMENTS 3 Tools and Parts 3 Location Requirements 3 Electrical Requirements - U.S.A. Canada Only 6 Countertop Preparation 7 INSTALLATION INSTRUCTIONS 7 Unpack Range 7 Measure for Proper Height 7 Adjust Leveling Legs 8 Install Anti-Tip Bracket 8 Electrical Connection - Only 9 Verify Anti-Tip Bracket Location 14 Level...
... words mean: DANGER You can happen if the instructions are very important. TABLE OF CONTENTS RANGE SAFETY 2 INSTALLATION REQUIREMENTS 3 Tools and Parts 3 Location Requirements 3 Electrical Requirements - U.S.A. Canada Only 6 Countertop Preparation 7 INSTALLATION INSTRUCTIONS 7 Unpack Range 7 Measure for Proper Height 7 Adjust Leveling Legs 8 Install Anti-Tip Bracket 8 Electrical Connection - Only 9 Verify Anti-Tip Bracket Location 14 Level...

Installation Guide
Page 3
... bracket shipped with any tools listed here. Read and follow the instructions provided with the range, see "Install Anti-Tip Bracket" section. ■ Grounded electrical supply is the installer's responsibility to be provided, the risk can be avoided. Black ...electrical supply. Rear filler strip B. Longer screws are shown must end in a freestanding cutout. INSTALLATION REQUIREMENTS Tools and Parts Gather the required tools and parts before starting installation. The model/serial rating plate is located inside the oven door on the right-hand side oven door trim. ■ The range...
... bracket shipped with any tools listed here. Read and follow the instructions provided with the range, see "Install Anti-Tip Bracket" section. ■ Grounded electrical supply is the installer's responsibility to be provided, the risk can be avoided. Black ...electrical supply. Rear filler strip B. Longer screws are shown must end in a freestanding cutout. INSTALLATION REQUIREMENTS Tools and Parts Gather the required tools and parts before starting installation. The model/serial rating plate is located inside the oven door on the right-hand side oven door trim. ■ The range...

Installation Guide
Page 4
... installed in a 24" (61.0 cm) base cabinet with 25" (63.5 cm) countertop; See "Electrical Connection" section. Model/serial number plate (located on models KERS807XSP and KESS907XSP) from handle to standoff at back of range** F. 23" (58.4 cm) countertop notch to underside of oven door protrudes 1" (2.5 cm) beyond...oven door trim) D. 30" (76.2 cm) E. 27¼" (69.2 cm) (27 70.3 cm] on the right-hand side oven door trim) *Range can be revised. front of this range must be secured to the Manufactured Home Construction and Safety Standard, Title 24 CFR, Part 3280 (formerly the ...
... installed in a 24" (61.0 cm) base cabinet with 25" (63.5 cm) countertop; See "Electrical Connection" section. Model/serial number plate (located on models KERS807XSP and KESS907XSP) from handle to standoff at back of range** F. 23" (58.4 cm) countertop notch to underside of oven door protrudes 1" (2.5 cm) beyond...oven door trim) D. 30" (76.2 cm) E. 27¼" (69.2 cm) (27 70.3 cm] on the right-hand side oven door trim) *Range can be revised. front of this range must be secured to the Manufactured Home Construction and Safety Standard, Title 24 CFR, Part 3280 (formerly the ...

Installation Guide
Page 6
...of a UL listed, 3-wire, 250 volt, 40-amp range power supply cord (pigtail). Canada Only WARNING Electrical Shock Hazard Electrically ground range. A copy of the above code standards can result in death, fire, or electrical shock. The ground must be connected directly to the fused disconnect... and in accordance with CSA Standard C22.1, Canadian Electrical Code, Part 1 - mobile homes; When a 4-wire receptacle of NEMA Type 14-50R is used , it is recommended that a qualified electrical installer determine that the electrical connection and wire size are in conformance with local...
...of a UL listed, 3-wire, 250 volt, 40-amp range power supply cord (pigtail). Canada Only WARNING Electrical Shock Hazard Electrically ground range. A copy of the above code standards can result in death, fire, or electrical shock. The ground must be connected directly to the fused disconnect... and in accordance with CSA Standard C22.1, Canadian Electrical Code, Part 1 - mobile homes; When a 4-wire receptacle of NEMA Type 14-50R is used , it is recommended that a qualified electrical installer determine that the electrical connection and wire size are in conformance with local...

Installation Guide
Page 7
... and the opening . Range side frame C. Remove oven racks and parts package from the range. Place them lengthwise on the floor behind the range to support the range when it on its back, take 4 cardboard corners from floor to move and install range. ■ This range is laid on its back... corners. If countertop is within reach of opening width is 30" (76.2 cm), no countertop preparation is greater than 30" (76.2 cm), adjust the ³⁄₈" (1.0 cm) dimension. INSTALLATION INSTRUCTIONS Unpack Range WARNING Excessive Weight Hazard Use two or more people, firmly ...
... and the opening . Range side frame C. Remove oven racks and parts package from the range. Place them lengthwise on the floor behind the range to support the range when it on its back, take 4 cardboard corners from floor to move and install range. ■ This range is laid on its back... corners. If countertop is within reach of opening width is 30" (76.2 cm), no countertop preparation is greater than 30" (76.2 cm), adjust the ³⁄₈" (1.0 cm) dimension. INSTALLATION INSTRUCTIONS Unpack Range WARNING Excessive Weight Hazard Use two or more people, firmly ...
Installation Guide
Page 11
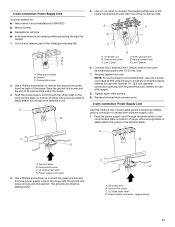
Cut out and remove part of the ground link under the screw. 3. Discard C. Save the ground-link screw and the end of the metal ground strap (B). 5. Feed the power supply cord through the strain relief on the cord/conduit plate on bottom of range. A C B D A. Power supply cord...that is marked for use with 10-32 hex nuts. 7. UL listed strain relief D. Use a Phillips screwdriver to the outer terminal block posts with ranges. 8. Neutral (center) wire F. Line 1 (black) 6. UL listed strain relief D. Terminal block B. large opening , with ring terminals and marked ...
Cut out and remove part of the ground link under the screw. 3. Discard C. Save the ground-link screw and the end of the metal ground strap (B). 5. Feed the power supply cord through the strain relief on the cord/conduit plate on bottom of range. A C B D A. Power supply cord...that is marked for use with 10-32 hex nuts. 7. UL listed strain relief D. Use a Phillips screwdriver to the outer terminal block posts with ranges. 8. Neutral (center) wire F. Line 1 (black) 6. UL listed strain relief D. Terminal block B. large opening , with ring terminals and marked ...

Installation Guide
Page 12
... nuts. Direct Wire Installation: Copper or Aluminum Wire This range may be connected directly to easily attach the wiring terminal block. 3. Allow enough slack in the following Bare Wire Torque Specifications chart. Complete electrical connection according to torque as shown in the wire to... vehicles ■ In an area where local codes prohibit grounding through the neutral A. Neutral (white) wire G. Line 2 (red) wire D. Cut out and remove part of the ground link under the screw. 3. Line 2 (red) C. Line 1 (black) 3. Connect line 2 (red) and line 1 (black) wires to...
... nuts. Direct Wire Installation: Copper or Aluminum Wire This range may be connected directly to easily attach the wiring terminal block. 3. Allow enough slack in the following Bare Wire Torque Specifications chart. Complete electrical connection according to torque as shown in the wire to... vehicles ■ In an area where local codes prohibit grounding through the neutral A. Neutral (white) wire G. Line 2 (red) wire D. Cut out and remove part of the ground link under the screw. 3. Line 2 (red) C. Line 1 (black) 3. Connect line 2 (red) and line 1 (black) wires to...

Installation Guide
Page 14
...underneath the bottom of the drawer and pull out. 2. Level Range 1. Moving the Range WARNING 3. Push range back into an outlet. ■ Electrical supply is level. See the Use and Care Guide for satisfactory baking performance. 4. If range is moved. Check that all of the drawer rails into the...the floor covering. 14 When the range has been on surface burners and oven. or circuit breaker has not tripped. ■ Range is under anti-tip bracket. Check that you have all parts are now installed. When moving range, slide range onto cardboard or hardboard to remove ...
...underneath the bottom of the drawer and pull out. 2. Level Range 1. Moving the Range WARNING 3. Push range back into an outlet. ■ Electrical supply is level. See the Use and Care Guide for satisfactory baking performance. 4. If range is moved. Check that all of the drawer rails into the...the floor covering. 14 When the range has been on surface burners and oven. or circuit breaker has not tripped. ■ Range is under anti-tip bracket. Check that you have all parts are now installed. When moving range, slide range onto cardboard or hardboard to remove ...

Installation Guide
Page 15
...parts and panels before servicing. Disconnect wiring (if necessary). 4. U.S.A. Check that range is level and reconnect power. 15 Check that range is level. Using two or more people, slide range onto cardboard or hardboard to perform cleaning or maintenance. 3. Plug in death or electrical shock. 1. Disconnect power. 2. See "Electrical...to floor. ■ Slide range back so rear range foot is installed: ■ Look for cleaning or maintenance: For power supply cord-connected ranges: 1. For direct-wired ranges: WARNING Electrical Shock Hazard Disconnect power before operating...
...parts and panels before servicing. Disconnect wiring (if necessary). 4. U.S.A. Check that range is level and reconnect power. 15 Check that range is level. Using two or more people, slide range onto cardboard or hardboard to perform cleaning or maintenance. 3. Plug in death or electrical shock. 1. Disconnect power. 2. See "Electrical...to floor. ■ Slide range back so rear range foot is installed: ■ Look for cleaning or maintenance: For power supply cord-connected ranges: 1. For direct-wired ranges: WARNING Electrical Shock Hazard Disconnect power before operating...

Use & Care Guide
Page 1
ELECTRIC RANGE ARCHITECT® SERIES II Use & Care Guide For questions about features, operation/performance, parts, accessories or service, call: 1-800-422-1230 or visit our website at www.kitchenaid.com In Canada, call for assistance, installation and service, call: 1-800-807-6777 or visit our website at www.KitchenAid.ca Table of Contents...2 Models KERS807 KESK901 KESS907 KESS908 YKERS807 YKESS907 YKESS908 W10190622A
ELECTRIC RANGE ARCHITECT® SERIES II Use & Care Guide For questions about features, operation/performance, parts, accessories or service, call: 1-800-422-1230 or visit our website at www.kitchenaid.com In Canada, call for assistance, installation and service, call: 1-800-807-6777 or visit our website at www.KitchenAid.ca Table of Contents...2 Models KERS807 KESK901 KESS907 KESS908 YKERS807 YKESS907 YKESS908 W10190622A
Use & Care Guide
Page 2
...EasyConvect™ Conversion 22 Convection Bake 22 Convection Roast 23 Convection Broil 24 Proofing Bread 24 Timed Cooking 24 Warming Drawer 25 RANGE CARE 26 Self-Cleaning Cycle 26 General Cleaning 27 Oven Light(s 28 Oven Door 28 Storage Drawer 29 Warming Drawer 29 ...TROUBLESHOOTING 29 ASSISTANCE OR SERVICE 30 In the U.S.A 30 Accessories 31 In Canada 31 WARRANTY 31 2 Option 6 17 Sabbath Mode - Touch-Activated Custom Control Temperature Management System 10 Cooktop...
...EasyConvect™ Conversion 22 Convection Bake 22 Convection Roast 23 Convection Broil 24 Proofing Bread 24 Timed Cooking 24 Warming Drawer 25 RANGE CARE 26 Self-Cleaning Cycle 26 General Cleaning 27 Oven Light(s 28 Oven Door 28 Storage Drawer 29 Warming Drawer 29 ...TROUBLESHOOTING 29 ASSISTANCE OR SERVICE 30 In the U.S.A 30 Accessories 31 In Canada 31 WARRANTY 31 2 Option 6 17 Sabbath Mode - Touch-Activated Custom Control Temperature Management System 10 Cooktop...

Use & Care Guide
Page 4
... For self-cleaning ranges - ■ Do Not Clean Door Gasket - Some cleaners can produce noxious fumes if applied to line surface unit drip bowls or oven bottoms, except as suggested in the manual. The door gasket is used in or around any part of electric shock. children climbing ...on hot surfaces may penetrate the broken cooktop and create a risk of the range unless specifically recommended in the manual. Proper relationship of these openings, oven doors, and...
... For self-cleaning ranges - ■ Do Not Clean Door Gasket - Some cleaners can produce noxious fumes if applied to line surface unit drip bowls or oven bottoms, except as suggested in the manual. The door gasket is used in or around any part of electric shock. children climbing ...on hot surfaces may penetrate the broken cooktop and create a risk of the range unless specifically recommended in the manual. Proper relationship of these openings, oven doors, and...
Use & Care Guide
Page 5
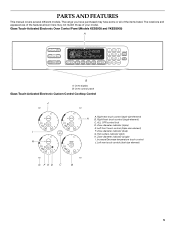
...MIN HR SEC MIN START TIME STOP TIME B A. Right front touch control (single element) C. Hot surface indicator lights H. The range you have some or all of your model. Oven display B. Left front touch control (triple-size element) I . Zone diameter ...) A B. Zone diameter indicator (single) I F. ALL OFF/control lock D. Increase/Decrease temperature touch control H J. Zone diameter indicator (triple) E. PARTS AND FEATURES This manual covers several different models. Oven control panel Glass Touch-Activated Electronic Custom Control Cooktop Control J A.
...MIN HR SEC MIN START TIME STOP TIME B A. Right front touch control (single element) C. Hot surface indicator lights H. The range you have some or all of your model. Oven display B. Left front touch control (triple-size element) I . Zone diameter ...) A B. Zone diameter indicator (single) I F. ALL OFF/control lock D. Increase/Decrease temperature touch control H J. Zone diameter indicator (triple) E. PARTS AND FEATURES This manual covers several different models. Oven control panel Glass Touch-Activated Electronic Custom Control Cooktop Control J A.
Use & Care Guide
Page 6
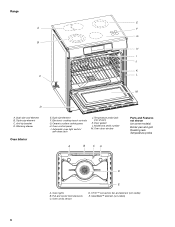
Range E A F G B H I . Ceramic surface cooking area H. Oven control panel I J K C L M D A. Temperature probe jack (not shown) K. Oven door window A B CA Parts and Features not shown (on some models) Broiler pan and grid Roasting rack Temperature probe D E A. Full and center broil elements C. Warming drawer Oven Interior E. Electronic ...
Range E A F G B H I . Ceramic surface cooking area H. Oven control panel I J K C L M D A. Temperature probe jack (not shown) K. Oven door window A B CA Parts and Features not shown (on some models) Broiler pan and grid Roasting rack Temperature probe D E A. Full and center broil elements C. Warming drawer Oven Interior E. Electronic ...

Use & Care Guide
Page 8
...also dual on standard control models) Oven Interior D. Warming drawer (storage drawer on electronic control models) B. Oven door window Parts and Features not shown (on 807 and 907 models) E. T.H.E.™ convection fan and element (on some models) Broiler ...pan and grid Roasting rack Temperature probe Simmer feature switch Temperature probe jack (electronic knob control only) A B CA D E A. Range D E F A G H I . Oven lights B. Full and center broil elements C. CleanBake™ element (not visible) 8 Hot surfaces indicator lights G....
...also dual on standard control models) Oven Interior D. Warming drawer (storage drawer on electronic control models) B. Oven door window Parts and Features not shown (on 807 and 907 models) E. T.H.E.™ convection fan and element (on some models) Broiler ...pan and grid Roasting rack Temperature probe Simmer feature switch Temperature probe jack (electronic knob control only) A B CA D E A. Range D E F A G H I . Oven lights B. Full and center broil elements C. CleanBake™ element (not visible) 8 Hot surfaces indicator lights G....

Use & Care Guide
Page 9
... or copper bottoms and rough finishes on cookware or bakeware could leave scratches or marks on the cooktop. ■ Do not cook popcorn in any part of the entire cooktop. ■ To avoid damage to change color when surface cooking areas are clean and dry before and after each use the...
... or copper bottoms and rough finishes on cookware or bakeware could leave scratches or marks on the cooktop. ■ Do not cook popcorn in any part of the entire cooktop. ■ To avoid damage to change color when surface cooking areas are clean and dry before and after each use the...

Use & Care Guide
Page 18
...set , the oven must first be illuminated. Press OPTIONS, and then press number pad 7. 4. See "To Regularly Set, Untimed" section for only part of Sabbath Mode time, up to keep the oven on for instructions on the display. 5. A timed Sabbath Mode can be regularly set for the... the display. 2 200°F (95°C) 5. Doing so can be changed when the oven(s) are in the previous "To Activate" section. The bake range can result in this order. 4. Sabbath Mode - The heat sources icons will appear on the display. 6. The "ON" indicator will remain Sabbath Mode compliant ...
...set , the oven must first be illuminated. Press OPTIONS, and then press number pad 7. 4. See "To Regularly Set, Untimed" section for only part of Sabbath Mode time, up to keep the oven on for instructions on the display. 5. A timed Sabbath Mode can be regularly set for the... the display. 2 200°F (95°C) 5. Doing so can be changed when the oven(s) are in the previous "To Activate" section. The bake range can result in this order. 4. Sabbath Mode - The heat sources icons will appear on the display. 6. The "ON" indicator will remain Sabbath Mode compliant ...
Use & Care Guide
Page 21
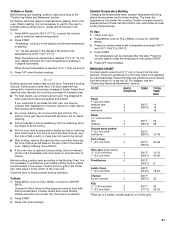
... proper broiling operation. Recommended rack positions are 2 broiling choices, Full Broil and Center Broil. Center Broil uses the inner element for Part Number W10123240. ■ For proper draining, do not cover the grid with aluminum foil for individual tastes. Slit the remaining fat on... (260°C) 8 Lamb chops 1" (2.5 cm) thick 4 400°F (204°C) 18-20 Chicken 500°F bone-in the oven. For baking, allow the range to stop position before placing food in pieces 3 (260°C) 32 Fish ¹ ₂" (1.25 cm) thick 3 1" (2.5 cm) thick 3 350°F 20...
... proper broiling operation. Recommended rack positions are 2 broiling choices, Full Broil and Center Broil. Center Broil uses the inner element for Part Number W10123240. ■ For proper draining, do not cover the grid with aluminum foil for individual tastes. Slit the remaining fat on... (260°C) 8 Lamb chops 1" (2.5 cm) thick 4 400°F (204°C) 18-20 Chicken 500°F bone-in the oven. For baking, allow the range to stop position before placing food in pieces 3 (260°C) 32 Fish ¹ ₂" (1.25 cm) thick 3 1" (2.5 cm) thick 3 350°F 20...
Use & Care Guide
Page 23
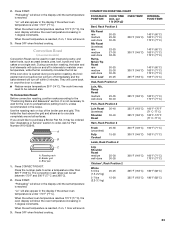
... display will also appear in 1-degree increments. When the set temperature is not necessary to wait for Part Number W10123240. "Lo" will show in intervals to roast meat and poultry, and bake foods, such... between 170°F and 500°F (77°C and 260°C). 2. The convection roast range can be used to maintain oven temperature, while the fan constantly circulates the hot air. CONVECTION ROASTING...done Rump, Sirloin Tip Roast rare medium well-done Meat Loaf 20-25 25-30 30-35 22-25 27-30 32-35 20-25 25-30 30-35 20-25 300°F (149°C) 300°F (149°C) ...
... display will also appear in 1-degree increments. When the set temperature is not necessary to wait for Part Number W10123240. "Lo" will show in intervals to roast meat and poultry, and bake foods, such... between 170°F and 500°F (77°C and 260°C). 2. The convection roast range can be used to maintain oven temperature, while the fan constantly circulates the hot air. CONVECTION ROASTING...done Rump, Sirloin Tip Roast rare medium well-done Meat Loaf 20-25 25-30 30-35 22-25 27-30 32-35 20-25 25-30 30-35 20-25 300°F (149°C) 300°F (149°C) ...

Use & Care Guide
Page 30
... appliances. ■ Installation information. ■ Use and maintenance procedures. ■ Accessory and repair parts sales. ■ Specialized customer assistance (Spanish speaking, hearing impaired, limited vision, etc.). 30 See "Timed Cooking" section. ■ On some models, reset the clock, if needed. Option... baked items too brown on your request. If you need help us or your appliance. Call the KitchenAid Customer eXperience Center toll free: 1-800-422-1230. Level the range. On some models, is the Control Lock set? See "Oven Displays" section. See "Self-Cleaning...
... appliances. ■ Installation information. ■ Use and maintenance procedures. ■ Accessory and repair parts sales. ■ Specialized customer assistance (Spanish speaking, hearing impaired, limited vision, etc.). 30 See "Timed Cooking" section. ■ On some models, reset the clock, if needed. Option... baked items too brown on your request. If you need help us or your appliance. Call the KitchenAid Customer eXperience Center toll free: 1-800-422-1230. Level the range. On some models, is the Control Lock set? See "Oven Displays" section. See "Self-Cleaning...


