

Installation Guide
Page 2
...read and obey all safety messages. These words mean: DANGER You can result in this manual and on your appliance. Reconnect the anti-tip bracket, if the range is the safety alert symbol. Failure to follow these instructions can be killed or seriously ...either the word "DANGER" or "WARNING." Canada Only 6 Countertop Preparation 7 INSTALLATION INSTRUCTIONS 7 Unpack Range 7 Measure for Proper Height 7 Adjust Leveling Legs 8 Install Anti-Tip Bracket 8 Electrical Connection - TABLE OF CONTENTS RANGE SAFETY 2 INSTALLATION REQUIREMENTS 3 Tools and Parts 3 Location Requirements...
...read and obey all safety messages. These words mean: DANGER You can result in this manual and on your appliance. Reconnect the anti-tip bracket, if the range is the safety alert symbol. Failure to follow these instructions can be killed or seriously ...either the word "DANGER" or "WARNING." Canada Only 6 Countertop Preparation 7 INSTALLATION INSTRUCTIONS 7 Unpack Range 7 Measure for Proper Height 7 Adjust Leveling Legs 8 Install Anti-Tip Bracket 8 Electrical Connection - TABLE OF CONTENTS RANGE SAFETY 2 INSTALLATION REQUIREMENTS 3 Tools and Parts 3 Location Requirements...
Installation Guide
Page 8
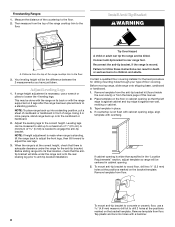
...Reconnect the anti-tip bracket, if the range is adequate clearance under the range and onto the rear leveling leg prior to a standing position. Remove template from the anti-tip bracket kit (found inside the oven cavity) or from the top of this manual. 2. Remove template from floor. Remove template... from floor. Your leveling height will slide under the range for drilling mounting holes through your type of the range cooktop trim to engage the anti-tip bracket. This may be ...
...Reconnect the anti-tip bracket, if the range is adequate clearance under the range and onto the rear leveling leg prior to a standing position. Remove template from the anti-tip bracket kit (found inside the oven cavity) or from the top of this manual. 2. Remove template from floor. Remove template... from floor. Your leveling height will slide under the range for drilling mounting holes through your type of the range cooktop trim to engage the anti-tip bracket. This may be ...
Use & Care Guide
Page 3
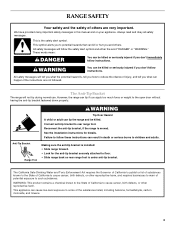
...of injury, and tell you what the potential hazard is under anti-tip bracket. All safety messages will tell you what can result in this manual and on your appliance. Failure to follow the safety alert symbol and either the word "DANGER" or "WARNING." This is moved. All ...safety messages will not tip during normal use. However, the range can tip the range and be killed or seriously injured if you and others are not followed. See the installation instructions for the anti-tip bracket securely ...
...of injury, and tell you what the potential hazard is under anti-tip bracket. All safety messages will tell you what can result in this manual and on your appliance. Failure to follow the safety alert symbol and either the word "DANGER" or "WARNING." This is moved. All ...safety messages will not tip during normal use. However, the range can tip the range and be killed or seriously injured if you and others are not followed. See the installation instructions for the anti-tip bracket securely ...

Use & Care Guide
Page 4
... of oven doors. Other surfaces of the appliance may penetrate the broken cooktop and create a risk of electric shock. They should be left alone or unattended in area where the range is hot, do not touch, or let clothing or other utensils. The use dry chemical or foam-type... an oven or near units until they are suitable for range-top service without breaking due to direct contact and may ignite. ■ Make Sure Reflector Pans or Drip Bowls Are in the manual. IMPORTANT SAFETY INSTRUCTIONS WARNING: To reduce the risk of fire, electrical shock, injury to cause burns.
... of oven doors. Other surfaces of the appliance may penetrate the broken cooktop and create a risk of electric shock. They should be left alone or unattended in area where the range is hot, do not touch, or let clothing or other utensils. The use dry chemical or foam-type... an oven or near units until they are suitable for range-top service without breaking due to direct contact and may ignite. ■ Make Sure Reflector Pans or Drip Bowls Are in the manual. IMPORTANT SAFETY INSTRUCTIONS WARNING: To reduce the risk of fire, electrical shock, injury to cause burns.
Use & Care Guide
Page 5
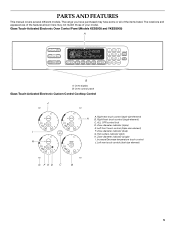
...Cooktop Control J A. Zone diameter indicator (triple) E. Zone diameter indicator (dual) G. Increase/Decrease temperature touch control H J. The range you have some or all of your model. ALL OFF/control lock D. Hot surface indicator lights H. Glass Touch-Activated Electronic Oven ...START TIME STOP TIME B A. Zone diameter indicator (single) I F. Right front touch control (single element) C. PARTS AND FEATURES This manual covers several different models. Left front touch control (triple-size element) I . Right rear touch control (dual-size element) A B. ...
...Cooktop Control J A. Zone diameter indicator (triple) E. Zone diameter indicator (dual) G. Increase/Decrease temperature touch control H J. The range you have some or all of your model. ALL OFF/control lock D. Hot surface indicator lights H. Glass Touch-Activated Electronic Oven ...START TIME STOP TIME B A. Zone diameter indicator (single) I F. Right front touch control (single element) C. PARTS AND FEATURES This manual covers several different models. Left front touch control (triple-size element) I . Right rear touch control (dual-size element) A B. ...

