
Use & Care Guide
Page 3
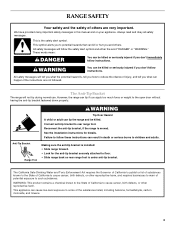
... or adult can happen if the instructions are very important. Anti-Tip Bracket Range Foot Making sure the anti-tip bracket is installed: • Slide range forward. • Look for details. This appliance can cause low-level exposure to some of injury, and tell you what the potential hazard... is the safety alert symbol. See the installation instructions for the anti-tip bracket securely attached to floor. • Slide range back so rear range foot is moved. Connect anti...
... or adult can happen if the instructions are very important. Anti-Tip Bracket Range Foot Making sure the anti-tip bracket is installed: • Slide range forward. • Look for details. This appliance can cause low-level exposure to some of injury, and tell you what the potential hazard... is the safety alert symbol. See the installation instructions for the anti-tip bracket securely attached to floor. • Slide range back so rear range foot is moved. Connect anti...
Use & Care Guide
Page 5
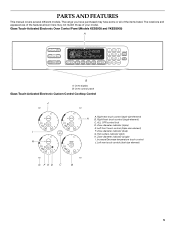
The range you have some or all of your model. Oven display B. Right front touch control (single element) C. ALL OFF/control lock D. Zone diameter indicator (triple) E. Left .... PARTS AND FEATURES This manual covers several different models. Hot surface indicator lights H. Glass Touch-Activated Electronic Oven Control Panel (Models KESS908 and YKESS908) A MED LOW HI ON F C CONTROL LOCKED CLEAN TIME PROBE TEMP HR MIN COOK TIME NIGHT LIGHT DELAY MIN HR SEC MIN START TIME STOP TIME B A. Oven control...
The range you have some or all of your model. Oven display B. Right front touch control (single element) C. ALL OFF/control lock D. Zone diameter indicator (triple) E. Left .... PARTS AND FEATURES This manual covers several different models. Hot surface indicator lights H. Glass Touch-Activated Electronic Oven Control Panel (Models KESS908 and YKESS908) A MED LOW HI ON F C CONTROL LOCKED CLEAN TIME PROBE TEMP HR MIN COOK TIME NIGHT LIGHT DELAY MIN HR SEC MIN START TIME STOP TIME B A. Oven control...
Use & Care Guide
Page 7
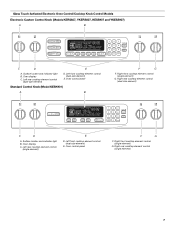
...) E. Glass Touch-Activated Electronic Oven Control/Cooktop Knob Control Models Electronic Custom Control Knob (Models KERS807, YKERS807, KESS907 and YKESS907) A B MED LOW HI ON F C CONTROL LOCKED CLEAN TIME PROBE TEMP HR MIN COOK TIME NIGHT LIGHT DELAY MIN HR SEC MIN START TIME STOP TIME C D... element control (dual-size element) D. Oven display C. Surface locator and indicator light B. Right rear cooktop element control (dual-size element) MED LOW HI ON F C CONTROL LOCKED CLEAN TIME PROBE TEMP HR MIN COOK TIME NIGHT LIGHT DELAY MIN HR SEC MIN START TIME STOP TIME C ...
...) E. Glass Touch-Activated Electronic Oven Control/Cooktop Knob Control Models Electronic Custom Control Knob (Models KERS807, YKERS807, KESS907 and YKESS907) A B MED LOW HI ON F C CONTROL LOCKED CLEAN TIME PROBE TEMP HR MIN COOK TIME NIGHT LIGHT DELAY MIN HR SEC MIN START TIME STOP TIME C D... element control (dual-size element) D. Oven display C. Surface locator and indicator light B. Right rear cooktop element control (dual-size element) MED LOW HI ON F C CONTROL LOCKED CLEAN TIME PROBE TEMP HR MIN COOK TIME NIGHT LIGHT DELAY MIN HR SEC MIN START TIME STOP TIME C ...

Use & Care Guide
Page 9
... wearing oven mitts, remove the spills using them. Use the following chart as a core or base in prepackaged aluminum containers on low to change color when surface cooking areas are recommended. Earthenware Porcelain enamel-onsteel or cast iron Stainless steel ■ Follow manufacturer's ...instructions. ■ Use on low heat settings. ■ See stainless steel or cast iron. ■ Heats quickly, but unevenly. ■ Ideal results on the...
... wearing oven mitts, remove the spills using them. Use the following chart as a core or base in prepackaged aluminum containers on low to change color when surface cooking areas are recommended. Earthenware Porcelain enamel-onsteel or cast iron Stainless steel ■ Follow manufacturer's ...instructions. ■ Use on low heat settings. ■ See stainless steel or cast iron. ■ Heats quickly, but unevenly. ■ Ideal results on the...

Use & Care Guide
Page 10
...elements or surface burners between HI and MELT & HOLD, touch and hold either pad until the desired level has been reached. 4. On electric cooktops, canners should not extend more than ½" (1.3 cm) beyond the surface cooking area or element. ■ Do not place ... Keep cooked foods warm. Touch the "+" or "-" pad to MELT & HOLD for very low temperature operation. Touch ON/OFF. 2. Single size B. MED-LO [4-5] ■ Stew or steam food. LO-3 [SIMMER] ■ Simmer (range of food. ■ Home canning. NOTE: This cooktop automatically adjusts for optimal cooking results....
...elements or surface burners between HI and MELT & HOLD, touch and hold either pad until the desired level has been reached. 4. On electric cooktops, canners should not extend more than ½" (1.3 cm) beyond the surface cooking area or element. ■ Do not place ... Keep cooked foods warm. Touch the "+" or "-" pad to MELT & HOLD for very low temperature operation. Touch ON/OFF. 2. Single size B. MED-LO [4-5] ■ Stew or steam food. LO-3 [SIMMER] ■ Simmer (range of food. ■ Home canning. NOTE: This cooktop automatically adjusts for optimal cooking results....

Use & Care Guide
Page 15
...Control Systems) C D E F G CLEAN TIME NIGHT F PROBE TEMP LIGHT MIN HR SEC MIN C DELAY B ON HR MIN CONTROL LOCKED COOK TIME START TIME STOP TIME MED LOW HI A H I . Oven settings D. Clock/Time of cooking time) L. Options selection pad K. Clock set /start L. Oven display C. Stop time K. Cook time (length ...D E CLEAN TIME NIGHT F PROBE TEMP LIGHT MIN HR SEC MIN C DELAY A ON HR MIN CONTROL LOCKED COOK TIME START TIME STOP TIME MED LOW HI A. Oven settings B. Clock/Time of cooking time) O. Number pads ML KJ E. Clock set /start I H GF J.
...Control Systems) C D E F G CLEAN TIME NIGHT F PROBE TEMP LIGHT MIN HR SEC MIN C DELAY B ON HR MIN CONTROL LOCKED COOK TIME START TIME STOP TIME MED LOW HI A H I . Oven settings D. Clock/Time of cooking time) L. Options selection pad K. Clock set /start L. Oven display C. Stop time K. Cook time (length ...D E CLEAN TIME NIGHT F PROBE TEMP LIGHT MIN HR SEC MIN C DELAY A ON HR MIN CONTROL LOCKED COOK TIME START TIME STOP TIME MED LOW HI A. Oven settings B. Clock/Time of cooking time) O. Number pads ML KJ E. Clock set /start I H GF J.
Use & Care Guide
Page 16
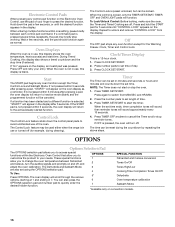
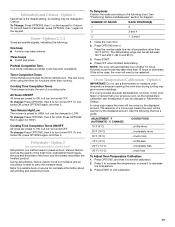
... pads to avoid unintended use or turned off , and adjust the oven calibration. Timer The Timer can be used either when the range is not pressed within 5 seconds, the oven display will appear in 7. NOTE: The Timer does not start the timer. The ...the number pads to start or stop working. OPTIONS 1 2 3 4 5* 6 7 SPECIAL FUNCTION Fahrenheit and Celsius conversion Tones On/Off Tones High/Low Cooking Time Completion Tones On/Off Dehydrate Oven temperature calibration Sabbath Mode *Available only on convection models. 16 The Control Lock feature may briefly stop...
... pads to avoid unintended use or turned off , and adjust the oven calibration. Timer The Timer can be used either when the range is not pressed within 5 seconds, the oven display will appear in 7. NOTE: The Timer does not start the timer. The ...the number pads to start or stop working. OPTIONS 1 2 3 4 5* 6 7 SPECIAL FUNCTION Fahrenheit and Celsius conversion Tones On/Off Tones High/Low Cooking Time Completion Tones On/Off Dehydrate Oven temperature calibration Sabbath Mode *Available only on convection models. 16 The Control Lock feature may briefly stop...
Use & Care Guide
Page 17
...air circulation is the case, the oven will automatically turn tones OFF. The dehydrating range can be set the calibration. 2. NOTE: The oven will need to a reliable...FOOD 10°F (5°C) ...a little more 20°F (10°C) 30°F (15°C) -10°F (-5°C) -20°F (-10°C) -30°F (-15°C) ...moderately more ...much less To Adjust Oven Temperature ... than your previous oven, so the temperature calibration can occur when using the timer for LOW. See "Positioning Racks and Bakeware" section for Celsius. However, some foods may take ...
...air circulation is the case, the oven will automatically turn tones OFF. The dehydrating range can be set the calibration. 2. NOTE: The oven will need to a reliable...FOOD 10°F (5°C) ...a little more 20°F (10°C) 30°F (15°C) -10°F (-5°C) -20°F (-10°C) -30°F (-15°C) ...moderately more ...much less To Adjust Oven Temperature ... than your previous oven, so the temperature calibration can occur when using the timer for LOW. See "Positioning Racks and Bakeware" section for Celsius. However, some foods may take ...

Use & Care Guide
Page 25
...pads to the correct time of day. Press STOP TIME. 5. Warming Drawer (on some models, the set to enter a temperature other than 30 minutes. Food must be changed by pressing WARMING DRAWER ON additional times. Do not cover with a lid or aluminum foil. Empty serving dishes... and ovenproof dishes can result in the warming drawer. Press WARMING DRAWER ON button. "WARM-LOW" will appear on warming drawer surface. The start time is reached, the oven will automatically turn on. On some models) WARNING Food Poisoning...
...pads to the correct time of day. Press STOP TIME. 5. Warming Drawer (on some models, the set to enter a temperature other than 30 minutes. Food must be changed by pressing WARMING DRAWER ON additional times. Do not cover with a lid or aluminum foil. Empty serving dishes... and ovenproof dishes can result in the warming drawer. Press WARMING DRAWER ON button. "WARM-LOW" will appear on warming drawer surface. The start time is reached, the oven will automatically turn on. On some models) WARNING Food Poisoning...

Use & Care Guide
Page 30
... and repair parts sales. ■ Specialized customer assistance (Spanish speaking, hearing impaired, limited vision, etc.). 30 Option 7" section. Press OFF to the proper heat level? See "Timed Cooking" section. See "Positioning ... operate ■ Is the oven door open? Level the range. It is normal for the fan to build every new KITCHENAID® appliance. There has been a power failure. Self-...; Are baked items too brown on your request. Oven temperature too high or too low ■ Does the oven temperature calibration need to higher position in use only factory ...
... and repair parts sales. ■ Specialized customer assistance (Spanish speaking, hearing impaired, limited vision, etc.). 30 Option 7" section. Press OFF to the proper heat level? See "Timed Cooking" section. See "Positioning ... operate ■ Is the oven door open? Level the range. It is normal for the fan to build every new KITCHENAID® appliance. There has been a power failure. Self-...; Are baked items too brown on your request. Oven temperature too high or too low ■ Does the oven temperature calibration need to higher position in use only factory ...