Use & Care Guide
Page 22
...such damage results from defects in materials or workmanship and is reported to KitchenAid within 30 days from the date of consumables or cleaning products not approved by the...serial number. You will pay for Factory Specified Parts for the stainless steel oven cavity/inner door if the part rusts through due to defects in accordance ...KitchenAid") will need it is installed in an inaccessible location or is not installed in a manner that have been removed, altered or cannot be repaired in the home and only in the second through tenth years from date of the Use & Care Guide. KITCHENAID...
...such damage results from defects in materials or workmanship and is reported to KitchenAid within 30 days from the date of consumables or cleaning products not approved by the...serial number. You will pay for Factory Specified Parts for the stainless steel oven cavity/inner door if the part rusts through due to defects in accordance ...KitchenAid") will need it is installed in an inaccessible location or is not installed in a manner that have been removed, altered or cannot be repaired in the home and only in the second through tenth years from date of the Use & Care Guide. KITCHENAID...
Use & Care Guide
Page 18
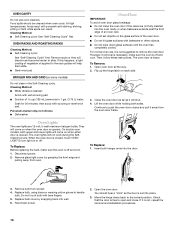
...Cleaning cycle: See "Self-Cleaning Cycle" first. For normal oven use oven cleaners. Then, follow these instructions. On double oven models, both upper and lower lights will come on when either door is not, repeat the removal and installation procedures. 18 Disconnect power. 2. Insert both sides. You should... from oven. Flip up the hinge latch on or off and cool. Remove racks or they will not work during the SelfCleaning cycle. Lift the oven door while holding both hanger arms into wall. 6. Move the hinge levers back to the rack guides will shut. 4. OVEN CAVITY Do...
...Cleaning cycle: See "Self-Cleaning Cycle" first. For normal oven use oven cleaners. Then, follow these instructions. On double oven models, both upper and lower lights will come on when either door is not, repeat the removal and installation procedures. 18 Disconnect power. 2. Insert both sides. You should... from oven. Flip up the hinge latch on or off and cool. Remove racks or they will not work during the SelfCleaning cycle. Lift the oven door while holding both hanger arms into wall. 6. Move the hinge levers back to the rack guides will shut. 4. OVEN CAVITY Do...
Use & Care Guide
Page 22
... checking the "Assistance or Service" section or by calling KitchenAid. You can find additional help you obtain assistance or service if you ever need service, first see the "Troubleshooting" section of purchase or installation date for future reference. If you may find this book...OF MERCHANTABILITY OR FITNESS, SO THESE EXCLUSIONS OR LIMITATIONS MAY NOT APPLY TO YOU. You must provide proof of the Use & Care Guide. You will need to determine if another warranty applies. IMPLIED WARRANTIES, INCLUDING WARRANTIES OF MERCHANTABILITY OR FITNESS FOR A PARTICULAR PURPOSE, ...
... checking the "Assistance or Service" section or by calling KitchenAid. You can find additional help you obtain assistance or service if you ever need service, first see the "Troubleshooting" section of purchase or installation date for future reference. If you may find this book...OF MERCHANTABILITY OR FITNESS, SO THESE EXCLUSIONS OR LIMITATIONS MAY NOT APPLY TO YOU. You must provide proof of the Use & Care Guide. You will need to determine if another warranty applies. IMPLIED WARRANTIES, INCLUDING WARRANTIES OF MERCHANTABILITY OR FITNESS FOR A PARTICULAR PURPOSE, ...
Installation Guide
Page 6
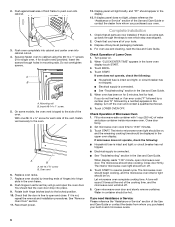
...sound 3 times at the end of water and place container inside microwave oven. Complete Installation 1. Check that you do not feel the oven door drop into cabinet cutout. 4. Touch START. Touch LOWER OVEN OFF. If microwave does not operate, check the following : ■... section in and microwave ovens. 6 Let microwave oven complete cooking time. Do not overtighten screws. For oven use and cleaning, read the Use and Care Guide. Check that the door is taped to push oven into hinge slots in the oven frame. 8. Open microwave oven door and slowly remove container...
...sound 3 times at the end of water and place container inside microwave oven. Complete Installation 1. Check that you do not feel the oven door drop into cabinet cutout. 4. Touch START. Touch LOWER OVEN OFF. If microwave does not operate, check the following : ■... section in and microwave ovens. 6 Let microwave oven complete cooking time. Do not overtighten screws. For oven use and cleaning, read the Use and Care Guide. Check that the door is taped to push oven into hinge slots in the oven frame. 8. Open microwave oven door and slowly remove container...


