Use & Care Guide
Page 3
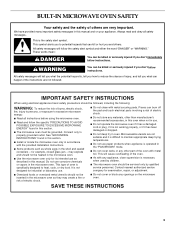
...precautions should not be killed or seriously injured if you what can be heated in the microwave oven. s Oversized foods or oversized metal utensils should not be inserted in this manual and on the microwave oven. s Do not store any appliance, close supervision is , tell you how to maintain appropriate... or plug, if it is not working properly, or if it is difficult to reduce the chance of the oven with any materials, other than manufacturer's recommended accessories, in this manual. s Do not cover racks or any other part of injury, and tell you don't follow the specific "...
...precautions should not be killed or seriously injured if you what can be heated in the microwave oven. s Oversized foods or oversized metal utensils should not be inserted in this manual and on the microwave oven. s Do not store any appliance, close supervision is , tell you how to maintain appropriate... or plug, if it is not working properly, or if it is difficult to reduce the chance of the oven with any materials, other than manufacturer's recommended accessories, in this manual. s Do not cover racks or any other part of injury, and tell you don't follow the specific "...
Use & Care Guide
Page 5
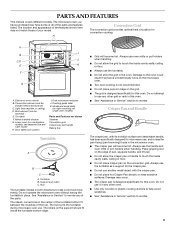
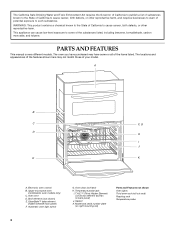
... inside cavity walls, ceiling or floor. s See "Assistance or Service" section to reorder. PARTS AND FEATURES This manual covers different models. The microwave oven you have purchased may not match those of the parts and features listed. The location and appearance of the features... the 3 spokes of pan, squeeze handle, and lift pan. Light (inaccessible, in both directions to use the turntable as a support for this oven. Broil element (can be lowered) E. Metal shielded window G. Cooking guide label K. Turntable B. Hub The turntable rotates in ceiling) D. The raised...
... inside cavity walls, ceiling or floor. s See "Assistance or Service" section to reorder. PARTS AND FEATURES This manual covers different models. The microwave oven you have purchased may not match those of the parts and features listed. The location and appearance of the features... the 3 spokes of pan, squeeze handle, and lift pan. Light (inaccessible, in both directions to use the turntable as a support for this oven. Broil element (can be lowered) E. Metal shielded window G. Cooking guide label K. Turntable B. Hub The turntable rotates in ceiling) D. The raised...

Use & Care Guide
Page 7
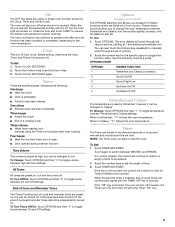
...) B. Microwave soften/melt L. Number keys J. Options P. Microwave popcorn E. Crisping G. Microwave custom reheating N. Options Q. Lower oven display Single Oven Models A B C D EF G H I . ELECTRONIC OVEN CONTROL This manual covers different models. Lower oven start O. Clock set /start /add a minute K. EasyConvect™ conversion cooking P. The oven you have some or all of your model. Timer C. Number keys D. Microwave cooking power...
...) B. Microwave soften/melt L. Number keys J. Options P. Microwave popcorn E. Crisping G. Microwave custom reheating N. Options Q. Lower oven display Single Oven Models A B C D EF G H I . ELECTRONIC OVEN CONTROL This manual covers different models. Lower oven start O. Clock set /start /add a minute K. EasyConvect™ conversion cooking P. The oven you have some or all of your model. Timer C. Number keys D. Microwave cooking power...
Use & Care Guide
Page 9
... the Timer "Off" key. 9 When the door is touched. Before setting, make sure the oven, Timer, and Timed Cooking are preset on and off . Touch CLOCK SET/START again. To Set: 1. Touch the number keys to manually scroll through the various options, starting at 1 and ending automatically at high, but can be...
... the Timer "Off" key. 9 When the door is touched. Before setting, make sure the oven, Timer, and Timed Cooking are preset on and off . Touch CLOCK SET/START again. To Set: 1. Touch the number keys to manually scroll through the various options, starting at 1 and ending automatically at high, but can be...
Use & Care Guide
Page 12
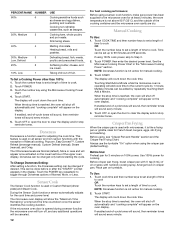
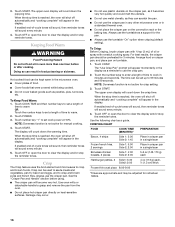
...for the cook time and power level. During the Sensor Cook function a sensor automatically adjusts for manual cooking. 2. Before Use: Preheat pan for adjusting the cook time. Place pan on the oven display. When the stop time is operating will appear on 100% power. Heating bread, rolls ... function, make sure power has been supplied to clear the display and/or stop reminder tones. PERCENT/NAME NUMBER 60% 6 50%, Medium 5 40% 4 30%, Medium- 3 Low, Defrost 20% 2 10%, Low 1 USE Cooking sensitive foods such as lasagna. This can be done before starting the cycle. Touch...
...for the cook time and power level. During the Sensor Cook function a sensor automatically adjusts for manual cooking. 2. Before Use: Preheat pan for adjusting the cook time. Place pan on the oven display. When the stop time is operating will appear on 100% power. Heating bread, rolls ... function, make sure power has been supplied to clear the display and/or stop reminder tones. PERCENT/NAME NUMBER 60% 6 50%, Medium 5 40% 4 30%, Medium- 3 Low, Defrost 20% 2 10%, Low 1 USE Cooking sensitive foods such as lasagna. This can be done before starting the cycle. Touch...
Use & Care Guide
Page 13
...overeasy doneness. Use the following chart as a guide. Beverage 6 Do not cover. Manual 7 QUANTITY 1-3 slices [3 oz (85 g) each 4 patties 8 patties Side 1: 2 min Side 2: 1 min 30 sec Side 1: 3 min Side 2: 2 min 30 sec Cook until 160°F (70°C) Vegetables, stir-fry, 2 cups ...1-2 cups (250 mL500 mL) Default power level 70% To Custom Reheat: 1. The upper oven display will appear on the oven display. Custom Reheat Times and cooking powers have been preset for manual reheating. 6. When the stop reminder tones. Cover with plastic wrap and vent. When the stop...
...overeasy doneness. Use the following chart as a guide. Beverage 6 Do not cover. Manual 7 QUANTITY 1-3 slices [3 oz (85 g) each 4 patties 8 patties Side 1: 2 min Side 2: 1 min 30 sec Side 1: 3 min Side 2: 2 min 30 sec Cook until 160°F (70°C) Vegetables, stir-fry, 2 cups ...1-2 cups (250 mL500 mL) Default power level 70% To Custom Reheat: 1. The upper oven display will appear on the oven display. Custom Reheat Times and cooking powers have been preset for manual reheating. 6. When the stop reminder tones. Cover with plastic wrap and vent. When the stop...
Use & Care Guide
Page 14
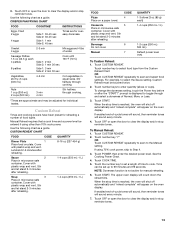
...) Fish* 3 0.1 - 4.4 lbs (45 g - 1.34 kg) Bread 4 0.1 - 2.0 lbs (45 g - 907 g) Juice 5 6, 12 or 16 oz (177, 355 or 473 mL) Manual 6 Default power level 30% *See the Defrost Preparation Chart at the end of "Custom Defrost" section for more even defrosting. Touch the number key from fruit juice) before...time. Touch CUSTOM DEFROST. 2. NOTE: Doneness function is reached, the oven will shut off automatically and "defrost complete" will defrost more than 30% cook power. IMPORTANT: Heated liquids can be manually set to clear the display and/or stop reminder tones. See "...
...) Fish* 3 0.1 - 4.4 lbs (45 g - 1.34 kg) Bread 4 0.1 - 2.0 lbs (45 g - 907 g) Juice 5 6, 12 or 16 oz (177, 355 or 473 mL) Manual 6 Default power level 30% *See the Defrost Preparation Chart at the end of "Custom Defrost" section for more even defrosting. Touch the number key from fruit juice) before...time. Touch CUSTOM DEFROST. 2. NOTE: Doneness function is reached, the oven will shut off automatically and "defrost complete" will defrost more than 30% cook power. IMPORTANT: Heated liquids can be manually set to clear the display and/or stop reminder tones. See "...
Use & Care Guide
Page 15
... the Power key before steaming. When the stop the cycle. Popcorn s Do not use steamer vessel. s Pop only 1 package of popcorn. The oven is preset for popping to slow to 1 pop every 1 or 2 seconds, then stop time is displayed to select the Fresh Vegetables setting, Steam ..., roast, stew Lamb: stew and chops Pork: chops, ribs, roasts, sausage The narrow or fatty areas of food types. See the "KitchenAid™ Steamer Vessel" section before defrosting. s Manual Steam Cook requires that uses microwaves to scan and select bag size. NOTE: Doneness function is reached the upper...
... the Power key before steaming. When the stop the cycle. Popcorn s Do not use steamer vessel. s Pop only 1 package of popcorn. The oven is preset for popping to slow to 1 pop every 1 or 2 seconds, then stop time is displayed to select the Fresh Vegetables setting, Steam ..., roast, stew Lamb: stew and chops Pork: chops, ribs, roasts, sausage The narrow or fatty areas of food types. See the "KitchenAid™ Steamer Vessel" section before defrosting. s Manual Steam Cook requires that uses microwaves to scan and select bag size. NOTE: Doneness function is reached the upper...
Use & Care Guide
Page 16
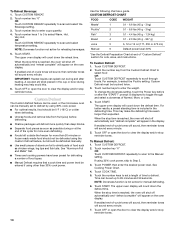
... chicken breasts, 2 pieces Side 1: 4:00 Side 2: 3:00 5-6 oz (142-170 g) each Hamburger patties, 2 Side1: 3:30 Side2: 2:00 4 oz (113 g) each, ½ (1.3 cm) thick Frozen thin crust pizza 8:00-9:00 *Times are ... time to enter a length of -cycle tones will sound, then reminder tones will appear in oven more than one hour before using. Crisp can be kept warm in minutes and seconds. NOTE:...to set cook power at 10%. Touch POWER. 3. NOTE: Doneness function is not active for manual cooking. 4. s The crisper pan will count down the crisp time. Damage may be used to...
... chicken breasts, 2 pieces Side 1: 4:00 Side 2: 3:00 5-6 oz (142-170 g) each Hamburger patties, 2 Side1: 3:30 Side2: 2:00 4 oz (113 g) each, ½ (1.3 cm) thick Frozen thin crust pizza 8:00-9:00 *Times are ... time to enter a length of -cycle tones will sound, then reminder tones will appear in oven more than one hour before using. Crisp can be kept warm in minutes and seconds. NOTE:...to set cook power at 10%. Touch POWER. 3. NOTE: Doneness function is not active for manual cooking. 4. s The crisper pan will count down the crisp time. Damage may be used to...
Use & Care Guide
Page 3
...Storage in or around any part of oven until they are not followed. Children should be used in Oven - Moist or damp potholders on your appliance. among these openings, oven doors, and windows of the oven. ■ Clean Only Parts Listed in this manual and on hot surfaces may become hot...should never be hot even though they have provided many important safety messages in Manual. ■ Before Self-Cleaning the Oven - They should be killed or seriously injured if you and others are oven vent openings and surfaces near these surfaces are very important. Do not let ...
...Storage in or around any part of oven until they are not followed. Children should be used in Oven - Moist or damp potholders on your appliance. among these openings, oven doors, and windows of the oven. ■ Clean Only Parts Listed in this manual and on hot surfaces may become hot...should never be hot even though they have provided many important safety messages in Manual. ■ Before Self-Cleaning the Oven - They should be killed or seriously injured if you and others are oven vent openings and surfaces near these surfaces are very important. Do not let ...
Use & Care Guide
Page 4
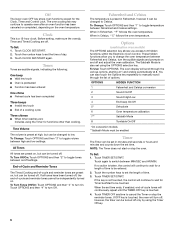
... to some or all of the items listed. A B C F, G D H I . Oven door lock latch H. Gasket K. Upper microwave oven (combination oven models only) C. Temperature probe jack I J E K A. Automatic oven light switch G. CleanBake™ bake element (hidden beneath floor panel) F. The locations and appearances ... features shown here may have purchased may not match those of your model. PARTS AND FEATURES This manual covers different models. Electronic oven control B. Oven vent D. WARNING: This product contains a chemical known to the State of California to cause cancer...
... to some or all of the items listed. A B C F, G D H I . Oven door lock latch H. Gasket K. Upper microwave oven (combination oven models only) C. Temperature probe jack I J E K A. Automatic oven light switch G. CleanBake™ bake element (hidden beneath floor panel) F. The locations and appearances ... features shown here may have purchased may not match those of your model. PARTS AND FEATURES This manual covers different models. Electronic oven control B. Oven vent D. WARNING: This product contains a chemical known to the State of California to cause cancer...

Use & Care Guide
Page 5
ELECTRONIC OVEN CONTROL This manual covers different models. Oven settings B. Number keys E. Convection cooking settings G. Oven light H. Self-clean I J KL F. Clock set/start time. If "Err" appears on the lower oven display, an error condition has occurred. Call for service. Timer D. ...Service" section. Call for service. If "Err" appears on the lower oven display, an error condition has occurred. EasyConvect™ conversion I . Lower Oven Display (combination oven models) When the lower oven is not in use , this display shows a time countdown and the...
ELECTRONIC OVEN CONTROL This manual covers different models. Oven settings B. Number keys E. Convection cooking settings G. Oven light H. Self-clean I J KL F. Clock set/start time. If "Err" appears on the lower oven display, an error condition has occurred. Call for service. Timer D. ...Service" section. Call for service. If "Err" appears on the lower oven display, an error condition has occurred. EasyConvect™ conversion I . Lower Oven Display (combination oven models) When the lower oven is not in use , this display shows a time countdown and the...
Use & Care Guide
Page 6
...depending on , but can be turned off and adjust the oven calibration. Touch CLOCK SET/START again. Touch OPTIONS and then "4" to cancel the Timer or stop the oven. The Sabbath Mode is also set the time of time to manually scroll through the various options, starting at 1 and ending ...automatically at high, but can be touched. If no action is touched, the oven will turn the audible signals and prompts ...
...depending on , but can be turned off and adjust the oven calibration. Touch CLOCK SET/START again. Touch OPTIONS and then "4" to cancel the Timer or stop the oven. The Sabbath Mode is also set the time of time to manually scroll through the various options, starting at 1 and ending ...automatically at high, but can be touched. If no action is touched, the oven will turn the audible signals and prompts ...
Installation Guide
Page 1
... INSTRUCTIONS 27" (68.6 CM) AND 30" (76.2 CM) ELECTRIC BUILT-IN MICROWAVE/OVEN COMBINATION INSTRUCTIONS D'INSTALLATION FOUR CONVENTIONNEL ET FOUR... (68,6 CM) ET 30" (76,2 CM) Table of Contents/Table des matières BUILT-IN MICROWAVE/OVEN COMBINATION SAFETY...........1 INSTALLATION REQUIREMENTS ...3 INSTALLATION INSTRUCTIONS 4 Prepare Built-In Microwave/Oven Combination 4 Remove Oven Door 4 Make Electrical Connection 4 Install Oven 5 Complete Installation 6 SÉCURITÉ ...four 11 Achever l'installation 12 BUILT-IN MICROWAVE/OVEN COMBINATION SAFETY Your safety and the safety of ...
... INSTRUCTIONS 27" (68.6 CM) AND 30" (76.2 CM) ELECTRIC BUILT-IN MICROWAVE/OVEN COMBINATION INSTRUCTIONS D'INSTALLATION FOUR CONVENTIONNEL ET FOUR... (68,6 CM) ET 30" (76,2 CM) Table of Contents/Table des matières BUILT-IN MICROWAVE/OVEN COMBINATION SAFETY...........1 INSTALLATION REQUIREMENTS ...3 INSTALLATION INSTRUCTIONS 4 Prepare Built-In Microwave/Oven Combination 4 Remove Oven Door 4 Make Electrical Connection 4 Install Oven 5 Complete Installation 6 SÉCURITÉ ...four 11 Achever l'installation 12 BUILT-IN MICROWAVE/OVEN COMBINATION SAFETY Your safety and the safety of ...


