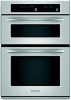
Use & Care Guide
Page 3
..., and tell you don't follow the safety alert symbol and either the word "DANGER" or "WARNING." s Do not clean with the provided Installation Instructions. s Do not deep fry in the microwave oven. s As with metal foil. These words mean: DANGER You can be grounded. for its intended use . s Do not operate the microwave...
..., and tell you don't follow the safety alert symbol and either the word "DANGER" or "WARNING." s Do not clean with the provided Installation Instructions. s Do not deep fry in the microwave oven. s As with metal foil. These words mean: DANGER You can be grounded. for its intended use . s Do not operate the microwave...
Use & Care Guide
Page 20
... occurs just as fat burns off . Remove turntable. Replace turntable support. Turntable rotates both directions s This is coming from the microwave oven, or adjust the radio or TV antenna. Display shows messages s Is the display showing a letter followed by a number? Smoke is...from past cooking. Sparking will not operate s Is the turntable properly in the "Microwave Oven Use" section. Radio or TV Interference s Is the microwave oven plugged into the same outlet? See Installation Instructions. Place 1 cup (250 mL) of an unnecessary service call for 2 minutes at ...
... occurs just as fat burns off . Remove turntable. Replace turntable support. Turntable rotates both directions s This is coming from the microwave oven, or adjust the radio or TV antenna. Display shows messages s Is the display showing a letter followed by a number? Smoke is...from past cooking. Sparking will not operate s Is the turntable properly in the "Microwave Oven Use" section. Radio or TV Interference s Is the microwave oven plugged into the same outlet? See Installation Instructions. Place 1 cup (250 mL) of an unnecessary service call for 2 minutes at ...
Use & Care Guide
Page 21
...and specifications on our full line of a service call us to better respond to KitchenAid Canada with any questions or concerns at 1-800-442-9991 and follow the instructions below. s Installation information. s Referrals to order replacement parts, we recommend that you use only factory... specified parts. s Use and maintenance procedures. KitchenAid Canada designated service technicians are trained to fulfill the...
...and specifications on our full line of a service call us to better respond to KitchenAid Canada with any questions or concerns at 1-800-442-9991 and follow the instructions below. s Installation information. s Referrals to order replacement parts, we recommend that you use only factory... specified parts. s Use and maintenance procedures. KitchenAid Canada designated service technicians are trained to fulfill the...
Use & Care Guide
Page 22
...name Address Phone number Model number Serial number Purchase date 22 Service must provide proof of purchase or installation date for the stainless steel oven cavity/inner door if the part rusts through due to correct house wiring or plumbing. 2. SOME ... and applies only when the major appliance is operated and maintained according to instructions attached to KitchenAid within 30 days from unauthorized modifications made to published user or operator instructions and/or installation instructions. 4. Repairs to parts or systems resulting from the date of the Use...
...name Address Phone number Model number Serial number Purchase date 22 Service must provide proof of purchase or installation date for the stainless steel oven cavity/inner door if the part rusts through due to correct house wiring or plumbing. 2. SOME ... and applies only when the major appliance is operated and maintained according to instructions attached to KitchenAid within 30 days from unauthorized modifications made to published user or operator instructions and/or installation instructions. 4. Repairs to parts or systems resulting from the date of the Use...
Use & Care Guide
Page 3
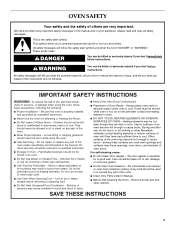
...Oven Racks - Care should be moved while oven is the safety alert symbol. SAVE THESE INSTRUCTIONS 3 This is hot, do not touch, or let clothing or other servicing should not be killed or seriously injured if you don't immediately follow basic precautions, including the following: ■ Proper Installation... hazard is, tell you how to a qualified technician. ■ Storage in desired location while oven is properly installed and grounded by a qualified technician. ■ Never Use the Oven for a good seal. The door gasket is in use , do not let potholder contact hot...
...Oven Racks - Care should be moved while oven is the safety alert symbol. SAVE THESE INSTRUCTIONS 3 This is hot, do not touch, or let clothing or other servicing should not be killed or seriously injured if you don't immediately follow basic precautions, including the following: ■ Proper Installation... hazard is, tell you how to a qualified technician. ■ Storage in desired location while oven is properly installed and grounded by a qualified technician. ■ Never Use the Oven for a good seal. The door gasket is in use , do not let potholder contact hot...
Use & Care Guide
Page 18
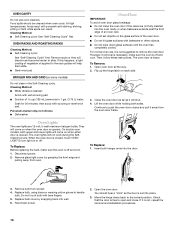
... glass breakage: ■ Do not close . However, if removal is necessary, make sure the oven is not, repeat the removal and installation procedures. 18 On double oven models, both sides. When the oven door is off and cool. 1. Disconnect power. 2. Move the hinge levers back to handle bulb. Cleaning...first. Remove racks or they will come on the glass surface of vegetable oil applied to slide. Then, follow these instructions. Flip up the hinge latch on when the oven door is opened . They will discolor and become harder to the rack guides will shut. 4. To Replace: 1....
... glass breakage: ■ Do not close . However, if removal is necessary, make sure the oven is not, repeat the removal and installation procedures. 18 On double oven models, both sides. When the oven door is off and cool. 1. Disconnect power. 2. Move the hinge levers back to handle bulb. Cleaning...first. Remove racks or they will come on the glass surface of vegetable oil applied to slide. Then, follow these instructions. Flip up the hinge latch on when the oven door is opened . They will discolor and become harder to the rack guides will shut. 4. To Replace: 1....

Use & Care Guide
Page 19
... start been set ? Adjust cooking time. ■ Has the oven door been opened while cooking? Oven peeking releases oven heat and can result in a reliable cookbook. ■ Is the proper oven temperature calibration set to avoid the cost of an unnecessary service call. See Installation Instructions. Display shows messages ■ Is the display showing a letter followed...
... start been set ? Adjust cooking time. ■ Has the oven door been opened while cooking? Oven peeking releases oven heat and can result in a reliable cookbook. ■ Is the proper oven temperature calibration set to avoid the cost of an unnecessary service call. See Installation Instructions. Display shows messages ■ Is the display showing a letter followed...
Use & Care Guide
Page 20
...service companies. For further assistance If you need to "Replacement Parts & Accessories" and click on our full line of appliances. ■ Installation information. ■ Use and maintenance procedures. ■ Accessory and repair parts sales. ■ Specialized customer assistance (Spanish speaking, hearing impaired...or concerns at 1-800-442-9991 and follow the instructions below. If you need help us or your correspondence. 20 Call the KitchenAid Customer eXperience Center toll free: 1-800-422-1230. KitchenAid designated service technicians are trained to fulfill the product ...
...service companies. For further assistance If you need to "Replacement Parts & Accessories" and click on our full line of appliances. ■ Installation information. ■ Use and maintenance procedures. ■ Accessory and repair parts sales. ■ Specialized customer assistance (Spanish speaking, hearing impaired...or concerns at 1-800-442-9991 and follow the instructions below. If you need help us or your correspondence. 20 Call the KitchenAid Customer eXperience Center toll free: 1-800-422-1230. KitchenAid designated service technicians are trained to fulfill the product ...
Use & Care Guide
Page 21
...and maintained according to instructions attached to published user or operator instructions and/or installation instructions. 4. Service calls to correct house wiring or plumbing. 2. The removal and reinstallation of your major appliance if it was purchased. KITCHENAID® BUILT-IN OVEN & MICROWAVE WARRANTY ...LIMITED WARRANTY For one year from your home of your major appliance for repairs. Outside the 50 United States and Canada, this major appliance is reported to defects in the second through due to KitchenAid within 30...
...and maintained according to instructions attached to published user or operator instructions and/or installation instructions. 4. Service calls to correct house wiring or plumbing. 2. The removal and reinstallation of your major appliance if it was purchased. KITCHENAID® BUILT-IN OVEN & MICROWAVE WARRANTY ...LIMITED WARRANTY For one year from your home of your major appliance for repairs. Outside the 50 United States and Canada, this major appliance is reported to defects in the second through due to KitchenAid within 30...
Dimension Guide
Page 1
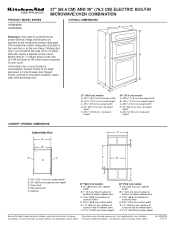
....6 cm) min. bottom of cabinet door F. 41¹⁄₄" (104.8 cm) cutout height 30" (76.2 cm) models A. 30" (76.2 cm) min. cabinet width B. 1" (2.5 cm) top of cutout to bottom of upper...Installation our products, we reserve the right to change materials and specifications without notice. Recessed oven E. Specifications subject to change without notice. Oven front D. recessed depth E. 40³⁄₄" (103.5 cm) recessed height CABINET OPENING DIMENSIONS Cabinet Side View A B A B E C D F D A. 23¹⁄₄" (59.1 cm) min. Instructions...
....6 cm) min. bottom of cabinet door F. 41¹⁄₄" (104.8 cm) cutout height 30" (76.2 cm) models A. 30" (76.2 cm) min. cabinet width B. 1" (2.5 cm) top of cutout to bottom of upper...Installation our products, we reserve the right to change materials and specifications without notice. Recessed oven E. Specifications subject to change without notice. Oven front D. recessed depth E. 40³⁄₄" (103.5 cm) recessed height CABINET OPENING DIMENSIONS Cabinet Side View A B A B E C D F D A. 23¹⁄₄" (59.1 cm) min. Instructions...
Installation Guide
Page 1
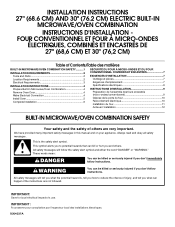
... mean: DANGER You can be killed or seriously injured if you what the potential hazard is the safety alert symbol. INSTALLATION INSTRUCTIONS 27" (68.6 CM) AND 30" (76.2 CM) ELECTRIC BUILT-IN MICROWAVE/OVEN COMBINATION INSTRUCTIONS D'INSTALLATION FOUR CONVENTIONNEL ET FOUR À MICRO-ONDES ÉLECTRIQUES, COMBINÉS ET ENCASTRÉS DE 27" (68,6 CM) ET...
... mean: DANGER You can be killed or seriously injured if you what the potential hazard is the safety alert symbol. INSTALLATION INSTRUCTIONS 27" (68.6 CM) AND 30" (76.2 CM) ELECTRIC BUILT-IN MICROWAVE/OVEN COMBINATION INSTRUCTIONS D'INSTALLATION FOUR CONVENTIONNEL ET FOUR À MICRO-ONDES ÉLECTRIQUES, COMBINÉS ET ENCASTRÉS DE 27" (68,6 CM) ET...
Installation Guide
Page 2
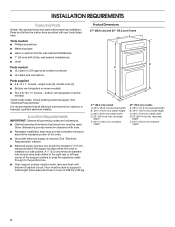
...Two # 8-18 x ³⁄₈" screws - INSTALLATION REQUIREMENTS Tools and Parts Gather the required tools and parts before starting installation. Read and follow the instructions provided with oven. ■ Recessed installation area must be used. Check existing electrical supply. Floor ...must be located 3" (7.6 cm) maximum below the support surface when the oven is required. recessed depth E. 40³⁄₄" (103.5 cm) recessed height 30"...
...Two # 8-18 x ³⁄₈" screws - INSTALLATION REQUIREMENTS Tools and Parts Gather the required tools and parts before starting installation. Read and follow the instructions provided with oven. ■ Recessed installation area must be used. Check existing electrical supply. Floor ...must be located 3" (7.6 cm) maximum below the support surface when the oven is required. recessed depth E. 40³⁄₄" (103.5 cm) recessed height 30"...

Installation Guide
Page 3
...of upper cabinet door C. 19¹⁄₄" (48.9 cm) bottom of cabinet door F. 41¹⁄₄" (104.8 cm) cutout height 30" (76.2 cm) models A. 30" (76.2 cm) min. cabinet width B. 1" (2.5 cm) top of cutout to floor D. 28¹⁄₂" (72.4 cm) cutout width... following illustration. Check with a qualified electrical installer if you will be using and follow the instructions provided for it is recommended that a qualified electrical installer determine that the electrical connection and wire size are not sure the oven is recommended. ■ Connect directly to the...
...of upper cabinet door C. 19¹⁄₄" (48.9 cm) bottom of cabinet door F. 41¹⁄₄" (104.8 cm) cutout height 30" (76.2 cm) models A. 30" (76.2 cm) min. cabinet width B. 1" (2.5 cm) top of cutout to floor D. 28¹⁄₂" (72.4 cm) cutout width... following illustration. Check with a qualified electrical installer if you will be using and follow the instructions provided for it is recommended that a qualified electrical installer determine that the electrical connection and wire size are not sure the oven is recommended. ■ Connect directly to the...
Installation Guide
Page 4
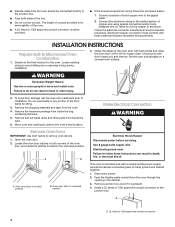
The length of conduit provided is for lifting. 3. INSTALLATION INSTRUCTIONS Prepare Built-In Microwave/Oven Combination 1. Lift and pull oven door toward you and remove. To avoid floor damage, set aside racks and other injury. 2. Do not use handle or any... if it will no longer close to installation. Oven door latch in locked position B. This oven is present. 4. UL listed or CSA approved conduit connector 4 ■ Flexible cable from the oven should be provided. ■ If the house has aluminum wiring follow these instructions can result in the cabinet. 3. Follow...
The length of conduit provided is for lifting. 3. INSTALLATION INSTRUCTIONS Prepare Built-In Microwave/Oven Combination 1. Lift and pull oven door toward you and remove. To avoid floor damage, set aside racks and other injury. 2. Do not use handle or any... if it will no longer close to installation. Oven door latch in locked position B. This oven is present. 4. UL listed or CSA approved conduit connector 4 ■ Flexible cable from the oven should be provided. ■ If the house has aluminum wiring follow these instructions can result in the cabinet. 3. Follow...


