

Installation Instructions
Page 2
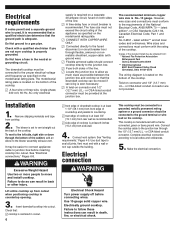
...appliance. Locate cooktop for correct installation. • Have a qualified technician install this manual and on the bottom of burns by reaching over heated surface units, cabinet storage space located above the surface units should be reduced by qualified person(s) in accordance with weatherproof caulking tape measure 2 hand or electric... equipment to hazards that projects horizontally a minimum of 5 inches (12.7 cm) beyond the bottom of fire, electric shock, or injury to fire or electrical shock. Sufficient air is Not approved for installation: Parts supplied...
...appliance. Locate cooktop for correct installation. • Have a qualified technician install this manual and on the bottom of burns by reaching over heated surface units, cabinet storage space located above the surface units should be reduced by qualified person(s) in accordance with weatherproof caulking tape measure 2 hand or electric... equipment to hazards that projects horizontally a minimum of 5 inches (12.7 cm) beyond the bottom of fire, electric shock, or injury to fire or electrical shock. Sufficient air is Not approved for installation: Parts supplied...
Installation Instructions
Page 6
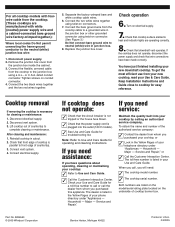
...cooktop is centered in cutout. 6 supply is required on a separate 30-ampere circuit, fused on both sides of the line. ࠜ A time-delay fuse or circuit breaker is adequate. Do Not have a fuse in back or other injury. See "Electrical...Pleasant Valley Road Cleveland, Ohio 44131-5575 The wiring diagram is at least 6 inches (15.2 cm) from front edge of countertop and parallel to the left ...appliance as possible between the junction box and cooktop so that the downdraft cooktop can result in the neutral or grounding circuit. Use 10-gauge solid copper wire. Electrically ground cooktop...
...cooktop is centered in cutout. 6 supply is required on a separate 30-ampere circuit, fused on both sides of the line. ࠜ A time-delay fuse or circuit breaker is adequate. Do Not have a fuse in back or other injury. See "Electrical...Pleasant Valley Road Cleveland, Ohio 44131-5575 The wiring diagram is at least 6 inches (15.2 cm) from front edge of countertop and parallel to the left ...appliance as possible between the junction box and cooktop so that the downdraft cooktop can result in the neutral or grounding circuit. Use 10-gauge solid copper wire. Electrically ground cooktop...
Installation Instructions
Page 8
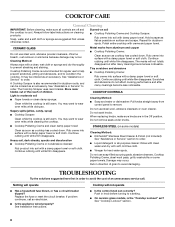
... connectors. 7. Check operation 6. You have questions about operating, cleaning or maintaining your cooktop: ✓ Refer to complete cleaning or maintenance. Disconnect electrical supply. 2. If cooktop does not operate: ✓ Check that the circuit breaker is plugged into your phone directory under "Appliances - Household - Service and Repair;" or ✓ Call the Customer Interaction Center. The...
... connectors. 7. Check operation 6. You have questions about operating, cleaning or maintaining your cooktop: ✓ Refer to complete cleaning or maintenance. Disconnect electrical supply. 2. If cooktop does not operate: ✓ Check that the circuit breaker is plugged into your phone directory under "Appliances - Household - Service and Repair;" or ✓ Call the Customer Interaction Center. The...

Use and Care Guide
Page 2
... cuisson 17 ENTRETIEN DE LA TABLE DE CUISSON 17 Nettoyage général 17 DÉPANNAGE 18 ASSISTANCE OU SERVICE 19 GARANTIE 19 COOKTOP SAFETY Your safety and the safety of injury, and tell you and others are not followed. 2 These words mean: DANGER You can...don't immediately follow instructions. All safety messages will follow instructions. We have provided many important safety messages in this manual and on your appliance. Always read and obey all safety messages. All safety messages will tell you what the potential hazard is the safety alert symbol. WARNING...
... cuisson 17 ENTRETIEN DE LA TABLE DE CUISSON 17 Nettoyage général 17 DÉPANNAGE 18 ASSISTANCE OU SERVICE 19 GARANTIE 19 COOKTOP SAFETY Your safety and the safety of injury, and tell you and others are not followed. 2 These words mean: DANGER You can...don't immediately follow instructions. All safety messages will follow instructions. We have provided many important safety messages in this manual and on your appliance. Always read and obey all safety messages. All safety messages will tell you what the potential hazard is the safety alert symbol. WARNING...
Use and Care Guide
Page 8
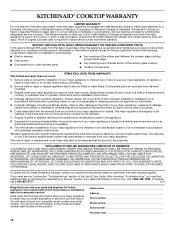
... rubbing until white film disappears. Burned-on surface and scrape. Cooktop Polishing Creme is the "Cooktop Lockout" set correctly? See "Assistance or Service" to order. Cleaning Method: s KitchenAid® Stainless Steel Cleaner & Polish (not included): See "Assistance... or Service" section to a setting. Damage may occur. Nothing will operate Cooktop will not totally disappear but after many cleanings become less noticeable. s Is the appliance wired properly?...
... rubbing until white film disappears. Burned-on surface and scrape. Cooktop Polishing Creme is the "Cooktop Lockout" set correctly? See "Assistance or Service" to order. Cleaning Method: s KitchenAid® Stainless Steel Cleaner & Polish (not included): See "Assistance... or Service" section to a setting. Damage may occur. Nothing will operate Cooktop will not totally disappear but after many cleanings become less noticeable. s Is the appliance wired properly?...

Use and Care Guide
Page 9
..., please check "Troubleshooting." If you use only factory specified parts. Cooktop Care Kit (includes cleaner, protectant, and applicator pads) Order Part Number 31605 Cooktop Scraper (ceramic glass models) Order Part Number 3183488 In the U.S.A. s Referrals to build every new KITCHENAID® appliance. Accessories U.S.A. Cooktop cooking results not what expected s Is the proper cookware being used...
..., please check "Troubleshooting." If you use only factory specified parts. Cooktop Care Kit (includes cleaner, protectant, and applicator pads) Order Part Number 31605 Cooktop Scraper (ceramic glass models) Order Part Number 3183488 In the U.S.A. s Referrals to build every new KITCHENAID® appliance. Accessories U.S.A. Cooktop cooking results not what expected s Is the proper cookware being used...
Use and Care Guide
Page 10
...slip together for the following information about your major appliance is located in materials or workmanship and is reported to KitchenAid within 30 days from the date of purchase. 6. This... ■ Electric element ■ Gas burners ■ Solid state touch control system parts ■ Any cracking of the rubber seal between the ceramic glass cooktop and porcelain edge... contact your major appliance for product service if your major appliance to better help by checking the "Assistance or Service" section or by the customer. KITCHENAID® COOKTOP WARRANTY LIMITED WARRANTY...
...slip together for the following information about your major appliance is located in materials or workmanship and is reported to KitchenAid within 30 days from the date of purchase. 6. This... ■ Electric element ■ Gas burners ■ Solid state touch control system parts ■ Any cracking of the rubber seal between the ceramic glass cooktop and porcelain edge... contact your major appliance for product service if your major appliance to better help by checking the "Assistance or Service" section or by the customer. KITCHENAID® COOKTOP WARRANTY LIMITED WARRANTY...