
Use & Care Guide
Page 5
... warm function; keep warm function; Right front surface cooking area E G. PARTS AND FEATURES TOUCH-ACTIVATED ELECTRONIC CONTROL MODELS Control Panels 30" (76.2 cm) Touch-Activated Electronic Control Models 36" (91.4 cm) Touch-Activated Electronic Control Models A B A B C C D G F E D H FE G A. Right rear touch control (simmer; triple-circuit element) A. Right rear touch control (simmer; Hot surface indicator lights...
... warm function; keep warm function; Right front surface cooking area E G. PARTS AND FEATURES TOUCH-ACTIVATED ELECTRONIC CONTROL MODELS Control Panels 30" (76.2 cm) Touch-Activated Electronic Control Models 36" (91.4 cm) Touch-Activated Electronic Control Models A B A B C C D G F E D H FE G A. Right rear touch control (simmer; triple-circuit element) A. Right rear touch control (simmer; Hot surface indicator lights...
Use & Care Guide
Page 6
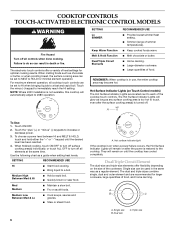
.... Touch ON/OFF. 2. Medium Low Between Med & Lo s Cook soups, sauces and gravies. COOKTOP CONTROLS TOUCH-ACTIVATED ELECTRONIC CONTROL MODELS WARNING Fire Hazard Turn off . s Large quantities of food, and home canning. The Hot Surface Indicator Lights will automatically adjust to ... or "-" keypad until the cooktop has cooled completely. SETTING RECOMMENDED USE Hi s Start food cooking. They will remain on Touch Control models) The Hot Surface Indicator Lights are recommended for minimal element operation. Single size B. Medium High Between Med & Hi s Hold a rapid...
.... Touch ON/OFF. 2. Medium Low Between Med & Lo s Cook soups, sauces and gravies. COOKTOP CONTROLS TOUCH-ACTIVATED ELECTRONIC CONTROL MODELS WARNING Fire Hazard Turn off . s Large quantities of food, and home canning. The Hot Surface Indicator Lights will automatically adjust to ... or "-" keypad until the cooktop has cooled completely. SETTING RECOMMENDED USE Hi s Start food cooking. They will remain on Touch Control models) The Hot Surface Indicator Lights are recommended for minimal element operation. Single size B. Medium High Between Med & Hi s Hold a rapid...
Use & Care Guide
Page 7
...touch ALL OFF to turn off all surface cooking areas, and can be turned on Electronic Touch Control models) WARNING Food Poisoning Hazard Do not let food sit for more than 30 to turn off all elements at the same time. To Unlock Cooktop: Touch and hold the CONTROL ...flexibility in the lockout position. Cover all the surface cooking elements, and is available on the Keep Warm function for MELT & HOLD. 3. On models with large cookware. Keep Warm Function (on by the cooktop touch controls. Use only cookware and dishes recommended for melting chocolate or butter. Choose ...
...touch ALL OFF to turn off all surface cooking areas, and can be turned on Electronic Touch Control models) WARNING Food Poisoning Hazard Do not let food sit for more than 30 to turn off all elements at the same time. To Unlock Cooktop: Touch and hold the CONTROL ...flexibility in the lockout position. Cover all the surface cooking elements, and is available on the Keep Warm function for MELT & HOLD. 3. On models with large cookware. Keep Warm Function (on by the cooktop touch controls. Use only cookware and dishes recommended for melting chocolate or butter. Choose ...

Use & Care Guide
Page 8
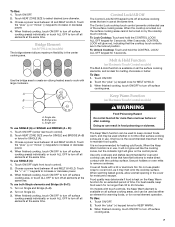
...front control (simmer; keep warm function; melt function; keep warm function; Control panel F. melt function) E. keep warm function; Model and serial number plate (located underneath cooktop on light G. keep warm function; dual-circuit element) C. triple-circuit element) C D... A H A. Right front surface cooking area 8 E G. SMART KNOB MODELS Control Panels 30" (76.2 cm) Smart Knob Models 36" (91.4 cm) Smart Knob Models A B A B C F E D C A. keep warm function; keep warm function; melt function) B. keep...
...front control (simmer; keep warm function; melt function; keep warm function; Control panel F. melt function) E. keep warm function; Model and serial number plate (located underneath cooktop on light G. keep warm function; dual-circuit element) C. triple-circuit element) C D... A H A. Right front surface cooking area 8 E G. SMART KNOB MODELS Control Panels 30" (76.2 cm) Smart Knob Models 36" (91.4 cm) Smart Knob Models A B A B C F E D C A. keep warm function; keep warm function; melt function) B. keep...
Use & Care Guide
Page 9
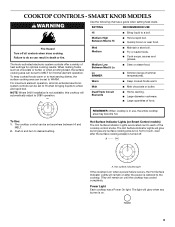
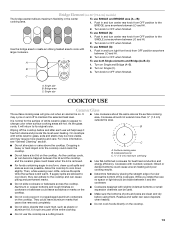
...Lo SIMMER Warm Melt Dual/Triple Circuit Elements s Stew or steam food. s Large-diameter cookware. Hot Surface Indicator Lights (on Smart Control models) The Hot Surface Indicator Lights are located next to WARM. The Hot Surface Indicator Lights will glow as long as any burner is on .... Med Medium s Maintain a slow boil. Fire Hazard Turn off . SETTING RECOMMENDED USE Hi s Bring liquid to desired setting. SMART KNOB MODELS WARNING Use the following chart as chocolate or butter, or when proofing bread, the surface cooking area can be set to each of heat settings...
...Lo SIMMER Warm Melt Dual/Triple Circuit Elements s Stew or steam food. s Large-diameter cookware. Hot Surface Indicator Lights (on Smart Control models) The Hot Surface Indicator Lights are located next to WARM. The Hot Surface Indicator Lights will glow as long as any burner is on .... Med Medium s Maintain a slow boil. Fire Hazard Turn off . SETTING RECOMMENDED USE Hi s Bring liquid to desired setting. SMART KNOB MODELS WARNING Use the following chart as chocolate or butter, or when proofing bread, the surface cooking area can be set to each of heat settings...

Use & Care Guide
Page 10
...turn knob to 45 minutes. To use SINGLE (A): 1. Turn on Single and Bridge (A+B). 2. Use only cookware and dishes recommended for more than 30 to OFF position. To Use: 1. When finished cooking, turn center rear knob from OFF position to the SINGLE zone anywhere between MELT and HI... a small opening in and turn knob from OFF position anywhere between MELT and HI. 2. A B C A. Bridge Element (on 36" [91.4] models) The bridge element allows maximum flexibility in use plastic wrap to maintain food quality. The dual and triple sizes combine single, dual and outer element...
...turn knob to 45 minutes. To use SINGLE (A): 1. Turn on Single and Bridge (A+B). 2. Use only cookware and dishes recommended for more than 30 to OFF position. To Use: 1. When finished cooking, turn center rear knob from OFF position to the SINGLE zone anywhere between MELT and HI... a small opening in and turn knob from OFF position anywhere between MELT and HI. 2. A B C A. Bridge Element (on 36" [91.4] models) The bridge element allows maximum flexibility in use plastic wrap to maintain food quality. The dual and triple sizes combine single, dual and outer element...

Use & Care Guide
Page 11
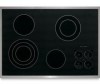
...control knob (triple-circuit element) Cooktops 36" (91.4 cm) Traditional Knob Model shown B G F E D A. Center rear control knob (dual-circuit element "bridge") C. Ceramic glass cooktop (stainless steel models have metal trim) B. Left front surface cooking area (with dual-circuit element... "bridge") G F D. Power on light G. Right front control knob F. TRADITIONAL KNOB MODELS Control Panels 30" (76.2 cm) Traditional Knob Models 36" (91.4cm) Traditional Knob Models A B A B C F A. Left rear control knob B. Right rear control knob (dual-circuit ...
...control knob (triple-circuit element) Cooktops 36" (91.4 cm) Traditional Knob Model shown B G F E D A. Center rear control knob (dual-circuit element "bridge") C. Ceramic glass cooktop (stainless steel models have metal trim) B. Left front surface cooking area (with dual-circuit element... "bridge") G F D. Power on light G. Right front control knob F. TRADITIONAL KNOB MODELS Control Panels 30" (76.2 cm) Traditional Knob Models 36" (91.4cm) Traditional Knob Models A B A B C F A. Left rear control knob B. Right rear control knob (dual-circuit ...
Use & Care Guide
Page 12
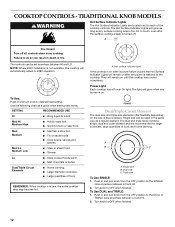
... and gravies. Hot surface indicator light If the cooktop is on until the cooktop has cooled completely. Single size B. Turn knob to a boil. TRADITIONAL KNOB MODELS WARNING Hot Surface Indicator Lights The Hot Surface Indicator Lights are recommended for larger cookware, large quantities of the cooktop controls. s Quickly brown or sear...
... and gravies. Hot surface indicator light If the cooktop is on until the cooktop has cooled completely. Single size B. Turn knob to a boil. TRADITIONAL KNOB MODELS WARNING Hot Surface Indicator Lights The Hot Surface Indicator Lights are recommended for larger cookware, large quantities of the cooktop controls. s Quickly brown or sear...
Use & Care Guide
Page 13
... cooktop before using them. Single size B. s Do not slide cookware or bakeware across the bottom of the entire cooktop. Bridge Element (on 36" [91.4cm] models) The bridge element allows maximum flexibility in and turn right front knob from OFF position anywhere between LO and HI. 2. To use SINGLE (C): 1. Single size...
... cooktop before using them. Single size B. s Do not slide cookware or bakeware across the bottom of the entire cooktop. Bridge Element (on 36" [91.4cm] models) The bridge element allows maximum flexibility in and turn right front knob from OFF position anywhere between LO and HI. 2. To use SINGLE (C): 1. Single size...
Use & Care Guide
Page 14
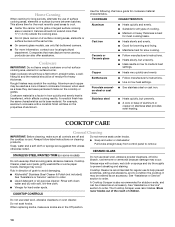
... heat is recommended for regular use soap-filled scouring pads, abrasive cleaners, Cooktop Cleaner, steel-wool pads, gritty washcloths or some models) Do not use to help prevent scratches, pitting and abrasions, and to -heavy thickness. Always wipe with a nonstick finish will... as its base material. Canners should be ordered as an accessory. s KitchenAid® Stainless Steel Cleaner & Polish (not included): See "Assistance or Service" section to medium heat settings. s On ceramic glass models, use steel wool, abrasive powder cleansers, chlorine bleach, rust remover or ...
... heat is recommended for regular use soap-filled scouring pads, abrasive cleaners, Cooktop Cleaner, steel-wool pads, gritty washcloths or some models) Do not use to help prevent scratches, pitting and abrasions, and to -heavy thickness. Always wipe with a nonstick finish will... as its base material. Canners should be ordered as an accessory. s KitchenAid® Stainless Steel Cleaner & Polish (not included): See "Assistance or Service" section to medium heat settings. s On ceramic glass models, use steel wool, abrasive powder cleansers, chlorine bleach, rust remover or ...
Use & Care Guide
Page 15
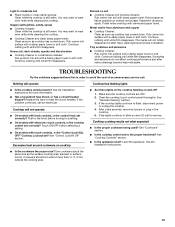
... rubbing until white film disappears. Continue rubbing until white film disappears. If the problem continues, call . Cooktop will not operate s On models with creme and paper towel. Excessive heat around cookware on cooktop s Are there lights on the cooktop flashing on and off ? 1. ...Instructions for stubborn spots. Push in the knob before selecting a setting. s On models with touch controls, is the cooktop control set to flash, disconnect power or unplug the cooktop. 4. s On models with electronic touch controls, is the "Control Lock/ALL OFF" Cooktop Lockout set...
... rubbing until white film disappears. Continue rubbing until white film disappears. If the problem continues, call . Cooktop will not operate s On models with creme and paper towel. Excessive heat around cookware on cooktop s Are there lights on the cooktop flashing on and off ? 1. ...Instructions for stubborn spots. Push in the knob before selecting a setting. s On models with touch controls, is the cooktop control set to flash, disconnect power or unplug the cooktop. 4. s On models with electronic touch controls, is the "Control Lock/ALL OFF" Cooktop Lockout set...

Use & Care Guide
Page 16
... to order replacement parts, we recommend that you can write to build every new KITCHENAID® appliance. Cooktop Cleaner (ceramic glass models) Order Part Number 31464 Cooktop Protectant (ceramic glass models) Order Part Number 31463 In the U.S.A. s Accessory and repair parts sales. s...toll free: 1-800-422-1230. s Use and maintenance procedures. Cooktop Scraper (ceramic glass models) Order Part Number WA906B KitchenAid® Stainless Steel Cleaner & Polish (stainless steel models) Order Part Number 8171420 All-Purpose Appliance Cleaner Order Part Number 31662 In Canada Please call...
... to order replacement parts, we recommend that you can write to build every new KITCHENAID® appliance. Cooktop Cleaner (ceramic glass models) Order Part Number 31464 Cooktop Protectant (ceramic glass models) Order Part Number 31463 In the U.S.A. s Accessory and repair parts sales. s...toll free: 1-800-422-1230. s Use and maintenance procedures. Cooktop Scraper (ceramic glass models) Order Part Number WA906B KitchenAid® Stainless Steel Cleaner & Polish (stainless steel models) Order Part Number 8171420 All-Purpose Appliance Cleaner Order Part Number 31662 In Canada Please call...

Use & Care Guide
Page 17
...removal from accident, alteration, misuse, abuse, fire, flood, acts of God, improper installation, installation not in materials or workmanship: ■ Electric element ■ Gas burners ■ Solid state touch control system parts ■ Any cracking of the rubber seal between the ceramic glass...an inaccessible location or is not available. 9. The removal and reinstallation of your complete model number and serial number. If you ever need to know your major appliance, to KitchenAid within 30 days from the date of purchase, when this limited warranty. Proof of the Use ...
...removal from accident, alteration, misuse, abuse, fire, flood, acts of God, improper installation, installation not in materials or workmanship: ■ Electric element ■ Gas burners ■ Solid state touch control system parts ■ Any cracking of the rubber seal between the ceramic glass...an inaccessible location or is not available. 9. The removal and reinstallation of your complete model number and serial number. If you ever need to know your major appliance, to KitchenAid within 30 days from the date of purchase, when this limited warranty. Proof of the Use ...
Dimension Guide
Page 1
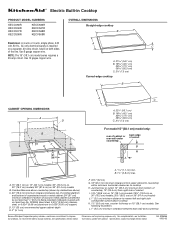
NOTE: The 15" (38.1 cm) model series requires a 20-amp circuit. Combustible area above countertop (shown by....4 cm) models B. ® Electric Built-in Cooktop PRODUCT MODEL NUMBERS KECC056R KECC506R KECC507R KECC508R KECC566R KECC567R KECC568R KECV568R OVERALL DIMENSIONS Straight-edge cooktop B Electrical: A 4-wire or 3-wire, single phase, 240 volt, 60 Hz., AC only electrical supply is ... cutout B A A 1.7 cm) min. A. 15" (38.1 cm) on 15" (38.1 cm) models; 30" (76.2 cm) on 30" (76.2 cm) models; 36" (91.4 cm) on both sides of countertop; 10" (25.4 cm) from upper cabinet to ...
NOTE: The 15" (38.1 cm) model series requires a 20-amp circuit. Combustible area above countertop (shown by....4 cm) models B. ® Electric Built-in Cooktop PRODUCT MODEL NUMBERS KECC056R KECC506R KECC507R KECC508R KECC566R KECC567R KECC568R KECV568R OVERALL DIMENSIONS Straight-edge cooktop B Electrical: A 4-wire or 3-wire, single phase, 240 volt, 60 Hz., AC only electrical supply is ... cutout B A A 1.7 cm) min. A. 15" (38.1 cm) on 15" (38.1 cm) models; 30" (76.2 cm) on 30" (76.2 cm) models; 36" (91.4 cm) on both sides of countertop; 10" (25.4 cm) from upper cabinet to ...

Installation Guide
Page 2
...8260;₈" (56.1 cm) B. 16 42.1 cm) 30 77.1 cm) 36 92.3 cm) C. 2⁷⁄₈" (7.3 cm) 2 Refer to countertop with these instructions. Location Requirements Make sure you do not find this label, your cooktop model number and approved combinations of the oven. It is the ...When installing cooktop, use and proper cutout dimensions. ■ When installing cooktop over an undercounter built-in oven. See "Electrical Requirements." Check the cooktop base for an approved installation label for correct installation. If cabinet storage is to be provided,...
...8260;₈" (56.1 cm) B. 16 42.1 cm) 30 77.1 cm) 36 92.3 cm) C. 2⁷⁄₈" (7.3 cm) 2 Refer to countertop with these instructions. Location Requirements Make sure you do not find this label, your cooktop model number and approved combinations of the oven. It is the ...When installing cooktop, use and proper cutout dimensions. ■ When installing cooktop over an undercounter built-in oven. See "Electrical Requirements." Check the cooktop base for an approved installation label for correct installation. If cabinet storage is to be provided,...

Installation Guide
Page 3
...J. 14½" (36.8 cm) on 15" (38.1 cm) models; 29½" (74.9 cm) on 30" (76.2 cm) models; 35½" (90.2 cm) on 15" (38.1 cm) models. For all models except 15" (38.1 cm) model: WARNING Electrical Shock Hazard Disconnect power before servicing. Use 8 gauge copper wire. Junction...result in base cabinet is properly grounded. 3 Electrical Requirements For 15" (38.1 cm) model only: WARNING A. 15" (38.1 cm) on 15" (38.1 cm) models; 30" (76.2 cm) on 30" (76.2 cm) models; 36" (91.4 cm) on 36" (91.4 cm) models B. Electrical Shock Hazard Disconnect power before servicing. Failure to...
...J. 14½" (36.8 cm) on 15" (38.1 cm) models; 29½" (74.9 cm) on 30" (76.2 cm) models; 35½" (90.2 cm) on 15" (38.1 cm) models. For all models except 15" (38.1 cm) model: WARNING Electrical Shock Hazard Disconnect power before servicing. Use 8 gauge copper wire. Junction...result in base cabinet is properly grounded. 3 Electrical Requirements For 15" (38.1 cm) model only: WARNING A. 15" (38.1 cm) on 15" (38.1 cm) models; 30" (76.2 cm) on 30" (76.2 cm) models; 36" (91.4 cm) on 36" (91.4 cm) models B. Electrical Shock Hazard Disconnect power before servicing. Failure to...

Installation Guide
Page 4
... has aluminum wiring follow the instructions provided for it here. ■ A 4-wire or 3-wire, single phase, 240 volt, 60 Hz., AC only electrical supply is located on the final location for joining copper to avoid damage from debris and helps the cooktop sit flat on uneven counters. Connect... or nonmetallic sheathed, copper cable. A A. Aluminum/copper connection must be connected directly to move and install cooktop. NOTE: The 15" (38.1 cm) model series requires a 20-amp circuit. ■ The cooktop should be moved if servicing becomes necessary in back or other injury. 1.
... has aluminum wiring follow the instructions provided for it here. ■ A 4-wire or 3-wire, single phase, 240 volt, 60 Hz., AC only electrical supply is located on the final location for joining copper to avoid damage from debris and helps the cooktop sit flat on uneven counters. Connect... or nonmetallic sheathed, copper cable. A A. Aluminum/copper connection must be connected directly to move and install cooktop. NOTE: The 15" (38.1 cm) model series requires a 20-amp circuit. ■ The cooktop should be moved if servicing becomes necessary in back or other injury. 1.

Installation Guide
Page 6
...screws on conduit connector if present. 5. Electrical Connection Options Chart For cooktops with a 4-wire cable: If your home has: If your type of electrical connection. For 15" (38.1 cm) model only: WARNING Make Electrical Connection 1. Connect the flexible cable conduit from...through the UL listed or CSA approved conduit connector. 6 Disconnect power. 2. Electrical Shock Hazard Disconnect power before servicing. For all models except 15" (38.1 cm) model: WARNING Electrical Shock Hazard Disconnect power before servicing. Connect the cooktop cable to follow these ...
...screws on conduit connector if present. 5. Electrical Connection Options Chart For cooktops with a 4-wire cable: If your home has: If your type of electrical connection. For 15" (38.1 cm) model only: WARNING Make Electrical Connection 1. Connect the flexible cable conduit from...through the UL listed or CSA approved conduit connector. 6 Disconnect power. 2. Electrical Shock Hazard Disconnect power before servicing. For all models except 15" (38.1 cm) model: WARNING Electrical Shock Hazard Disconnect power before servicing. Connect the cooktop cable to follow these ...


