Use & Care Guide
Page 13
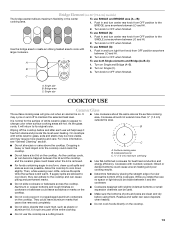
... slightly indented bottoms or small expansion channels can leave deposits when heated. Residue and water can be removed completely. Push in any part of white ceramic glass to appear to the cooktop and can become trapped between LO and HI. 2. Turn on the cooktop. It may require more ... area B. s Do not use both Single elements and Bridge (A+B+C): A 1. Push in and turn center rear knob from OFF position to cook with white ceramic glass, soils and stains may be visible between LO and HI. 2. Use the bridge area to create an oblong heated area to the BRIDGE...
... slightly indented bottoms or small expansion channels can leave deposits when heated. Residue and water can be removed completely. Push in any part of white ceramic glass to appear to the cooktop and can become trapped between LO and HI. 2. Turn on the cooktop. It may require more ... area B. s Do not use both Single elements and Bridge (A+B+C): A 1. Push in and turn center rear knob from OFF position to cook with white ceramic glass, soils and stains may be visible between LO and HI. 2. Use the bridge area to create an oblong heated area to the BRIDGE...
Use & Care Guide
Page 15
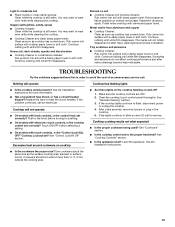
... area, element or surface burner. The marks will not totally disappear but after many cleanings become less noticeable. Continue rubbing until white film disappears. If the problem continues, call . Excessive heat around cookware on cooktop s Are there lights on the cooktop flashing... the cooktop. See "Cookware" section. Level the appliance. Light to flash, disconnect power or unplug the cooktop. 4. Continue rubbing until white film disappears. Repeat for service. Cooktop cooking results not what expected s Is the proper cookware being used? s Is the cooktop control set...
... area, element or surface burner. The marks will not totally disappear but after many cleanings become less noticeable. Continue rubbing until white film disappears. If the problem continues, call . Excessive heat around cookware on cooktop s Are there lights on the cooktop flashing... the cooktop. See "Cookware" section. Level the appliance. Light to flash, disconnect power or unplug the cooktop. 4. Continue rubbing until white film disappears. Repeat for service. Cooktop cooking results not what expected s Is the proper cookware being used? s Is the cooktop control set...

Installation Guide
Page 4
...do so can be connected directly to the junction box through flexible, armored or nonmetallic sheathed, copper cable. NOTE: The 15" (38.1 cm) model series requires a 20-amp circuit. ■ The cooktop should be provided at each end of the power supply cable (at the cooktop and at the ...NFPA 70-latest edition or CSA Standards C22.1-94, Canadian Electrical Code, Part 1 and C22.2 No. Connect the aluminum wiring to the added section of solid copper wire to the junction box. Using 2 or more people to do not have a neutral (white) wire. Apply foam strip adhesive-side down on the...
...do so can be connected directly to the junction box through flexible, armored or nonmetallic sheathed, copper cable. NOTE: The 15" (38.1 cm) model series requires a 20-amp circuit. ■ The cooktop should be provided at each end of the power supply cable (at the cooktop and at the ...NFPA 70-latest edition or CSA Standards C22.1-94, Canadian Electrical Code, Part 1 and C22.2 No. Connect the aluminum wiring to the added section of solid copper wire to the junction box. Using 2 or more people to do not have a neutral (white) wire. Apply foam strip adhesive-side down on the...
Installation Guide
Page 7
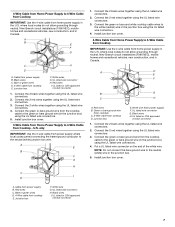
...Power Supply to 4-Wire Cable from cooktop D. A E B F G H C I . NOTE: Do not connect the bare ground wire to the neutral (white) wire in the junction box using the UL listed wire connectors. 5. Black wires C. UL listed or CSA approved conduit connector 1. Connect the 2 black wires together... power supply B. Bare or green wires D. 4-Wire cable from home power supply in the junction box) using the UL listed wire connectors. 3. White wire G. 4-Wire Cable from Home Power Supply to 4-Wire Cable from Cooktop IMPORTANT: Use the 4-wire cable from cooktop E. Red wires I D...
...Power Supply to 4-Wire Cable from cooktop D. A E B F G H C I . NOTE: Do not connect the bare ground wire to the neutral (white) wire in the junction box using the UL listed wire connectors. 5. Black wires C. UL listed or CSA approved conduit connector 1. Connect the 2 black wires together... power supply B. Bare or green wires D. 4-Wire cable from home power supply in the junction box) using the UL listed wire connectors. 3. White wire G. 4-Wire Cable from Home Power Supply to 4-Wire Cable from Cooktop IMPORTANT: Use the 4-wire cable from cooktop E. Red wires I D...

Installation Guide
Page 8
... the green or bare cooktop cable wires to the white (neutral) wire in the cooktop Use and Care Guide. 6. Attachment screw D. Foam seal 1. Dry thoroughly with a soft cloth. G A D A E F G B H C A. White wire (from power supply where local codes permit connecting... the frame-ground conductor to the neutral (white) junction box wire. Glass cooktop B. Clamping bracket (extends far enough beyond cooktop base to allow installation ...
... the green or bare cooktop cable wires to the white (neutral) wire in the cooktop Use and Care Guide. 6. Attachment screw D. Foam seal 1. Dry thoroughly with a soft cloth. G A D A E F G B H C A. White wire (from power supply where local codes permit connecting... the frame-ground conductor to the neutral (white) junction box wire. Glass cooktop B. Clamping bracket (extends far enough beyond cooktop base to allow installation ...