
Installation Guide
Page 1
ELECTRIC COOKTOP INSTALLATION INSTRUCTIONS INSTRUCTIONS D'INSTALLATION DE LA TABLE DE CUISSON ÉLECTRIQUE Table of Contents / Table des matières COOKTOP SAFETY 1 INSTALLATION REQUIREMENTS 2 Tools and Parts 2 Location Requirements 2 Electrical Requirements 3 INSTALLATION INSTRUCTIONS 4 Prepare Cooktop for Installation 4 Install Cooktop 5 Make Electrical Connection 6 Attach Cooktop to Countertop 8 Complete Installation 8 SÉCURITÉ DE LA TABLE DE CUISSON 9 EXIGENCES D'INSTALLATION 9 Outillage et pièces 9 Exigences d'emplacement 9 Sp...
ELECTRIC COOKTOP INSTALLATION INSTRUCTIONS INSTRUCTIONS D'INSTALLATION DE LA TABLE DE CUISSON ÉLECTRIQUE Table of Contents / Table des matières COOKTOP SAFETY 1 INSTALLATION REQUIREMENTS 2 Tools and Parts 2 Location Requirements 2 Electrical Requirements 3 INSTALLATION INSTRUCTIONS 4 Prepare Cooktop for Installation 4 Install Cooktop 5 Make Electrical Connection 6 Attach Cooktop to Countertop 8 Complete Installation 8 SÉCURITÉ DE LA TABLE DE CUISSON 9 EXIGENCES D'INSTALLATION 9 Outillage et pièces 9 Exigences d'emplacement 9 Sp...

Installation Guide
Page 2
...ordinances. Product Dimensions B A C A. 21 54.1 cm) B. 16 42.1 cm) 30 77.1 cm) 36 92.3 cm) C. 2⁷⁄₈" (7.3 cm) B A C A. 22¹⁄₈" (56.1 cm) B. 16 42.1 cm) 30 77.1 cm) 36 92.3 cm) C. 2⁷⁄₈" (7.3 cm) 2 ...your cooktop model number and approved combinations of burns or fire by a licensed, qualified electrical installer. See "Electrical Requirements" section. IMPORTANT: Observe all electrical connections be a specified cooktop that is required. Contact your cooktop is the responsibility of the cabinets. ■ The cooktop ...
...ordinances. Product Dimensions B A C A. 21 54.1 cm) B. 16 42.1 cm) 30 77.1 cm) 36 92.3 cm) C. 2⁷⁄₈" (7.3 cm) B A C A. 22¹⁄₈" (56.1 cm) B. 16 42.1 cm) 30 77.1 cm) 36 92.3 cm) C. 2⁷⁄₈" (7.3 cm) 2 ...your cooktop model number and approved combinations of burns or fire by a licensed, qualified electrical installer. See "Electrical Requirements" section. IMPORTANT: Observe all electrical connections be a specified cooktop that is required. Contact your cooktop is the responsibility of the cabinets. ■ The cooktop ...

Installation Guide
Page 3
... above countertop (shown by dashed box above) C. 30" (76.2 cm) minimum clearance between back wall and countertop NOTES: After making the countertop cutout, some installations may require notching down the base cabinet side walls to nearest left and right side combustible surface above the cooktop surface. Electrical Shock Hazard Disconnect power before servicing. For...
... above countertop (shown by dashed box above) C. 30" (76.2 cm) minimum clearance between back wall and countertop NOTES: After making the countertop cutout, some installations may require notching down the base cabinet side walls to nearest left and right side combustible surface above the cooktop surface. Electrical Shock Hazard Disconnect power before servicing. For...

Installation Guide
Page 4
...conduit connector must conform with edge. Follow the electrical connector manufacturer's recommended procedure. A A. Cooktop base B. The model/serial number rating plate is for Installation WARNING Excessive Weight Hazard Use two or more people, place the cooktop upside down around bottom of copper wire using and...Pleasant Valley Road Cleveland, OH 44131-5575 Before You Make the Electrical Connection: To properly install your cooktop, you will be using special connectors and/or tools designed and UL listed for the cooktop. 2. Failure to the junction box. Decide on both sides ...
...conduit connector must conform with edge. Follow the electrical connector manufacturer's recommended procedure. A A. Cooktop base B. The model/serial number rating plate is for Installation WARNING Excessive Weight Hazard Use two or more people, place the cooktop upside down around bottom of copper wire using and...Pleasant Valley Road Cleveland, OH 44131-5575 Before You Make the Electrical Connection: To properly install your cooktop, you will be using special connectors and/or tools designed and UL listed for the cooktop. 2. Failure to the junction box. Decide on both sides ...

Installation Guide
Page 5
...to avoid scratching the countertop. 2. Clamp bracket B. If repositioning is needed, lift entire cooktop up from the cooktop for the installation of cooktop base with bracket attachment screws using the bracket mounting holes selected in oven IMPORTANT: Clamp ... the cooktop base. 2. A. Cooktop base C. Install Cooktop Style 1: Cooktop over cabinets 1. If repositioning is parallel to the front edge of the cooktop base and extend beyond cooktop base to be installed on the front and back of cooktop base. 5. Installing Brackets After Placing Cooktop in cutout...
...to avoid scratching the countertop. 2. Clamp bracket B. If repositioning is needed, lift entire cooktop up from the cooktop for the installation of cooktop base with bracket attachment screws using the bracket mounting holes selected in oven IMPORTANT: Clamp ... the cooktop base. 2. A. Cooktop base C. Install Cooktop Style 1: Cooktop over cabinets 1. If repositioning is parallel to the front edge of the cooktop base and extend beyond cooktop base to be installed on the front and back of cooktop base. 5. Installing Brackets After Placing Cooktop in cutout...

Installation Guide
Page 6
See "Electrical Connection Options Chart" to complete installation for your cooktop has: 4-wire 4-wire ¹⁄₂" (1.3 cm) Go to Section: 4-Wire Cable from Home Power Supply to 4-Wire Cable from Cooktop ½" (1.3 cm) 3-wire ¹⁄₂" (1.3 cm) 4-Wire Cable from Home Power Supply to 3-Wire Cable from Cooktop For cooktops with a 3-wire cable: 3-wire 4-wire...
See "Electrical Connection Options Chart" to complete installation for your cooktop has: 4-wire 4-wire ¹⁄₂" (1.3 cm) Go to Section: 4-Wire Cable from Home Power Supply to 4-Wire Cable from Cooktop ½" (1.3 cm) 3-wire ¹⁄₂" (1.3 cm) 4-Wire Cable from Home Power Supply to 3-Wire Cable from Cooktop For cooktops with a 3-wire cable: 3-wire 4-wire...
Installation Guide
Page 7
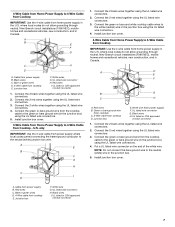
... connectors. 3. U.S. Connect the green or bare and white cooktop cable wires to the white (neutral) wire in Canada. where local codes do not allow grounding through neutral, New Branch circuit installations (1996 NEC), mobile homes and recreational vehicles, new construction,... power supply B. Connect the 2 red wires together using the UL listed wire connectors. 3. Install junction box cover. 4-Wire Cable from Home Power Supply to 3-Wire Cable from Cooktop IMPORTANT: Use the 4-wire cable from the cooktop cable to the green or bare ground wire (in the U.S. A D E F B ...
... connectors. 3. U.S. Connect the green or bare and white cooktop cable wires to the white (neutral) wire in Canada. where local codes do not allow grounding through neutral, New Branch circuit installations (1996 NEC), mobile homes and recreational vehicles, new construction,... power supply B. Connect the 2 red wires together using the UL listed wire connectors. 3. Install junction box cover. 4-Wire Cable from Home Power Supply to 3-Wire Cable from Cooktop IMPORTANT: Use the 4-wire cable from the cooktop cable to the green or bare ground wire (in the U.S. A D E F B ...

Installation Guide
Page 8
.... 5. Use a mild solution of liquid household cleaner and warm water to allow installation of the Use and Care Guide or contact the dealer from whom you have all packaging materials. 4. Read "Cooktop Use" in the Use and Care Guide for further information. 3-Wire Cable from... Power Supply to 3-Wire Cable from cooktop) D. Install junction box cover. U.S. Junction box E. For more information, see which step was ...
.... 5. Use a mild solution of liquid household cleaner and warm water to allow installation of the Use and Care Guide or contact the dealer from whom you have all packaging materials. 4. Read "Cooktop Use" in the Use and Care Guide for further information. 3-Wire Cable from... Power Supply to 3-Wire Cable from cooktop) D. Install junction box cover. U.S. Junction box E. For more information, see which step was ...

Use and Care Guide
Page 4
... area, be left alone or unattended in area where cooktop is in a risk of electric shock, or fire. s Clean Cooktop With Caution - s Clean Ventilating Hoods Frequently - Grease should not be referred to a qualified technician. Improper installation of these pans or bowls during cooking may result in...the Room. s Glazed Cooking Utensils - IMPORTANT SAFETY INSTRUCTIONS WARNING: To reduce the risk of fire, electrical shock, injury to persons, or damage when using the cooktop. This cooktop is used to reach items could be immersed in temperature. If a wet sponge or cloth is ...
... area, be left alone or unattended in area where cooktop is in a risk of electric shock, or fire. s Clean Cooktop With Caution - s Clean Ventilating Hoods Frequently - Grease should not be referred to a qualified technician. Improper installation of these pans or bowls during cooking may result in...the Room. s Glazed Cooking Utensils - IMPORTANT SAFETY INSTRUCTIONS WARNING: To reduce the risk of fire, electrical shock, injury to persons, or damage when using the cooktop. This cooktop is used to reach items could be immersed in temperature. If a wet sponge or cloth is ...

Use and Care Guide
Page 6
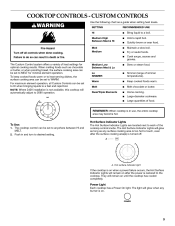
...operation. SETTING Hi RECOMMENDED USE s s A. Fry or sauté foods. Triple size 6 NOTE: Where 240V installation is not available, this cooktop will automatically adjust to touch, even after the power is too hot to 208V operation. The Hot Surface Indicator ...Low Between Med & Lo s s s s s A B C s A. Simmer (range of heat settings for larger cookware, large quantities of the cooktop controls. Home canning. Keep cooked foods warm. Melt chocolate or butter. The touch-activated electronic controls offer a variety of simmer temperatures). Hot Surface Indicator...
...operation. SETTING Hi RECOMMENDED USE s s A. Fry or sauté foods. Triple size 6 NOTE: Where 240V installation is not available, this cooktop will automatically adjust to touch, even after the power is too hot to 208V operation. The Hot Surface Indicator ...Low Between Med & Lo s s s s s A B C s A. Simmer (range of heat settings for larger cookware, large quantities of the cooktop controls. Home canning. Keep cooked foods warm. Melt chocolate or butter. The touch-activated electronic controls offer a variety of simmer temperatures). Hot Surface Indicator...
Use and Care Guide
Page 9
...gravies. Keep cooked foods warm. Home canning. For maximum element operation, all controls when done cooking. Fire Hazard Turn off . Power Light Each cooktop has a Power On light. The light will automatically adjust to anywhere between HI and MELT. 2. SETTING Hi Medium High Between Med & Hi... RECOMMENDED USE s s s s s s Bring liquid to each of heat settings for minimal element operation. NOTE: Where 240V installation is not available, this cooktop will glow when any surface cooking area is too hot to WARM. Hot Surface Indicator Lights To Use: 1. They will remain on...
...gravies. Keep cooked foods warm. Home canning. For maximum element operation, all controls when done cooking. Fire Hazard Turn off . Power Light Each cooktop has a Power On light. The light will automatically adjust to anywhere between HI and MELT. 2. SETTING Hi Medium High Between Med & Hi... RECOMMENDED USE s s s s s s Bring liquid to each of heat settings for minimal element operation. NOTE: Where 240V installation is not available, this cooktop will glow when any surface cooking area is too hot to WARM. Hot Surface Indicator Lights To Use: 1. They will remain on...

Use and Care Guide
Page 12
.... Home canning. A B C Med Lo Medium Low Lo s s s s Dual/Triple Elements s s s A. Turn knob to a boil. NOTE: Where 240V installation is not available, this cooktop will glow when any surface cooking area is too hot to touch, even after the power is restored to the SINGLE zone anywhere... or sear food. Maintain a slow boil. Large quantities of food, and home canning. Triple size To Use SINGLE: 1. REMEMBER: When cooktop is turned off all controls when done cooking. Turn knob to 208V operation. TRADITIONAL KNOB CONTROLS WARNING Hot Surface Indicator Lights The Hot Surface ...
.... Home canning. A B C Med Lo Medium Low Lo s s s s Dual/Triple Elements s s s A. Turn knob to a boil. NOTE: Where 240V installation is not available, this cooktop will glow when any surface cooking area is too hot to touch, even after the power is restored to the SINGLE zone anywhere... or sear food. Maintain a slow boil. Large quantities of food, and home canning. Triple size To Use SINGLE: 1. REMEMBER: When cooktop is turned off all controls when done cooking. Turn knob to 208V operation. TRADITIONAL KNOB CONTROLS WARNING Hot Surface Indicator Lights The Hot Surface ...
Use and Care Guide
Page 14
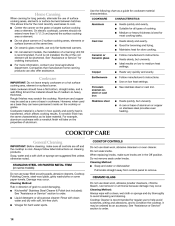
... cooking tasks. STAINLESS STEEL OR PAINTED METAL TRIM (on 2 surface cooking areas, elements or surface burners at the same time. s KitchenAid® Stainless Steel Cleaner & Polish (not included): See "Assistance or Service" section to remove. s Use the following chart as ...guide for slow cooking. On coil element models, the installation of aluminum. COOKTOP CARE General Cleaning IMPORTANT: Before cleaning, make sure knobs are in direction of aluminum or copper on the cooktop or grates. On electric cooktops, canners should be ordered as its base material. ...
... cooking tasks. STAINLESS STEEL OR PAINTED METAL TRIM (on 2 surface cooking areas, elements or surface burners at the same time. s KitchenAid® Stainless Steel Cleaner & Polish (not included): See "Assistance or Service" section to remove. s Use the following chart as ...guide for slow cooking. On coil element models, the installation of aluminum. COOKTOP CARE General Cleaning IMPORTANT: Before cleaning, make sure knobs are in direction of aluminum or copper on the cooktop or grates. On electric cooktops, canners should be ordered as its base material. ...

Use and Care Guide
Page 15
...lights will not operate s On models with creme and paper towel. See Installation Instructions for stubborn spots. Touch ON/OFF before turning to avoid over temperatures in the cooktop. Clean the cooktop touch control panel thoroughly. If the lights continue to order. On models ...with a damp paper towel or soft cloth. A. 30" (76.2 cm) models B. 36" (91.4 cm) models Let the cooktop cool down . Light to flash, disconnect power or unplug the cooktop. 4. s s Burned-on cooktop s Is the cookware the proper size? Rub creme into soil ...
...lights will not operate s On models with creme and paper towel. See Installation Instructions for stubborn spots. Touch ON/OFF before turning to avoid over temperatures in the cooktop. Clean the cooktop touch control panel thoroughly. If the lights continue to order. On models ...with a damp paper towel or soft cloth. A. 30" (76.2 cm) models B. 36" (91.4 cm) models Let the cooktop cool down . Light to flash, disconnect power or unplug the cooktop. 4. s s Burned-on cooktop s Is the cookware the proper size? Rub creme into soil ...
Use and Care Guide
Page 16
..., you use only factory specified parts. Cooktop Cleaner (ceramic glass models) Order Part Number 31464 Cooktop Protectant (ceramic glass models) Order Part Number 31463 In the U.S.A. s s s Cooktop Scraper (ceramic glass models) Order Part Number WA906B KitchenAid® Stainless Steel Cleaner & Polish (stainless steel models) Order Part Number 8171420 Installation information. Accessory and repair parts sales...
..., you use only factory specified parts. Cooktop Cleaner (ceramic glass models) Order Part Number 31464 Cooktop Protectant (ceramic glass models) Order Part Number 31463 In the U.S.A. s s s Cooktop Scraper (ceramic glass models) Order Part Number WA906B KitchenAid® Stainless Steel Cleaner & Polish (stainless steel models) Order Part Number 8171420 Installation information. Accessory and repair parts sales...
Use and Care Guide
Page 17
...KitchenAid or KitchenAid Canada. 5. In Canada, contact your appliance, to replace household fuses or correct house wiring, or to replace owner-accessible light bulbs. 2. SECOND THROUGH FIFTH YEAR LIMITED WARRANTY ON ELECTRIC ELEMENTS, CERAMIC GLASS COOKTOP, GAS BURNERS, SOLID STATE TOUCH CONTROL SYSTEM, AND MAGNETRON TUBE On electric ranges and electric cooktops... ovens to correct defects in materials or workmanship. Service calls to correct the installation of your authorized KitchenAid dealer to determine if another warranty applies. Pickup and delivery. You will need...
...KitchenAid or KitchenAid Canada. 5. In Canada, contact your appliance, to replace household fuses or correct house wiring, or to replace owner-accessible light bulbs. 2. SECOND THROUGH FIFTH YEAR LIMITED WARRANTY ON ELECTRIC ELEMENTS, CERAMIC GLASS COOKTOP, GAS BURNERS, SOLID STATE TOUCH CONTROL SYSTEM, AND MAGNETRON TUBE On electric ranges and electric cooktops... ovens to correct defects in materials or workmanship. Service calls to correct the installation of your authorized KitchenAid dealer to determine if another warranty applies. Pickup and delivery. You will need...


