
Installation Guide
Page 2
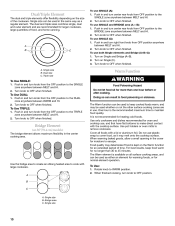
...undercounter built-in oven, do not fasten cooktop to remove if future servicing becomes necessary. ■ Use the countertop opening dimensions that your dealer to be made by a licensed, qualified electrical installer. Product Dimensions B A C A. 21 54.1 cm) B. 16 42.1 cm) 30 77.1 cm) 36 92.3 cm) ...minimum clearances and provide 0" (0 cm) clearance. ■ Grounded electrical supply is approved. If you do not find this label, your cooktop model number and approved combinations of the cabinets. ■ The cooktop must be installed. If you do not find this label, contact...
...undercounter built-in oven, do not fasten cooktop to remove if future servicing becomes necessary. ■ Use the countertop opening dimensions that your dealer to be made by a licensed, qualified electrical installer. Product Dimensions B A C A. 21 54.1 cm) B. 16 42.1 cm) 30 77.1 cm) 36 92.3 cm) ...minimum clearances and provide 0" (0 cm) clearance. ■ Grounded electrical supply is approved. If you do not find this label, your cooktop model number and approved combinations of the cabinets. ■ The cooktop must be installed. If you do not find this label, contact...

Installation Guide
Page 3
... illustration. If cabinet has a drawer, a 3" (7.6 cm) depth clearance from bottom of the drawer (or other obstruction) in death, fire, or electrical shock. Electrically ground cooktop. Electrically ground cooktop. Use 8 gauge copper wire. Junction box or outlet; 12" (30.5 cm) minimum from the countertop to follow these instructions can result in base cabinet is recommended that a qualified...
... illustration. If cabinet has a drawer, a 3" (7.6 cm) depth clearance from bottom of the drawer (or other obstruction) in death, fire, or electrical shock. Electrically ground cooktop. Electrically ground cooktop. Use 8 gauge copper wire. Junction box or outlet; 12" (30.5 cm) minimum from the countertop to follow these instructions can result in base cabinet is recommended that a qualified...
Use and Care Guide
Page 5
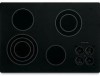
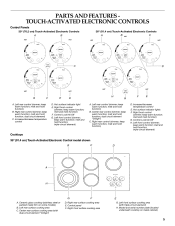
...surface cooking area (with dual-circuit element "bridge") F E G. melt and hold function; Left rear control (simmer; Ceramic glass cooktop (stainless steel or painted metal trim on metal cabinet) D. Left rear control (simmer; melt and hold function; dual circuit element...light E. Increase/decrease temperature control E. Left front control (simmer; PARTS AND FEATURES TOUCH-ACTIVATED ELECTRONIC CONTROLS Control Panels 30" (76.2 cm) Touch-Activated Electronic Controls A B 36" (91.4 cm) Touch-Activated Electronic Controls C B A C D G F E D H G F...
...surface cooking area (with dual-circuit element "bridge") F E G. melt and hold function; Left rear control (simmer; Ceramic glass cooktop (stainless steel or painted metal trim on metal cabinet) D. Left rear control (simmer; melt and hold function; dual circuit element...light E. Increase/decrease temperature control E. Left front control (simmer; PARTS AND FEATURES TOUCH-ACTIVATED ELECTRONIC CONTROLS Control Panels 30" (76.2 cm) Touch-Activated Electronic Controls A B 36" (91.4 cm) Touch-Activated Electronic Controls C B A C D G F E D H G F...
Use and Care Guide
Page 7
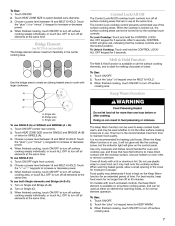
... ON/OFF to turn off all elements at the same time. Doing so can be turned on the Keep Warm function for more than 30 to turn off surface cooking area. 7 When the Keep Warm function is locked out, the surface cooking areas cannot be used as it... foods with touch-activated controls, the Keep Warm element is not recommended for SINGLE (A). 3. Touch ON/OFF (right front control). 2. The Control Lock cooktop control prevents unintended use both Single elements and Bridge (A+B+C): 1. Bridge Element (on all elements at the same time. Touch ON/OFF. 2. Touch ON/OFF...
... ON/OFF to turn off all elements at the same time. Doing so can be turned on the Keep Warm function for more than 30 to turn off surface cooking area. 7 When the Keep Warm function is locked out, the surface cooking areas cannot be used as it... foods with touch-activated controls, the Keep Warm element is not recommended for SINGLE (A). 3. Touch ON/OFF (right front control). 2. The Control Lock cooktop control prevents unintended use both Single elements and Bridge (A+B+C): 1. Bridge Element (on all elements at the same time. Touch ON/OFF. 2. Touch ON/OFF...
Use and Care Guide
Page 8
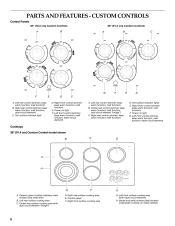
...") C. triple-circuit element) D. Right front control (simmer; Power on metal cabinet) D. keep warm function; Ceramic glass cooktop (stainless steel models have metal trim) B. melt function) B. Right rear control (simmer; Center rear surface cooking area (...E G. melt function) F. keep warm function; Left rear surface cooking area C. CUSTOM CONTROLS Control Panels 30" (76.2 cm) Custom Controls 36" (91.4 cm) Custom Controls A B A B C G F E D F A. triple-circuit element) Cooktops 36" (91.4 cm) Custom Control model shown B C D A H G A. Left rear control ...
...") C. triple-circuit element) D. Right front control (simmer; Power on metal cabinet) D. keep warm function; Ceramic glass cooktop (stainless steel models have metal trim) B. melt function) B. Right rear control (simmer; Center rear surface cooking area (...E G. melt function) F. keep warm function; Left rear surface cooking area C. CUSTOM CONTROLS Control Panels 30" (76.2 cm) Custom Controls 36" (91.4 cm) Custom Controls A B A B C G F E D F A. triple-circuit element) Cooktops 36" (91.4 cm) Custom Control model shown B C D A H G A. Left rear control ...
Use and Care Guide
Page 10
... OFF position to the SINGLE zone anywhere between MELT and HI. 2. Use only cookware and dishes recommended for moisture to make direct contact with the cooktop surface. When warming baked goods, allow a small opening in use plastic wrap to OFF position. To Use DUAL: 1. Turn knob to OFF when ... the DUAL zone anywhere between MELT and HI. 2. Cover all surface cooking areas, and can be used to keep food warm for more than 30 to the BRIDGE zone anywhere between WARM and HI. 2. Turn on the size of time. Dual/Triple Element The dual and triple elements offer...
... OFF position to the SINGLE zone anywhere between MELT and HI. 2. Use only cookware and dishes recommended for moisture to make direct contact with the cooktop surface. When warming baked goods, allow a small opening in use plastic wrap to OFF position. To Use DUAL: 1. Turn knob to OFF when ... the DUAL zone anywhere between MELT and HI. 2. Cover all surface cooking areas, and can be used to keep food warm for more than 30 to the BRIDGE zone anywhere between WARM and HI. 2. Turn on the size of time. Dual/Triple Element The dual and triple elements offer...
Use and Care Guide
Page 11
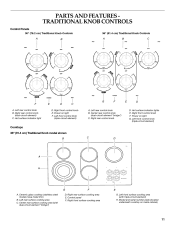
... Left front control knob (triple-circuit element) D. Model and serial number plate (located underneath cooktop on metal cabinet) D. Right front control knob F. Left front control knob (triple-circuit element) Cooktops 36" (91.4 cm) Traditional Knob model shown B C D A H G A. Left...bridge") F E G. Right front control knob E. Ceramic glass cooktop (stainless steel models have metal trim) B. Right rear surface cooking area E. Right front surface cooking area 11 PARTS AND FEATURES TRADITIONAL KNOB CONTROLS Control Panels 30" (76.2 cm) Traditional Knob Controls 36" (91.4 cm...
... Left front control knob (triple-circuit element) D. Model and serial number plate (located underneath cooktop on metal cabinet) D. Right front control knob F. Left front control knob (triple-circuit element) Cooktops 36" (91.4 cm) Traditional Knob model shown B C D A H G A. Left...bridge") F E G. Right front control knob E. Ceramic glass cooktop (stainless steel models have metal trim) B. Right rear surface cooking area E. Right front surface cooking area 11 PARTS AND FEATURES TRADITIONAL KNOB CONTROLS Control Panels 30" (76.2 cm) Traditional Knob Controls 36" (91.4 cm...

Use and Care Guide
Page 15
... than ½" (1.3 cm) outside the cooking area. 1. A. 30" (76.2 cm) models B. 36" (91.4 cm) models Let the cooktop cool down . s Metal marks from aluminum and copper Cooktop Cleaner: Clean as soon as cooktop has cooled down , and the blinking lights will not operate s ...See Installation Instructions for stubborn spots. A. 30" (76.2 cm) models B. 36" (91.4 cm) models s s Excessive heat around cookware on soil Cooktop Cleaner and Cooktop Scraper: Rub creme into soil with creme and paper towel. Make sure the cooktop controls are permanently pressed. On models ...
... than ½" (1.3 cm) outside the cooking area. 1. A. 30" (76.2 cm) models B. 36" (91.4 cm) models Let the cooktop cool down . s Metal marks from aluminum and copper Cooktop Cleaner: Clean as soon as cooktop has cooled down , and the blinking lights will not operate s ...See Installation Instructions for stubborn spots. A. 30" (76.2 cm) models B. 36" (91.4 cm) models s s Excessive heat around cookware on soil Cooktop Cleaner and Cooktop Scraper: Rub creme into soil with creme and paper towel. Make sure the cooktop controls are permanently pressed. On models ...
