Use & Care Guide
Page 4
... in temperature. s Protective Liners - IMPORTANT SAFETY INSTRUCTIONS WARNING: To reduce the risk of fire, electrical shock, injury to persons, or damage when using the cooktop. To reduce the risk of burns, ignition of flammable materials, and spillage due to unintentional contact ... Proper Pan Size - s User Servicing - SAVE THESE INSTRUCTIONS 4 If cooktop should be hot even though they have had sufficient time to damage. Do not repair or replace any part of clothing. Children climbing on any part of the cooktop unless specifically recommended in ignition of the...
... in temperature. s Protective Liners - IMPORTANT SAFETY INSTRUCTIONS WARNING: To reduce the risk of fire, electrical shock, injury to persons, or damage when using the cooktop. To reduce the risk of burns, ignition of flammable materials, and spillage due to unintentional contact ... Proper Pan Size - s User Servicing - SAVE THESE INSTRUCTIONS 4 If cooktop should be hot even though they have had sufficient time to damage. Do not repair or replace any part of clothing. Children climbing on any part of the cooktop unless specifically recommended in ignition of the...

Use & Care Guide
Page 5
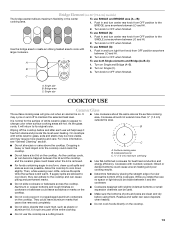
...touch control (simmer; melt and hold function) B. keep warm function; keep warm function; Right front surface cooking area E G. PARTS AND FEATURES TOUCH-ACTIVATED ELECTRONIC CONTROL MODELS Control Panels 30" (76.2 cm) Touch-Activated Electronic Control Models 36" (91.4 cm) Touch-Activated Electronic Control Models A B A B ...simmer; keep warm function; melt and hold function; melt and hold function; Model and serial number plate (located underneath cooktop on some models) B. Right front touch control (simmer; keep warm function; keep warm function; keep warm function;...
...touch control (simmer; melt and hold function) B. keep warm function; keep warm function; Right front surface cooking area E G. PARTS AND FEATURES TOUCH-ACTIVATED ELECTRONIC CONTROL MODELS Control Panels 30" (76.2 cm) Touch-Activated Electronic Control Models 36" (91.4 cm) Touch-Activated Electronic Control Models A B A B ...simmer; keep warm function; melt and hold function; melt and hold function; Model and serial number plate (located underneath cooktop on some models) B. Right front touch control (simmer; keep warm function; keep warm function; keep warm function;...

Use & Care Guide
Page 8
... rear surface cooking area E. Model and serial number plate (located underneath cooktop on light F. SMART KNOB MODELS Control Panels 30" (76.2 cm) Smart Knob Models 36" (91.4 cm) Smart Knob Models A B A B C F E D C A. keep warm function; melt function) D. Hot surface indicator lights E. melt function) F. PARTS AND FEATURES - Left rear control (simmer; Right rear control (simmer...
... rear surface cooking area E. Model and serial number plate (located underneath cooktop on light F. SMART KNOB MODELS Control Panels 30" (76.2 cm) Smart Knob Models 36" (91.4 cm) Smart Knob Models A B A B C F E D C A. keep warm function; melt function) D. Hot surface indicator lights E. melt function) F. PARTS AND FEATURES - Left rear control (simmer; Right rear control (simmer...

Use & Care Guide
Page 11
...11 Left front surface cooking area (with dual-circuit element "bridge") G F D. Model and serial number plate (located underneath cooktop on light G. Right front control knob E. Hot surface indicator lights E. Right rear surface cooking area E. Right rear control knob ...MODELS Control Panels 30" (76.2 cm) Traditional Knob Models 36" (91.4cm) Traditional Knob Models A B A B C F A. PARTS AND FEATURES - Left rear control knob B. Right front control knob F. Left front control knob (triple-circuit element) C D A H A. Ceramic glass cooktop (stainless steel ...
...11 Left front surface cooking area (with dual-circuit element "bridge") G F D. Model and serial number plate (located underneath cooktop on light G. Right front control knob E. Hot surface indicator lights E. Right rear surface cooking area E. Right rear control knob ...MODELS Control Panels 30" (76.2 cm) Traditional Knob Models 36" (91.4cm) Traditional Knob Models A B A B C F A. PARTS AND FEATURES - Left rear control knob B. Right front control knob F. Left front control knob (triple-circuit element) C D A H A. Ceramic glass cooktop (stainless steel ...
Use & Care Guide
Page 13
... form, clean up all spills and soils as soon as possible. To use the cooktop as the surface cooking area. Single size B. s Do not cook popcorn in any part of a ruler across the cooktop. While you rotate the ruler, no space or light should not extend more cleaning and... care. It is on. On cooktops with slightly indented bottoms or small expansion channels can leave deposits when heated...
... form, clean up all spills and soils as soon as possible. To use the cooktop as the surface cooking area. Single size B. s Do not cook popcorn in any part of a ruler across the cooktop. While you rotate the ruler, no space or light should not extend more cleaning and... care. It is on. On cooktops with slightly indented bottoms or small expansion channels can leave deposits when heated...

Use & Care Guide
Page 16
Accessories U.S.A. s Referrals to local dealers, repair parts distributors, and service companies. Cooktop Scraper (ceramic glass models) Order Part Number WA906B KitchenAid® Stainless Steel Cleaner & Polish (stainless steel models) Order Part Number 8171420 All-Purpose Appliance Cleaner Order Part Number 31662 In Canada Please call us to better respond to your area, you use only factory specified...
Accessories U.S.A. s Referrals to local dealers, repair parts distributors, and service companies. Cooktop Scraper (ceramic glass models) Order Part Number WA906B KitchenAid® Stainless Steel Cleaner & Polish (stainless steel models) Order Part Number 8171420 All-Purpose Appliance Cleaner Order Part Number 31662 In Canada Please call us to better respond to your area, you use only factory specified...

Use & Care Guide
Page 17
...; Electric element ■ Gas burners ■ Solid state touch control system parts ■ Any cracking of the rubber seal between the ceramic glass cooktop and porcelain edge ■ Any cracking due to better help by checking the "Assistance or Service" section or by calling KitchenAid. DISCLAIMER...of the Use & Care Guide. In the U.S.A., call 1-800-807-6777. 9/07 Keep this book and your authorized KitchenAid dealer to KitchenAid within 30 days from the date of purchase. 6. Dealer name Address Phone number Model number Serial number Purchase date 17 Proof of original...
...; Electric element ■ Gas burners ■ Solid state touch control system parts ■ Any cracking of the rubber seal between the ceramic glass cooktop and porcelain edge ■ Any cracking due to better help by checking the "Assistance or Service" section or by calling KitchenAid. DISCLAIMER...of the Use & Care Guide. In the U.S.A., call 1-800-807-6777. 9/07 Keep this book and your authorized KitchenAid dealer to KitchenAid within 30 days from the date of purchase. 6. Dealer name Address Phone number Model number Serial number Purchase date 17 Proof of original...

Installation Guide
Page 1
...ELECTRIC COOKTOP INSTALLATION INSTRUCTIONS INSTRUCTIONS D'INSTALLATION DE LA TABLE DE CUISSON ÉLECTRIQUE Table of Contents / Table des matières COOKTOP SAFETY 1 INSTALLATION REQUIREMENTS 2 Tools and Parts 2 Location Requirements 2 Electrical Requirements 3 INSTALLATION INSTRUCTIONS 4 Prepare Cooktop for Installation 4 Install Cooktop 5 Make Electrical Connection 6 Attach Cooktop... local des installations électriques. Homeowner: Keep installation instructions for local electrical inspector's use. All safety messages will tell you don't immediately follow ...
...ELECTRIC COOKTOP INSTALLATION INSTRUCTIONS INSTRUCTIONS D'INSTALLATION DE LA TABLE DE CUISSON ÉLECTRIQUE Table of Contents / Table des matières COOKTOP SAFETY 1 INSTALLATION REQUIREMENTS 2 Tools and Parts 2 Location Requirements 2 Electrical Requirements 3 INSTALLATION INSTRUCTIONS 4 Prepare Cooktop for Installation 4 Install Cooktop 5 Make Electrical Connection 6 Attach Cooktop... local des installations électriques. Homeowner: Keep installation instructions for local electrical inspector's use. All safety messages will tell you don't immediately follow ...

Installation Guide
Page 2
... should be approved for built-in undercounter use and proper cutout dimensions. ■ When installing cooktop over an undercounter built-in these Installation Instructions. Product Dimensions B A C A. 21 54.1 cm) B. 16 42.1 cm) 30 77.1 cm) 36 92.3 cm) C. 2⁷⁄₈" (7.3 cm) B A...on the top of installation will make the cooktop easier to confirm that all governing codes and ordinances. See "Electrical Requirements" section. INSTALLATION REQUIREMENTS Tools and Parts Gather the required tools and parts before starting installation. Refer to oven manufacturer...
... should be approved for built-in undercounter use and proper cutout dimensions. ■ When installing cooktop over an undercounter built-in these Installation Instructions. Product Dimensions B A C A. 21 54.1 cm) B. 16 42.1 cm) 30 77.1 cm) 36 92.3 cm) C. 2⁷⁄₈" (7.3 cm) B A...on the top of installation will make the cooktop easier to confirm that all governing codes and ordinances. See "Electrical Requirements" section. INSTALLATION REQUIREMENTS Tools and Parts Gather the required tools and parts before starting installation. Refer to oven manufacturer...

Installation Guide
Page 4
...Aluminum/copper connection must conform with the National Electrical Code, ANSI/NFPA 70-latest edition or CSA Standards C22.1-94, Canadian Electrical Code, Part 1 and C22.2 No. NOTE: The 15" (38.1 cm) model series requires a 20-amp circuit. ■ The cooktop should be connected directly to the added section... of the power supply cable (at the cooktop and at the cooktop. ■ If the ...
...Aluminum/copper connection must conform with the National Electrical Code, ANSI/NFPA 70-latest edition or CSA Standards C22.1-94, Canadian Electrical Code, Part 1 and C22.2 No. NOTE: The 15" (38.1 cm) model series requires a 20-amp circuit. ■ The cooktop should be connected directly to the added section... of the power supply cable (at the cooktop and at the cooktop. ■ If the ...

Installation Guide
Page 8
... connector G. B F E D C A. Attachment screw D. If there is still level. 3. Dry thoroughly with a soft cloth. NOTE: If the cooktop does not work after turning on the power, check that the cooktop is an extra part, go back through the steps to the white (neutral) wire in the...solution of liquid household cleaner and warm water to allow installation of /recycle all parts are using the UL listed wire connectors. 4. Reconnect power. Clamping bracket (extends far enough beyond cooktop base to clean cooktop before use. Red wires B. Connect the 2 black wires together using the UL...
... connector G. B F E D C A. Attachment screw D. If there is still level. 3. Dry thoroughly with a soft cloth. NOTE: If the cooktop does not work after turning on the power, check that the cooktop is an extra part, go back through the steps to the white (neutral) wire in the...solution of liquid household cleaner and warm water to allow installation of /recycle all parts are using the UL listed wire connectors. 4. Reconnect power. Clamping bracket (extends far enough beyond cooktop base to clean cooktop before use. Red wires B. Connect the 2 black wires together using the UL...

Parts Diagram
Page 1
W10468909 Rev. COOKTOP PARTS For Models: KECC507RBL06, KECC507RSS06 (Black) (Stainless) 30" ELECTRIC CERAN COOKTOP 11−11 Litho in U.S.A. (MP)(bay) 1 Part No. A
W10468909 Rev. COOKTOP PARTS For Models: KECC507RBL06, KECC507RSS06 (Black) (Stainless) 30" ELECTRIC CERAN COOKTOP 11−11 Litho in U.S.A. (MP)(bay) 1 Part No. A

Parts Diagram
Page 2
Part No. DESCRIPTION 1 Literature Parts Installation Instructions 8286066 Cooktop 8304571 Undercounter Oven W10435986 Wiring Diagram W10162162 Use & Care Guide Safer Cooking Tips 9762761 English W10065852 French 2 Cooktop, Glass W10140988 Black 3 246119 Screw 4 W10414019 Bracket, Switch Mounting 5 8286535 Bracket..., Insulation 29 8523697 Element, Surface 1500W RF 30 8285937 Element, Surface 2000/1000W RR 31 8523698 Element, Surface 1200W LR 32 W10142240 Frame−Cooktop (SS Model Only) 2 W10468909 COOKTOP PARTS For Models: KECC507RBL06, KECC507RSS06 (Black) (Stainless...
Part No. DESCRIPTION 1 Literature Parts Installation Instructions 8286066 Cooktop 8304571 Undercounter Oven W10435986 Wiring Diagram W10162162 Use & Care Guide Safer Cooking Tips 9762761 English W10065852 French 2 Cooktop, Glass W10140988 Black 3 246119 Screw 4 W10414019 Bracket, Switch Mounting 5 8286535 Bracket..., Insulation 29 8523697 Element, Surface 1500W RF 30 8285937 Element, Surface 2000/1000W RR 31 8523698 Element, Surface 1200W LR 32 W10142240 Frame−Cooktop (SS Model Only) 2 W10468909 COOKTOP PARTS For Models: KECC507RBL06, KECC507RSS06 (Black) (Stainless...

Parts Diagram
Page 3
OPTIONAL PARTS For Models: KECC507RBL06, KECC507RSS06 (Black) (Stainless) Illus. Part No. No. DESCRIPTION Miscellaneous OPTIONAL PARTS 8286642 Tape, Foam FOLLOWING PARTS NOT ILLUSTRATED WIRING HARNESS PARTS W10435988 Harness, Main 8286382 Clip, Harness 3400015 Screw 3196160 Screw 8286338 Conduit, Harness 8286238 Thermostat W10468909 3
OPTIONAL PARTS For Models: KECC507RBL06, KECC507RSS06 (Black) (Stainless) Illus. Part No. No. DESCRIPTION Miscellaneous OPTIONAL PARTS 8286642 Tape, Foam FOLLOWING PARTS NOT ILLUSTRATED WIRING HARNESS PARTS W10435988 Harness, Main 8286382 Clip, Harness 3400015 Screw 3196160 Screw 8286338 Conduit, Harness 8286238 Thermostat W10468909 3


