
Use & Care Guide
Page 5
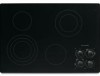
... hold function; melt and hold function) G. Center rear surface cooking area (with triple-circuit element) H. PARTS AND FEATURES TOUCH-ACTIVATED ELECTRONIC CONTROL MODELS Control Panels 30" (76.2 cm) Touch-Activated Electronic Control Models 36" (91.4 cm) Touch-Activated Electronic Control Models A B A B C C D G F E D ... B. keep warm function; melt and hold function) F. Left front touch control (simmer; Ceramic glass cooktop (stainless steel or painted metal trim on metal cabinet) 5 Right rear surface cooking area E. Model and serial number plate (located underneath...
... hold function; melt and hold function) G. Center rear surface cooking area (with triple-circuit element) H. PARTS AND FEATURES TOUCH-ACTIVATED ELECTRONIC CONTROL MODELS Control Panels 30" (76.2 cm) Touch-Activated Electronic Control Models 36" (91.4 cm) Touch-Activated Electronic Control Models A B A B C C D G F E D ... B. keep warm function; melt and hold function) F. Left front touch control (simmer; Ceramic glass cooktop (stainless steel or painted metal trim on metal cabinet) 5 Right rear surface cooking area E. Model and serial number plate (located underneath...
Use & Care Guide
Page 7
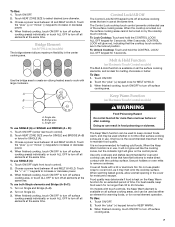
... cooking areas. Choose a power level between HI and MELT & HOLD. Bridge area C. Single size To use at the same time. To Unlock Cooktop: Touch and hold the CONTROL LOCK/ ALL OFF keypad for normal element operation. Melt & Hold Function (on Electronic Touch Control models) The Melt ...controls are in food poisoning or sickness. Turn on Electronic Touch Control models) WARNING Food Poisoning Hazard Do not let food sit for more than 30 to turn off surface cooking area(s) individually, or touch ALL OFF to increase or decrease power. 3. Single size B. To use SINGLE (C):...
... cooking areas. Choose a power level between HI and MELT & HOLD. Bridge area C. Single size To use at the same time. To Unlock Cooktop: Touch and hold the CONTROL LOCK/ ALL OFF keypad for normal element operation. Melt & Hold Function (on Electronic Touch Control models) The Melt ...controls are in food poisoning or sickness. Turn on Electronic Touch Control models) WARNING Food Poisoning Hazard Do not let food sit for more than 30 to turn off surface cooking area(s) individually, or touch ALL OFF to increase or decrease power. 3. Single size B. To use SINGLE (C):...

Use & Care Guide
Page 8
...melt function) D. Left front control (simmer; melt function; Right rear surface cooking area E. Model and serial number plate (located underneath cooktop on light G. Right rear control (simmer; dual-circuit element) C. Center rear control (simmer; Power on metal cabinet) Center rear ...) F. Left front surface cooking area (with dual-circuit element "bridge") G F D. Power on light F. Ceramic glass cooktop (stainless steel models have metal trim) B. SMART KNOB MODELS Control Panels 30" (76.2 cm) Smart Knob Models 36" (91.4 cm) Smart Knob Models A B A B C F E ...
...melt function) D. Left front control (simmer; melt function; Right rear surface cooking area E. Model and serial number plate (located underneath cooktop on light G. Right rear control (simmer; dual-circuit element) C. Center rear control (simmer; Power on metal cabinet) Center rear ...) F. Left front surface cooking area (with dual-circuit element "bridge") G F D. Power on light F. Ceramic glass cooktop (stainless steel models have metal trim) B. SMART KNOB MODELS Control Panels 30" (76.2 cm) Smart Knob Models 36" (91.4 cm) Smart Knob Models A B A B C F E ...

Use & Care Guide
Page 10
... foods warm, and may be used whether or not the other surface cooking zones are recommended for oven and cooktop use, and that have flat bottoms to keep food warm for more than 30 to the BRIDGE zone anywhere between MELT and HI. 2. To Use: 1. Single size B. Bridge area C. To Use... DUAL: 1. Turn knob to OFF when finished. To use SINGLE and BRIDGE area (A + B): 1. Food quality may melt onto the cooktop surface. Rotate knob to OFF when...
... foods warm, and may be used whether or not the other surface cooking zones are recommended for oven and cooktop use, and that have flat bottoms to keep food warm for more than 30 to the BRIDGE zone anywhere between MELT and HI. 2. To Use: 1. Single size B. Bridge area C. To Use... DUAL: 1. Turn knob to OFF when finished. To use SINGLE and BRIDGE area (A + B): 1. Food quality may melt onto the cooktop surface. Rotate knob to OFF when...

Use & Care Guide
Page 11
...PARTS AND FEATURES - Power on light G. Left rear control knob B. Right front control knob E. Power on light F. TRADITIONAL KNOB MODELS Control Panels 30" (76.2 cm) Traditional Knob Models 36" (91.4cm) Traditional Knob Models A B A B C F A. Hot surface indicator light E D...Left rear surface cooking area C. Right rear surface cooking area E. Right front surface cooking area E G. Left front control knob (triple-circuit element) Cooktops 36" (91.4 cm) Traditional Knob Model shown B G F E D A. Center rear control knob (dual-circuit element "bridge") C. Right rear...
...PARTS AND FEATURES - Power on light G. Left rear control knob B. Right front control knob E. Power on light F. TRADITIONAL KNOB MODELS Control Panels 30" (76.2 cm) Traditional Knob Models 36" (91.4cm) Traditional Knob Models A B A B C F A. Hot surface indicator light E D...Left rear surface cooking area C. Right rear surface cooking area E. Right front surface cooking area E G. Left front control knob (triple-circuit element) Cooktops 36" (91.4 cm) Traditional Knob Model shown B G F E D A. Center rear control knob (dual-circuit element "bridge") C. Right rear...

Use & Care Guide
Page 17
...service. You can find additional help you obtain assistance or service if you may find this limited warranty does not apply. KITCHENAID® COOKTOP WARRANTY LIMITED WARRANTY For one year from the date of purchase, when this major appliance is operated and maintained according to instructions...only in the United States or Canada and applies only when the major appliance is reported to KitchenAid within 30 days from your major appliance is used in materials or workmanship: ■ Electric element ■ Gas burners ■ Solid state touch control system parts ■ Any ...
...service. You can find additional help you obtain assistance or service if you may find this limited warranty does not apply. KITCHENAID® COOKTOP WARRANTY LIMITED WARRANTY For one year from the date of purchase, when this major appliance is operated and maintained according to instructions...only in the United States or Canada and applies only when the major appliance is reported to KitchenAid within 30 days from your major appliance is used in materials or workmanship: ■ Electric element ■ Gas burners ■ Solid state touch control system parts ■ Any ...

Installation Guide
Page 2
...'s Installation Instructions for approval for built-in oven. See "Electrical Requirements." When installing cooktop, use over an undercounter built-in undercounter use and proper cutout dimensions. ■ When installing cooktop over the heated surface units, cabinet storage space located above ...or over an undercounter built-in these Installation Instructions. If you do not fasten cooktop to confirm that your dealer to comply with any tools listed here. Product Dimensions B A C A. 21 54.1 cm) B. 16 42.1 cm) 30 77.1 cm) 36 92.3 cm) C. 2⁷⁄₈" (7.3 cm...
...'s Installation Instructions for approval for built-in oven. See "Electrical Requirements." When installing cooktop, use over an undercounter built-in undercounter use and proper cutout dimensions. ■ When installing cooktop over the heated surface units, cabinet storage space located above ...or over an undercounter built-in these Installation Instructions. If you do not fasten cooktop to confirm that your dealer to comply with any tools listed here. Product Dimensions B A C A. 21 54.1 cm) B. 16 42.1 cm) 30 77.1 cm) 36 92.3 cm) C. 2⁷⁄₈" (7.3 cm...

Installation Guide
Page 3
... notching down the base cabinet side walls to cooktop H. Junction box or outlet; 12" (30.5 cm) minimum from upper cabinet to countertop within minimum horizontal clearances to clear the cooktop base. If codes permit and a separate ground wire is used, it is recommended that a qualified electrical installer determine that the ground path and wire...
... notching down the base cabinet side walls to cooktop H. Junction box or outlet; 12" (30.5 cm) minimum from upper cabinet to countertop within minimum horizontal clearances to clear the cooktop base. If codes permit and a separate ground wire is used, it is recommended that a qualified electrical installer determine that the ground path and wire...

Parts Diagram
Page 1
COOKTOP PARTS For Models: KECC507RBL06, KECC507RSS06 (Black) (Stainless) 30" ELECTRIC CERAN COOKTOP 11−11 Litho in U.S.A. (MP)(bay) 1 Part No. A W10468909 Rev.
COOKTOP PARTS For Models: KECC507RBL06, KECC507RSS06 (Black) (Stainless) 30" ELECTRIC CERAN COOKTOP 11−11 Litho in U.S.A. (MP)(bay) 1 Part No. A W10468909 Rev.

Parts Diagram
Page 2
... Undercounter Oven W10435986 Wiring Diagram W10162162 Use & Care Guide Safer Cooking Tips 9762761 English W10065852 French 2 Cooktop, Glass W10140988 Black 3 246119 Screw 4 W10414019 Bracket, Switch Mounting 5 8286535 Bracket, Bottom 6 9759094 Spring Locator 7 Switch,...Inside Wall, Insulation 29 8523697 Element, Surface 1500W RF 30 8285937 Element, Surface 2000/1000W RR 31 8523698 Element, Surface 1200W LR 32 W10142240 Frame−Cooktop (SS Model Only) 2 W10468909 No. Part No. DESCRIPTION Illus. COOKTOP PARTS For Models: KECC507RBL06, KECC507RSS06 (Black) (Stainless) ...
... Undercounter Oven W10435986 Wiring Diagram W10162162 Use & Care Guide Safer Cooking Tips 9762761 English W10065852 French 2 Cooktop, Glass W10140988 Black 3 246119 Screw 4 W10414019 Bracket, Switch Mounting 5 8286535 Bracket, Bottom 6 9759094 Spring Locator 7 Switch,...Inside Wall, Insulation 29 8523697 Element, Surface 1500W RF 30 8285937 Element, Surface 2000/1000W RR 31 8523698 Element, Surface 1200W LR 32 W10142240 Frame−Cooktop (SS Model Only) 2 W10468909 No. Part No. DESCRIPTION Illus. COOKTOP PARTS For Models: KECC507RBL06, KECC507RSS06 (Black) (Stainless) ...
