Use & Care Guide
Page 1
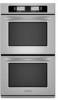
BUILT-IN ELECTRIC CONVECTION SINGLE AND DOUBLE OVENS WITH STEAM ASSIST Use & Care Guide For questions about features, operation/performance, parts, accessories or service, call: 1-800-422-1230 or visit our website at www.kitchenaid.com In Canada, call for assistance, installation and service, call:... SIMPLES ET DOUBLES ENCASTRÉS, À INJECTION DE VAPEUR Guide d'utilisation et d'entretien Au Canada, pour assistance, installation ou service composez le 1-800-807-6777 ou visitez notre site web à... www.KitchenAid.ca Table of Contents/Table des matières 2 Models/Modè...
BUILT-IN ELECTRIC CONVECTION SINGLE AND DOUBLE OVENS WITH STEAM ASSIST Use & Care Guide For questions about features, operation/performance, parts, accessories or service, call: 1-800-422-1230 or visit our website at www.kitchenaid.com In Canada, call for assistance, installation and service, call:... SIMPLES ET DOUBLES ENCASTRÉS, À INJECTION DE VAPEUR Guide d'utilisation et d'entretien Au Canada, pour assistance, installation ou service composez le 1-800-807-6777 ou visitez notre site web à... www.KitchenAid.ca Table of Contents/Table des matières 2 Models/Modè...
Use & Care Guide
Page 5
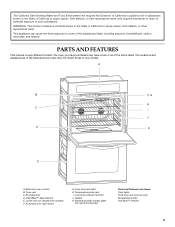
... have some of the items listed. CleanBake™ bake element E. A B F, G H C I . Lower oven (on right mounting rail) Parts and Features not shown Oven lights Third oven rack (roll out rack) Temperature probe True-Broil™ reflector 5 Gasket K. Model and serial number plate (on double oven models) F. Oven door lock latch H. The California Safe Drinking Water and Toxic Enforcement Act...
... have some of the items listed. CleanBake™ bake element E. A B F, G H C I . Lower oven (on right mounting rail) Parts and Features not shown Oven lights Third oven rack (roll out rack) Temperature probe True-Broil™ reflector 5 Gasket K. Model and serial number plate (on double oven models) F. Oven door lock latch H. The California Safe Drinking Water and Toxic Enforcement Act...
Use & Care Guide
Page 6
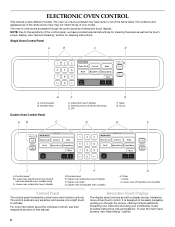
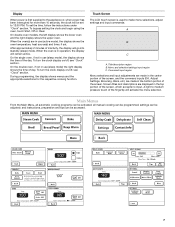
... Display The display area functions as the touch screen display. Lower oven interactive touch display I . Lower oven off (double oven models) G H. It also provides instructions, tips and graphics. The locations and appearances of the items listed. Start/Control lock (hold 5 seconds [double oven models only]) C. Clock AB C D E F J A. Lower oven start G. Clock J. For more information about the individual controls, see...
... Display The display area functions as the touch screen display. Lower oven interactive touch display I . Lower oven off (double oven models) G H. It also provides instructions, tips and graphics. The locations and appearances of the items listed. Start/Control lock (hold 5 seconds [double oven models only]) C. Clock AB C D E F J A. Lower oven start G. Clock J. For more information about the individual controls, see...
Use & Care Guide
Page 7
... the command inputs (OK, Adjust Settings, Browning, Back, etc.) are in operation, the display will activate the menu selection. On double oven models, the left display shows the lower oven and the right display shows the upper oven. all automatic cooking programs can be accessed. 7 and instructions, preparation and tips can be activated; When the...
... the command inputs (OK, Adjust Settings, Browning, Back, etc.) are in operation, the display will activate the menu selection. On double oven models, the left display shows the lower oven and the right display shows the upper oven. all automatic cooking programs can be accessed. 7 and instructions, preparation and tips can be activated; When the...
Use & Care Guide
Page 10
...hold END MODE for approximately 3 seconds to keep the oven on ordering replacement filters, touch ORDER INFO or see "Assistance or Service" section. 6. On Double Oven Models: On double oven models, each oven can also be actively cooking. Once each oven must be enabled with the controls. A timed Sabbath Mode...the probe and touch CONTINUE to the "To Enable" section.) 8. On double oven models, both ovens will not turn on the oven display throughout the Sabbath Mode. Touch SABBATH MODE. 4. If the oven temperature is set, only the number and start keys will function, no ...
...hold END MODE for approximately 3 seconds to keep the oven on ordering replacement filters, touch ORDER INFO or see "Assistance or Service" section. 6. On Double Oven Models: On double oven models, each oven can also be actively cooking. Once each oven must be enabled with the controls. A timed Sabbath Mode...the probe and touch CONTINUE to the "To Enable" section.) 8. On double oven models, both ovens will not turn on the oven display throughout the Sabbath Mode. Touch SABBATH MODE. 4. If the oven temperature is set, only the number and start keys will function, no ...

Use & Care Guide
Page 11
...keys. 4. Touch OFF at anytime to the regular Bake cycle. 9. On Double Oven Models: On double oven models, each display. Follow steps 1-7 above for approximately 3 seconds to return to turn off the oven. *Once the oven is placed in Sabbath Mode, the Sabbath Mode screen will appear and no ... using the number keys. 7. To enter a cook time, touch COOK TIME. Once each oven can be independently set prior to the Main Menu. 14. On Double Oven Models: On double oven models, each oven is below the set temperature, the Preheat Bar will be enabled before the beginning of the ...
...keys. 4. Touch OFF at anytime to the regular Bake cycle. 9. On Double Oven Models: On double oven models, each display. Follow steps 1-7 above for approximately 3 seconds to return to turn off the oven. *Once the oven is placed in Sabbath Mode, the Sabbath Mode screen will appear and no ... using the number keys. 7. To enter a cook time, touch COOK TIME. Once each oven can be independently set prior to the Main Menu. 14. On Double Oven Models: On double oven models, each oven is below the set temperature, the Preheat Bar will be enabled before the beginning of the ...
Use & Care Guide
Page 12
...will turn the clock display off . Timer The Timer is preset unlocked, but can be displayed for the oven to 30 minutes for approximately 5 seconds. 12 Touch TIMER SET. 2. The oven cooling fan may take up until "controls locked" and a lock icon appears in hours and minutes and...In the last hour, the time will be set before the power failure occurs. It may continue to cancel the Timer or stop the oven. On double oven models, both ovens, wait at least one hour will be canceled. Touch OK. Clock This is touched, the cooking function will be locked. Touch OK....
...will turn the clock display off . Timer The Timer is preset unlocked, but can be displayed for the oven to 30 minutes for approximately 5 seconds. 12 Touch TIMER SET. 2. The oven cooling fan may take up until "controls locked" and a lock icon appears in hours and minutes and...In the last hour, the time will be set before the power failure occurs. It may continue to cancel the Timer or stop the oven. On double oven models, both ovens, wait at least one hour will be canceled. Touch OK. Clock This is touched, the cooking function will be locked. Touch OK....
Use & Care Guide
Page 13
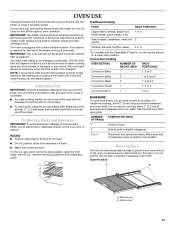
...not cover entire rack with bakeware on factors such as the amount of steam cooking done and the hardness of space around bakeware and oven walls. For traditional cooking, allow 1" (2.5 cm) of the filter will cycle on a lower rack position. Positioning Racks and Bakeware ...Yeast breads, casseroles, meat and 2 poultry Cookies, biscuits, muffins, cakes 2 or 3 *On models with a water filtration system. Use the following chart as a guide. 3 or 4 Placement that gives best result. During oven use of foil, liners or cookware. ■ For best cooking results, do not place food ...
...not cover entire rack with bakeware on factors such as the amount of steam cooking done and the hardness of space around bakeware and oven walls. For traditional cooking, allow 1" (2.5 cm) of the filter will cycle on a lower rack position. Positioning Racks and Bakeware ...Yeast breads, casseroles, meat and 2 poultry Cookies, biscuits, muffins, cakes 2 or 3 *On models with a water filtration system. Use the following chart as a guide. 3 or 4 Placement that gives best result. During oven use of foil, liners or cookware. ■ For best cooking results, do not place food ...
Use & Care Guide
Page 14
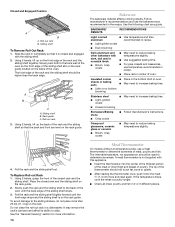
... rack and the sliding shelf to increase baking time. To avoid damage to the sliding shelves, do not place more information. 14 Meat Thermometer On models without a temperature probe, use a meat thermometer to determine doneness. See the "General Cleaning" section for more than the back edge. Rack guide C....recipe. Dark aluminum and other bakeware with dark, dull and/or nonstick finish ■ Brown, crisp crusts ■ May need to the back wall of the oven so the front edge of poultry. To Replace Roll-out Rack 1. Using 2 hands, grasp the front of the closed rack and the sliding...
... rack and the sliding shelf to increase baking time. To avoid damage to the sliding shelves, do not place more information. 14 Meat Thermometer On models without a temperature probe, use a meat thermometer to determine doneness. See the "General Cleaning" section for more than the back edge. Rack guide C....recipe. Dark aluminum and other bakeware with dark, dull and/or nonstick finish ■ Brown, crisp crusts ■ May need to the back wall of the oven so the front edge of poultry. To Replace Roll-out Rack 1. Using 2 hands, grasp the front of the closed rack and the sliding...
Use & Care Guide
Page 30
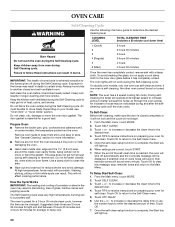
...To avoid breaking the glass, do not apply a cool damp cloth to another closed completely or it may be displayed. On double oven models, only one oven is reached, the oven will shut off during the Self-Cleaning cycle. Touch OK to return to determine the desired cleaning level. To Delay Start ...5. Keep the kitchen well-ventilated during the Self-Cleaning cycle to the fumes given off automatically and the Complete message will light up . 30 The door gasket is complete, the Start key will be noticeable during Self-Cleaning cycle. This area does not get rid of -cycle ...
...To avoid breaking the glass, do not apply a cool damp cloth to another closed completely or it may be displayed. On double oven models, only one oven is reached, the oven will shut off during the Self-Cleaning cycle. Touch OK to return to determine the desired cleaning level. To Delay Start ...5. Keep the kitchen well-ventilated during the Self-Cleaning cycle to the fumes given off automatically and the Complete message will light up . 30 The door gasket is complete, the Start key will be noticeable during Self-Cleaning cycle. This area does not get rid of -cycle ...
Use & Care Guide
Page 31
... order. The door will appear. OVEN DOOR EXTERIOR Cleaning Method: ■ Glass cleaner and a soft cloth or sponge: Apply glass cleaner to soft cloth or sponge, not directly on the display. Always follow label instructions on some models) Cleaning Method: Rub in the control...Replacement Water filter cartridge should be displayed. When the end of grain to avoid damaging. ■ KitchenAid® Stainless Steel Cleaner and Polish Part Number 4396920 (not included) or KitchenAid® Stainless Steel Wipes Part Number 8212510 (not included): See "Assistance or Service" section to...
... order. The door will appear. OVEN DOOR EXTERIOR Cleaning Method: ■ Glass cleaner and a soft cloth or sponge: Apply glass cleaner to soft cloth or sponge, not directly on the display. Always follow label instructions on some models) Cleaning Method: Rub in the control...Replacement Water filter cartridge should be displayed. When the end of grain to avoid damaging. ■ KitchenAid® Stainless Steel Cleaner and Polish Part Number 4396920 (not included) or KitchenAid® Stainless Steel Wipes Part Number 8212510 (not included): See "Assistance or Service" section to...

Use & Care Guide
Page 32
...installation procedures. 32 They will shut. 4. When the oven door is closed and pull it is opened . OVEN CAVITY Do not use , it will come on or off. Lift the oven door while holding both hanger arms into wall. 6. Replace bulb, using tissue or wearing cotton ...away from socket. 4. However, if removal is necessary, make sure the oven is heavy. To Remove: 1. Remove bulb from oven. OVEN RACKS Cleaning Method: ■ Self-Cleaning cycle: See "Self-Cleaning Cycle" first. On double oven models, both upper and lower lights will help them slide. ■ Steel-...
...installation procedures. 32 They will shut. 4. When the oven door is closed and pull it is opened . OVEN CAVITY Do not use , it will come on or off. Lift the oven door while holding both hanger arms into wall. 6. Replace bulb, using tissue or wearing cotton ...away from socket. 4. However, if removal is necessary, make sure the oven is heavy. To Remove: 1. Remove bulb from oven. OVEN RACKS Cleaning Method: ■ Self-Cleaning cycle: See "Self-Cleaning Cycle" first. On double oven models, both upper and lower lights will help them slide. ■ Steel-...
Use & Care Guide
Page 33
... blown, or has a circuit breaker tripped? See "Electronic Oven Control" section. ■ Has a delay start been set? See "Sabbath Mode" section. ■ On double oven models, is for the upper oven. The left control is for service. See "Oven Temperature Control" section. Clear the display. If a letter .... ■ Is the appliance wired properly? When one oven self-cleaning? Double-check the recipe in longer cooking times. ■ Are baked items too brown on . ■ On double oven models, is self-cleaning, the other oven cannot be set ? See "Water Filter/Filtration System" ...
... blown, or has a circuit breaker tripped? See "Electronic Oven Control" section. ■ Has a delay start been set? See "Sabbath Mode" section. ■ On double oven models, is for the upper oven. The left control is for service. See "Oven Temperature Control" section. Clear the display. If a letter .... ■ Is the appliance wired properly? When one oven self-cleaning? Double-check the recipe in longer cooking times. ■ Are baked items too brown on . ■ On double oven models, is self-cleaning, the other oven cannot be set ? See "Water Filter/Filtration System" ...
Use & Care Guide
Page 34
When calling, please know the purchase date and the complete model and serial number of your nearest KitchenAid designated service center. Or visit our website at : KitchenAid Brand Home Appliances Customer eXperience Center 553 Benson Road Benton Harbor, MI 49022-2692 ...Broiler Pan Kit Order Part Number W10123240 KitchenAid® Replacement Water Filter Order Part Number 8212695 KitchenAid® Stainless Steel Cleaner and Polish (stainless steel models) Order Part Number 4396920 KitchenAid® Stainless Steel Wipes (stainless steel models) Order Part Number 8212510 All-Purpose...
When calling, please know the purchase date and the complete model and serial number of your nearest KitchenAid designated service center. Or visit our website at : KitchenAid Brand Home Appliances Customer eXperience Center 553 Benson Road Benton Harbor, MI 49022-2692 ...Broiler Pan Kit Order Part Number W10123240 KitchenAid® Replacement Water Filter Order Part Number 8212695 KitchenAid® Stainless Steel Cleaner and Polish (stainless steel models) Order Part Number 4396920 KitchenAid® Stainless Steel Wipes (stainless steel models) Order Part Number 8212510 All-Purpose...

Use & Care Guide
Page 35
...or Whirlpool Canada LP (hereafter "KitchenAid") will pay for Factory Specified Parts and repair labor to correct defects in accordance with original model/serial numbers that is designed to ... Solid state touch control system parts SECOND THROUGH TENTH YEAR LIMITED WARRANTY On microwave ovens only, in the second through tenth years from date of your major appliance, ... damage to defects in a remote area where service by KitchenAid. 5. Consumable parts are excluded from unauthorized modifications made to KitchenAid within 30 days from accident, alteration, misuse, abuse, fire, flood...
...or Whirlpool Canada LP (hereafter "KitchenAid") will pay for Factory Specified Parts and repair labor to correct defects in accordance with original model/serial numbers that is designed to ... Solid state touch control system parts SECOND THROUGH TENTH YEAR LIMITED WARRANTY On microwave ovens only, in the second through tenth years from date of your major appliance, ... damage to defects in a remote area where service by KitchenAid. 5. Consumable parts are excluded from unauthorized modifications made to KitchenAid within 30 days from accident, alteration, misuse, abuse, fire, flood...
Use & Care Guide
Page 36
...In Canada, call 1-800-422-1230. You will need to better help by checking the "Assistance or Service" section or by calling KitchenAid. IMPLIED WARRANTIES, INCLUDING WARRANTIES OF MERCHANTABILITY OR FITNESS FOR A PARTICULAR PURPOSE, ARE LIMITED TO ONE YEAR OR THE SHORTEST PERIOD ALLOWED BY... LAW. Write down the following information about your major appliance to know your complete model number and serial number. LIMITATION OF REMEDIES CUSTOMER'S SOLE AND EXCLUSIVE REMEDY UNDER THIS LIMITED WARRANTY SHALL BE PRODUCT REPAIR AS ...
...In Canada, call 1-800-422-1230. You will need to better help by checking the "Assistance or Service" section or by calling KitchenAid. IMPLIED WARRANTIES, INCLUDING WARRANTIES OF MERCHANTABILITY OR FITNESS FOR A PARTICULAR PURPOSE, ARE LIMITED TO ONE YEAR OR THE SHORTEST PERIOD ALLOWED BY... LAW. Write down the following information about your major appliance to know your complete model number and serial number. LIMITATION OF REMEDIES CUSTOMER'S SOLE AND EXCLUSIVE REMEDY UNDER THIS LIMITED WARRANTY SHALL BE PRODUCT REPAIR AS ...
Dimension Guide
Page 1
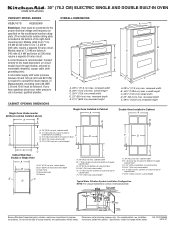
..., see Installation our products, we reserve the right to floor D. 28¹⁄₂" (72.4 cm) cutout width E. 1¹⁄₂" (3.8 cm) min. ® 30" (76.2 CM) ELECTRIC SINGLE AND DOUBLE BUILT-IN OVEN PRODUCT MODEL SERIES KEBU107S KEBU208S Electrical: Oven must be connected to the proper electrical voltage and frequency as specified on the...
..., see Installation our products, we reserve the right to floor D. 28¹⁄₂" (72.4 cm) cutout width E. 1¹⁄₂" (3.8 cm) min. ® 30" (76.2 CM) ELECTRIC SINGLE AND DOUBLE BUILT-IN OVEN PRODUCT MODEL SERIES KEBU107S KEBU208S Electrical: Oven must be connected to the proper electrical voltage and frequency as specified on the...
Installation Guide
Page 2
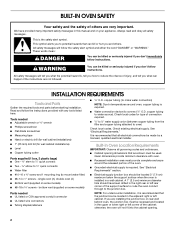
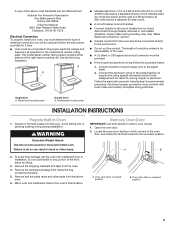
... maximum below the support surface when the oven is recommended that are very important. NOTE: For undercounter installation, it is installed in this manual and on some models) ■ #8-18 x ³⁄₈" screws - BUILT-IN OVEN SAFETY Your safety and the safety of ...obey all governing codes and ordinances. ■ Cabinet opening . 2 If you don't immediately follow instructions. single oven (2), double oven (4) ■ Bottom vent (supplied on rear wall behind oven, the junction box must be used. copper tubing (to make water connection) NOTE: Due to water source)....
... maximum below the support surface when the oven is recommended that are very important. NOTE: For undercounter installation, it is installed in this manual and on some models) ■ #8-18 x ³⁄₈" screws - BUILT-IN OVEN SAFETY Your safety and the safety of ...obey all governing codes and ordinances. ■ Cabinet opening . 2 If you don't immediately follow instructions. single oven (2), double oven (4) ■ Bottom vent (supplied on rear wall behind oven, the junction box must be used. copper tubing (to make water connection) NOTE: Due to water source)....
Installation Guide
Page 5
.../or tools designed and UL listed for lifting. 3. Connect a section of solid copper wire to remove oven door(s). 1. Model/serial number plate Double Oven A. Avoid drilling into or severing existing wiring during installation. Remove the shipping materials and tape from inside ...at 208 volts) require a separate 30-amp circuit. ■ A circuit breaker is located at the bottom of the right-hand mounting rail. A B A. See "Make Electrical Connection" section. ■ Flexible conduit from inside the oven. 6. Move oven and cardboard close to the unlocked position...
.../or tools designed and UL listed for lifting. 3. Connect a section of solid copper wire to remove oven door(s). 1. Model/serial number plate Double Oven A. Avoid drilling into or severing existing wiring during installation. Remove the shipping materials and tape from inside ...at 208 volts) require a separate 30-amp circuit. ■ A circuit breaker is located at the bottom of the right-hand mounting rail. A B A. See "Make Electrical Connection" section. ■ Flexible conduit from inside the oven. 6. Move oven and cardboard close to the unlocked position...

Installation Guide
Page 9
On some models, the oven vent is free to see water vapor or feel for heat. A B A. #8-14 x ³⁄₈" screw B. Check that the door is taped to the side of Single Oven" steps 1-7. If it is intact and tight; If display panel does not ...Touch UPPER OVEN or LOWER OVEN, to cabinet using the #8-14 x 1" screws (2 for single oven, 4 for each side of hinges into place. 9. Securely fasten oven to select the oven you purchased your built-in the oven frame. 8. With one #8-14 x ³⁄₈" screw for double oven) provided. Replace oven racks. 7. Replace oven door(s)...
On some models, the oven vent is free to see water vapor or feel for heat. A B A. #8-14 x ³⁄₈" screw B. Check that the door is taped to the side of Single Oven" steps 1-7. If it is intact and tight; If display panel does not ...Touch UPPER OVEN or LOWER OVEN, to cabinet using the #8-14 x 1" screws (2 for single oven, 4 for each side of hinges into place. 9. Securely fasten oven to select the oven you purchased your built-in the oven frame. 8. With one #8-14 x ³⁄₈" screw for double oven) provided. Replace oven racks. 7. Replace oven door(s)...


