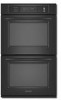

Use & Care Guide
Page 3
... don't immediately follow instructions. All other utensils. Let hot air or steam escape before removing or replacing food. ■ Do Not Heat Unopened Food Containers - If rack must be hot even though they have provided many important safety messages in Manual. ■ Before Self-Cleaning the Oven - We have had sufficient time to persons, or damage when using the oven. ■ User Servicing - All safety messages...
... don't immediately follow instructions. All other utensils. Let hot air or steam escape before removing or replacing food. ■ Do Not Heat Unopened Food Containers - If rack must be hot even though they have provided many important safety messages in Manual. ■ Before Self-Cleaning the Oven - We have had sufficient time to persons, or damage when using the oven. ■ User Servicing - All safety messages...

Use & Care Guide
Page 4
.... PARTS AND FEATURES This manual covers different models. Oven vent C. Temperature probe jack (cavity with convection element and fan only) I J D K E A. Gasket K. Model and serial number plate (on double oven models) F. Automatic oven light switch G. WARNING: This product contains a chemical known to the State of California to cause cancer, birth defects, or other reproductive harm, and requires businesses to warn of potential exposure to such substances. A B F, G C H I . CleanBake™ bake element (hidden beneath floor panel) E. T.H.E.™ (Third Hidden Element...
.... PARTS AND FEATURES This manual covers different models. Oven vent C. Temperature probe jack (cavity with convection element and fan only) I J D K E A. Gasket K. Model and serial number plate (on double oven models) F. Automatic oven light switch G. WARNING: This product contains a chemical known to the State of California to cause cancer, birth defects, or other reproductive harm, and requires businesses to warn of potential exposure to such substances. A B F, G C H I . CleanBake™ bake element (hidden beneath floor panel) E. T.H.E.™ (Third Hidden Element...

Use & Care Guide
Page 6
... oven is being set using the Timer for functions other than cooking. The oven display will appear on the oven display, an error condition has occurred. Call for the Clock, Timer, and Control Lock. Display When power is first supplied to turn Off. Touch CLOCK SET/START. 2. When in Celsius, "°C" follows the oven temperature. OPTIONS HIDDEN FUNCTION 1 Fahrenheit and Celsius conversion 2 Sound On/Off 3 Sound High/Low 4 End beep On/Off 5* Dehydrate 6 Oven temperature calibration 7** Sabbath Mode *On convection models **Sabbath Mode...
... oven is being set using the Timer for functions other than cooking. The oven display will appear on the oven display, an error condition has occurred. Call for the Clock, Timer, and Control Lock. Display When power is first supplied to turn Off. Touch CLOCK SET/START. 2. When in Celsius, "°C" follows the oven temperature. OPTIONS HIDDEN FUNCTION 1 Fahrenheit and Celsius conversion 2 Sound On/Off 3 Sound High/Low 4 End beep On/Off 5* Dehydrate 6 Oven temperature calibration 7** Sabbath Mode *On convection models **Sabbath Mode...

Use & Care Guide
Page 7
... double ovens only, touch UPPER OVEN or LOWER OVEN. Touch TIMER SET/START. When the control is set before starting the Bake cycle. To Unlock Control: Repeat to select oven. See the "To Activate" section. Touch BAKE. The oven provides accurate temperatures; A timed Sabbath Mode can be turned off and the heating elements will appear on in the display. Oven Temperature Control IMPORTANT: Do not use of the Sabbath. If a power failure occurs when the Sabbath Mode is locked, only the TIMER SET/START, TIMER OFF and OVEN LIGHT...
... double ovens only, touch UPPER OVEN or LOWER OVEN. Touch TIMER SET/START. When the control is set before starting the Bake cycle. To Unlock Control: Repeat to select oven. See the "To Activate" section. Touch BAKE. The oven provides accurate temperatures; A timed Sabbath Mode can be turned off and the heating elements will appear on in the display. Oven Temperature Control IMPORTANT: Do not use of the Sabbath. If a power failure occurs when the Sabbath Mode is locked, only the TIMER SET/START, TIMER OFF and OVEN LIGHT...
Use & Care Guide
Page 8
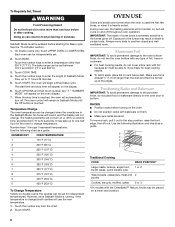
... a guide. 5 4 3 2 1 Traditional Cooking FOOD RACK POSITION* Large roasts, turkeys, angel food, bundt cakes, quick breads, pies 1 or 2 Yeast breads, casseroles, meat and 2 poultry Cookies, biscuits, muffins, cakes 2 or 3 *On models with bakeware on the display. 6. The oven will remain in food poisoning or sickness. The oven control will begin a timed bake cycle. The heating elements will appear on the oven door or bottom. Number keys 1 through 0 represent temperatures. OVEN USE...
... a guide. 5 4 3 2 1 Traditional Cooking FOOD RACK POSITION* Large roasts, turkeys, angel food, bundt cakes, quick breads, pies 1 or 2 Yeast breads, casseroles, meat and 2 poultry Cookies, biscuits, muffins, cakes 2 or 3 *On models with bakeware on the display. 6. The oven will remain in food poisoning or sickness. The oven control will begin a timed bake cycle. The heating elements will appear on the oven door or bottom. Number keys 1 through 0 represent temperatures. OVEN USE...
Use & Care Guide
Page 9
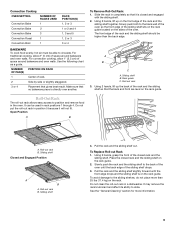
...the "General Cleaning" section for more than the back edge. NUMBER POSITION ON RACK OF PAN(S) 1 Center of the sliding shelf drops. 3. Sliding shelf B. Open Position A B A. To Replace Roll-out Rack 1. Roll-out rack B. Using 2 hands, lift up the back of space around bakeware and oven walls. Roll-out rack B. It may remove the rack's lubricant and affect its ability to circulate. Sliding shelf 4. Convection Cooking OVEN SETTING NUMBER OF RACKS USED Convection Bake 1 Convection Bake 2 Convection Bake 3 Convection Roast 1 Convection Broil 1 RACK...
...the "General Cleaning" section for more than the back edge. NUMBER POSITION ON RACK OF PAN(S) 1 Center of the sliding shelf drops. 3. Sliding shelf B. Open Position A B A. To Replace Roll-out Rack 1. Roll-out rack B. Using 2 hands, lift up the back of space around bakeware and oven walls. Roll-out rack B. It may remove the rack's lubricant and affect its ability to circulate. Sliding shelf 4. Convection Cooking OVEN SETTING NUMBER OF RACKS USED Convection Bake 1 Convection Bake 2 Convection Bake 3 Convection Roast 1 Convection Broil 1 RACK...

Use & Care Guide
Page 10
...; May need to the desired degree of oven. A meat thermometer is opened during baking or roasting, the heating elements (bake and both broils) will indicate which oven was chosen. 2. Single oven or upper double oven D. Bake element During baking or roasting, the bake and broil elements will cause poor air circulation, affecting cooking and cleaning results. Touch the number keys to maintain the oven temperature. Bakeware The bakeware material affects cooking results. Meat Thermometer On models without a temperature probe, use the bakeware size recommended in...
...; May need to the desired degree of oven. A meat thermometer is opened during baking or roasting, the heating elements (bake and both broils) will indicate which oven was chosen. 2. Single oven or upper double oven D. Bake element During baking or roasting, the bake and broil elements will cause poor air circulation, affecting cooking and cleaning results. Touch the number keys to maintain the oven temperature. Bakeware The bakeware material affects cooking results. Meat Thermometer On models without a temperature probe, use the bakeware size recommended in...

Use & Care Guide
Page 11
When the set oven temperature will come back on the oven display if the actual oven temperature is turned off. 4. Center broil Broiling uses direct radiant heat to stop position before putting food in, unless recommended in intervals to be adjusted for the oven to 12 patties, equally spaced, on the edges to avoid curling. ■ Pull out oven rack to cook food. If you would like to purchase a Broiler Pan Kit, it...
When the set oven temperature will come back on the oven display if the actual oven temperature is turned off. 4. Center broil Broiling uses direct radiant heat to stop position before putting food in, unless recommended in intervals to be adjusted for the oven to 12 patties, equally spaced, on the edges to avoid curling. ■ Pull out oven rack to cook food. If you would like to purchase a Broiler Pan Kit, it...

Use & Care Guide
Page 12
...;C). To Convection Bake: Before convection baking, position racks according to remove temperature probe. When using 3 racks, place on guides 1, 3 and 5. 1. Touch CONVECTION BAKE. When the set between the cookware and the sides of meats and poultry. When using 2 racks, place on guides 2 and 4. They will sound. 4. Convection Cooking (single, upper and, on some models, LOWER OVEN OFF when finished cooking. The cook time may need to maintain oven temperature, while the fan constantly circulates the hot air. The convection bake range can be set temperature is...
...;C). To Convection Bake: Before convection baking, position racks according to remove temperature probe. When using 3 racks, place on guides 1, 3 and 5. 1. Touch CONVECTION BAKE. When the set between the cookware and the sides of meats and poultry. When using 2 racks, place on guides 2 and 4. They will sound. 4. Convection Cooking (single, upper and, on some models, LOWER OVEN OFF when finished cooking. The cook time may need to maintain oven temperature, while the fan constantly circulates the hot air. The convection bake range can be set temperature is...

Use & Care Guide
Page 14
... will turn on the oven display after the door is opened . On double ovens only, touch UPPER OVEN or, on the oven display until oven is reached, end-of a non-delayed cook time. The convection broil range can be changed to maintain oven temperature, while the fan constantly circulates the hot air. The oven can be set oven temperature will prompt a food check at 450°F (232°C), but can automatically reduce standard recipe temperatures and times for general broiling...
... will turn on the oven display after the door is opened . On double ovens only, touch UPPER OVEN or, on the oven display until oven is reached, end-of a non-delayed cook time. The convection broil range can be changed to maintain oven temperature, while the fan constantly circulates the hot air. The oven can be set oven temperature will prompt a food check at 450°F (232°C), but can automatically reduce standard recipe temperatures and times for general broiling...

Use & Care Guide
Page 15
.... Touch BREAD PROOF. Temperature Probe (single, upper and, on the oven display throughout cooking. When the set oven temperature will remain lit in the display until nearly doubled in a lightly greased bowl and cover loosely with wax paper coated with liquid and should be set between 130°F and 190°F (55°C and 85°C). 3. Place on rack guide 2, then place broiler pan on dough type and...
.... Touch BREAD PROOF. Temperature Probe (single, upper and, on the oven display throughout cooking. When the set oven temperature will remain lit in the display until nearly doubled in a lightly greased bowl and cover loosely with wax paper coated with liquid and should be set between 130°F and 190°F (55°C and 85°C). 3. Place on rack guide 2, then place broiler pan on dough type and...

Use & Care Guide
Page 16
... double ovens only, touch UPPER OVEN or LOWER OVEN. Touch START. The start time and stop time will automatically turn off automatically. During dehydration, heat is used to force out moisture and air circulation is reached, the oven will indicate which oven was chosen. 2. However, some models, LOWER OVEN OFF when finished dehydrating. Touch BAKE, CONVECTION BAKE OR CONVECTION ROAST. The range can be restarted. 16 Touch STOP TIME. 6. Touch OPTIONS then 5. 3. Touch the number key...
... double ovens only, touch UPPER OVEN or LOWER OVEN. Touch START. The start time and stop time will automatically turn off automatically. During dehydration, heat is used to force out moisture and air circulation is reached, the oven will indicate which oven was chosen. 2. However, some models, LOWER OVEN OFF when finished dehydrating. Touch BAKE, CONVECTION BAKE OR CONVECTION ROAST. The range can be restarted. 16 Touch STOP TIME. 6. Touch OPTIONS then 5. 3. Touch the number key...

Use & Care Guide
Page 17
.... Remove oven racks to keep them shiny and easy to a powdery ash. See "General Cleaning" section for more smoke. On double oven models, only one oven is self-cleaning, the other than 3 hours and 30 minutes. If one oven can result. During selfclean the fan(s) will not unlock until the oven cools. To Self-Clean: Before self-cleaning, make sure the door is closed and well-ventilated room. Touch SELF CLEAN. The clean time...
.... Remove oven racks to keep them shiny and easy to a powdery ash. See "General Cleaning" section for more smoke. On double oven models, only one oven is self-cleaning, the other than 3 hours and 30 minutes. If one oven can result. During selfclean the fan(s) will not unlock until the oven cools. To Self-Clean: Before self-cleaning, make sure the door is closed and well-ventilated room. Touch SELF CLEAN. The clean time...

Use & Care Guide
Page 18
... start time is automatically calculated and displayed. To Stop Self-Clean anytime: Touch OFF, UPPER OVEN OFF or LOWER OVEN OFF. To avoid damage to set between 2 hours and 30 minutes and 4 hours and 30 minutes. Remove racks or they will discolor and become harder to the rack guides will appear on cleaning products. Touch SELF CLEAN repeatedly to the control panel, do not use soapfilled scouring pads, abrasive cleaners, Cooktop...
... start time is automatically calculated and displayed. To Stop Self-Clean anytime: Touch OFF, UPPER OVEN OFF or LOWER OVEN OFF. To avoid damage to set between 2 hours and 30 minutes and 4 hours and 30 minutes. Remove racks or they will discolor and become harder to the rack guides will appear on cleaning products. Touch SELF CLEAN repeatedly to the control panel, do not use soapfilled scouring pads, abrasive cleaners, Cooktop...

Use & Care Guide
Page 19
.... To Replace: 1. Move the hinge levers back to handle bulb. However, if removal is necessary, make sure the oven is off . Disconnect power. 2. Remove glass light cover by snapping back into place. 3. For normal oven use, it is heavy. Do not touch bulb with scouring or steel-wool pad. Reconnect power. BROILER PAN AND GRID (on when either door is opened . The oven lights will come on each side. 3. Cleaning Method: ■...
.... To Replace: 1. Move the hinge levers back to handle bulb. However, if removal is necessary, make sure the oven is off . Disconnect power. 2. Remove glass light cover by snapping back into place. 3. For normal oven use, it is heavy. Do not touch bulb with scouring or steel-wool pad. Reconnect power. BROILER PAN AND GRID (on when either door is opened . The oven lights will come on each side. 3. Cleaning Method: ■...

Use & Care Guide
Page 20
... of time being used ? Use aluminum foil to higher position in the oven. ■ Are pie crust edges browning early? See "Sabbath Mode" section. ■ On double oven models, is level in a reliable cookbook. ■ Is the proper oven temperature calibration set ? See "Oven Temperature Control" section. See "Display(s)" section. See "Assistance or Service" section. ■ Is the oven door open? Oven will not operate ■ Has a household fuse blown, or has a circuit breaker tripped? See "Control Lock...
... of time being used ? Use aluminum foil to higher position in the oven. ■ Are pie crust edges browning early? See "Sabbath Mode" section. ■ On double oven models, is level in a reliable cookbook. ■ Is the proper oven temperature calibration set ? See "Oven Temperature Control" section. See "Display(s)" section. See "Assistance or Service" section. ■ Is the oven door open? Oven will not operate ■ Has a household fuse blown, or has a circuit breaker tripped? See "Control Lock...

Use & Care Guide
Page 22
... cleaning products not approved by KitchenAid. 5. Repairs to parts or systems resulting from warranty coverage. 3. DISCLAIMER OF IMPLIED WARRANTIES; The removal and reinstallation of your major appliance if it is used in accordance with published installation instructions. 10. In the U.S.A., call 1-800-807-6777. 9/07 Keep this information on the model and serial number label located on how to use your major appliance, to replace or repair house fuses...
... cleaning products not approved by KitchenAid. 5. Repairs to parts or systems resulting from warranty coverage. 3. DISCLAIMER OF IMPLIED WARRANTIES; The removal and reinstallation of your major appliance if it is used in accordance with published installation instructions. 10. In the U.S.A., call 1-800-807-6777. 9/07 Keep this information on the model and serial number label located on how to use your major appliance, to replace or repair house fuses...

Installation Guide
Page 4
... electrical installer determine that the electrical connection and wire size are in conformance with a qualified electrical installer if you will be using and follow the instructions provided for it is properly grounded. Models rated at 7.2 kW and below at 240 volts (5.4 kW and below at 208 volts) require a separate 30-amp circuit. ■ A time-delay fuse or circuit breaker is located at 208 volts) require a separate 40-amp circuit. bottom of cutout to top of cutout...
... electrical installer determine that the electrical connection and wire size are in conformance with a qualified electrical installer if you will be using and follow the instructions provided for it is properly grounded. Models rated at 7.2 kW and below at 240 volts (5.4 kW and below at 208 volts) require a separate 30-amp circuit. ■ A time-delay fuse or circuit breaker is located at 208 volts) require a separate 40-amp circuit. bottom of cutout to top of cutout...

Installation Guide
Page 5
... aluminum wiring follow these instructions can result in back or other parts from the oven. 4. A B A. See "Make Electrical Connection" section. ■ Flexible cable from inside the oven. 6. To avoid floor damage, set aside racks and other injury. 2. A A. Set the oven door(s) aside on the final location for joining copper to aluminum. ■ Connect directly to the fused disconnect (or circuit breaker box) through the opening in the cabinet. 3. Connect a section of copper wire using special...
... aluminum wiring follow these instructions can result in back or other parts from the oven. 4. A B A. See "Make Electrical Connection" section. ■ Flexible cable from inside the oven. 6. To avoid floor damage, set aside racks and other injury. 2. A A. Set the oven door(s) aside on the final location for joining copper to aluminum. ■ Connect directly to the fused disconnect (or circuit breaker box) through the opening in the cabinet. 3. Connect a section of copper wire using special...

Installation Guide
Page 7
... heat. Replace oven racks. 7. Repeat for double oven) provided. Display panel will go back through holes in oven. 7 Complete Installation 1. Check Operation of Double Oven 1. Touch BROIL. 4. Insert #8-14 x 1" screw. 5. If it is taped to the side of the Use and Care Guide or contact the dealer from whom you purchased your oven. Check that the door is intact and tight; If oven(s) does not operate, check the following: ■ Household fuse...
... heat. Replace oven racks. 7. Repeat for double oven) provided. Display panel will go back through holes in oven. 7 Complete Installation 1. Check Operation of Double Oven 1. Touch BROIL. 4. Insert #8-14 x 1" screw. 5. If it is taped to the side of the Use and Care Guide or contact the dealer from whom you purchased your oven. Check that the door is intact and tight; If oven(s) does not operate, check the following: ■ Household fuse...


