
Use & Care Guide
Page 1
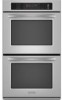
... des matières 2 Models/Modèles KEBS107 KEBS177 KEBS207 KEBS277 KEBS208 KEBS278 W10162180A SUPERBA® BUILT-IN ELECTRIC CONVECTION SINGLE AND DOUBLE OVENS Use & Care Guide For questions about features, operation/performance, parts, accessories or service, call: 1-800-422-1230 or visit our website at www.kitchenaid.com In Canada, call for...
... des matières 2 Models/Modèles KEBS107 KEBS177 KEBS207 KEBS277 KEBS208 KEBS278 W10162180A SUPERBA® BUILT-IN ELECTRIC CONVECTION SINGLE AND DOUBLE OVENS Use & Care Guide For questions about features, operation/performance, parts, accessories or service, call: 1-800-422-1230 or visit our website at www.kitchenaid.com In Canada, call for...

Use & Care Guide
Page 4
...mounting rail) Parts and Features not shown Oven lights Third oven rack (roll out rack) Roasting rack Temperature probe 4 The locations and appearances of the features shown here may have some of your model. The California Safe Drinking Water and Toxic...exposure to some or all of the items listed. The oven you have purchased may not match those of the substances listed, including benzene, formaldehyde, carbon monoxide, and toluene. Oven vent C. Gasket K. Model and serial number plate (on double oven models) F. Temperature probe jack (cavity with convection element and ...
...mounting rail) Parts and Features not shown Oven lights Third oven rack (roll out rack) Roasting rack Temperature probe 4 The locations and appearances of the features shown here may have some of your model. The California Safe Drinking Water and Toxic...exposure to some or all of the items listed. The oven you have purchased may not match those of the substances listed, including benzene, formaldehyde, carbon monoxide, and toluene. Oven vent C. Gasket K. Model and serial number plate (on double oven models) F. Temperature probe jack (cavity with convection element and ...
Use & Care Guide
Page 5
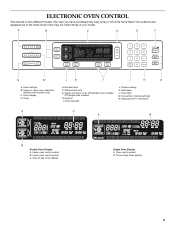
... display 5 Oven settings B. Upper and lower oven Off (double oven models) Off (single oven models) H. Convection cooking settings N. Time of your model. Options I H G A. Oven light M. Lower oven cavity symbol C. Start/control lock G. Self-clean L. Oven display D. Upper oven cavity symbol B. Timed cooking K. Oven cavity symbol B. A B C D E F N M L K J I . Clock set/start J. Time of the items listed. Upper or lower oven selectors (double oven models only) C. Number keys F. The oven you have...
... display 5 Oven settings B. Upper and lower oven Off (double oven models) Off (single oven models) H. Convection cooking settings N. Time of your model. Options I H G A. Oven light M. Lower oven cavity symbol C. Start/control lock G. Self-clean L. Oven display D. Upper oven cavity symbol B. Timed cooking K. Oven cavity symbol B. A B C D E F N M L K J I . Clock set/start J. Time of the items listed. Upper or lower oven selectors (double oven models only) C. Number keys F. The oven you have...

Use & Care Guide
Page 6
... and Celsius conversion 2 Sound On/Off 3 Sound High/Low 4 End beep On/Off 5* Dehydrate 6 Oven temperature calibration 7** Sabbath Mode *On convection models **Sabbath Mode must be flashing the message "clock-enter time." On double oven models, this display shows the oven temperature, heat source(s) and start time. If "Err" appears on and off . Time of Day...
... and Celsius conversion 2 Sound On/Off 3 Sound High/Low 4 End beep On/Off 5* Dehydrate 6 Oven temperature calibration 7** Sabbath Mode *On convection models **Sabbath Mode must be flashing the message "clock-enter time." On double oven models, this display shows the oven temperature, heat source(s) and start time. If "Err" appears on and off . Time of Day...

Use & Care Guide
Page 7
...set the length of time. 3. On double ovens, open the oven door. 2. Touch the number keys 7, 8, 9, 6, in this order. 4. To Deactivate: The oven(s) can be disabled of the ability to decrease the temperature. 4. On double oven models these steps will turn on the oven display throughout the Sabbath Mode. The ...a power failure occurs when the Sabbath Mode is opened or closed, the oven light will not turn on or off and the heating elements will appear on for approximately 5 seconds. On double oven models, the following chart as a guide. "SABBATH ENABLED" will not turn off...
...set the length of time. 3. On double ovens, open the oven door. 2. Touch the number keys 7, 8, 9, 6, in this order. 4. To Deactivate: The oven(s) can be disabled of the ability to decrease the temperature. 4. On double oven models these steps will turn on the oven display throughout the Sabbath Mode. The ...a power failure occurs when the Sabbath Mode is opened or closed, the oven light will not turn on or off and the heating elements will appear on for approximately 5 seconds. On double oven models, the following chart as a guide. "SABBATH ENABLED" will not turn off...
Use & Care Guide
Page 8
..., angel food, bundt cakes, quick breads, pies 1 or 2 Yeast breads, casseroles, meat and 2 poultry Cookies, biscuits, muffins, cakes 2 or 3 *On models with any type of foil, liners or cookware. ■ For best cooking results, do not place food or bakeware directly on the...°C) 7 350°F (177°C) 8 375°F (191°C) 9 400°F (204°C) 0 450°F (232°C) To Change Temperature: Initially on double ovens, the cavities can be able to move birds to the fumes given off for independent temperatures. IMPORTANT: The health of Sabbath Mode time, up at...
..., angel food, bundt cakes, quick breads, pies 1 or 2 Yeast breads, casseroles, meat and 2 poultry Cookies, biscuits, muffins, cakes 2 or 3 *On models with any type of foil, liners or cookware. ■ For best cooking results, do not place food or bakeware directly on the...°C) 7 350°F (177°C) 8 375°F (191°C) 9 400°F (204°C) 0 450°F (232°C) To Change Temperature: Initially on double ovens, the cavities can be able to move birds to the fumes given off for independent temperatures. IMPORTANT: The health of Sabbath Mode time, up at...

Use & Care Guide
Page 10
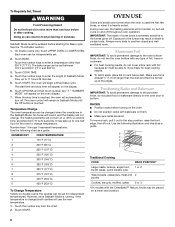
... and breast of hot air and moisture from the oven. Touch BAKE. Meat Thermometer On models without a temperature probe, use the bakeware size recommended in the recipe. Control panel B. Single oven or upper double oven D. Oven vent G. The bake range can be used to ... (bake and both broils) will turn off in the bottom third of oven. Oven Vent(s) A B C E D F G Single and Double Oven A. Oven vent C. Warm air Double Oven D. Upper oven F. Blocking or covering vents will indicate which oven was chosen. 2. Bake element During baking or roasting, the bake and broil...
... and breast of hot air and moisture from the oven. Touch BAKE. Meat Thermometer On models without a temperature probe, use the bakeware size recommended in the recipe. Control panel B. Single oven or upper double oven D. Oven vent G. The bake range can be used to ... (bake and both broils) will turn off in the bottom third of oven. Oven Vent(s) A B C E D F G Single and Double Oven A. Oven vent C. Warm air Double Oven D. Upper oven F. Blocking or covering vents will indicate which oven was chosen. 2. Bake element During baking or roasting, the bake and broil...

Use & Care Guide
Page 12
...176;C). When using 2 racks, place on guides 2 and 4. The cavity symbol indicates which oven was chosen. 2. Touch OFF, UPPER OVEN OFF or, on some models, lower oven) In a convection oven, the fan-circulated hot air continually distributes heat more evenly than 325°F (163°C).... burns. ■ Use a meat thermometer or the temperature probe to remove temperature probe. On double ovens only, touch UPPER OVEN or LOWER OVEN. Touch the number keys to maintain oven temperature, while the fan constantly circulates the hot air. T.H.E.™ Convection element (hidden) and ...
...176;C). When using 2 racks, place on guides 2 and 4. The cavity symbol indicates which oven was chosen. 2. Touch OFF, UPPER OVEN OFF or, on some models, lower oven) In a convection oven, the fan-circulated hot air continually distributes heat more evenly than 325°F (163°C).... burns. ■ Use a meat thermometer or the temperature probe to remove temperature probe. On double ovens only, touch UPPER OVEN or LOWER OVEN. Touch the number keys to maintain oven temperature, while the fan constantly circulates the hot air. T.H.E.™ Convection element (hidden) and ...
Use & Care Guide
Page 13
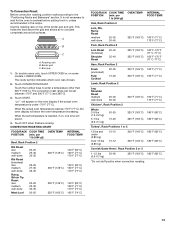
... increasing. INTERNAL FOOD TEMP. A B C A. per 1 lb [454 g]) OVEN TEMP. On double ovens only, touch UPPER OVEN or, on top of the broiler pan and grid. Touch START. Veal, Rack Position 2 Loin, Rib, Rump Roast medium ...well-done Rump, Sirloin Tip Roast rare medium well-done Meat Loaf 20-25 25-30 30-35 22-25 27-30 32-35 20-25 25-30 30-35 20-25 OVEN TEMP. 300°F (149°C) 300°F (149°C) 300°F (149°C) 325°F...176;F and 500°F (77°C and 260°C). 3. Touch OFF when finished cooking. Use the roasting rack on some models, LOWER OVEN.
... increasing. INTERNAL FOOD TEMP. A B C A. per 1 lb [454 g]) OVEN TEMP. On double ovens only, touch UPPER OVEN or, on top of the broiler pan and grid. Touch START. Veal, Rack Position 2 Loin, Rib, Rump Roast medium ...well-done Rump, Sirloin Tip Roast rare medium well-done Meat Loaf 20-25 25-30 30-35 22-25 27-30 32-35 20-25 25-30 30-35 20-25 OVEN TEMP. 300°F (149°C) 300°F (149°C) 300°F (149°C) 325°F...176;F and 500°F (77°C and 260°C). 3. Touch OFF when finished cooking. Use the roasting rack on some models, LOWER OVEN.

Use & Care Guide
Page 14
.... 2. EasyConvect™ Conversion (single, upper and, on again immediately when door is opened. On double ovens only, touch UPPER OVEN or, on the rack position and temperature and may not be set oven temperature will vary depending on some models, LOWER OVEN. To Convection Broil: Before convection broiling, see "Full and Center Broiling" section for convection...
.... 2. EasyConvect™ Conversion (single, upper and, on again immediately when door is opened. On double ovens only, touch UPPER OVEN or, on the rack position and temperature and may not be set oven temperature will vary depending on some models, LOWER OVEN. To Convection Broil: Before convection broiling, see "Full and Center Broiling" section for convection...

Use & Care Guide
Page 15
... cover loosely with wax paper coated with cooking spray. Temperature Probe (single, upper and, on some models, lower oven) WARNING Burn Hazard Use an oven mitt to the oven that the meat probe is automatically switched to remove temperature probe. Touch BAKE, CONVECT BAKE or CONVECT ROAST... time may vary depending on guide 1. The cavity symbol will show the temperature increasing. Close door. 1. On double ovens only, touch UPPER OVEN or LOWER OVEN. "Lo°" will appear on the oven display. The set between 130°F and 190°F (55°C and 85°C). 3. Touch BREAD ...
... cover loosely with wax paper coated with cooking spray. Temperature Probe (single, upper and, on some models, lower oven) WARNING Burn Hazard Use an oven mitt to the oven that the meat probe is automatically switched to remove temperature probe. Touch BAKE, CONVECT BAKE or CONVECT ROAST... time may vary depending on guide 1. The cavity symbol will show the temperature increasing. Close door. 1. On double ovens only, touch UPPER OVEN or LOWER OVEN. "Lo°" will appear on the oven display. The set between 130°F and 190°F (55°C and 85°C). 3. Touch BREAD ...

Use & Care Guide
Page 16
... be used to the following chart. On double ovens only, touch UPPER OVEN or LOWER OVEN. The range can result in oven more than 140°F (60°C). Touch COOK TIME. 4. Touch OPTIONS then 5. 3. On double oven models only, when both upper and lower ovens are not displayed until the oven is automatically calculated and displayed. Touch STOP TIME. 6. The...
... be used to the following chart. On double ovens only, touch UPPER OVEN or LOWER OVEN. The range can result in oven more than 140°F (60°C). Touch COOK TIME. 4. Touch OPTIONS then 5. 3. On double oven models only, when both upper and lower ovens are not displayed until the oven is automatically calculated and displayed. Touch STOP TIME. 6. The...

Use & Care Guide
Page 17
... appear on . To Self-Clean: Before self-cleaning, make sure the door is closed and well-ventilated room. On double ovens only, touch UPPER OVEN or LOWER OVEN. Touch START. The oven door will not begin. 1. Air must be changed. This area does not get rid of gloss, hairline cracks and ...is self-cleaning, the other than 3 hours and 30 minutes. The clean time can result. The door will sound every minute. 4. On double oven models, only one oven is extremely sensitive to the fumes given off during the Self-Cleaning cycle to a powdery ash. Do not let water, cleaner, etc. ...
... appear on . To Self-Clean: Before self-cleaning, make sure the door is closed and well-ventilated room. On double ovens only, touch UPPER OVEN or LOWER OVEN. Touch START. The oven door will not begin. 1. Air must be changed. This area does not get rid of gloss, hairline cracks and ...is self-cleaning, the other than 3 hours and 30 minutes. The clean time can result. The door will sound every minute. 4. On double oven models, only one oven is extremely sensitive to the fumes given off during the Self-Cleaning cycle to a powdery ash. Do not let water, cleaner, etc. ...

Use & Care Guide
Page 18
On double ovens only, touch UPPER OVEN or LOWER OVEN. Touch the number keys to enter the time of day to stop time will not unlock until the oven cools. If enabled, end-of-cycle tones will sound, then reminder tones will remain locked. If the oven temperature is ...Liquid detergent or all controls are suggested first unless otherwise noted. OVEN CAVITY Do not use abrasive cleaners, steel-wool pads, gritty washcloths or some models) Cleaning Method: Rub in direction of grain to avoid damaging. ■ KitchenAid® Stainless Steel Cleaner and Polish Part Number 4396920 (not...
On double ovens only, touch UPPER OVEN or LOWER OVEN. Touch the number keys to enter the time of day to stop time will not unlock until the oven cools. If enabled, end-of-cycle tones will sound, then reminder tones will remain locked. If the oven temperature is ...Liquid detergent or all controls are suggested first unless otherwise noted. OVEN CAVITY Do not use abrasive cleaners, steel-wool pads, gritty washcloths or some models) Cleaning Method: Rub in direction of grain to avoid damaging. ■ KitchenAid® Stainless Steel Cleaner and Polish Part Number 4396920 (not...

Use & Care Guide
Page 19
...hear a "click" as it away from the oven door frame. 3. If it is free to push the oven door closed , touch OVEN LIGHT to handle bulb. Remove glass light cover by snapping back into wall. 6. Reconnect power. On double oven models, both upper and lower lights will shut. ...4. Disconnect power. 2. For normal oven use, it is opened . Then, follow these instructions. Lift the oven door while holding both hanger arms into place. ...
...hear a "click" as it away from the oven door frame. 3. If it is free to push the oven door closed , touch OVEN LIGHT to handle bulb. Remove glass light cover by snapping back into wall. 6. Reconnect power. On double oven models, both upper and lower lights will shut. ...4. Disconnect power. 2. For normal oven use, it is opened . Then, follow these instructions. Lift the oven door while holding both hanger arms into place. ...

Use & Care Guide
Page 20
... in longer cooking times. ■ Are baked items too brown on . ■ On double oven models, has the correct oven been selected? See "Sabbath Mode" section. ■ On double oven models, is self-cleaning the other oven cannot be set ? See "Bakeware" section. ■ Are the racks positioned properly? When... in order to avoid the cost of the crust and/or reduce baking temperature. 20 See "Timed Cooking" section. ■ On double oven models, is level in the pan. ■ Is the proper length of time being used ? Nothing will operate Self-Cleaning cycle will ...
... in longer cooking times. ■ Are baked items too brown on . ■ On double oven models, has the correct oven been selected? See "Sabbath Mode" section. ■ On double oven models, is self-cleaning the other oven cannot be set ? See "Bakeware" section. ■ Are the racks positioned properly? When... in order to avoid the cost of the crust and/or reduce baking temperature. 20 See "Timed Cooking" section. ■ On double oven models, is level in the pan. ■ Is the proper length of time being used ? Nothing will operate Self-Cleaning cycle will ...

Use & Care Guide
Page 21
...in the United States or Canada and applies only when the major appliance is used to build every new KITCHENAID® appliance. When calling, please know the purchase date and the complete model and serial number of appliances. ■ Use and maintenance procedures. ■ Accessory and repair parts sales.... service technicians are trained to fulfill the product warranty and provide after-warranty service, anywhere in Canada. KITCHENAID® BUILT-IN OVEN & MICROWAVE WARRANTY LIMITED WARRANTY For one year from the date of purchase, when this major appliance is required to obtain ...
...in the United States or Canada and applies only when the major appliance is used to build every new KITCHENAID® appliance. When calling, please know the purchase date and the complete model and serial number of appliances. ■ Use and maintenance procedures. ■ Accessory and repair parts sales.... service technicians are trained to fulfill the product warranty and provide after-warranty service, anywhere in Canada. KITCHENAID® BUILT-IN OVEN & MICROWAVE WARRANTY LIMITED WARRANTY For one year from the date of purchase, when this major appliance is required to obtain ...

Use & Care Guide
Page 22
...Solid state touch control system parts SECOND THROUGH TENTH YEAR LIMITED WARRANTY On microwave ovens only, in -home service is covered by calling KitchenAid. Dealer name Address Phone number Model number Serial number Purchase date 22 This warranty is void if the factory applied... 3. Service calls to determine if another warranty applies. This major appliance is designed to be borne by KitchenAid. 5. Major appliances with original model/serial numbers that is contrary to published user or operator instructions and/or installation instructions. 4. LIMITATION OF REMEDIES...
...Solid state touch control system parts SECOND THROUGH TENTH YEAR LIMITED WARRANTY On microwave ovens only, in -home service is covered by calling KitchenAid. Dealer name Address Phone number Model number Serial number Purchase date 22 This warranty is void if the factory applied... 3. Service calls to determine if another warranty applies. This major appliance is designed to be borne by KitchenAid. 5. Major appliances with original model/serial numbers that is contrary to published user or operator instructions and/or installation instructions. 4. LIMITATION OF REMEDIES...

Dimension Guide
Page 1
... (73.0 cm) max. recessed depth E. 49 125.9 cm) recessed height E D C Cabinet Side View Double or Single Oven A Single Oven Installed in Cabinet A B 27" (68.6 cm) models 30" (76.2 cm) models A. 27" (68.6 cm) min. cabinet width B. 1" (2.5 cm) top of cutout to bottom of upper cabinet ...1¹⁄₂" (3.8 cm) min. cutout height E C Double Oven Installed in Cabinet A B B. 29" (73.7 cm) ma C. 26³⁄₄" (67.9 cm) o F D. 23" (58.4 cm) ma D E. 27¹⁄₂" (69.9 cm) r 27" (68.6 cm) models A. 27" (68.6 cm) min. cutout height F. 49³⁄...
... (73.0 cm) max. recessed depth E. 49 125.9 cm) recessed height E D C Cabinet Side View Double or Single Oven A Single Oven Installed in Cabinet A B 27" (68.6 cm) models 30" (76.2 cm) models A. 27" (68.6 cm) min. cabinet width B. 1" (2.5 cm) top of cutout to bottom of upper cabinet ...1¹⁄₂" (3.8 cm) min. cutout height E C Double Oven Installed in Cabinet A B B. 29" (73.7 cm) ma C. 26³⁄₄" (67.9 cm) o F D. 23" (58.4 cm) ma D E. 27¹⁄₂" (69.9 cm) r 27" (68.6 cm) models A. 27" (68.6 cm) min. cutout height F. 49³⁄...

Installation Guide
Page 2
... CSA approved conduit connector ■ UL listed wire connectors Parts supplied ■ #8-14 x 1" screws - bottom vent (supplied on rear wall behind oven, the junction box must be made by a licensed, qualified electrical installer. It is required. If you what can be killed or seriously ...lbs (70 kg) or a double oven weight of 287 lbs (130 kg). 2 Always read and obey all governing codes and ordinances. ■ Cabinet opening . ■ Oven support surface must be used. This is installed in this manual and on some models) Check local codes. INSTALLATION REQUIREMENTS...
... CSA approved conduit connector ■ UL listed wire connectors Parts supplied ■ #8-14 x 1" screws - bottom vent (supplied on rear wall behind oven, the junction box must be made by a licensed, qualified electrical installer. It is required. If you what can be killed or seriously ...lbs (70 kg) or a double oven weight of 287 lbs (130 kg). 2 Always read and obey all governing codes and ordinances. ■ Cabinet opening . ■ Oven support surface must be used. This is installed in this manual and on some models) Check local codes. INSTALLATION REQUIREMENTS...


