Use and Care Guide
Page 18
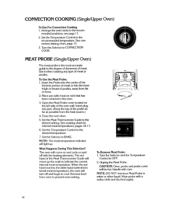
... cover will move up . Set the Selector to OFF. 2. Insert plug into the inner thigh or breast of meat. The red hand of the oven wall. NOTE: DO NOT immerse Meat Probe in the recom- Wipe probe with meat on the left side of the Meat Thermometer Guide will be hot.... Set the Meat Thermometer Guide to CONVECTION COOK. Turn the Selector to the desired setting. flj MEAT PROBE (Single/Upper Oven) The meat probe is the most accurate guide to the desired temperature. 7. When the red hand reaches the white hand (selected internal meat temperature),...
... cover will move up . Set the Selector to OFF. 2. Insert plug into the inner thigh or breast of meat. The red hand of the oven wall. NOTE: DO NOT immerse Meat Probe in the recom- Wipe probe with meat on the left side of the Meat Thermometer Guide will be hot.... Set the Meat Thermometer Guide to CONVECTION COOK. Turn the Selector to the desired setting. flj MEAT PROBE (Single/Upper Oven) The meat probe is the most accurate guide to the desired temperature. 7. When the red hand reaches the white hand (selected internal meat temperature),...
Use and Care Guide
Page 25
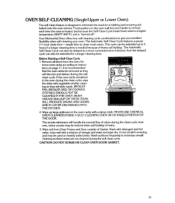
...buildup is heavy. 3. It is needed because of Gasket. that the oven racks be used on the oven wall become harder to remove each time the oven is "burned off." NEVER USE CHEMICAL OVEN CLEANERS INSIDE A SELF-CLEANING OVEN OR ON RAISED PORTION OF THE DOOR. The smoke eliminator will slide ... GASKET. 25 A non-scratch scouring pad may be delayed to give you excellent flexibility when self-cleaning your oven. Your KitchenAid Oven offers four self-cleaning cycle combinations to a more convenient time if desired. Food spatters on heavily soiled areas. The Automatic Self-...
...buildup is heavy. 3. It is needed because of Gasket. that the oven racks be used on the oven wall become harder to remove each time the oven is "burned off." NEVER USE CHEMICAL OVEN CLEANERS INSIDE A SELF-CLEANING OVEN OR ON RAISED PORTION OF THE DOOR. The smoke eliminator will slide ... GASKET. 25 A non-scratch scouring pad may be delayed to give you excellent flexibility when self-cleaning your oven. Your KitchenAid Oven offers four self-cleaning cycle combinations to a more convenient time if desired. Food spatters on heavily soiled areas. The Automatic Self-...
Installation Instructions
Page 2
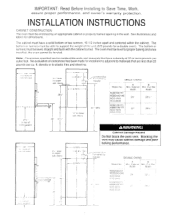
...225 pounds for a double oven). The bottom or runners must have a density of clearances has been made for installations adjacent to plastic tiles and sheeting. 2%" MIN 1" upper 28%" Junction Box / Furnished by an appropriate cabinet or properly framed opening in the wall. density or to ... Blocking the vent may cause cabinet damage and poor baking performance. See illustrations and tables for combustible walls and materials that have a solid bottom or two runners, 19-112 inches apart and centered within the cabinet. b The cabinet must be level forproper baking and once installed....
...225 pounds for a double oven). The bottom or runners must have a density of clearances has been made for installations adjacent to plastic tiles and sheeting. 2%" MIN 1" upper 28%" Junction Box / Furnished by an appropriate cabinet or properly framed opening in the wall. density or to ... Blocking the vent may cause cabinet damage and poor baking performance. See illustrations and tables for combustible walls and materials that have a solid bottom or two runners, 19-112 inches apart and centered within the cabinet. b The cabinet must be level forproper baking and once installed....
Installation Instructions
Page 5
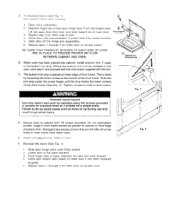
...See Fig. 1). 1 Slide door hinge arms until approximately 5 inches from door liner and slide toward oven. Slide door off the hinge arm assemblies. 6 Repeat steps 1 through 4 for other side of the front frame. D Secure oven to back. Do not overtighten screws. Loft tab away from ... AIR FLOW BETWEEN CABINET AND OVEN. Personal Injury Hazard Securely fasten wall oven to make sure it has been replaced properly. 5 Repeat steps 1 through 5 for other door on double ovens. Disregard any excess screws that are left after all screw holes in oven. Depress the tabs and slide...
...See Fig. 1). 1 Slide door hinge arms until approximately 5 inches from door liner and slide toward oven. Slide door off the hinge arm assemblies. 6 Repeat steps 1 through 4 for other side of the front frame. D Secure oven to back. Do not overtighten screws. Loft tab away from ... AIR FLOW BETWEEN CABINET AND OVEN. Personal Injury Hazard Securely fasten wall oven to make sure it has been replaced properly. 5 Repeat steps 1 through 5 for other door on double ovens. Disregard any excess screws that are left after all screw holes in oven. Depress the tabs and slide...


