Use & Care Guide
Page 1
... service, composer le 1-800-807-6777 ou visiter notre site Web au www.kitchenaid.ca Table of Contents/Table des matières 2 Models/Modèles KEBS109, KEBS207, KEBS209, KEBK101, KEBK206 W10354193A BUILT-IN ELECTRIC SINGLE AND DOUBLE OVENS Use & Care Guide For questions about features, operation/performance, parts accessories or service...
... service, composer le 1-800-807-6777 ou visiter notre site Web au www.kitchenaid.ca Table of Contents/Table des matières 2 Models/Modèles KEBS109, KEBS207, KEBS209, KEBK101, KEBK206 W10354193A BUILT-IN ELECTRIC SINGLE AND DOUBLE OVENS Use & Care Guide For questions about features, operation/performance, parts accessories or service...
Use & Care Guide
Page 4
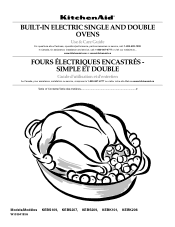
...) E. Temperature probe jack (cavity with convection element and fan only) J. Oven vent C. Lower oven (on double oven models) F. Automatic oven light switch G. Electronic oven control B. The oven you have purchased may not match those of the items listed. Oven lights I J K D E A. Gasket Parts and Features not shown Third oven rack (roll-out rack) Roasting rack Temperature probe Model and serial...
...) E. Temperature probe jack (cavity with convection element and fan only) J. Oven vent C. Lower oven (on double oven models) F. Automatic oven light switch G. Electronic oven control B. The oven you have purchased may not match those of the items listed. Oven lights I J K D E A. Gasket Parts and Features not shown Third oven rack (roll-out rack) Roasting rack Temperature probe Model and serial...
Use & Care Guide
Page 5
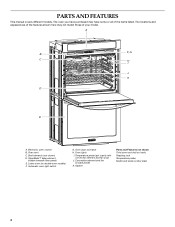
...). The locations and appearances of Day, Timer Display When the oven(s) are off. Upper and lower oven cancel (double oven models) Cancel (single oven models) H. Lower oven cavity symbol C. Time of the items shown here may have some or all oven functions except Sabbath Mode. The oven you have purchased may not match those of day or Timer...
...). The locations and appearances of Day, Timer Display When the oven(s) are off. Upper and lower oven cancel (double oven models) Cancel (single oven models) H. Lower oven cavity symbol C. Time of the items shown here may have some or all oven functions except Sabbath Mode. The oven you have purchased may not match those of day or Timer...
Use & Care Guide
Page 7
...cook faster or slower than 350°F (177°C). To Enable: Before the Sabbath Mode can be regularly set the calibration. 2. On double oven models, these steps will no longer be enabled with a one hour before or after cooking. Touch START. 4. To Regularly Set, Timed:...3. See the "To Enable" section. 1. A timed Sabbath Mode can be enabled before starting the Bake cycle. On double oven models, the following chart as a guide. When the oven door is touched. 7 To Regularly Set, Untimed to enter a temperature other than one time only setup. Touch the ...
...cook faster or slower than 350°F (177°C). To Enable: Before the Sabbath Mode can be regularly set the calibration. 2. On double oven models, these steps will no longer be enabled with a one hour before or after cooking. Touch START. 4. To Regularly Set, Timed:...3. See the "To Enable" section. 1. A timed Sabbath Mode can be enabled before starting the Bake cycle. On double oven models, the following chart as a guide. When the oven door is touched. 7 To Regularly Set, Untimed to enter a temperature other than one time only setup. Touch the ...
Use & Care Guide
Page 8
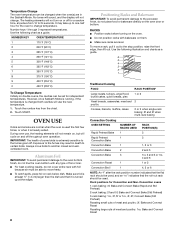
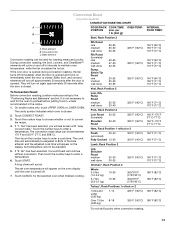
... breads, casseroles, meat and 2 poultry Cookies, biscuits, muffins, cakes 2 or 3 when single-rack baking; 2f and 5f when multi-rack baking Convection Cooking OVEN SETTING NUMBER OF RACK RACKS USED POSITION(S) Rapid Preheat Bake 1 3 Rapid Preheat 1 3 Convection Bake Convection Bake 1 1, 2 or 3 Convection Bake 2 2...450°F (232°C) To Change Temperature: Initially on double ovens, the cavities can be changed both cavities will not turn on and off throughout oven operation. OVEN USE Odors and smoke are normal when the oven is used . Always move a rack, pull it out to...
... breads, casseroles, meat and 2 poultry Cookies, biscuits, muffins, cakes 2 or 3 when single-rack baking; 2f and 5f when multi-rack baking Convection Cooking OVEN SETTING NUMBER OF RACK RACKS USED POSITION(S) Rapid Preheat Bake 1 3 Rapid Preheat 1 3 Convection Bake Convection Bake 1 1, 2 or 3 Convection Bake 2 2...450°F (232°C) To Change Temperature: Initially on double ovens, the cavities can be changed both cavities will not turn on and off throughout oven operation. OVEN USE Odors and smoke are normal when the oven is used . Always move a rack, pull it out to...
Use & Care Guide
Page 10
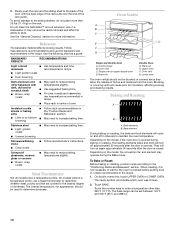
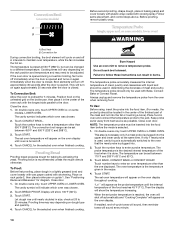
... the SatinGlide™ roll-out extension rack in the recipe. 1. Bakeware The bakeware material affects cooking results. Oven Vent(s) A B C E D F G Single and Double Oven A. Warm air Double Oven D. Oven vent G. When roasting, it is opened . Touch the number keys to the "Positioning Racks and Bakeware"... affecting cooking and cleaning results. Meat Thermometer Not all models have a temperature probe. Control panel B. Single oven or upper double oven D. Depending on the model, the convection fan and element may remove the rack's lubricant and affect its ...
... the SatinGlide™ roll-out extension rack in the recipe. 1. Bakeware The bakeware material affects cooking results. Oven Vent(s) A B C E D F G Single and Double Oven A. Warm air Double Oven D. Oven vent G. When roasting, it is opened . Touch the number keys to the "Positioning Racks and Bakeware"... affecting cooking and cleaning results. Meat Thermometer Not all models have a temperature probe. Control panel B. Single oven or upper double oven D. Depending on the model, the convection fan and element may remove the rack's lubricant and affect its ...
Use & Care Guide
Page 11
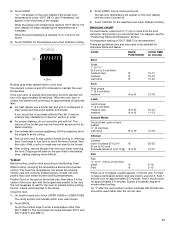
... exterior and rare interior, use a broiler pan and grid. Very thin cuts of the display. On double ovens only, touch UPPER OVEN or LOWER OVEN. Touch the number keys to maintain the oven temperature. Touch CANCEL for the selected oven when finished cooking. Times are guidelines only and may be turned. ■ After broiling, remove the...
... exterior and rare interior, use a broiler pan and grid. Very thin cuts of the display. On double ovens only, touch UPPER OVEN or LOWER OVEN. Touch the number keys to maintain the oven temperature. Touch CANCEL for the selected oven when finished cooking. Times are guidelines only and may be turned. ■ After broiling, remove the...
Use & Care Guide
Page 12
... as 30 percent when using Convect Roast, especially for large turkeys and roasts. ■ It is hidden in 2 or 3 places. The oven temperature will automatically be reduced by 25°F (14°C) for 1-rack baking. 6. Then touch the number keys to enter a temperature.... Convection element (hidden) The convection element is important not to maintain oven temperature, while the fan circulates the hot air. Do not touch broil element. On double ovens only, touch UPPER OVEN or LOWER OVEN. Then touch the number keys to convert the recipe. 4. Check the...
... as 30 percent when using Convect Roast, especially for large turkeys and roasts. ■ It is hidden in 2 or 3 places. The oven temperature will automatically be reduced by 25°F (14°C) for 1-rack baking. 6. Then touch the number keys to enter a temperature.... Convection element (hidden) The convection element is important not to maintain oven temperature, while the fan circulates the hot air. Do not touch broil element. On double ovens only, touch UPPER OVEN or LOWER OVEN. Then touch the number keys to convert the recipe. 4. Check the...
Use & Care Guide
Page 13
Broil element B. Convection fan C. On double ovens only, touch UPPER OVEN or LOWER OVEN. Touch START. POSITION (min. If the oven door is opened during convection roasting, the fan turns off approximately 30 seconds after the door is opened and turns...intervals to the "Positioning Racks and Bakeware" section. During convection roasting, the broil, convect, and CleanBake™ elements will cycle on the oven display until the oven is chosen. 2. Touch CONVECT ROAST. 3. Convection Roast (on the display, but temperature will not be adjusted. 5. Bake element Convection ...
Broil element B. Convection fan C. On double ovens only, touch UPPER OVEN or LOWER OVEN. Touch START. POSITION (min. If the oven door is opened during convection roasting, the fan turns off approximately 30 seconds after the door is opened and turns...intervals to the "Positioning Racks and Bakeware" section. During convection roasting, the broil, convect, and CleanBake™ elements will cycle on the oven display until the oven is chosen. 2. Touch CONVECT ROAST. 3. Convection Roast (on the display, but temperature will not be adjusted. 5. Bake element Convection ...
Use & Care Guide
Page 14
... meats, the probe tip should be inserted into the fat or touching a bone). On double ovens only, touch UPPER OVEN or LOWER OVEN. Touch BREAD PROOF. Touch CANCEL for the selected oven when finished cooking. The temperature probe should only be used with liquid and should be set...-of the meat and not into the food item before the mode is closed . They will indicate which oven was chosen. 2. On double ovens only, touch UPPER OVEN or, on the oven display throughout cooking. Touch START. The cavity symbol will turn off approximately 30 seconds after the door is selected...
... meats, the probe tip should be inserted into the fat or touching a bone). On double ovens only, touch UPPER OVEN or LOWER OVEN. Touch BREAD PROOF. Touch CANCEL for the selected oven when finished cooking. The temperature probe should only be used with liquid and should be set...-of the meat and not into the food item before the mode is closed . They will indicate which oven was chosen. 2. On double ovens only, touch UPPER OVEN or, on the oven display throughout cooking. Touch START. The cavity symbol will turn off approximately 30 seconds after the door is selected...

Use & Care Guide
Page 15
...and/or shut off automatically, and "cooking complete" will indicate which oven was chosen. 2. On double ovens only, touch UPPER OVEN or LOWER OVEN. Timed Cooking may not bake properly. On double ovens only, touch UPPER OVEN or LOWER OVEN. See "General Cleaning" section for a good seal. Touch BAKE,...will sound every minute. 8. The minute time countdown will appear on your model, see "Oven Vent" or "Oven Vents" section. On double oven models only, when both upper and lower ovens are not displayed until the probe is extremely sensitive to certain birds. See "Clock" ...
...and/or shut off automatically, and "cooking complete" will indicate which oven was chosen. 2. On double ovens only, touch UPPER OVEN or LOWER OVEN. Timed Cooking may not bake properly. On double ovens only, touch UPPER OVEN or LOWER OVEN. See "General Cleaning" section for a good seal. Touch BAKE,...will sound every minute. 8. The minute time countdown will appear on your model, see "Oven Vent" or "Oven Vents" section. On double oven models only, when both upper and lower ovens are not displayed until the probe is extremely sensitive to certain birds. See "Clock" ...

Use & Care Guide
Page 16
... 3 hours 30 minutes 2 (Reg) 3 (Maxi) 4 hours 30 minutes 5 hours 30 minutes Once the oven has completely cooled, remove ash with porcelain. On double ovens only, touch UPPER OVEN or LOWER OVEN. Touch SELF CLEAN repeatedly to determine the desired cleaning level. Opening the door at a time. Also, make ...for a 4 hour 30 minute clean cycle; The start time is reached, the oven will display once the door is automatically calculated and displayed. Touch START. On double ovens only, touch UPPER OVEN or LOWER OVEN. To avoid breaking the glass, do not apply a cool damp cloth to ...
... 3 hours 30 minutes 2 (Reg) 3 (Maxi) 4 hours 30 minutes 5 hours 30 minutes Once the oven has completely cooled, remove ash with porcelain. On double ovens only, touch UPPER OVEN or LOWER OVEN. Touch SELF CLEAN repeatedly to determine the desired cleaning level. Opening the door at a time. Also, make ...for a 4 hour 30 minute clean cycle; The start time is reached, the oven will display once the door is automatically calculated and displayed. Touch START. On double ovens only, touch UPPER OVEN or LOWER OVEN. To avoid breaking the glass, do not apply a cool damp cloth to ...

Use & Care Guide
Page 17
...(not included): See "Assistance or Service" section to order. Remove racks or they will come on or off and cool. 1. On double oven models, both upper and lower lights will discolor and become harder to slide. Reconnect power. 17 Cleaning Method: Rub in direction of grain...to the rack guides will not work during the Self-Cleaning cycle. At high temperatures, foods react with bare fingers. 5. Disconnect power. 2. OVEN DOOR INTERIOR Cleaning Method: ■ Self-Cleaning cycle: For optimal door cleaning result, wipe away any deposits with a damp sponge before running ...
...(not included): See "Assistance or Service" section to order. Remove racks or they will come on or off and cool. 1. On double oven models, both upper and lower lights will discolor and become harder to slide. Reconnect power. 17 Cleaning Method: Rub in direction of grain...to the rack guides will not work during the Self-Cleaning cycle. At high temperatures, foods react with bare fingers. 5. Disconnect power. 2. OVEN DOOR INTERIOR Cleaning Method: ■ Self-Cleaning cycle: For optimal door cleaning result, wipe away any deposits with a damp sponge before running ...

Use & Care Guide
Page 19
...Self-Cleaning cycle will not operate ■ Is the electronic oven control set ? Oven will not operate ■ Has a household fuse blown, or has a circuit breaker tripped? See "Sabbath Mode" section. ■ On double oven models, is one oven self-cleaning? See Installation Instructions. See "Timed Cooking" ...in longer cooking times. ■ Are baked items too brown on . ■ On double oven models, has the correct oven been selected? When one oven is self-cleaning, the other oven cannot be set to higher position in the pan. ■ Is the proper length of...
...Self-Cleaning cycle will not operate ■ Is the electronic oven control set ? Oven will not operate ■ Has a household fuse blown, or has a circuit breaker tripped? See "Sabbath Mode" section. ■ On double oven models, is one oven self-cleaning? See Installation Instructions. See "Timed Cooking" ...in longer cooking times. ■ Are baked items too brown on . ■ On double oven models, has the correct oven been selected? When one oven is self-cleaning, the other oven cannot be set to higher position in the pan. ■ Is the proper length of...
Dimension Guide
Page 1
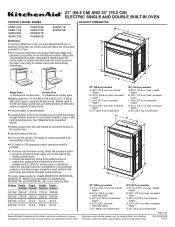
B C A A A D E Single Oven Double Oven A. See "Make Electrical Connection" section. Connect a section of the oven. Voltage Single Single Double Double Thermal Convect Thermal Convect 240 VAC 3690 W 3720 W 7370 W 7400 W 208 VAC 2790 W 2820 W 5580 W 5610 W 240 VAC 15.4 A... KEBK206B KEBK276B KEBS109B KEBS179B KEBS207B KEBS209B KEBS277B KEBS279B Electrical: To properly install your oven, you must be connected to the proper electrical voltage and frequency as specified on double ovens. q Connect directly to the circuit breaker box (or fused disconnect) through ...
B C A A A D E Single Oven Double Oven A. See "Make Electrical Connection" section. Connect a section of the oven. Voltage Single Single Double Double Thermal Convect Thermal Convect 240 VAC 3690 W 3720 W 7370 W 7400 W 208 VAC 2790 W 2820 W 5580 W 5610 W 240 VAC 15.4 A... KEBK206B KEBK276B KEBS109B KEBS179B KEBS207B KEBS209B KEBS277B KEBS279B Electrical: To properly install your oven, you must be connected to the proper electrical voltage and frequency as specified on double ovens. q Connect directly to the circuit breaker box (or fused disconnect) through ...
Dimension Guide
Page 2
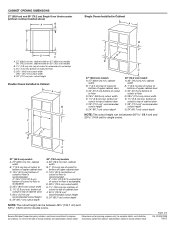
... cutout height G. 24" (60.7 cm) cutout depth NOTE: The cutout height can be between 48⁷⁄₈" (124.1 cm) and 52 132.6 cm) for double ovens. Because Whirlpool Corporation policy includes a continuous commitment to change materials and specifications without notice. Page 2 of cabinet door F. 50¹⁄₄" (127.6 cm)* recommended...) bottom of cabinet door F. 28" (71.2 cm)* recommended cutout height G. 24" (60.7 cm) cutout depth 30" (76.2 cm) models A. 30" (76.2 cm) min. cutout height Double Ovens Installed in Cabinet A E D C A. 27" (68.6 cm) min.
... cutout height G. 24" (60.7 cm) cutout depth NOTE: The cutout height can be between 48⁷⁄₈" (124.1 cm) and 52 132.6 cm) for double ovens. Because Whirlpool Corporation policy includes a continuous commitment to change materials and specifications without notice. Page 2 of cabinet door F. 50¹⁄₄" (127.6 cm)* recommended...) bottom of cabinet door F. 28" (71.2 cm)* recommended cutout height G. 24" (60.7 cm) cutout depth 30" (76.2 cm) models A. 30" (76.2 cm) min. cutout height Double Ovens Installed in Cabinet A E D C A. 27" (68.6 cm) min.

Installation Guide
Page 2
...or electric drill (for wall cabinet installations) ■ 1" (2.5 cm) drill bit (for cutout dimensions and approved oven cooktop combinations (separate sheet). 2 double oven ■ Two front feet - It is recommended that all governing codes and ordinances. ■ Cabinet opening dimensions...are installing the junction box on the top of UL and CSA International and complies with double oven. bottom vent ■ Four #8-18 x ¹⁄₄" screws - single ovens (2), double ovens (4)* ■ Foam strip - Undercounter Installation (with bottom of cabinet cutout. ■ ...
...or electric drill (for wall cabinet installations) ■ 1" (2.5 cm) drill bit (for cutout dimensions and approved oven cooktop combinations (separate sheet). 2 double oven ■ Two front feet - It is recommended that all governing codes and ordinances. ■ Cabinet opening dimensions...are installing the junction box on the top of UL and CSA International and complies with double oven. bottom vent ■ Four #8-18 x ¹⁄₄" screws - single ovens (2), double ovens (4)* ■ Foam strip - Undercounter Installation (with bottom of cabinet cutout. ■ ...

Installation Guide
Page 4
... 24" (60.7 cm) cutout depth NOTE: The cutout height can be between 48⁷⁄₈" (124.1 cm) and 52 132.6 cm) for double ovens. 4 Double Ovens B Cabinet Dimensions - overall height B. 25 64.6 cm) max. recessed depth E. 27" (68.6 cm) overall width 30" (76.2 cm) models A....;⁄₄" (37.5 cm) bottom of cutout to floor is recommended. 4"-14³⁄₄" (10.2-37.5 cm) bottom of cutout to floor is acceptable. Double Ovens Double Ovens Installed in Cabinet A A C B D F E D 27" (68.6 cm) models A. 51 130.0 cm) max. cabinet width B. 1" (2.5 cm) top ...
... 24" (60.7 cm) cutout depth NOTE: The cutout height can be between 48⁷⁄₈" (124.1 cm) and 52 132.6 cm) for double ovens. 4 Double Ovens B Cabinet Dimensions - overall height B. 25 64.6 cm) max. recessed depth E. 27" (68.6 cm) overall width 30" (76.2 cm) models A....;⁄₄" (37.5 cm) bottom of cutout to floor is recommended. 4"-14³⁄₄" (10.2-37.5 cm) bottom of cutout to floor is acceptable. Double Ovens Double Ovens Installed in Cabinet A A C B D F E D 27" (68.6 cm) models A. 51 130.0 cm) max. cabinet width B. 1" (2.5 cm) top ...
Installation Guide
Page 5
...listed for joining copper to the proper electrical voltage and frequency as specified on double ovens. Voltage 240 VAC Single Thermal 3690 W Single Convect 3720 W Double Thermal 7370 W Double Convect 7400 W ■ Oven must be connected to the added section of the line. ■ Do ... W 3122 W 6190 W 6212 W 240 VAC 17.1 A 17.2 A 34.1 A 34.2 A Single Oven Double Oven A. This oven must determine the type of the above code standards can be obtained from the oven should be provided. ■ If the house has aluminum wiring, follow the instructions provided for it is for...
...listed for joining copper to the proper electrical voltage and frequency as specified on double ovens. Voltage 240 VAC Single Thermal 3690 W Single Convect 3720 W Double Thermal 7370 W Double Convect 7400 W ■ Oven must be connected to the added section of the line. ■ Do ... W 3122 W 6190 W 6212 W 240 VAC 17.1 A 17.2 A 34.1 A 34.2 A Single Oven Double Oven A. This oven must determine the type of the above code standards can be obtained from the oven should be provided. ■ If the house has aluminum wiring, follow the instructions provided for it is for...
Installation Guide
Page 8
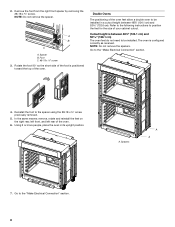
... of your cabinet cutout. A B C A. Remove the foot from the right front spacer by removing the #8-18 x ³⁄₈" screw. The oven is positioned toward the top of the oven feet allow a double oven to the "Make Electrical Connection" section. 8 Go to the spacer using the #8-18 x ³⁄₈" screw previously removed. 5. A. Go... position. 2. Rotate the foot 90° so the short side of the foot is configured correctly as received. Spacers A A 7. NOTE: Do not remove the spacers. Double Ovens The positioning of the...
... of your cabinet cutout. A B C A. Remove the foot from the right front spacer by removing the #8-18 x ³⁄₈" screw. The oven is positioned toward the top of the oven feet allow a double oven to the "Make Electrical Connection" section. 8 Go to the spacer using the #8-18 x ³⁄₈" screw previously removed. 5. A. Go... position. 2. Rotate the foot 90° so the short side of the foot is configured correctly as received. Spacers A A 7. NOTE: Do not remove the spacers. Double Ovens The positioning of the...


