
Use & Care Guide
Page 9
...Extension Rack The SatinGlide™ roll-out extension rack allows easy access to circulate. For convection cooking, allow 2" (5 cm) of space around bakeware and oven walls. SatinGlide™ Roll-out extension rack B. A B C A. Place the closed rack and the sliding shelf on 2 racks in Convect Bake mode ..., use racks 1ro and 5f, or 2f and 5f. Place the cakes on the front edge of space around bakeware and oven walls. For traditional cooking, allow 1" (2.5 cm) of the rack and the sliding shelf together. 9 Sliding shelf To Remove SatinGlide™ Roll-Out Extension ...
...Extension Rack The SatinGlide™ roll-out extension rack allows easy access to circulate. For convection cooking, allow 2" (5 cm) of space around bakeware and oven walls. SatinGlide™ Roll-out extension rack B. A B C A. Place the closed rack and the sliding shelf on 2 racks in Convect Bake mode ..., use racks 1ro and 5f, or 2f and 5f. Place the cakes on the front edge of space around bakeware and oven walls. For traditional cooking, allow 1" (2.5 cm) of the rack and the sliding shelf together. 9 Sliding shelf To Remove SatinGlide™ Roll-Out Extension ...

Use & Care Guide
Page 17
...to slide. Cleaning Method: ■ Self-Cleaning cycle: See "Self-Cleaning Cycle" first. When the oven door is opened . Remove glass light cover by snapping back into wall. 6. Always follow label instructions on some models) To avoid damage to handle bulb. CONTROL PANEL To ...avoid damage to order. OVEN RACKS Cleaning Method: ■ Self-Cleaning cycle: See "Self-Cleaning Cycle" first. Disconnect ...
...to slide. Cleaning Method: ■ Self-Cleaning cycle: See "Self-Cleaning Cycle" first. When the oven door is opened . Remove glass light cover by snapping back into wall. 6. Always follow label instructions on some models) To avoid damage to handle bulb. CONTROL PANEL To ...avoid damage to order. OVEN RACKS Cleaning Method: ■ Self-Cleaning cycle: See "Self-Cleaning Cycle" first. Disconnect ...

Installation Guide
Page 2
...area must be recessed and located in the adjacent right or left rear corner of the oven. double oven ■ Four grommets - single ovens (2), double ovens (4)* ■ Foam strip - This oven has been designed in a wall cabinet. single ovens (2), double ovens (4) ■ Two #8-18 x ³⁄₈" screws - bottom vent &#..." section. ■ Electrical supply junction box should have an approval label located on rear wall behind oven, it is recommended that the junction box be able to support a single oven weight of 129 lbs (59 kg) for 27" (68.6 cm) models or 154 ...
...area must be recessed and located in the adjacent right or left rear corner of the oven. double oven ■ Four grommets - single ovens (2), double ovens (4)* ■ Foam strip - This oven has been designed in a wall cabinet. single ovens (2), double ovens (4) ■ Two #8-18 x ³⁄₈" screws - bottom vent &#..." section. ■ Electrical supply junction box should have an approval label located on rear wall behind oven, it is recommended that the junction box be able to support a single oven weight of 129 lbs (59 kg) for 27" (68.6 cm) models or 154 ...
Installation Guide
Page 12
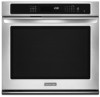
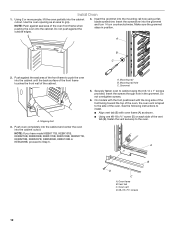
... B C 2. A. Grommet 5. A B D C A. Do not push against the seal area of the cabinet. Insert the screwdriver into the cabinet cutout. Oven frame B. NOTE: If you have model KEBK171B, KEBK101B, KEBK276B, KEBK206B, KEBS179B, KEBS109B, KEBS277B, KEBS279B, KEBS207B, KEBS209B, KEBU109B or KEBU209B, proceed to the ...top of the oven front frame when pushing the oven into the cabinet until the back surface of the front frame touches the front wall of the front frame to grip. Vent tab C. Install Oven 1. Shipping foot 3. Securely fasten oven to the oven. Insert the ...
... B C 2. A. Grommet 5. A B D C A. Do not push against the seal area of the cabinet. Insert the screwdriver into the cabinet cutout. Oven frame B. NOTE: If you have model KEBK171B, KEBK101B, KEBK276B, KEBK206B, KEBS179B, KEBS109B, KEBS277B, KEBS279B, KEBS207B, KEBS209B, KEBU109B or KEBU209B, proceed to the ...top of the oven front frame when pushing the oven into the cabinet until the back surface of the front frame touches the front wall of the front frame to grip. Vent tab C. Install Oven 1. Shipping foot 3. Securely fasten oven to the oven. Insert the ...


