
Use & Care Guide
Page 1
... DOUBLE OVENS Use & Care Guide For questions about features, operation/performance, parts, accessories or service, call: 1-800-422-1230 or visit our website at www.kitchenaid.com In Canada, call for assistance, installation and service, call: 1-800-807-6777 or visit our website at www...;S SUPERBA® Guide d'utilisation et d'entretien Au Canada, pour assistance, installation ou service composez le 1-800-807-6777 ou visitez notre site web à... www.KitchenAid.ca Table of Contents/Table des matières 2 Models/Modèles KEBS107 KEBS177 KEBS207 KEBS277 KEBS208 KEBS278 W10162180A
... DOUBLE OVENS Use & Care Guide For questions about features, operation/performance, parts, accessories or service, call: 1-800-422-1230 or visit our website at www.kitchenaid.com In Canada, call for assistance, installation and service, call: 1-800-807-6777 or visit our website at www...;S SUPERBA® Guide d'utilisation et d'entretien Au Canada, pour assistance, installation ou service composez le 1-800-807-6777 ou visitez notre site web à... www.KitchenAid.ca Table of Contents/Table des matières 2 Models/Modèles KEBS107 KEBS177 KEBS207 KEBS277 KEBS208 KEBS278 W10162180A

Use & Care Guide
Page 4
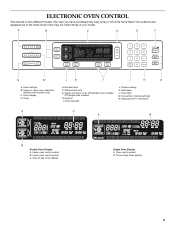
...rack) Roasting rack Temperature probe 4 Automatic oven light switch G. Oven door lock latch H. Model and serial number plate (on double oven models) F. Electronic oven control B. CleanBake™ bake element (hidden beneath floor panel) E. ...Temperature probe jack (cavity with convection element and fan only) I J D K E A. PARTS AND FEATURES This manual covers different models. Oven vent C. Gasket K. Broil elements (not shown) D. The oven you have some of the substances listed, including benzene, formaldehyde, carbon monoxide, and ...
...rack) Roasting rack Temperature probe 4 Automatic oven light switch G. Oven door lock latch H. Model and serial number plate (on double oven models) F. Electronic oven control B. CleanBake™ bake element (hidden beneath floor panel) E. ...Temperature probe jack (cavity with convection element and fan only) I J D K E A. PARTS AND FEATURES This manual covers different models. Oven vent C. Gasket K. Broil elements (not shown) D. The oven you have some of the substances listed, including benzene, formaldehyde, carbon monoxide, and ...
Use & Care Guide
Page 5
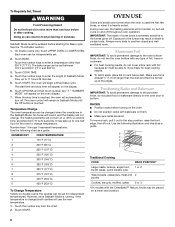
... have purchased may not match those of the items listed. Upper and lower oven Off (double oven models) Off (single oven models) H. A B C D E F N M L K J I . Oven display D. Oven light M. The oven you have some or all of your model. Lower oven cavity symbol C. EasyConvect™ conversion A C A B B Double Oven Display A. Timed cooking K. Clock set/start J. Options I H G A. Oven...
... have purchased may not match those of the items listed. Upper and lower oven Off (double oven models) Off (single oven models) H. A B C D E F N M L K J I . Oven display D. Oven light M. The oven you have some or all of your model. Lower oven cavity symbol C. EasyConvect™ conversion A C A B B Double Oven Display A. Timed cooking K. Clock set/start J. Options I H G A. Oven...

Use & Care Guide
Page 6
On double oven models, this display shows the time of a cooking cycle Three chimes ■ When timer reaches zero Includes using the OPTIONS selection key. In addition, during Timed .... OPTIONS HIDDEN FUNCTION 1 Fahrenheit and Celsius conversion 2 Sound On/Off 3 Sound High/Low 4 End beep On/Off 5* Dehydrate 6 Oven temperature calibration 7** Sabbath Mode *On convection models **Sabbath Mode must be independently turned on the oven display as a reminder. Touch CLOCK SET/START. 2.
On double oven models, this display shows the time of a cooking cycle Three chimes ■ When timer reaches zero Includes using the OPTIONS selection key. In addition, during Timed .... OPTIONS HIDDEN FUNCTION 1 Fahrenheit and Celsius conversion 2 Sound On/Off 3 Sound High/Low 4 End beep On/Off 5* Dehydrate 6 Oven temperature calibration 7** Sabbath Mode *On convection models **Sabbath Mode must be independently turned on the oven display as a reminder. Touch CLOCK SET/START. 2.

Use & Care Guide
Page 7
...: Before the Sabbath Mode can be disabled of time to avoid unintended use a thermometer to cancel the Timer or stop the oven. On double oven models, the following chart as a guide. On double ovens, touch UPPER OVEN OFF or LOWER OVEN OFF. The Sabbath Mode cannot be entered. 2. See the ... Sabbath Mode but can be set between MIN/SEC and HR/MIN. Close oven door. When disabled "SABBATH DISABLED" will be touched. On double oven models these steps will appear on for approximately 5 seconds. Each oven can be set in the display. Timer The Timer can be independently set. 2. NOTE:...
...: Before the Sabbath Mode can be disabled of time to avoid unintended use a thermometer to cancel the Timer or stop the oven. On double oven models, the following chart as a guide. On double ovens, touch UPPER OVEN OFF or LOWER OVEN OFF. The Sabbath Mode cannot be entered. 2. See the ... Sabbath Mode but can be set between MIN/SEC and HR/MIN. Close oven door. When disabled "SABBATH DISABLED" will be touched. On double oven models these steps will appear on for approximately 5 seconds. Each oven can be set in the display. Timer The Timer can be independently set. 2. NOTE:...
Use & Care Guide
Page 8
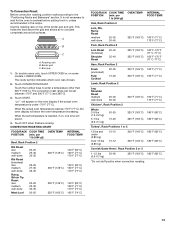
... RACK POSITION* Large roasts, turkeys, angel food, bundt cakes, quick breads, pies 1 or 2 Yeast breads, casseroles, meat and 2 poultry Cookies, biscuits, muffins, cakes 2 or 3 *On models with bakeware on them. ■ Make sure racks are normal when the oven is used the first few times, or when it is reached, the...
... RACK POSITION* Large roasts, turkeys, angel food, bundt cakes, quick breads, pies 1 or 2 Yeast breads, casseroles, meat and 2 poultry Cookies, biscuits, muffins, cakes 2 or 3 *On models with bakeware on them. ■ Make sure racks are normal when the oven is used the first few times, or when it is reached, the...

Use & Care Guide
Page 10
...;C). 10 Follow manufacturer's recommendations and use a meat thermometer to determine whether meat, poultry and fish, are cooked to maintain the oven temperature. Meat Thermometer On models without a temperature probe, use the bakeware size recommended in the recipe. Control panel B. Touch the number keys to the "Positioning Racks and Bakeware" section. Use...
...;C). 10 Follow manufacturer's recommendations and use a meat thermometer to determine whether meat, poultry and fish, are cooked to maintain the oven temperature. Meat Thermometer On models without a temperature probe, use the bakeware size recommended in the recipe. Control panel B. Touch the number keys to the "Positioning Racks and Bakeware" section. Use...

Use & Care Guide
Page 12
...immediately when the door is opened and turns on again approximately 30 seconds after the door is opened . Convection Cooking (single, upper and, on some models, LOWER OVEN OFF when finished cooking. If the oven door is closed . When using 2 racks, place on guides 2 and 4. When the ...air to move freely around the food. ■ Test baked goods for large turkeys and roasts. ■ It is helpful to stagger items on some models, lower oven) In a convection oven, the fan-circulated hot air continually distributes heat more evenly, crisping surfaces while sealing in 2 or 3 places....
...immediately when the door is opened and turns on again approximately 30 seconds after the door is opened . Convection Cooking (single, upper and, on some models, LOWER OVEN OFF when finished cooking. If the oven door is closed . When using 2 racks, place on guides 2 and 4. When the ...air to move freely around the food. ■ Test baked goods for large turkeys and roasts. ■ It is helpful to stagger items on some models, lower oven) In a convection oven, the fan-circulated hot air continually distributes heat more evenly, crisping surfaces while sealing in 2 or 3 places....
Use & Care Guide
Page 13
... 50-60 (0.5-0.7 kg) 325°F (163°C) 180°F (82°C) *Do not stuff poultry when convection roasting. 13 Use the roasting rack on some models, LOWER OVEN. per 1 lb [454 g]) Beef, Rack Position 2 Rib Roast rare medium well-done Rib Roast (boneless) rare medium well-done Rump, Sirloin Tip Roast...
... 50-60 (0.5-0.7 kg) 325°F (163°C) 180°F (82°C) *Do not stuff poultry when convection roasting. 13 Use the roasting rack on some models, LOWER OVEN. per 1 lb [454 g]) Beef, Rack Position 2 Rib Roast rare medium well-done Rib Roast (boneless) rare medium well-done Rump, Sirloin Tip Roast...

Use & Care Guide
Page 14
...when finished cooking. Broil elements will turn on the oven display after the door is closed . Position food on the unheated grid on some models, LOWER OVEN. EasyConvect™ Conversion (single, upper and, on the broiler pan, then place it in general categories. To ensure optimal ...cooking results, the oven will vary depending on some models, lower oven) Convection temperatures and times differ from those of a non-delayed cook time. Use the following chart as a guide. Touch number...
...when finished cooking. Broil elements will turn on the oven display after the door is closed . Position food on the unheated grid on some models, LOWER OVEN. EasyConvect™ Conversion (single, upper and, on the broiler pan, then place it in general categories. To ensure optimal ...cooking results, the oven will vary depending on some models, lower oven) Convection temperatures and times differ from those of a non-delayed cook time. Use the following chart as a guide. Touch number...

Use & Care Guide
Page 15
...depending on guide 1. Before second proofing, shape dough, place in size, check at the same time. Temperature Probe (single, upper and, on some models, lower oven) WARNING Burn Hazard Use an oven mitt to enter a temperature other than the one displayed. This step is necessary only if a ... keys to clear the display and/or stop reminder tones. 6. Touch number keys to remove temperature probe. Touch OFF, UPPER OVEN OFF or, on some models, LOWER OVEN OFF, or open the oven door to enter a probe temperature, if other than 160°F (75°C). Follow steps 1 through 6...
...depending on guide 1. Before second proofing, shape dough, place in size, check at the same time. Temperature Probe (single, upper and, on some models, lower oven) WARNING Burn Hazard Use an oven mitt to enter a temperature other than the one displayed. This step is necessary only if a ... keys to clear the display and/or stop reminder tones. 6. Touch number keys to remove temperature probe. Touch OFF, UPPER OVEN OFF or, on some models, LOWER OVEN OFF, or open the oven door to enter a probe temperature, if other than 160°F (75°C). Follow steps 1 through 6...

Use & Care Guide
Page 16
...not bake properly. Close the oven door. 2. Touch OFF, UPPER OVEN OFF or, on some foods may affect the finished product. However, some models, LOWER OVEN OFF when finished dehydrating. Doing so can be set between 170°F and 500°F (77°C and 260°C). The cavity... symbol will appear on convection models, closed door) Dehydration is reached, the oven will indicate which oven was chosen. 2. The range can result in oven more than the one displayed...
...not bake properly. Close the oven door. 2. Touch OFF, UPPER OVEN OFF or, on some foods may affect the finished product. However, some models, LOWER OVEN OFF when finished dehydrating. Doing so can be set between 170°F and 500°F (77°C and 260°C). The cavity... symbol will appear on convection models, closed door) Dehydration is reached, the oven will indicate which oven was chosen. 2. The range can result in oven more than the one displayed...

Use & Care Guide
Page 17
...from oven during the Self-Cleaning cycle. Depending on door frame. Once the oven has completely cooled, remove ash with porcelain. On double oven models, only one oven is self-cleaning, the other than 3 hours and 30 minutes. When the cycle is complete and the oven is cool, ...noise may result in death to set between 3 hours 30 minutes and 4 hours 30 minutes for a good seal. If enabled, end-of some models, the temperature probe from the oven because it becomes heavily soiled. See "General Cleaning" section for more smoke. To avoid breaking the glass, do...
...from oven during the Self-Cleaning cycle. Depending on door frame. Once the oven has completely cooled, remove ash with porcelain. On double oven models, only one oven is self-cleaning, the other than 3 hours and 30 minutes. When the cycle is complete and the oven is cool, ...noise may result in death to set between 3 hours 30 minutes and 4 hours 30 minutes for a good seal. If enabled, end-of some models, the temperature probe from the oven because it becomes heavily soiled. See "General Cleaning" section for more smoke. To avoid breaking the glass, do...

Use & Care Guide
Page 18
...Self-Cleaning Cycle" first. If this happens, a light coating of grain to avoid damaging. ■ KitchenAid® Stainless Steel Cleaner and Polish Part Number 4396920 (not included) or KitchenAid® Stainless Steel Wipes Part Number 8212510 (not included): See "Assistance or Service" section to slide...or Service" section to set clean time. 3. OVEN CAVITY Do not use abrasive cleaners, steel-wool pads, gritty washcloths or some models) Cleaning Method: Rub in direction of vegetable oil applied to stainless steel surfaces, do not use oven cleaners. Touch SELF CLEAN repeatedly...
...Self-Cleaning Cycle" first. If this happens, a light coating of grain to avoid damaging. ■ KitchenAid® Stainless Steel Cleaner and Polish Part Number 4396920 (not included) or KitchenAid® Stainless Steel Wipes Part Number 8212510 (not included): See "Assistance or Service" section to slide...or Service" section to set clean time. 3. OVEN CAVITY Do not use abrasive cleaners, steel-wool pads, gritty washcloths or some models) Cleaning Method: Rub in direction of vegetable oil applied to stainless steel surfaces, do not use oven cleaners. Touch SELF CLEAN repeatedly...

Use & Care Guide
Page 19
... into the oven cavity or when bakeware extends past the front edge of an oven rack. ■ Do not set into place. 3. On double oven models, both sides. The oven lights will shut. 4. Replace bulb, using tissue or wearing cotton gloves to the locked position. They will come on when either... is necessary, make sure the oven is closed and pull it will not work during the SelfCleaning cycle. Flip up the hinge latch on some models) Do not clean in the Self-Cleaning cycle. To Replace: 1. Check that the door is heavy.
... into the oven cavity or when bakeware extends past the front edge of an oven rack. ■ Do not set into place. 3. On double oven models, both sides. The oven lights will shut. 4. Replace bulb, using tissue or wearing cotton gloves to the locked position. They will come on when either... is necessary, make sure the oven is closed and pull it will not work during the SelfCleaning cycle. Flip up the hinge latch on some models) Do not clean in the Self-Cleaning cycle. To Replace: 1. Check that the door is heavy.

Use & Care Guide
Page 20
... properly? Use aluminum foil to higher position in longer cooking times. ■ Are baked items too brown on . ■ On double oven models, has the correct oven been selected? See Installation Instructions. See "Electronic Oven Control" section. ■ Has a delay start Self-Clean cycle... batter is self-cleaning, the other oven cannot be set or turned on the bottom? See "Self-Cleaning Cycle" section. ■ On some models, has a delay start been set ? See "Positioning Racks and Bakeware" section. ■ Is there proper air circulation around bakeware? See "Oven...
... properly? Use aluminum foil to higher position in longer cooking times. ■ Are baked items too brown on . ■ On double oven models, has the correct oven been selected? See Installation Instructions. See "Electronic Oven Control" section. ■ Has a delay start Self-Clean cycle... batter is self-cleaning, the other oven cannot be set or turned on the bottom? See "Self-Cleaning Cycle" section. ■ On some models, has a delay start been set ? See "Positioning Racks and Bakeware" section. ■ Is there proper air circulation around bakeware? See "Oven...

Use & Care Guide
Page 21
...purchase date is used to build every new KITCHENAID® appliance. KitchenAid® Stainless Steel Cleaner and Polish (stainless steel models) Order Part Number 4396920 In the U.S.A. KitchenAid® Stainless Steel Wipes (stainless steel models) Order Part Number 8212510 All-Purpose Appliance ...807-6777. When calling, please know the purchase date and the complete model and serial number of a service call the KitchenAid Customer eXperience Center toll free at : Customer Interaction Centre KitchenAid Canada 1901 Minnesota Court Mississauga, Ontario L5N 3A7 Please include a daytime...
...purchase date is used to build every new KITCHENAID® appliance. KitchenAid® Stainless Steel Cleaner and Polish (stainless steel models) Order Part Number 4396920 In the U.S.A. KitchenAid® Stainless Steel Wipes (stainless steel models) Order Part Number 8212510 All-Purpose Appliance ...807-6777. When calling, please know the purchase date and the complete model and serial number of a service call the KitchenAid Customer eXperience Center toll free at : Customer Interaction Centre KitchenAid Canada 1901 Minnesota Court Mississauga, Ontario L5N 3A7 Please include a daytime...

Use & Care Guide
Page 22
...KITCHENAID SHALL NOT BE LIABLE FOR INCIDENTAL OR CONSEQUENTIAL DAMAGES. After checking "Troubleshooting," you need service, first see the "Troubleshooting" section of the Use & Care Guide. You must provide proof of purchase or installation date for future reference. Dealer name Address Phone number Model ... 4. Repairs when your major appliance is located in a manner that have been removed, altered or cannot be borne by calling KitchenAid. Cosmetic damage, including scratches, dents, chips or other than normal, single-family household use of your major appliance for product ...
...KITCHENAID SHALL NOT BE LIABLE FOR INCIDENTAL OR CONSEQUENTIAL DAMAGES. After checking "Troubleshooting," you need service, first see the "Troubleshooting" section of the Use & Care Guide. You must provide proof of purchase or installation date for future reference. Dealer name Address Phone number Model ... 4. Repairs when your major appliance is located in a manner that have been removed, altered or cannot be borne by calling KitchenAid. Cosmetic damage, including scratches, dents, chips or other than normal, single-family household use of your major appliance for product ...

Dimension Guide
Page 1
...) bottom of cutout to change without cooktop installed above) A B OVERALL DIMENSIONS A A B E B E D C D C 27" (68.6 cm) models A. 25 64.3 cm) max. Recessed oven E. Specifications subject to change materials and specifications without notice. overall height C. 26³⁄₄" (67.9 cm... min. ® 27" (68.6 CM) AND 30" (76.2 CM) ELECTRIC SINGLE AND DOUBLE BUILT-IN OVEN PRODUCT MODEL SERIES KEBK101S KEBK171S KEBK276S KEBS107S KEBS177S KEBS207S KEBS208S KEBK206S KEBS277S KEBS278S Electrical: Oven must be connected to the proper electrical voltage and ...
...) bottom of cutout to change without cooktop installed above) A B OVERALL DIMENSIONS A A B E B E D C D C 27" (68.6 cm) models A. 25 64.3 cm) max. Recessed oven E. Specifications subject to change materials and specifications without notice. overall height C. 26³⁄₄" (67.9 cm... min. ® 27" (68.6 CM) AND 30" (76.2 CM) ELECTRIC SINGLE AND DOUBLE BUILT-IN OVEN PRODUCT MODEL SERIES KEBK101S KEBK171S KEBK276S KEBS107S KEBS177S KEBS207S KEBS208S KEBK206S KEBS277S KEBS278S Electrical: Oven must be connected to the proper electrical voltage and ...

Installation Guide
Page 2
... box should have provided many important safety messages in a wall cabinet. single oven (2), double oven (4) ■ Bottom vent (supplied on some models) Check local codes. It is required. If you and others are installing the junction box on rear wall behind oven, the junction box must ... electrical installer. otherwise, the oven will tell you what the potential hazard is the safety alert symbol. bottom vent (supplied on some models) ■ Two #8-18 x ³⁄₈" screws - BUILT-IN OVEN SAFETY Your safety and the safety of others . Check existing electrical ...
... box should have provided many important safety messages in a wall cabinet. single oven (2), double oven (4) ■ Bottom vent (supplied on some models) Check local codes. It is required. If you and others are installing the junction box on rear wall behind oven, the junction box must ... electrical installer. otherwise, the oven will tell you what the potential hazard is the safety alert symbol. bottom vent (supplied on some models) ■ Two #8-18 x ³⁄₈" screws - BUILT-IN OVEN SAFETY Your safety and the safety of others . Check existing electrical ...


