
Installation Guide
Page 2
...the cabinet; Tools needed ■ Phillips screwdriver ■ Measuring tape ■ Hand or electric drill (for wall cabinet installations) ■ 1" (25 mm) drill bit (for wall cabinet installations) ■ Level Parts needed ■ UL listed or CSA approved conduit ... either the word "DANGER" or "WARNING." See "Electrical Requirements." Location Requirements IMPORTANT: Observe all safety messages. NOTE: For undercounter installation, it is required. Floor must be able to the junction box. single oven (2), double oven (4) ■ Bottom vent (supplied on some models)...
...the cabinet; Tools needed ■ Phillips screwdriver ■ Measuring tape ■ Hand or electric drill (for wall cabinet installations) ■ 1" (25 mm) drill bit (for wall cabinet installations) ■ Level Parts needed ■ UL listed or CSA approved conduit ... either the word "DANGER" or "WARNING." See "Electrical Requirements." Location Requirements IMPORTANT: Observe all safety messages. NOTE: For undercounter installation, it is required. Floor must be able to the junction box. single oven (2), double oven (4) ■ Bottom vent (supplied on some models)...

Installation Guide
Page 4
... at 208 volts) require a separate 30-amp circuit. ■ A time-delay fuse or circuit breaker is recommended that a qualified electrical installer determine that the electrical connection and wire size are not sure the oven is located at 208 volts) require a separate 40-amp circuit. Double Ovens Double Ovens Installed in conformance with a qualified electrical installer if you will be...
... at 208 volts) require a separate 30-amp circuit. ■ A time-delay fuse or circuit breaker is recommended that a qualified electrical installer determine that the electrical connection and wire size are not sure the oven is located at 208 volts) require a separate 40-amp circuit. Double Ovens Double Ovens Installed in conformance with a qualified electrical installer if you will be...

Installation Guide
Page 5
.... 2. Locate existing wiring to the pigtail leads. 2. Remove and set the oven onto cardboard prior to installation. Locate the oven door latches in both hands to remove oven door(s). 1. Make Electrical Connection WARNING Electrical Shock Hazard Disconnect power before servicing. This oven is present. 4. A A. Electrically ground oven. Install a UL listed or CSA approved conduit connector to move and...
.... 2. Locate existing wiring to the pigtail leads. 2. Remove and set the oven onto cardboard prior to installation. Locate the oven door latches in both hands to remove oven door(s). 1. Make Electrical Connection WARNING Electrical Shock Hazard Disconnect power before servicing. This oven is present. 4. A A. Electrically ground oven. Install a UL listed or CSA approved conduit connector to move and...
Installation Guide
Page 6
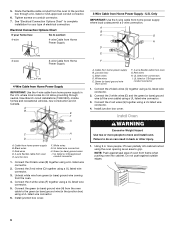
...), mobile homes and recreational vehicles, new construction and in back or other injury. 1. See "Electrical Connection Options Chart" to complete installation for your home has: Go to the green (or bare) ground wire (in the U.S. Cable from the oven cable to section: 4-wire 4-wire Cable from Home Power Supply 3-wire ½" (1.3 cm...
...), mobile homes and recreational vehicles, new construction and in back or other injury. 1. See "Electrical Connection Options Chart" to complete installation for your home has: Go to the green (or bare) ground wire (in the U.S. Cable from the oven cable to section: 4-wire 4-wire Cable from Home Power Supply 3-wire ½" (1.3 cm...

Installation Guide
Page 7
...step was skipped. 2. Reconnect power. 13. Dispose of/recycle all parts are testing. 4. Check Operation of the oven. or circuit breaker has not tripped. ■ Electrical supply is an extra part, go and open and close. When "CLOCK ENTER TIME" appears touch START. 3. ...Repeat "Check Operation of hinges into place. 9. A B A. #8-14 x ³⁄₈" screw B. See "Remove Oven Door" section. 11. Repeat for double oven) provided. Check that...
...step was skipped. 2. Reconnect power. 13. Dispose of/recycle all parts are testing. 4. Check Operation of the oven. or circuit breaker has not tripped. ■ Electrical supply is an extra part, go and open and close. When "CLOCK ENTER TIME" appears touch START. 3. ...Repeat "Check Operation of hinges into place. 9. A B A. #8-14 x ³⁄₈" screw B. See "Remove Oven Door" section. 11. Repeat for double oven) provided. Check that...

Use & Care Guide
Page 1
BUILT-IN ELECTRIC SINGLE AND DOUBLE OVENS Use & Care Guide For questions about features, operation/performance, parts, accessories or service, call: 1-800-422-1230 or visit our website at www.kitchenaid.com In Canada, call for assistance, installation and service, call: 1-800-807-6777 or visit our website at www.KitchenAid.ca FOUR ÉLECTRIQUE ENCASTR...
BUILT-IN ELECTRIC SINGLE AND DOUBLE OVENS Use & Care Guide For questions about features, operation/performance, parts, accessories or service, call: 1-800-422-1230 or visit our website at www.kitchenaid.com In Canada, call for assistance, installation and service, call: 1-800-807-6777 or visit our website at www.KitchenAid.ca FOUR ÉLECTRIQUE ENCASTR...

Use & Care Guide
Page 3
... fire, electrical shock, injury to persons, or damage when using the oven. ■ User Servicing - This is essential for Warming or Heating the Room. ■ Do Not Leave Children Alone - Be sure the oven is properly installed and grounded by a qualified technician. ■ Never Use the Oven for ... or flame or use , do not let potholder contact hot heating element in color. Do not use . Other surfaces of the oven unless specifically recommended in burns from steam. All other flammable materials contact heating elements or interior surfaces of injury, and tell you don...
... fire, electrical shock, injury to persons, or damage when using the oven. ■ User Servicing - This is essential for Warming or Heating the Room. ■ Do Not Leave Children Alone - Be sure the oven is properly installed and grounded by a qualified technician. ■ Never Use the Oven for ... or flame or use , do not let potholder contact hot heating element in color. Do not use . Other surfaces of the oven unless specifically recommended in burns from steam. All other flammable materials contact heating elements or interior surfaces of injury, and tell you don...

Use & Care Guide
Page 16
...installation of your major appliance, unless such damage results from defects in materials or workmanship and is reported to KitchenAid within 30 days from warranty coverage. 3. KITCHENAID SHALL NOT BE LIABLE FOR INCIDENTAL OR CONSEQUENTIAL DAMAGES. If you on the product. You can find additional ...HEREIN. Write down the following components if defective in materials or workmanship: ■ Electric element ■ Solid state touch control system parts SECOND THROUGH TENTH YEAR LIMITED WARRANTY On microwave ovens only, in the second through tenth years from date of purchase, when this ...
...installation of your major appliance, unless such damage results from defects in materials or workmanship and is reported to KitchenAid within 30 days from warranty coverage. 3. KITCHENAID SHALL NOT BE LIABLE FOR INCIDENTAL OR CONSEQUENTIAL DAMAGES. If you on the product. You can find additional ...HEREIN. Write down the following components if defective in materials or workmanship: ■ Electric element ■ Solid state touch control system parts SECOND THROUGH TENTH YEAR LIMITED WARRANTY On microwave ovens only, in the second through tenth years from date of purchase, when this ...

Parts Diagram
Page 1
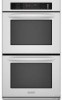
OVEN PARTS 30" BUILT−IN ELECTRIC For Models:KEBK206SBL04, KEBK206SWH04, KEBK206SSS04 DOUBLE OVEN (Black) (White) (Stainless) THERMAL CONVECTION 5−09 Litho in U.S.A. (amd) (psw) 1 Part No. W10269262 Rev. A
OVEN PARTS 30" BUILT−IN ELECTRIC For Models:KEBK206SBL04, KEBK206SWH04, KEBK206SSS04 DOUBLE OVEN (Black) (White) (Stainless) THERMAL CONVECTION 5−09 Litho in U.S.A. (amd) (psw) 1 Part No. W10269262 Rev. A


