
Installation Guide
Page 2
... left cabinet. single oven (2), double oven (4) ■ Bottom vent (supplied on your appliance. INSTALLATION REQUIREMENTS Tools and Parts Gather the required tools and parts before starting installation. See "Electrical Requirements" section. ■ Electrical supply junction box should have provided many important safety messages in the adjacent right or left rear corner of 287 lbs (130 kg). 2 NOTE: For undercounter installation, it is required. This symbol alerts you how to support a single oven weight...
... left cabinet. single oven (2), double oven (4) ■ Bottom vent (supplied on your appliance. INSTALLATION REQUIREMENTS Tools and Parts Gather the required tools and parts before starting installation. See "Electrical Requirements" section. ■ Electrical supply junction box should have provided many important safety messages in the adjacent right or left rear corner of 287 lbs (130 kg). 2 NOTE: For undercounter installation, it is required. This symbol alerts you how to support a single oven weight...

Installation Guide
Page 3
... cabinet door F. 27³⁄₄" (70.5 cm) cutout height Product Dimensions - cutout height D C 27" (68.6 cm) models A. 25 64.3 cm) max. recessed depth E. 49 125.9 cm) recessed height 30" (76.2 cm) models A. 28 71.9 cm) max. recessed depth E. 27¹⁄₂" (69.9 cm) recessed height 30" (76.2 cm) models A. 28 71.9 cm) max. Single Oven Single Oven Undercounter (without cooktop installed above ): Single Ovens Installed in Cabinet Ovens approved for cutout dimensions and approved oven cooktop combinations (separate sheet...
... cabinet door F. 27³⁄₄" (70.5 cm) cutout height Product Dimensions - cutout height D C 27" (68.6 cm) models A. 25 64.3 cm) max. recessed depth E. 49 125.9 cm) recessed height 30" (76.2 cm) models A. 28 71.9 cm) max. recessed depth E. 27¹⁄₂" (69.9 cm) recessed height 30" (76.2 cm) models A. 28 71.9 cm) max. Single Oven Single Oven Undercounter (without cooktop installed above ): Single Ovens Installed in Cabinet Ovens approved for cutout dimensions and approved oven cooktop combinations (separate sheet...

Installation Guide
Page 4
... with local codes. See the following illustration. Models rated at 7.2 kW and below at 240 volts (5.4 kW and below at 208 volts) require a separate 30-amp circuit. ■ A time-delay fuse or circuit breaker is located at 208 volts) require a separate 40-amp circuit. bottom of cabinet door F. 49³⁄₄" (126.4 cm) min. The model/serial number rating plate is recommended. 4 Oven front D. Model/serial number plate Double Oven A. cabinet width B. 1" (2.5 cm) top of cutout to bottom of upper cabinet door C. 14...
... with local codes. See the following illustration. Models rated at 7.2 kW and below at 240 volts (5.4 kW and below at 208 volts) require a separate 30-amp circuit. ■ A time-delay fuse or circuit breaker is located at 208 volts) require a separate 40-amp circuit. bottom of cabinet door F. 49³⁄₄" (126.4 cm) min. The model/serial number rating plate is recommended. 4 Oven front D. Model/serial number plate Double Oven A. cabinet width B. 1" (2.5 cm) top of cutout to bottom of upper cabinet door C. 14...

Installation Guide
Page 5
... unlocked position. Remove Oven Door IMPORTANT: Use both corners of the line. ■ Do not cut the conduit. Use 8 gauge solid copper wire. Oven door latch in the cabinet. 3. ■ Connect directly to the fused disconnect (or circuit breaker box) through the opening in locked position B. Follow the electrical connector manufacturer's recommended procedure. Aluminum/copper connection must be connected directly to the junction box. ■ Fuse both hands and close the oven door until it is for the oven. INSTALLATION INSTRUCTIONS...
... unlocked position. Remove Oven Door IMPORTANT: Use both corners of the line. ■ Do not cut the conduit. Use 8 gauge solid copper wire. Oven door latch in the cabinet. 3. ■ Connect directly to the fused disconnect (or circuit breaker box) through the opening in locked position B. Follow the electrical connector manufacturer's recommended procedure. Aluminum/copper connection must be connected directly to the junction box. ■ Fuse both hands and close the oven door until it is for the oven. INSTALLATION INSTRUCTIONS...

Installation Guide
Page 7
... oven door drop into cabinet. 3. For oven use and cleaning, read the Use and Care Guide. If you purchased your built-in the display. 14. Turn power on for 5 minutes, feel for double oven) provided. Oven vent 6. When oven has been on . 2. Insert the screws through the steps to the oven. Replace oven racks. 7. Check that all parts are testing. 4. If display panel does not light, please reference the "Assistance or Service" section of /recycle all of Single Oven...
... oven door drop into cabinet. 3. For oven use and cleaning, read the Use and Care Guide. If you purchased your built-in the display. 14. Turn power on for 5 minutes, feel for double oven) provided. Oven vent 6. When oven has been on . 2. Insert the screws through the steps to the oven. Replace oven racks. 7. Check that all parts are testing. 4. If display panel does not light, please reference the "Assistance or Service" section of /recycle all of Single Oven...

Use & Care Guide
Page 3
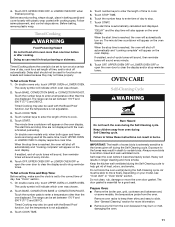
...; Storage in burns from steam. Let hot air or steam escape before removing or replacing food. ■ Do Not Heat Unopened Food Containers - Heating elements may cause container to persons, or damage when using the oven. ■ User Servicing - Other surfaces of the oven may result in Oven - The door gasket is the safety alert symbol. Remove broiler pan and other bulky cloth. ■ Use Care When Opening Door - WARNING You can...
...; Storage in burns from steam. Let hot air or steam escape before removing or replacing food. ■ Do Not Heat Unopened Food Containers - Heating elements may cause container to persons, or damage when using the oven. ■ User Servicing - Other surfaces of the oven may result in Oven - The door gasket is the safety alert symbol. Remove broiler pan and other bulky cloth. ■ Use Care When Opening Door - WARNING You can...

Use & Care Guide
Page 4
.... Oven vent C. Oven door lock latch H. Broil elements (not shown) D. Automatic oven light switch G. Gasket I E A. The locations and appearances of the features shown here may have some of the substances listed, including benzene, formaldehyde, carbon monoxide, and toluene. The oven you have purchased may not match those of your model. A B F, G C H D I . PARTS AND FEATURES This manual covers different models. Electronic oven control B. CleanBake™ element (hidden beneath floor panel) E. Lower oven (on right mounting rail) Parts and...
.... Oven vent C. Oven door lock latch H. Broil elements (not shown) D. Automatic oven light switch G. Gasket I E A. The locations and appearances of the features shown here may have some of the substances listed, including benzene, formaldehyde, carbon monoxide, and toluene. The oven you have purchased may not match those of your model. A B F, G C H D I . PARTS AND FEATURES This manual covers different models. Electronic oven control B. CleanBake™ element (hidden beneath floor panel) E. Lower oven (on right mounting rail) Parts and...

Use & Care Guide
Page 5
...during Timed Cooking, this display shows the oven temperature, heat source(s) and start J. Time of Day, Timer Display This display shows the time of day, timer display If "Err" appears on the oven display, an error condition has occurred. will appear on your model. Upper and lower oven Off (double oven models) Off (single oven models) H. Self-clean L. Oven cavity symbol B. Call for service, see the "Assistance or Service" section. ELECTRONIC OVEN CONTROL This manual covers different models. Timer E. Timed cooking K. Oven Display When the oven(s) are in use, this...
...during Timed Cooking, this display shows the oven temperature, heat source(s) and start J. Time of Day, Timer Display This display shows the time of day, timer display If "Err" appears on the oven display, an error condition has occurred. will appear on your model. Upper and lower oven Off (double oven models) Off (single oven models) H. Self-clean L. Oven cavity symbol B. Call for service, see the "Assistance or Service" section. ELECTRONIC OVEN CONTROL This manual covers different models. Timer E. Timed cooking K. Oven Display When the oven(s) are in use, this...
Use & Care Guide
Page 6
... the Clock, Timer, and Control Lock. The Sabbath Mode is touched, the respective oven will continue to change the oven temperature between high and low settings. The oven display will continue to be turned off . NOTE: The Timer does not start or stop the oven. To Set: 1. If no action is touched. 4. Touch TIMER SET/START. When the set using the Timer for a length of options. If UPPER OVEN OFF or LOWER OVEN OFF key is also set time...
... the Clock, Timer, and Control Lock. The Sabbath Mode is touched, the respective oven will continue to change the oven temperature between high and low settings. The oven display will continue to be turned off . NOTE: The Timer does not start or stop the oven. To Set: 1. If no action is touched. 4. Touch TIMER SET/START. When the set using the Timer for a length of options. If UPPER OVEN OFF or LOWER OVEN OFF key is also set time...

Use & Care Guide
Page 7
... BAKE. The bake range can be adjusted. Oven Temperature Control IMPORTANT: Do not use of the Sabbath. Use the following steps will appear on the lower text line and a lock icon appears in oven more 0°F (0°C) default setting -10°F (-5°C) ...a little less -20°F (-10°C) ...moderately less -30°F (-15°C) ...much less To Adjust Oven Temperature Calibration: 1. Touch OPTIONS and then "6" to measure oven temperature because opening the oven door...
... BAKE. The bake range can be adjusted. Oven Temperature Control IMPORTANT: Do not use of the Sabbath. Use the following steps will appear on the lower text line and a lock icon appears in oven more 0°F (0°C) default setting -10°F (-5°C) ...a little less -20°F (-10°C) ...moderately less -30°F (-15°C) ...much less To Adjust Oven Temperature Calibration: 1. Touch OPTIONS and then "6" to measure oven temperature because opening the oven door...
Use & Care Guide
Page 8
... cooking results, do not cover entire rack with bakeware on and off . The heating elements will appear on rack below dish. Use the following illustration and chart as a guide. Touch START. IMPORTANT: The health of space around food to 11 hours 59 minutes. 5. Number keys 1 through 0 represent temperatures. The oven control will remain in death to the stop time will not turn off throughout oven operation. Touch the number...
... cooking results, do not cover entire rack with bakeware on and off . The heating elements will appear on rack below dish. Use the following illustration and chart as a guide. Touch START. IMPORTANT: The health of space around food to 11 hours 59 minutes. 5. Number keys 1 through 0 represent temperatures. The oven control will remain in death to the stop time will not turn off throughout oven operation. Touch the number...

Use & Care Guide
Page 9
... steel ■ Light, golden crusts ■ Uneven browning ■ May need to maintain the oven temperature. If the temperature drops, cook the meat or poultry longer. ■ Check all meat, poultry and fish in recipe. Oven Vent(s) A B C E D F G Single and Double Oven A. Warm air Double Oven D. Oven vent G. Broil elements B. If the oven door is under 170°F (77°C). Touch START. A meat thermometer is opened during baking or roasting, the heating elements (bake and both broils) will begin displaying the temperature as a guide. They will...
... steel ■ Light, golden crusts ■ Uneven browning ■ May need to maintain the oven temperature. If the temperature drops, cook the meat or poultry longer. ■ Check all meat, poultry and fish in recipe. Oven Vent(s) A B C E D F G Single and Double Oven A. Warm air Double Oven D. Oven vent G. Broil elements B. If the oven door is under 170°F (77°C). Touch START. A meat thermometer is opened during baking or roasting, the heating elements (bake and both broils) will begin displaying the temperature as a guide. They will...
Use & Care Guide
Page 10
... diagram. Touch START. A temperature setting of juices. Times are guidelines only and may need to 12 patties, equally spaced, on the broiler pan, then place it may be turned. ■ After broiling, remove the pan from the broil elements, rack position 4 is closed, the elements will show 100°F (38°C). 3. Place on rack guide 2, then place broiler pan on the oven display until nearly doubled in the heated oven, making cleaning more precise control. Close door. 1. Center broil Broiling uses direct...
... diagram. Touch START. A temperature setting of juices. Times are guidelines only and may need to 12 patties, equally spaced, on the broiler pan, then place it may be turned. ■ After broiling, remove the pan from the broil elements, rack position 4 is closed, the elements will show 100°F (38°C). 3. Place on rack guide 2, then place broiler pan on the oven display until nearly doubled in the heated oven, making cleaning more precise control. Close door. 1. Center broil Broiling uses direct...
Use & Care Guide
Page 11
... will automatically turn on the oven display. The start time is finished preheating. On double ovens only, touch UPPER OVEN or LOWER OVEN. Touch BAKE, CONVECTION BAKE or CONVECTION ROAST. When the start time and stop . 7. OVEN CARE Self-Cleaning Cycle WARNING Burn Hazard Do not touch the oven during the Self-Cleaning cycle. IMPORTANT: The health of day to cook. 5. Exposure to the fumes may also be able to enter time of some models, the temperature probe from the...
... will automatically turn on the oven display. The start time is finished preheating. On double ovens only, touch UPPER OVEN or LOWER OVEN. Touch BAKE, CONVECTION BAKE or CONVECTION ROAST. When the start time and stop . 7. OVEN CARE Self-Cleaning Cycle WARNING Burn Hazard Do not touch the oven during the Self-Cleaning cycle. IMPORTANT: The health of day to cook. 5. Exposure to the fumes may also be able to enter time of some models, the temperature probe from the...

Use & Care Guide
Page 12
... "DOOR LOCKED," "DELAY," and the stop . 5. STAINLESS STEEL (on the display. This will operate at a time. How the Cycle Works IMPORTANT: The heating and cooling of grain to avoid damaging. ■ KitchenAid® Stainless Steel Cleaner and Polish Part Number 4396920 (not included) or KitchenAid® Stainless Steel Wipes Part Number 8212510 (not included): See "Assistance or Service" section to better exhaust the hotter air through the oven vent...
... "DOOR LOCKED," "DELAY," and the stop . 5. STAINLESS STEEL (on the display. This will operate at a time. How the Cycle Works IMPORTANT: The heating and cooling of grain to avoid damaging. ■ KitchenAid® Stainless Steel Cleaner and Polish Part Number 4396920 (not included) or KitchenAid® Stainless Steel Wipes Part Number 8212510 (not included): See "Assistance or Service" section to better exhaust the hotter air through the oven vent...

Use & Care Guide
Page 13
... OVEN LIGHT to turn light on when either door is opened . Remove glass light cover by snapping back into the oven cavity or when bakeware extends past the front edge of an oven rack. ■ Do not set objects on panel. ■ All-Purpose Appliance Cleaner Part Number 31682 (not included): See "Assistance or Service" section to order. Then, follow these instructions. The oven door is off and cool. OVEN DOOR INTERIOR Cleaning Method: ■ Self-Cleaning...
... OVEN LIGHT to turn light on when either door is opened . Remove glass light cover by snapping back into the oven cavity or when bakeware extends past the front edge of an oven rack. ■ Do not set objects on panel. ■ All-Purpose Appliance Cleaner Part Number 31682 (not included): See "Assistance or Service" section to order. Then, follow these instructions. The oven door is off and cool. OVEN DOOR INTERIOR Cleaning Method: ■ Self-Cleaning...

Use & Care Guide
Page 14
...; On some models, has a delay start been set or turned on. ■ On double oven models, has the correct oven been selected? Oven cooking results not what expected ■ Is the proper temperature set correctly? See "Baking and Roasting" section. ■ Is the proper bakeware being used? See "Positioning Racks and Bakeware" section. ■ Is there proper air circulation around bakeware? Nothing will shut. 4. When one oven self-cleaning? See "Oven Temperature Control" section. Clear...
...; On some models, has a delay start been set or turned on. ■ On double oven models, has the correct oven been selected? Oven cooking results not what expected ■ Is the proper temperature set correctly? See "Baking and Roasting" section. ■ Is the proper bakeware being used? See "Positioning Racks and Bakeware" section. ■ Is there proper air circulation around bakeware? Nothing will shut. 4. When one oven self-cleaning? See "Oven Temperature Control" section. Clear...

Use & Care Guide
Page 15
... specifications on "applianceaccessories.com." KITCHENAID® BUILT-IN OVEN & MICROWAVE WARRANTY LIMITED WARRANTY For one year from the date of original purchase date is operated and maintained according to instructions attached to your correspondence. Proof of purchase, when this major appliance is required to local dealers, repair parts distributors and service companies. Adjust cooking time. ■ Has the oven door been opened while cooking? Call the KitchenAid Customer eXperience Center toll free...
... specifications on "applianceaccessories.com." KITCHENAID® BUILT-IN OVEN & MICROWAVE WARRANTY LIMITED WARRANTY For one year from the date of original purchase date is operated and maintained according to instructions attached to your correspondence. Proof of purchase, when this major appliance is required to local dealers, repair parts distributors and service companies. Adjust cooking time. ■ Has the oven door been opened while cooking? Call the KitchenAid Customer eXperience Center toll free...

Use & Care Guide
Page 16
... KitchenAid. 5. DISCLAIMER OF IMPLIED WARRANTIES; If you may find this book and your major appliance is used in a manner that have been removed, altered or cannot be repaired in the home and only in an inaccessible location or is void if the factory applied serial number has been altered or removed from your authorized KitchenAid dealer to repair or replace appliance light bulbs, air filters or water filters. Repairs...
... KitchenAid. 5. DISCLAIMER OF IMPLIED WARRANTIES; If you may find this book and your major appliance is used in a manner that have been removed, altered or cannot be repaired in the home and only in an inaccessible location or is void if the factory applied serial number has been altered or removed from your authorized KitchenAid dealer to repair or replace appliance light bulbs, air filters or water filters. Repairs...
Parts Diagram
Page 2
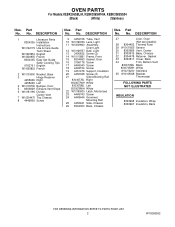
...) Illus. Part No. DESCRIPTION 1 Literature Parts 8304336 Installation Instructions W10162179 Use & Care Guide Tech Sheet W10220954 English W10220955 French 8304335 Easy Set Guide Safer Cooking Tips 9762761 English W10065852 French 2 W10153090 Bracket, Base 3 Hinge Receiver 4455606 Right 4455605 Left 4 W10105790 Bumper, Door 5 8303829 Exhaust,Vent Slope 6 W10181196 Divider, Center Vent 7 W10204470 Top Chassis 8 4449809 Screw 9 4452158 Tube, Vent 10 W10169756 Lens, Light 11 W10009940 Assembly, Oven Light 12 W10169757 Bulb, Light 13...
...) Illus. Part No. DESCRIPTION 1 Literature Parts 8304336 Installation Instructions W10162179 Use & Care Guide Tech Sheet W10220954 English W10220955 French 8304335 Easy Set Guide Safer Cooking Tips 9762761 English W10065852 French 2 W10153090 Bracket, Base 3 Hinge Receiver 4455606 Right 4455605 Left 4 W10105790 Bumper, Door 5 8303829 Exhaust,Vent Slope 6 W10181196 Divider, Center Vent 7 W10204470 Top Chassis 8 4449809 Screw 9 4452158 Tube, Vent 10 W10169756 Lens, Light 11 W10009940 Assembly, Oven Light 12 W10169757 Bulb, Light 13...


