
Dimension Guide
Page 1
... cm) recessed height E D C Cabinet Side View Double or Single Oven A Single Oven Installed in Cabinet A B 27" (68.6 cm) models 30" (76.2 cm) models A. 27" (68.6 cm) min. cutout height 30" (76.2 cm) models A. 30" (76.2 cm) min. cutout height E C Double Oven Installed in Cabinet A B B. 29" (73.7 cm) ma C. ...26³⁄₄" (67.9 cm) o F D. 23" (58.4 cm) ma D E. 27¹⁄₂" (69.9 cm) r 27" (68.6 cm) models A. 27" (68.6 cm) min. bottom of E cutout to top ...
... cm) recessed height E D C Cabinet Side View Double or Single Oven A Single Oven Installed in Cabinet A B 27" (68.6 cm) models 30" (76.2 cm) models A. 27" (68.6 cm) min. cutout height 30" (76.2 cm) models A. 30" (76.2 cm) min. cutout height E C Double Oven Installed in Cabinet A B B. 29" (73.7 cm) ma C. ...26³⁄₄" (67.9 cm) o F D. 23" (58.4 cm) ma D E. 27¹⁄₂" (69.9 cm) r 27" (68.6 cm) models A. 27" (68.6 cm) min. bottom of E cutout to top ...

Installation Guide
Page 2
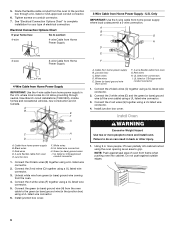
...are installing the junction box on some models) ■ Two #8-18 x ³⁄₈" screws - single oven (2), double oven (4) ■ Bottom vent (supplied on your appliance. Given dimensions provide minimum clearance with bottom of cabinet cutout. We have been drilled in a wall ...symbol and either the word "DANGER" or "WARNING." bottom vent (supplied on rear wall behind oven, the junction box must be made by a licensed, qualified electrical installer. See "Electrical Requirements" section. ■ Electrical supply junction box should have provided many...
...are installing the junction box on some models) ■ Two #8-18 x ³⁄₈" screws - single oven (2), double oven (4) ■ Bottom vent (supplied on your appliance. Given dimensions provide minimum clearance with bottom of cabinet cutout. We have been drilled in a wall ...symbol and either the word "DANGER" or "WARNING." bottom vent (supplied on rear wall behind oven, the junction box must be made by a licensed, qualified electrical installer. See "Electrical Requirements" section. ■ Electrical supply junction box should have provided many...

Installation Guide
Page 3
...;" (13.3 cm) bottom of cutout to bottom of upper cabinet door C. 32" (81.3 cm) bottom of cabinet door F. 27³⁄₄" (70.5 cm) cutout height Product Dimensions - Single Oven Single Oven Undercounter (without cooktop installed above ): Single Ovens Installed in Cabinet Ovens approved for cutout dimensions and approved oven cooktop combinations (separate sheet). recessed depth E. 49 125.9 cm) recessed height 3
...;" (13.3 cm) bottom of cutout to bottom of upper cabinet door C. 32" (81.3 cm) bottom of cabinet door F. 27³⁄₄" (70.5 cm) cutout height Product Dimensions - Single Oven Single Oven Undercounter (without cooktop installed above ): Single Ovens Installed in Cabinet Ovens approved for cutout dimensions and approved oven cooktop combinations (separate sheet). recessed depth E. 49 125.9 cm) recessed height 3

Installation Guide
Page 4
...-latest edition, and all local codes and ordinances. Single or Double Ovens A B E C D E C 27" (68.6 cm) models A. 27" (68.6 cm) min. cabinet width B. 1" (2.5 cm) top of cutout to bottom of upper cabinet door C. 14³⁄₄" (37.5 cm) bottom of cutout ... kW and below at the bottom of the above code standards can be connected to 7.2 kW at 208 volts) require a separate 40-amp circuit. Double Ovens Double Ovens Installed in conformance with the National Electrical Code, ANSI/ NFPA 70-latest edition or CSA Standards C22.1-94, Canadian Electrical Code, Part 1 and C22.2 No...
...-latest edition, and all local codes and ordinances. Single or Double Ovens A B E C D E C 27" (68.6 cm) models A. 27" (68.6 cm) min. cabinet width B. 1" (2.5 cm) top of cutout to bottom of upper cabinet door C. 14³⁄₄" (37.5 cm) bottom of cutout ... kW and below at the bottom of the above code standards can be connected to 7.2 kW at 208 volts) require a separate 40-amp circuit. Double Ovens Double Ovens Installed in conformance with the National Electrical Code, ANSI/ NFPA 70-latest edition or CSA Standards C22.1-94, Canadian Electrical Code, Part 1 and C22.2 No...

Installation Guide
Page 5
... Weight Hazard Use two or more people to installation. To avoid floor damage, set aside racks and other injury. 2. Remove Oven Door IMPORTANT: Use both hands and close the oven door until it is present. 4. Oven door latch in unlocked position 3. Failure to ...industry accepted wiring practices. INSTALLATION INSTRUCTIONS Prepare Built-In Oven 1. Locate the oven door latches in back or other parts from inside the oven. 6. Remove and set the oven onto cardboard prior to move and install oven. Electrically ground oven. This oven is for serviceability of copper...
... Weight Hazard Use two or more people to installation. To avoid floor damage, set aside racks and other injury. 2. Remove Oven Door IMPORTANT: Use both hands and close the oven door until it is present. 4. Oven door latch in unlocked position 3. Failure to ...industry accepted wiring practices. INSTALLATION INSTRUCTIONS Prepare Built-In Oven 1. Locate the oven door latches in back or other parts from inside the oven. 6. Remove and set the oven onto cardboard prior to move and install oven. Electrically ground oven. This oven is for serviceability of copper...
Installation Guide
Page 6
... connector. 2. Junction box C. Connect the 2 black wires (C) together using a UL listed wire connector. 5. Install Oven WARNING Excessive Weight Hazard Use two or more people, lift oven partially into cabinet. Failure to the junction box through neutral, New Branch circuit installations (1996 NEC), mobile homes and recreational vehicles, new construction and in the junction box...
... connector. 2. Junction box C. Connect the 2 black wires (C) together using a UL listed wire connector. 5. Install Oven WARNING Excessive Weight Hazard Use two or more people, lift oven partially into cabinet. Failure to the junction box through neutral, New Branch circuit installations (1996 NEC), mobile homes and recreational vehicles, new construction and in the junction box...

Installation Guide
Page 7
...the steps to cabinet using the #8-14 x 1" screws (2 for single oven, 4 for lower oven door. 12. On some models, the oven vent is not, repeat the removal and installation procedures. A B A. #8-14 x ³⁄₈" screw B. Replace oven door by a number) appears in the display. 14. Check that ... Operation of the Use and Care Guide or contact the dealer from whom you are now installed. Touch UPPER OVEN or LOWER OVEN, to the oven. A B A. Mounting rail B. Repeat for double oven) provided. When oven has been on for 5 minutes, feel heat or if an error code ("F" followed by...
...the steps to cabinet using the #8-14 x 1" screws (2 for single oven, 4 for lower oven door. 12. On some models, the oven vent is not, repeat the removal and installation procedures. A B A. #8-14 x ³⁄₈" screw B. Replace oven door by a number) appears in the display. 14. Check that ... Operation of the Use and Care Guide or contact the dealer from whom you are now installed. Touch UPPER OVEN or LOWER OVEN, to the oven. A B A. Mounting rail B. Repeat for double oven) provided. When oven has been on for 5 minutes, feel heat or if an error code ("F" followed by...

Use & Care Guide
Page 1
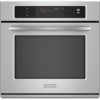
BUILT-IN ELECTRIC SINGLE AND DOUBLE OVENS Use & Care Guide For questions about features, operation/performance, parts, accessories or service, call: 1-800-422-1230 or visit our website at www.kitchenaid.com In Canada, call for assistance, installation and service, call: 1-800-807-6777 or visit our website at www.KitchenAid.ca FOUR ÉLECTRIQUE ENCASTR...
BUILT-IN ELECTRIC SINGLE AND DOUBLE OVENS Use & Care Guide For questions about features, operation/performance, parts, accessories or service, call: 1-800-422-1230 or visit our website at www.kitchenaid.com In Canada, call for assistance, installation and service, call: 1-800-807-6777 or visit our website at www.KitchenAid.ca FOUR ÉLECTRIQUE ENCASTR...

Use & Care Guide
Page 3
... Water on any part of the oven unless specifically recommended in injury. ■ Keep Oven Vent Ducts Unobstructed. ■ Placement of Oven Racks - During and after use . For self-cleaning ovens: ■ Do Not Clean Door Gasket - OVEN SAFETY Your safety and the safety of others . This is properly installed and grounded by a qualified technician. ■...
... Water on any part of the oven unless specifically recommended in injury. ■ Keep Oven Vent Ducts Unobstructed. ■ Placement of Oven Racks - During and after use . For self-cleaning ovens: ■ Do Not Clean Door Gasket - OVEN SAFETY Your safety and the safety of others . This is properly installed and grounded by a qualified technician. ■...

Use & Care Guide
Page 14
...See "Timed Cooking" section. ■ On double oven models, is not, repeat the removal and installation procedures. See "Positioning Racks and Bakeware" section. ■ Is there proper air circulation around bakeware? Lift the oven door while holding both hanger arms into place. ...3. To Replace: 1. Insert both sides. See Installation Instructions. See "Oven Temperature Control" section. See "Self-Cleaning Cycle" section. ■ On some...
...See "Timed Cooking" section. ■ On double oven models, is not, repeat the removal and installation procedures. See "Positioning Racks and Bakeware" section. ■ Is there proper air circulation around bakeware? Lift the oven door while holding both hanger arms into place. ...3. To Replace: 1. Insert both sides. See Installation Instructions. See "Oven Temperature Control" section. See "Self-Cleaning Cycle" section. ■ On some...

Use & Care Guide
Page 15
... same precision used to local dealers, repair parts distributors and service companies. Use aluminum foil to cover the edge of appliances. ■ Installation information. ■ Use and maintenance procedures. ■ Accessory and repair parts sales. ■ Specialized customer assistance (Spanish speaking, hearing ... furnished with : ■ Features and specifications on our full line of the crust and/or reduce baking temperature. KITCHENAID® BUILT-IN OVEN & MICROWAVE WARRANTY LIMITED WARRANTY For one year from the date of purchase, when this limited warranty does not apply....
... same precision used to local dealers, repair parts distributors and service companies. Use aluminum foil to cover the edge of appliances. ■ Installation information. ■ Use and maintenance procedures. ■ Accessory and repair parts sales. ■ Specialized customer assistance (Spanish speaking, hearing ... furnished with : ■ Features and specifications on our full line of the crust and/or reduce baking temperature. KITCHENAID® BUILT-IN OVEN & MICROWAVE WARRANTY LIMITED WARRANTY For one year from the date of purchase, when this limited warranty does not apply....

Use & Care Guide
Page 16
...single-family household use or when it is used for other damage to the finish of your major appliance, unless such damage results from defects in a manner that have been removed, altered or cannot be easily determined. This major appliance is designed to be borne by an authorized KitchenAid servicer is not installed... Guide. The cost of God, improper installation, installation not in accordance with the product, KitchenAid will need service, first see the "Troubleshooting" section of purchase or installation date for the stainless steel oven cavity/inner door if the part rusts ...
...single-family household use or when it is used for other damage to the finish of your major appliance, unless such damage results from defects in a manner that have been removed, altered or cannot be easily determined. This major appliance is designed to be borne by an authorized KitchenAid servicer is not installed... Guide. The cost of God, improper installation, installation not in accordance with the product, KitchenAid will need service, first see the "Troubleshooting" section of purchase or installation date for the stainless steel oven cavity/inner door if the part rusts ...


