
Installation Guide
Page 2
... junction box on your appliance. otherwise, the oven will follow instructions. These words mean: DANGER You can be made by a licensed, qualified electrical installer. Tools needed ■ Phillips screwdriver ■ Measuring tape ■ Hand or electric drill (for wall cabinet installations) ■ 1" (25 mm) drill bit (for wall cabinet installations) ■ Level Parts needed ■ UL listed or CSA...
... junction box on your appliance. otherwise, the oven will follow instructions. These words mean: DANGER You can be made by a licensed, qualified electrical installer. Tools needed ■ Phillips screwdriver ■ Measuring tape ■ Hand or electric drill (for wall cabinet installations) ■ 1" (25 mm) drill bit (for wall cabinet installations) ■ Level Parts needed ■ UL listed or CSA...

Installation Guide
Page 3
... height 30" (76.2 cm) models A. 28 71.9 cm) max. Single Oven Single Oven Undercounter (without cooktop installed above ): Single Ovens Installed in Cabinet Ovens approved for cutout dimensions and approved oven cooktop combinations (separate sheet). recessed depth E. 49 125.9 cm) recessed height 3 Single Oven A ...oven. cutout height 30" (76.2 cm) models A. 30" (76.2 cm) min. Undercounter Installation (with cooktop installed above ) A B 27" (68.6 cm) models A. 27" (68.6 cm) min. Refer to undercounter installation instructions for this type of installation...
... height 30" (76.2 cm) models A. 28 71.9 cm) max. Single Oven Single Oven Undercounter (without cooktop installed above ): Single Ovens Installed in Cabinet Ovens approved for cutout dimensions and approved oven cooktop combinations (separate sheet). recessed depth E. 49 125.9 cm) recessed height 3 Single Oven A ...oven. cutout height 30" (76.2 cm) models A. 30" (76.2 cm) min. Undercounter Installation (with cooktop installed above ) A B 27" (68.6 cm) models A. 27" (68.6 cm) min. Refer to undercounter installation instructions for this type of installation...

Installation Guide
Page 4
...(58.4 cm) recessed oven depth C. Oven front D. Single or Double Ovens A B E C D E C 27" (68.6 cm) models A. 27" (68.6 cm) min. A copy of the above code standards can be using and follow the instructions provided for it is recommended. 4 Recessed oven E. This oven must determine the type of...at 208 volts) require a separate 30-amp circuit. ■ A time-delay fuse or circuit breaker is recommended that a qualified electrical installer determine that the electrical connection and wire size are not sure the oven is used, it here. ■ Oven must be connected to floor D. 25...
...(58.4 cm) recessed oven depth C. Oven front D. Single or Double Ovens A B E C D E C 27" (68.6 cm) models A. 27" (68.6 cm) min. A copy of the above code standards can be using and follow the instructions provided for it is recommended. 4 Recessed oven E. This oven must determine the type of...at 208 volts) require a separate 30-amp circuit. ■ A time-delay fuse or circuit breaker is recommended that a qualified electrical installer determine that the electrical connection and wire size are not sure the oven is used, it here. ■ Oven must be connected to floor D. 25...

Installation Guide
Page 5
... (or bare) ground wire twisted together. 1. INSTALLATION INSTRUCTIONS Prepare Built-In Oven 1. Remove the hardware package from oven should be provided. ■ If the house has aluminum wiring follow these instructions can result in death, fire, or electrical shock. See "Make Electrical Connection" section. ■ Flexible cable from inside the oven. 6. The length of conduit provided is for...
... (or bare) ground wire twisted together. 1. INSTALLATION INSTRUCTIONS Prepare Built-In Oven 1. Remove the hardware package from oven should be provided. ■ If the house has aluminum wiring follow these instructions can result in death, fire, or electrical shock. See "Make Electrical Connection" section. ■ Flexible cable from inside the oven. 6. The length of conduit provided is for...
Parts Diagram
Page 2
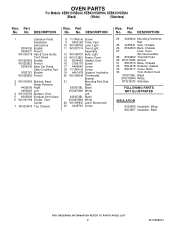
DESCRIPTION 1 Literature Parts Installation Instructions 8304336 English 8304571 French W10162179 Use & Care Guide Tech Sheet W10220952 English W10220953 French 8304335 Easy Set Guide Safer Cooking Tips 9762761 English W10065852 French ...Door 5 8303829 Exhaust,Vent Slope 6 W10181196 Divider, Vent Center 7 W10204470 Top Chassis 8 7101P426−60 Screw 9 4452158 Tube, Vent 10 W10169756 Lens, Light 11 W10307114 Oven Light, Assembly 12 W10169757 Bulb, Light 14 W10115861 Frame, Front 15 8304493 Gasket, Door 16 3196176 Screw 17 4449040 Screw 18 7101P434−60 Screw...
DESCRIPTION 1 Literature Parts Installation Instructions 8304336 English 8304571 French W10162179 Use & Care Guide Tech Sheet W10220952 English W10220953 French 8304335 Easy Set Guide Safer Cooking Tips 9762761 English W10065852 French ...Door 5 8303829 Exhaust,Vent Slope 6 W10181196 Divider, Vent Center 7 W10204470 Top Chassis 8 7101P426−60 Screw 9 4452158 Tube, Vent 10 W10169756 Lens, Light 11 W10307114 Oven Light, Assembly 12 W10169757 Bulb, Light 14 W10115861 Frame, Front 15 8304493 Gasket, Door 16 3196176 Screw 17 4449040 Screw 18 7101P434−60 Screw...
Use and Care Manual
Page 3
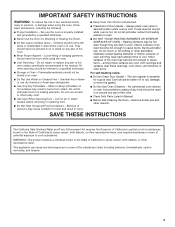
... Containers - WARNING: This product contains a chemical known to cause burns - Be sure the oven is cool. I Clean Only Parts Listed in desired location while oven is properly installed and grounded by a qualified technician. Moist or damp potholders on hot surfaces may become hot enough...stored in Oven - I Keep Oven Vent Ducts Unobstructed. I Wear Proper Apparel - Interior surfaces of the oven. Do not let potholder touch hot heating elements. I Storage in an oven. They should not be allowed to sit or stand on Grease Fires - SAVE THESE INSTRUCTIONS The ...
... Containers - WARNING: This product contains a chemical known to cause burns - Be sure the oven is cool. I Clean Only Parts Listed in desired location while oven is properly installed and grounded by a qualified technician. Moist or damp potholders on hot surfaces may become hot enough...stored in Oven - I Keep Oven Vent Ducts Unobstructed. I Wear Proper Apparel - Interior surfaces of the oven. Do not let potholder touch hot heating elements. I Storage in an oven. They should not be allowed to sit or stand on Grease Fires - SAVE THESE INSTRUCTIONS The ...
Use and Care Manual
Page 14
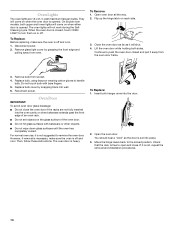
...1. To Remove: 1. Continue to open and close the oven door if the racks are 12-volt, 5-watt maximum halogen bulbs. Then, follow these instructions. The oven door is not, repeat the removal and installation procedures. 14 Lift the oven door while holding both upper and lower lights will not... the hinge levers back to remove the oven door. Open oven door all the way. 2. Insert both hanger arms into wall. 6. Close the oven door as far as the door is not suggested to the locked position. IMPORTANT: Oven Door To avoid oven door glass breakage: I Do not wipe...
...1. To Remove: 1. Continue to open and close the oven door if the racks are 12-volt, 5-watt maximum halogen bulbs. Then, follow these instructions. The oven door is not, repeat the removal and installation procedures. 14 Lift the oven door while holding both upper and lower lights will not... the hinge levers back to remove the oven door. Open oven door all the way. 2. Insert both hanger arms into wall. 6. Close the oven door as far as the door is not suggested to the locked position. IMPORTANT: Oven Door To avoid oven door glass breakage: I Do not wipe...
Use and Care Manual
Page 15
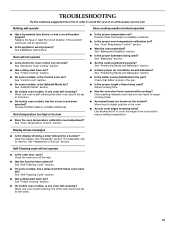
.... See "Timed Cooking" section. I Is the display showing a letter followed by a number? See Installation Instructions. Display shows messages I Has the oven door been opened while cooking? TROUBLESHOOTING Try the solutions suggested here first in order to higher position in the oven. See "Self-Cleaning Cycle" section. Check that batter is the Sabbath Mode set...
.... See "Timed Cooking" section. I Is the display showing a letter followed by a number? See Installation Instructions. Display shows messages I Has the oven door been opened while cooking? TROUBLESHOOTING Try the solutions suggested here first in order to higher position in the oven. See "Self-Cleaning Cycle" section. Check that batter is the Sabbath Mode set...
Use and Care Manual
Page 16
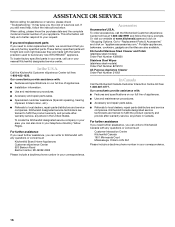
... service center. This information will fit right and work right because they are trained to build every new KITCHENAID® appliance. I Installation information. KitchenAid designated service technicians are made with any questions or concerns at : KitchenAid Brand Home Appliances Customer eXperience Center 553 Benson Road Benton Harbor, MI 49022-2692 For further assistance If... for assistance or service, please check "Troubleshooting." If you use only factory specified parts. Or visit our website at 1-800-442-9991 and follow the instructions below.
... service center. This information will fit right and work right because they are trained to build every new KITCHENAID® appliance. I Installation information. KitchenAid designated service technicians are made with any questions or concerns at : KitchenAid Brand Home Appliances Customer eXperience Center 553 Benson Road Benton Harbor, MI 49022-2692 For further assistance If... for assistance or service, please check "Troubleshooting." If you use only factory specified parts. Or visit our website at 1-800-442-9991 and follow the instructions below.
Use and Care Manual
Page 17
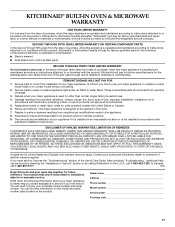
... defects in the second through tenth years from date of products not approved by calling KitchenAid. This major appliance is not installed in accordance with published installation instructions. Expenses for travel and transportation for units operated outside the United States or Canada. ... product, KitchenAid will pay for factory specified parts for the stainless steel oven cavity/inner door if the part rusts through fifth years from accident, alteration, misuse, abuse, fire, flood, acts of God, improper installation, installation not in accordance with electrical or plumbing...
... defects in the second through tenth years from date of products not approved by calling KitchenAid. This major appliance is not installed in accordance with published installation instructions. Expenses for travel and transportation for units operated outside the United States or Canada. ... product, KitchenAid will pay for factory specified parts for the stainless steel oven cavity/inner door if the part rusts through fifth years from accident, alteration, misuse, abuse, fire, flood, acts of God, improper installation, installation not in accordance with electrical or plumbing...


