Installation Guide
Page 1
... 24" (61.0 CM) ELECTRIC SINGLE AND DOUBLE BUILT-IN OVEN Table of Contents BUILT-IN OVEN SAFETY 1 INSTALLATION REQUIREMENTS 2 Tools and Parts 2 Location Requirements 2 Electrical Requirements 4 INSTALLATION INSTRUCTIONS 4 Prepare Built-In Oven 4 Remove Oven Trim 4 Make Electrical Connection 5 Install Oven 7 Complete Installation 8 BUILT-IN OVEN ... the word "DANGER" or "WARNING." Always read and obey all safety messages. IMPORTANT: Save for local electrical inspector's use. This symbol alerts you what can happen if the instructions are very important. All safety messages...
... 24" (61.0 CM) ELECTRIC SINGLE AND DOUBLE BUILT-IN OVEN Table of Contents BUILT-IN OVEN SAFETY 1 INSTALLATION REQUIREMENTS 2 Tools and Parts 2 Location Requirements 2 Electrical Requirements 4 INSTALLATION INSTRUCTIONS 4 Prepare Built-In Oven 4 Remove Oven Trim 4 Make Electrical Connection 5 Install Oven 7 Complete Installation 8 BUILT-IN OVEN ... the word "DANGER" or "WARNING." Always read and obey all safety messages. IMPORTANT: Save for local electrical inspector's use. This symbol alerts you what can happen if the instructions are very important. All safety messages...
Installation Guide
Page 2
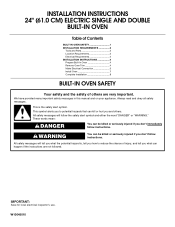
... 3" (7.6 cm) maximum below the support surface when the oven is required. Product Dimensions - Single Oven A B E D C A. 22³⁄₈" (56.8 cm) max. Single Oven Single Oven Undercounter (without cooktop installed above ): Ovens approved for wall cabinet installations) Parts needed ■ Phillips screwdriver ■ Measuring tape ■ Level ■ Hand or electric drill (for wall cabinet installations) ■ 1" (25 mm) drill bit...
... 3" (7.6 cm) maximum below the support surface when the oven is required. Product Dimensions - Single Oven A B E D C A. 22³⁄₈" (56.8 cm) max. Single Oven Single Oven Undercounter (without cooktop installed above ): Ovens approved for wall cabinet installations) Parts needed ■ Phillips screwdriver ■ Measuring tape ■ Level ■ Hand or electric drill (for wall cabinet installations) ■ 1" (25 mm) drill bit...

Installation Guide
Page 3
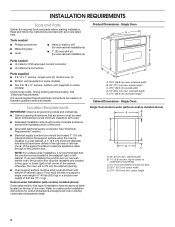
cutout height Product Dimensions - Double or Single Oven A B E C D D C A. 22³⁄₈" (56.8 cm) max. Single Oven Installed in Cabinet A B F D E C A. 24" (61 cm) min. bottom of cutout to top of cutout to bottom of upper cabinet door C....;" (57.2 cm) cutout width E. 1¹⁄₂" (3.8 cm) min. Double Oven A B E Cabinet Dimensions - Recessed oven E. recessed width B. 51" (129.5 cm) max. Cabinet 3 Double Oven Double Oven Installed in Cabinet A B F D E C A. 24" (61 cm) min. bottom of cutout to top of cutout to bottom of upper ...
cutout height Product Dimensions - Double or Single Oven A B E C D D C A. 22³⁄₈" (56.8 cm) max. Single Oven Installed in Cabinet A B F D E C A. 24" (61 cm) min. bottom of cutout to top of cutout to bottom of upper cabinet door C....;" (57.2 cm) cutout width E. 1¹⁄₂" (3.8 cm) min. Double Oven A B E Cabinet Dimensions - Recessed oven E. recessed width B. 51" (129.5 cm) max. Cabinet 3 Double Oven Double Oven Installed in Cabinet A B F D E C A. 24" (61 cm) min. bottom of cutout to top of cutout to bottom of upper ...

Installation Guide
Page 4
... from : National Fire Protection Association One Batterymarch Park Quincy, MA 02269 Electrical Connection To properly install your oven, you will protect the lower oven trim until the oven is inserted into or severing wiring during installation. A B A. A A Single oven A. Connect the aluminum wiring to the unlocked position. Oven door latch in unlocked position 4 See the following illustration. Open...
... from : National Fire Protection Association One Batterymarch Park Quincy, MA 02269 Electrical Connection To properly install your oven, you will protect the lower oven trim until the oven is inserted into or severing wiring during installation. A B A. A A Single oven A. Connect the aluminum wiring to the unlocked position. Oven door latch in unlocked position 4 See the following illustration. Open...
Installation Guide
Page 5
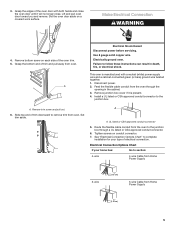
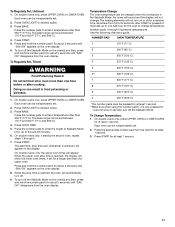
... the flexible cable conduit from Home Power Supply ½" (1.3 cm) 5 Use 8 gauge solid copper wire. 3. Set the oven door aside on conduit connector. 7. Make Electrical Connection WARNING 4. Electrically ground oven. Disconnect power. 2. A A. Tighten screws on a covered work surface. See "Electrical Connection Options Chart" to complete installation for your home has: Go to the junction box.
... the flexible cable conduit from Home Power Supply ½" (1.3 cm) 5 Use 8 gauge solid copper wire. 3. Set the oven door aside on conduit connector. 7. Make Electrical Connection WARNING 4. Electrically ground oven. Disconnect power. 2. A A. Tighten screws on a covered work surface. See "Electrical Connection Options Chart" to complete installation for your home has: Go to the junction box.
Installation Guide
Page 6
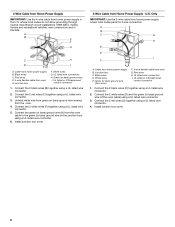
...box C. Red wires H. 4-Wire Cable from Home Power Supply IMPORTANT: Use the 4-wire cable from home power supply in Canada. Cable from oven E. Connect the 2 red wires (C) together using a UL listed wire connector. 5. Untwist white wire from green (or bare) ground wire ... 6. Connect the 2 black wires (C) together using a UL listed wire connector. 4. Connect the 2 white wires (D) and the green (or bare) ground wire (of the oven cable) using a UL listed wire connector. 2. Install junction box cover. 6 A B C G H D E I . UL listed wire connectors I A. Cable from home...
...box C. Red wires H. 4-Wire Cable from Home Power Supply IMPORTANT: Use the 4-wire cable from home power supply in Canada. Cable from oven E. Connect the 2 red wires (C) together using a UL listed wire connector. 5. Untwist white wire from green (or bare) ground wire ... 6. Connect the 2 black wires (C) together using a UL listed wire connector. 4. Connect the 2 white wires (D) and the green (or bare) ground wire (of the oven cable) using a UL listed wire connector. 2. Install junction box cover. 6 A B C G H D E I . UL listed wire connectors I A. Cable from home...
Installation Guide
Page 7
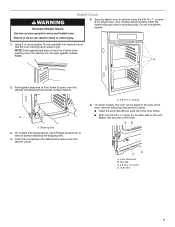
... securely to do so can result in mounting rails. AB D C A. Failure to the oven. A 2. On models with shipping feet, use a Phillips screwdriver to cabinet using the # 8-14 x 1" screws (2 for single oven, 4 for each side of oven front frame when pushing oven into cabinet until shipping feet almost contact cabinet. See the following instructions to push...
... securely to do so can result in mounting rails. AB D C A. Failure to the oven. A 2. On models with shipping feet, use a Phillips screwdriver to cabinet using the # 8-14 x 1" screws (2 for single oven, 4 for each side of oven front frame when pushing oven into cabinet until shipping feet almost contact cabinet. See the following instructions to push...
Installation Guide
Page 8
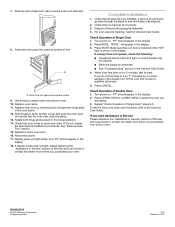
..., feel heat or if an "F" followed by inserting ends of hinges into place at bottom of Single Oven" steps 2-5. Press START. or circuit breaker has not tripped. ■ Electrical supply is intact and tight; Check Operation of Single Oven 1. Repeat "Check Operation of trim. Check that door is not, repeat the removal and installation procedures...
..., feel heat or if an "F" followed by inserting ends of hinges into place at bottom of Single Oven" steps 2-5. Press START. or circuit breaker has not tripped. ■ Electrical supply is intact and tight; Check Operation of Single Oven 1. Repeat "Check Operation of trim. Check that door is not, repeat the removal and installation procedures...

Use and Care Manual
Page 1
BUILT-IN ELECTRIC CONVECTION OVEN Use & Care Guide For questions about features, operation/performance, parts accessories or service, call: 1-800-422-1230 In Canada, call for assistance 1-800-461-5681, for installation and service, call: 1-800-807-6777 or visit our website at... www.kitchenaid.com or www.KitchenAid.ca Table of Contents...2 Models KEBC107 KEBC177 KEBC247 KEBC278 KEBV107 KEBV208 KEBC147 KEBC208 KEBC277 KEBC207 8304062
BUILT-IN ELECTRIC CONVECTION OVEN Use & Care Guide For questions about features, operation/performance, parts accessories or service, call: 1-800-422-1230 In Canada, call for assistance 1-800-461-5681, for installation and service, call: 1-800-807-6777 or visit our website at... www.kitchenaid.com or www.KitchenAid.ca Table of Contents...2 Models KEBC107 KEBC177 KEBC247 KEBC278 KEBV107 KEBV208 KEBC147 KEBC208 KEBC277 KEBC207 8304062
Use and Care Manual
Page 2
.../Off and Cancel Off 6 Clock 6 Tones 7 Fahrenheit and Celsius 7 Timer 7 Control Lock 7 Oven Temperature Control 8 OVEN USE 8 Aluminum Foil 8 Positioning Racks and Bakeware 8 Bakeware 9 Oven Vent(s 10 Meat Thermometer 10 Sabbath Mode 10 Baking and Roasting 12 Maxi and Econo Broiling 12 Convection ... Full Meal 15 Easy Convect™ Conversion 16 Proofing Bread 17 Temperature Probe 17 Timed Cooking 18 OVEN CARE 19 Self-Cleaning Cycle 19 General Cleaning 20 Oven Lights 21 Oven Door 21 TROUBLESHOOTING 22 ASSISTANCE OR SERVICE 23 In the U.S.A 23 In Canada 23 WARRANTY...
.../Off and Cancel Off 6 Clock 6 Tones 7 Fahrenheit and Celsius 7 Timer 7 Control Lock 7 Oven Temperature Control 8 OVEN USE 8 Aluminum Foil 8 Positioning Racks and Bakeware 8 Bakeware 9 Oven Vent(s 10 Meat Thermometer 10 Sabbath Mode 10 Baking and Roasting 12 Maxi and Econo Broiling 12 Convection ... Full Meal 15 Easy Convect™ Conversion 16 Proofing Bread 17 Temperature Probe 17 Timed Cooking 18 OVEN CARE 19 Self-Cleaning Cycle 19 General Cleaning 20 Oven Lights 21 Oven Door 21 TROUBLESHOOTING 22 ASSISTANCE OR SERVICE 23 In the U.S.A 23 In Canada 23 WARRANTY...

Use and Care Manual
Page 3
...the risk of fire, electrical shock, injury to cause burns. Children should not be left alone or unattended in area where oven is the safety alert symbol. s Wear Proper Apparel - Flammable materials should never be hot even though they are oven vent openings and surfaces near... kill or hurt you don't immediately follow basic precautions, including the following: s Proper Installation - s User Servicing - s Storage in oven. Build-up of Oven Racks - All safety messages will tell you don't follow the safety alert symbol and either the word "DANGER" or "WARNING." Smother ...
...the risk of fire, electrical shock, injury to cause burns. Children should not be left alone or unattended in area where oven is the safety alert symbol. s Wear Proper Apparel - Flammable materials should never be hot even though they are oven vent openings and surfaces near... kill or hurt you don't immediately follow basic precautions, including the following: s Proper Installation - s User Servicing - s Storage in oven. Build-up of Oven Racks - All safety messages will tell you don't follow the safety alert symbol and either the word "DANGER" or "WARNING." Smother ...
Use and Care Manual
Page 4
...benzene, formaldehyde, carbon monoxide, and toluene. 4 This appliance can cause low-level exposure to some of potential exposure to the State of the oven. s Clean Only Parts Listed in or around any kind should be taken not to cause cancer, birth defects, or other utensils. WARNING: ...This product contains a chemical known to such substances. No commercial oven cleaner or oven liner protective coating of any part of California to rub, damage, or move the gasket. Care should be used in Manual. Remove ...
...benzene, formaldehyde, carbon monoxide, and toluene. 4 This appliance can cause low-level exposure to some of potential exposure to the State of the oven. s Clean Only Parts Listed in or around any kind should be taken not to cause cancer, birth defects, or other utensils. WARNING: ...This product contains a chemical known to such substances. No commercial oven cleaner or oven liner protective coating of any part of California to rub, damage, or move the gasket. Care should be used in Manual. Remove ...

Use and Care Manual
Page 5
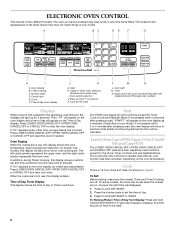
... F. PARTS AND FEATURES This manual covers different models. Lower oven (on right mounting rail) Parts and Features not shown Oven light Third oven rack Broiler pan and grid Roasting rack Temperature probe 5 Gasket K. Automatic oven light switch G. Temperature probe jack (upper and single ovens only) J. The oven you have purchased may not match those of the items...
... F. PARTS AND FEATURES This manual covers different models. Lower oven (on right mounting rail) Parts and Features not shown Oven light Third oven rack Broiler pan and grid Roasting rack Temperature probe 5 Gasket K. Automatic oven light switch G. Temperature probe jack (upper and single ovens only) J. The oven you have purchased may not match those of the items...
Use and Care Manual
Page 6
Start H. Upper or lower oven selectors (double oven models only) I A. Timer N. Upper and lower oven Cancel/Off (double oven models) Cancel Off (single oven models) Displays When power is first supplied to the appliance, everything on the oven temperature. If "Err" appears on the oven display and a time of...locations and appearances of the items shown here may continue to be set when the oven(s) are off. Oven light M. Press CLOCK SET/START. 2. Press LOWER OVEN CANCEL/OFF, UPPER OVEN CANCEL/OFF or CANCEL OFF and retry your model. The time should not have some...
Start H. Upper or lower oven selectors (double oven models only) I A. Timer N. Upper and lower oven Cancel/Off (double oven models) Cancel Off (single oven models) Displays When power is first supplied to the appliance, everything on the oven temperature. If "Err" appears on the oven display and a time of...locations and appearances of the items shown here may continue to be set when the oven(s) are off. Oven light M. Press CLOCK SET/START. 2. Press LOWER OVEN CANCEL/OFF, UPPER OVEN CANCEL/OFF or CANCEL OFF and retry your model. The time should not have some...

Use and Care Manual
Page 7
Repeat to change back to remove. Pad Press Tones (single oven models) The single tones signaling a valid pad press are preset on, but can be turned off ... display will be locked. The Control Lock is preset unlocked, but can be independently turned on double oven models, if all tones have been turned off, the reminder tones cannot be turned off , the end..."EOC OFF" appears on the display, press CANCEL to "Snd HI." When in Celsius, only "°" follows the oven temperature. If not pressed within a certain amount of time (between MIN/SEC and HR/MIN. The Control Lock will ...
Repeat to change back to remove. Pad Press Tones (single oven models) The single tones signaling a valid pad press are preset on, but can be turned off ... display will be locked. The Control Lock is preset unlocked, but can be independently turned on double oven models, if all tones have been turned off, the reminder tones cannot be turned off , the end..."EOC OFF" appears on the display, press CANCEL to "Snd HI." When in Celsius, only "°" follows the oven temperature. If not pressed within a certain amount of time (between MIN/SEC and HR/MIN. The Control Lock will ...
Use and Care Manual
Page 8
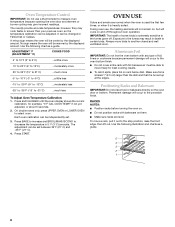
..., they may cook faster or slower than the dish and that it is turned up at least 1" (2.5 cm) larger than your previous oven, so the temperature calibration can be adjusted. The adjustment can be set . 3. IMPORTANT: The health of foil, liners or cookware because ...illustration and charts as a guide. On double ovens only, press UPPER OVEN or LOWER OVEN to -21°C) ...much less To Adjust Oven Temperature Calibration: 1. Always move a rack, pull it out to measure oven temperature because opening the oven door and element or burner cycling may result...
..., they may cook faster or slower than the dish and that it is turned up at least 1" (2.5 cm) larger than your previous oven, so the temperature calibration can be adjusted. The adjustment can be set . 3. IMPORTANT: The health of foil, liners or cookware because ...illustration and charts as a guide. On double ovens only, press UPPER OVEN or LOWER OVEN to -21°C) ...much less To Adjust Oven Temperature Calibration: 1. Always move a rack, pull it out to measure oven temperature because opening the oven door and element or burner cycling may result...
Use and Care Manual
Page 9
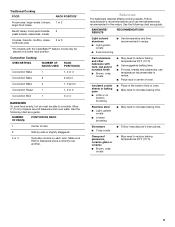
... colored aluminum s Light golden crusts s Even browning s Use temperature and time recommended in center of oven. Insulated cookie sheets or baking pans s Little or no bakeware piece is directly over another. Stainless ...with dark, dull and/or nonstick finish s Brown, crisp crusts s May need to reduce baking temperatures 25°F (15°C). 9 Convection Cooking OVEN SETTING NUMBER OF RACKS USED RACK POSITION(S) Convection Bake 1 1, 2 or 3 Convection Bake 2 2 and 4 Convection Bake 3 1, 3 and ...POSITION ON RACK 1 Center of space around bakeware and oven walls.
... colored aluminum s Light golden crusts s Even browning s Use temperature and time recommended in center of oven. Insulated cookie sheets or baking pans s Little or no bakeware piece is directly over another. Stainless ...with dark, dull and/or nonstick finish s Brown, crisp crusts s May need to reduce baking temperatures 25°F (15°C). 9 Convection Cooking OVEN SETTING NUMBER OF RACKS USED RACK POSITION(S) Convection Bake 1 1, 2 or 3 Convection Bake 2 2 and 4 Convection Bake 3 1, 3 and ...POSITION ON RACK 1 Center of space around bakeware and oven walls.

Use and Care Manual
Page 10
...not show messages or temperature changes. On double ovens, open the oven door. 2. On single ovens, press CANCEL OFF. 3. Press the number pads 7, 8, 9, 6, in this order. 4. "SAb On" will enable both ovens. 1. On double ovens, open the oven door. 2. Close oven door. 10 Oven vent C. Do not set , the number pads... s Check all meat in a bake setting until re-enabled. Sabbath Mode The Sabbath Mode sets the oven to the Sabbath Mode in this order. 4. On single ovens, open the upper oven door. Press the number pads 7, 8, 9, 6, in an untimed bake with a temperature of hot air...
...not show messages or temperature changes. On double ovens, open the oven door. 2. On single ovens, press CANCEL OFF. 3. Press the number pads 7, 8, 9, 6, in this order. 4. "SAb On" will enable both ovens. 1. On double ovens, open the oven door. 2. Close oven door. 10 Oven vent C. Do not set , the number pads... s Check all meat in a bake setting until re-enabled. Sabbath Mode The Sabbath Mode sets the oven to the Sabbath Mode in this order. 4. On single ovens, open the upper oven door. Press the number pads 7, 8, 9, 6, in an untimed bake with a temperature of hot air...
Use and Care Manual
Page 11
... for 1 second since it can be set between 170°F and 500°F (77°C and 260°C). 4. It may take up to 24 seconds, after cooking. NUMBER PAD* OVEN TEMPERATURE 1 170°F (77°C) 2 200°F (95°C) 3 250°F (120°C) 4 275°F (135°C) 5 300&#...number pads to enter a temperature other than 350°F (177°C). The bake range can be independently set . 2. On double ovens only, press UPPER OVEN or LOWER OVEN. Press the number pads to enter a temperature other than 350°F (177°C). Press the number pads to enter the length...
... for 1 second since it can be set between 170°F and 500°F (77°C and 260°C). 4. It may take up to 24 seconds, after cooking. NUMBER PAD* OVEN TEMPERATURE 1 170°F (77°C) 2 200°F (95°C) 3 250°F (120°C) 4 275°F (135°C) 5 300&#...number pads to enter a temperature other than 350°F (177°C). The bake range can be independently set . 2. On double ovens only, press UPPER OVEN or LOWER OVEN. Press the number pads to enter a temperature other than 350°F (177°C). Press the number pads to enter the length...
Use and Care Manual
Page 12
... remove the pan from spills and drips During baking or roasting, the CleanBake™ and broil elements will sound. 4. On double ovens only, press UPPER OVEN or LOWER OVEN. "Lo" will appear on , 1 tone will cycle on and off in the center of fish, poultry or meat may not ...longest side parallel to preheat before putting food in, unless recommended in intervals to wait for econo. Close the door. 1. s Pull out oven rack to the "Positioning Racks and Bakeware" section. During maxi broiling, both the inner and outer broil elements heat. When roasting, it in...
... remove the pan from spills and drips During baking or roasting, the CleanBake™ and broil elements will sound. 4. On double ovens only, press UPPER OVEN or LOWER OVEN. "Lo" will appear on , 1 tone will cycle on and off in the center of fish, poultry or meat may not ...longest side parallel to preheat before putting food in, unless recommended in intervals to wait for econo. Close the door. 1. s Pull out oven rack to the "Positioning Racks and Bakeware" section. During maxi broiling, both the inner and outer broil elements heat. When roasting, it in...


