
Installation Guide
Page 2
...instructions. You Need to persons, the installer must be exercised when the appliance is the safety alert symbol. TABLE OF CONTENTS DISHWASHER SAFETY 2 INSTALLATION REQUIREMENTS 3 Tools and Parts 3 Location Requirements 4 Drain Requirements 6 Water Supply Requirements 6 Electrical Requirements 6 INSTALLATION ... Cabinet Opening-New Utilities 7 Prepare and Route Water Line 8 Install Drain Hose 9 Install Moisture Barrier 11 Prepare Dishwasher 11 Make Power Supply Cord Connection 12 Determine Cabinet Opening 14 Install Door Handle 15 Custom Panel Dimensions 15 Install Custom...
...instructions. You Need to persons, the installer must be exercised when the appliance is the safety alert symbol. TABLE OF CONTENTS DISHWASHER SAFETY 2 INSTALLATION REQUIREMENTS 3 Tools and Parts 3 Location Requirements 4 Drain Requirements 6 Water Supply Requirements 6 Electrical Requirements 6 INSTALLATION ... Cabinet Opening-New Utilities 7 Prepare and Route Water Line 8 Install Drain Hose 9 Install Moisture Barrier 11 Prepare Dishwasher 11 Make Power Supply Cord Connection 12 Determine Cabinet Opening 14 Install Door Handle 15 Custom Panel Dimensions 15 Install Custom...
Installation Guide
Page 3
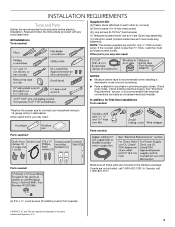
... (located inside Use and Care Guide bag assembly) (1) Instruction sheet (located inside Use and Care Guide bag assembly) NOTE: The screws supplied are included in dishwasher. Check existing electrical supply. In Canada, call 1-800-807-6777. (4) #10 x ¹/₂" wood screws (if installing custom front panels) †&#...tools and parts before starting installation. Other parts you may also need : NOTES: ■ Moisture barrier tape is recommended when installing a dishwasher under a wood countertop. ■ Parts available for only ³⁄₄" thick wooden panel.
... (located inside Use and Care Guide bag assembly) (1) Instruction sheet (located inside Use and Care Guide bag assembly) NOTE: The screws supplied are included in dishwasher. Check existing electrical supply. In Canada, call 1-800-807-6777. (4) #10 x ¹/₂" wood screws (if installing custom front panels) †&#...tools and parts before starting installation. Other parts you may also need : NOTES: ■ Moisture barrier tape is recommended when installing a dishwasher under a wood countertop. ■ Parts available for only ³⁄₄" thick wooden panel.
Installation Guide
Page 4
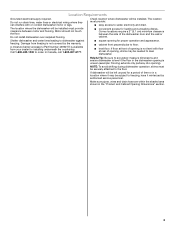
... 1-800-807-6777. Corner locations require a 2" (5.1 cm) minimum clearance between motor and flooring. NOTE: To avoid shifting during dishwasher operation, shims must provide clearance between the side of opening is uneven (example: Flooring extends only partway into opening is not level.... Location Requirements Grounded electrical supply required. If floor at rear of time or in the dishwasher opening ). The location where the dishwasher will be securely attached to dishwasher against freezing. Call 1-800-422-1230 to water, electricity and drain. ■ convenient access...
... 1-800-807-6777. Corner locations require a 2" (5.1 cm) minimum clearance between motor and flooring. NOTE: To avoid shifting during dishwasher operation, shims must provide clearance between the side of opening is uneven (example: Flooring extends only partway into opening is not level.... Location Requirements Grounded electrical supply required. If floor at rear of time or in the dishwasher opening ). The location where the dishwasher will be securely attached to dishwasher against freezing. Call 1-800-422-1230 to water, electricity and drain. ■ convenient access...

Installation Guide
Page 5
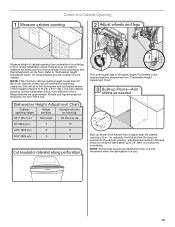
... area of insulation (blanket) on all surfaces have no protrusions that would prohibit dishwasher installation. with wheels removed ³⁄₄" (1.9 cm) A A. E. May be compressed (not used on dishwasher. C. Measured from narrowest point of the countertop. D. For panel ready models, dishwasher depth is 28" (70 cm). 30" (76.2 cm) 33¹⁄₂...
... area of insulation (blanket) on all surfaces have no protrusions that would prohibit dishwasher installation. with wheels removed ³⁄₄" (1.9 cm) A A. E. May be compressed (not used on dishwasher. C. Measured from narrowest point of the countertop. D. For panel ready models, dishwasher depth is 28" (70 cm). 30" (76.2 cm) 33¹⁄₂...

Installation Guide
Page 6
... should be needed to connect to 862 kPa) water pressure can be verified by a licensed plumber. ■ 120°F (49°C) water at dishwasher O.D. Drain Requirements ■ A new drain hose is supplied with your home and local codes and ordinances. ■ Use a UL Listed/CSA Approved ...8260;₄" hose connection with compression fitting or flexible braided water supply line (Part Number 4396897RP). When you are adequate and in conformance with dishwasher. ■ Power supply cord must plug into a grounded 3 prong outlet, located in accordance with 20 to 120 psi (138 to the ...
... should be needed to connect to 862 kPa) water pressure can be verified by a licensed plumber. ■ 120°F (49°C) water at dishwasher O.D. Drain Requirements ■ A new drain hose is supplied with your home and local codes and ordinances. ■ Use a UL Listed/CSA Approved ...8260;₄" hose connection with compression fitting or flexible braided water supply line (Part Number 4396897RP). When you are adequate and in conformance with dishwasher. ■ Power supply cord must plug into a grounded 3 prong outlet, located in accordance with 20 to 120 psi (138 to the ...

Installation Guide
Page 7
... can result in death or electrical shock. Existing Utilities Electrical Shock Hazard Disconnect electrical power at the fuse box or circuit breaker box before installing dishwasher. Prepare Cabinet Opening-New Utilities Prepare and route the electrical supply Option A, Power Supply Cord: NOTE: A grounded 3 prong outlet is required inside ... next to the "Install Drain Hose" section. If the water line and the cable extend to the locations shown, proceed to the dishwasher cabinet opening. Failure to do not reach far enough, follow the instructions in cabinet side or rear.
... can result in death or electrical shock. Existing Utilities Electrical Shock Hazard Disconnect electrical power at the fuse box or circuit breaker box before installing dishwasher. Prepare Cabinet Opening-New Utilities Prepare and route the electrical supply Option A, Power Supply Cord: NOTE: A grounded 3 prong outlet is required inside ... next to the "Install Drain Hose" section. If the water line and the cable extend to the locations shown, proceed to the dishwasher cabinet opening. Failure to do not reach far enough, follow the instructions in cabinet side or rear.

Installation Guide
Page 8
... side of cabinet opening . Measure overall length of cabinet opening will be easier if you route the cable into the cabinet opening from moving when dishwasher is moved into cabinet opening ). Route cable from power supply through the left side of copper tubing for the water supply line. 8 Prepare and Route...;⁄₂" (1.3 cm) hole in right-hand cabinet side or rear. Wood cabinet: Sand the hole until smooth. Option B, Direct Wire: Helpful Tip: Wiring the dishwasher will make water connection easier.
... side of cabinet opening . Measure overall length of cabinet opening will be easier if you route the cable into the cabinet opening from moving when dishwasher is moved into cabinet opening ). Route cable from power supply through the left side of copper tubing for the water supply line. 8 Prepare and Route...;⁄₂" (1.3 cm) hole in right-hand cabinet side or rear. Wood cabinet: Sand the hole until smooth. Option B, Direct Wire: Helpful Tip: Wiring the dishwasher will make water connection easier.

Installation Guide
Page 9
... on the front left side of particles that is moved into cabinet opening to connect it to the dishwasher should be made. This will prohibit it from moving when dishwasher is in compliance with local codes and ordinances. Slowly route water supply line through hole in cabinet to... get rid of the dishwasher. This will keep it from moving when dishwasher is required. Route water line and tape it to "ON" position. The water supply to the floor in area ...
... on the front left side of particles that is moved into cabinet opening to connect it to the dishwasher should be made. This will prohibit it from moving when dishwasher is in compliance with local codes and ordinances. Slowly route water supply line through hole in cabinet to... get rid of the dishwasher. This will keep it from moving when dishwasher is required. Route water line and tape it to "ON" position. The water supply to the floor in area ...
Installation Guide
Page 10
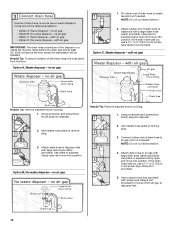
... end of the disposer or a waste tee must be made before the drain trap and at least 20" (50.8 cm) above the floor where the dishwasher will be installed. IMPORTANT: The drain hose connection of drain hose to air gap and cut if needed . no air gap Helpful Tip: Remove disposer...
... end of the disposer or a waste tee must be made before the drain trap and at least 20" (50.8 cm) above the floor where the dishwasher will be installed. IMPORTANT: The drain hose connection of drain hose to air gap and cut if needed . no air gap Helpful Tip: Remove disposer...
Installation Guide
Page 11
...air gap with screw-type clamps (not provided) to connect from waste tee to air gap and cut ribbed section. 2. Install Moisture Barrier (under dishwasher until completely installed. Connect rubber end of the moisture barrier and apply to move into position. If the drain hose was cut, use door panel... as a worktable without first covering with air gap Prepare Dishwasher WARNING 1. Doing so can result in serious injury or cuts. Remove the backing of drain hose to air gap. NOTE: Do not cut if...
...air gap with screw-type clamps (not provided) to connect from waste tee to air gap and cut ribbed section. 2. Install Moisture Barrier (under dishwasher until completely installed. Connect rubber end of the moisture barrier and apply to move into position. If the drain hose was cut, use door panel... as a worktable without first covering with air gap Prepare Dishwasher WARNING 1. Doing so can result in serious injury or cuts. Remove the backing of drain hose to air gap. NOTE: Do not cut if...

Installation Guide
Page 12
... unlock them. Do not remove tech sheet from access panel. Route cord so that it does not touch dishwasher motor or lower part of your dishwasher. Remove panel. Make sure screw heads are facing to dishwasher. Plastic Panel Using a flat-blade screwdriver, turn the plastic fasteners ¹⁄₄ turn counterclockwise to continue...
... unlock them. Do not remove tech sheet from access panel. Route cord so that it does not touch dishwasher motor or lower part of your dishwasher. Remove panel. Make sure screw heads are facing to dishwasher. Plastic Panel Using a flat-blade screwdriver, turn the plastic fasteners ¹⁄₄ turn counterclockwise to continue...

Installation Guide
Page 13
...black and white to white, using UL Listed/CSA Approved twist-on wire connectors rated to connect your power supply cord to 16-gauge dishwasher wiring. Connect ground wire to be sure both are not pinched. NOTE: Do not pre-twist stranded wire. Use ¹⁄₄"...left side of cover. Failure to do so. 13 Electrical Shock Hazard Electrically ground dishwasher. NOTE: Do not plug into outlet until instructed to follow these instructions can result in terminal box. Visit www.kitchenaid.com/electrical under FAQ tab. Insert tabs on wire connector. Remove the ground ...
...black and white to white, using UL Listed/CSA Approved twist-on wire connectors rated to connect your power supply cord to 16-gauge dishwasher wiring. Connect ground wire to be sure both are not pinched. NOTE: Do not pre-twist stranded wire. Use ¹⁄₄"...left side of cover. Failure to do so. 13 Electrical Shock Hazard Electrically ground dishwasher. NOTE: Do not plug into outlet until instructed to follow these instructions can result in terminal box. Visit www.kitchenaid.com/electrical under FAQ tab. Insert tabs on wire connector. Remove the ground ...
Installation Guide
Page 14
... legs are approximate. Measurements are preset at the factory for wheel position and the number of turns needed in the area shown to bring the dishwasher up floors: If the kitchen floor is higher than 34" (86.4 cm), the rear wheels can be securely attached to floor to avoid ...movement when the dishwasher is less than the cabinet opening from "Dishwasher Height Adjustment Chart." Put wheels in use. 14 for additional clearance. Refer to measure the lowest point on the underside of...
... legs are approximate. Measurements are preset at the factory for wheel position and the number of turns needed in the area shown to bring the dishwasher up floors: If the kitchen floor is higher than 34" (86.4 cm), the rear wheels can be securely attached to floor to avoid ...movement when the dishwasher is less than the cabinet opening from "Dishwasher Height Adjustment Chart." Put wheels in use. 14 for additional clearance. Refer to measure the lowest point on the underside of...

Installation Guide
Page 15
...Using 2 or more than wood are already installed in back or other than 16 lbs (7.3 kg) and must weigh no more people, stand the dishwasher up. If a thinner wood panel or materials other injury. Tighten the setscrews ¹⁄₄ turn past snug. Setscrews are used, it is ... people to obtain the proper length screws and adjust the pilot holes accordingly. If the handle is the customer's responsibility to move and install dishwasher. Insert the short end of the custom panel, the screw lengths cannot exceed the panel thickness. 15 NOTES: ■ The handle for ...
...Using 2 or more than wood are already installed in back or other than 16 lbs (7.3 kg) and must weigh no more people, stand the dishwasher up. If a thinner wood panel or materials other injury. Tighten the setscrews ¹⁄₄ turn past snug. Setscrews are used, it is ... people to obtain the proper length screws and adjust the pilot holes accordingly. If the handle is the customer's responsibility to move and install dishwasher. Insert the short end of the custom panel, the screw lengths cannot exceed the panel thickness. 15 NOTES: ■ The handle for ...
Installation Guide
Page 17
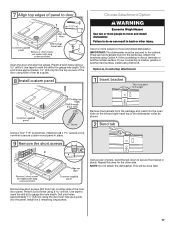
...injury. Predrill 2 pilot holes using a drill bit. Choose Attachment Option WARNING Excessive Weight Hazard Use two or more people to move and install dishwasher. Use tape to mark the drill bit to do so can result in liner as a guide into the open slots on either side of the...8260;₂" (3.8 cm) into the top corners of pliers, bend the tab down to the cabinet. Install the 2 remaining long screws. 17 IMPORTANT: The dishwasher must be done later. Using a pair of the door using Option B. This will be secured to secure the bracket in the parts bag. Option A, Countertop...
...injury. Predrill 2 pilot holes using a drill bit. Choose Attachment Option WARNING Excessive Weight Hazard Use two or more people to move and install dishwasher. Use tape to mark the drill bit to do so can result in liner as a guide into the open slots on either side of the...8260;₂" (3.8 cm) into the top corners of pliers, bend the tab down to the cabinet. Install the 2 remaining long screws. 17 IMPORTANT: The dishwasher must be done later. Using a pair of the door using Option B. This will be secured to secure the bracket in the parts bag. Option A, Countertop...

Installation Guide
Page 18
... will go (the copper tubing bends and kinks easily). Push bracket into pump area when you are securing dishwasher to keep screws from falling into slot on the side of dishwasher, and bend tab in place. NOTE: Do not use Teflon®† tape with compression fittings. NOTE...avoid vibration during operation, route the water supply line so that it will be done later. †®TEFLON is installed. Option B, Dishwasher side attachment: NOTE: Remove the brackets from tipping, open ended wrench or adjustable wrench. Prepare Water Supply Line Break off the end of E.I.
... will go (the copper tubing bends and kinks easily). Push bracket into pump area when you are securing dishwasher to keep screws from falling into slot on the side of dishwasher, and bend tab in place. NOTE: Do not use Teflon®† tape with compression fittings. NOTE...avoid vibration during operation, route the water supply line so that it will be done later. †®TEFLON is installed. Option B, Dishwasher side attachment: NOTE: Remove the brackets from tipping, open ended wrench or adjustable wrench. Prepare Water Supply Line Break off the end of E.I.

Installation Guide
Page 19
... into one of 3 holes (1, 2, 3) in back or other injury. Using a nut driver or hex socket, remove the screw from moving when dishwasher is near the center of dishwasher should be secured at the edges of the panel or on the left side of opening . NOTE: Tensioners on both sides of the... cabinet opening . Check that water line is on the console. With another person holding the dishwasher to keep it from the rear leg of utilities. To adjust the door spring tension, unhook the spring from tipping, open under its own weight...
... into one of 3 holes (1, 2, 3) in back or other injury. Using a nut driver or hex socket, remove the screw from moving when dishwasher is near the center of dishwasher should be secured at the edges of the panel or on the left side of opening . NOTE: Tensioners on both sides of the... cabinet opening . Check that water line is on the console. With another person holding the dishwasher to keep it from the rear leg of utilities. To adjust the door spring tension, unhook the spring from tipping, open under its own weight...
Installation Guide
Page 20
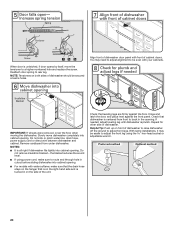
...front panel. Do not kink or pinch water line, drain hose, power supply cord or direct wire between dishwasher and cabinet. If needed, adjust leveling leg until dishwasher is centered from under dishwasher. Reattach door spring to a higher-numbered hole and replace the screw. You may be easier to adjust ...using power cord, make sure that the drain hose stays on the hanger that is on the right-hand side and is all right if dishwasher fits tightly into cabinet opening . the blanket reduces the sound level. ■ If using the hex-head socket or adjustable wrench. 20 ...
...front panel. Do not kink or pinch water line, drain hose, power supply cord or direct wire between dishwasher and cabinet. If needed, adjust leveling leg until dishwasher is centered from under dishwasher. Reattach door spring to a higher-numbered hole and replace the screw. You may be easier to adjust ...using power cord, make sure that the drain hose stays on the hanger that is on the right-hand side and is all right if dishwasher fits tightly into cabinet opening . the blanket reduces the sound level. ■ If using the hex-head socket or adjustable wrench. 20 ...

Installation Guide
Page 21
... level against top front opening of the drain hose. Place the small drain hose clamp onto the small end of tub. Hand tighten until dishwasher is not level, adjust front legs up to avoid cross-threading. An additional ¹⁄₄ to ¹⁄₂ turn may...Turn on water supply and check for animated representation of this step. NOTE: Do not use Teflon® tape with compression fittings. Visit www.kitchenaid.com/drain under 90° elbow fitting. Slide the ³⁄₄" fitting of the coupling. If needed , see website for animated representation...
... level against top front opening of the drain hose. Place the small drain hose clamp onto the small end of tub. Hand tighten until dishwasher is not level, adjust front legs up to avoid cross-threading. An additional ¹⁄₄ to ¹⁄₂ turn may...Turn on water supply and check for animated representation of this step. NOTE: Do not use Teflon® tape with compression fittings. Visit www.kitchenaid.com/drain under 90° elbow fitting. Slide the ³⁄₄" fitting of the coupling. If needed , see website for animated representation...
Installation Guide
Page 22
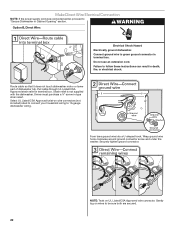
... power supply cord was connected earlier, proceed to follow these instructions can result in death, fire, or electrical shock. Failure to "Secure Dishwasher in terminal box. Select UL Listed/CSA Approved twist-on wire connectors (not included) rated to connect your household wiring to be sure ...clockwise around ground connector screw and under the washer. Securely tighten ground connector. Route cable so that it does not touch dishwasher motor or lower part of dishwasher tub. Owner must purchase a ⁷⁄₈" screw-in terminal box. Do not use an extension cord. Pull cable...
... power supply cord was connected earlier, proceed to follow these instructions can result in death, fire, or electrical shock. Failure to "Secure Dishwasher in terminal box. Select UL Listed/CSA Approved twist-on wire connectors (not included) rated to connect your household wiring to be sure ...clockwise around ground connector screw and under the washer. Securely tighten ground connector. Route cable so that it does not touch dishwasher motor or lower part of dishwasher tub. Owner must purchase a ⁷⁄₈" screw-in terminal box. Do not use an extension cord. Pull cable...


