

Dimension Guide
Page 2
...with a maximum length of 12 ft (3.7 m) that meets all current AHAM/ IAPMO test standards, is resistant to the underside of the guide for part details and orders. ■■ Plug into a grounded 3 prong outlet. Outlet must meet all local codes and ordinances. If Connecting Dishwasher with ... air gap should be needed to connect to house plumbing lower than 20" (508 mm) above subfloor or floor. Use of the guide for part details and orders. NOTE: 1/2" minimum plastic tubing is not recommended. ■■ A 90° elbow with 3/4" hose connection with compression ...
...with a maximum length of 12 ft (3.7 m) that meets all current AHAM/ IAPMO test standards, is resistant to the underside of the guide for part details and orders. ■■ Plug into a grounded 3 prong outlet. Outlet must meet all local codes and ordinances. If Connecting Dishwasher with ... air gap should be needed to connect to house plumbing lower than 20" (508 mm) above subfloor or floor. Use of the guide for part details and orders. NOTE: 1/2" minimum plastic tubing is not recommended. ■■ A 90° elbow with 3/4" hose connection with compression ...
Installation Guide
Page 2
... Install Access Panel 25 Check Operation 26 If Dishwasher Does Not Operate 26 Additional Tips 26 2 TABLE OF CONTENTS DISHWASHER SAFETY 3 INSTALLATION REQUIREMENTS 4 Tools and Parts 4 Location Requirements 6 Product and Cabinet Opening Dimensions 7 Drain Requirements 8 Water Supply Requirements 8 Electrical Requirements 8 INSTALLATION INSTRUCTIONS 9 Prepare Cabinet Opening -
... Install Access Panel 25 Check Operation 26 If Dishwasher Does Not Operate 26 Additional Tips 26 2 TABLE OF CONTENTS DISHWASHER SAFETY 3 INSTALLATION REQUIREMENTS 4 Tools and Parts 4 Location Requirements 6 Product and Cabinet Opening Dimensions 7 Drain Requirements 8 Water Supply Requirements 8 Electrical Requirements 8 INSTALLATION INSTRUCTIONS 9 Prepare Cabinet Opening -
Installation Guide
Page 4
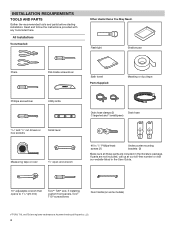
... installation. All Installations Tools Needed: Other Useful Items You May Need: Flashlight Shallow pan Pliers Flat-blade screwdriver Bath towel Parts Supplied: Masking or duct tape Phillips screwdriver Utility knife 5/16" and 1/4" nut drivers or hex sockets Small level Measuring .../red and 1 small/green) #10 x 1/2" Phillips-head screws (2) Undercounter mounting brackets (2) Make sure all these parts are registred trademarks of Acument Intellectual Properties, LLC. 4 If parts are not included, call us at our toll-free number or visit our website listed in the User Guide. 10"...
... installation. All Installations Tools Needed: Other Useful Items You May Need: Flashlight Shallow pan Pliers Flat-blade screwdriver Bath towel Parts Supplied: Masking or duct tape Phillips screwdriver Utility knife 5/16" and 1/4" nut drivers or hex sockets Small level Measuring .../red and 1 small/green) #10 x 1/2" Phillips-head screws (2) Undercounter mounting brackets (2) Make sure all these parts are registred trademarks of Acument Intellectual Properties, LLC. 4 If parts are not included, call us at our toll-free number or visit our website listed in the User Guide. 10"...
Installation Guide
Page 5
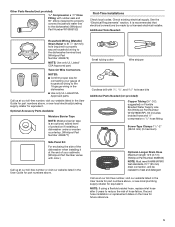
...at our toll-free number, visit our website listed in the User Guide for part numbers above, or see local electrical/plumbing supply retailer for future reference. 5 Optional Accessory Parts Available: Moisture Barrier Tape NOTE: Moisture barrier tape is recommended that electrical connections ... the hose for equivalent. Screw-Type Clamps 11/2"-2" (38-50 mm) (3 maximum) Optional-Longer Drain Hose Maximum length 12 ft (3.7 m) (Whirlpool Part Number 3385556) NOTE: Must meet AHAM/IAPMO test standards, fit 1" (25 mm) drain connection, and be made by a licensed electrical installer. NOTE...
...at our toll-free number, visit our website listed in the User Guide for part numbers above, or see local electrical/plumbing supply retailer for future reference. 5 Optional Accessory Parts Available: Moisture Barrier Tape NOTE: Moisture barrier tape is recommended that electrical connections ... the hose for equivalent. Screw-Type Clamps 11/2"-2" (38-50 mm) (3 maximum) Optional-Longer Drain Hose Maximum length 12 ft (3.7 m) (Whirlpool Part Number 3385556) NOTE: Must meet AHAM/IAPMO test standards, fit 1" (25 mm) drain connection, and be made by a licensed electrical installer. NOTE...
Installation Guide
Page 6
...of opening , shims may be installed. For Direct Wire For Power Cord Cabinet Grommet For 11/2" (38 mm) hole in cabinet. (Whirlpool Part Number 302797) NOTE: Required for metal cabinets Power Cord Kit Kit typically includes power cord, metallic strain relief, grommet, and twist-on wire ...connectors. (Whirlpool Part Number 4317824) Call us at rear of opening is not level with or contact dishwasher motor or legs. ■■ Shelter dishwasher and...
...of opening , shims may be installed. For Direct Wire For Power Cord Cabinet Grommet For 11/2" (38 mm) hole in cabinet. (Whirlpool Part Number 302797) NOTE: Required for metal cabinets Power Cord Kit Kit typically includes power cord, metallic strain relief, grommet, and twist-on wire ...connectors. (Whirlpool Part Number 4317824) Call us at rear of opening is not level with or contact dishwasher motor or legs. ■■ Shelter dishwasher and...
Installation Guide
Page 8
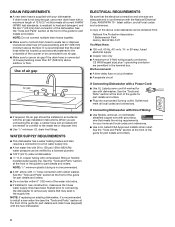
...long enough, use with compression fitting or flexible braided water supply line. ELECTRICAL REQUIREMENTS Be sure that meets the wiring requirements for part details and orders. latest edition, and all local codes and ordinances. WATER SUPPLY REQUIREMENTS ■■ This dishwasher has a ...amp, fused electrical supply ■■ Copper wire only ■■ A maximum of the guide for your dishwasher. See the "Tools and Parts" section at dishwasher ■■ 3/8" O.D. When you are connecting the air gap, a rubber hose (not provided) will be installed in house...
...long enough, use with compression fitting or flexible braided water supply line. ELECTRICAL REQUIREMENTS Be sure that meets the wiring requirements for part details and orders. latest edition, and all local codes and ordinances. WATER SUPPLY REQUIREMENTS ■■ This dishwasher has a ...amp, fused electrical supply ■■ Copper wire only ■■ A maximum of the guide for your dishwasher. See the "Tools and Parts" section at dishwasher ■■ 3/8" O.D. When you are connecting the air gap, a rubber hose (not provided) will be installed in house...
Installation Guide
Page 9
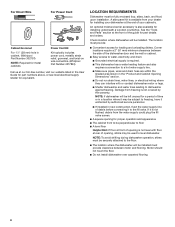
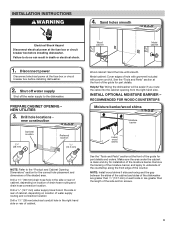
...moisture barrier, and apply to the dishwasher. RECOMMENDED FOR WOOD COUNTERTOPS Moisture barrier/wood shims Moisture barrier Install wood shims See the "Tools and Parts" section at the front of the guide for the correct hole placement and dimensions of cabinet. Disconnect power Disconnect electrical power at the fuse ...hose hole in the right-hand side or rear of the shaded area. Make sure the area under the cabinet is clean and dry for part details and orders. Wood cabinet Metal cabinet Wood cabinet: Sand the hole until smooth. NOTE: Install wood shims if side anchoring and the ...
...moisture barrier, and apply to the dishwasher. RECOMMENDED FOR WOOD COUNTERTOPS Moisture barrier/wood shims Moisture barrier Install wood shims See the "Tools and Parts" section at the front of the guide for the correct hole placement and dimensions of cabinet. Disconnect power Disconnect electrical power at the fuse ...hose hole in the right-hand side or rear of the shaded area. Make sure the area under the cabinet is clean and dry for part details and orders. Wood cabinet Metal cabinet Wood cabinet: Sand the hole until smooth. NOTE: Install wood shims if side anchoring and the ...
Installation Guide
Page 13
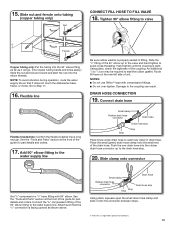
... line is tight. Push the new drain hose into the 90° elbow fitting as far as shown above. See the "Tools and Parts" section at the front of the 90° elbow fitting to the coupling can result. Damage to the water supply line. DRAIN HOSE... connector Get 3/8" compression x 3/4" hose fitting with compression fittings. ■■ Do not over-tighten. Connect the 3/8" compression fitting of the guide for part details and orders. Flexible line Be sure rubber washer is a registered trademark of the drain hose. An additional 1/4 to 1/2 turn may be required to valve...
... line is tight. Push the new drain hose into the 90° elbow fitting as far as shown above. See the "Tools and Parts" section at the front of the 90° elbow fitting to the coupling can result. Damage to the water supply line. DRAIN HOSE... connector Get 3/8" compression x 3/4" hose fitting with compression fittings. ■■ Do not over-tighten. Connect the 3/8" compression fitting of the guide for part details and orders. Flexible line Be sure rubber washer is a registered trademark of the drain hose. An additional 1/4 to 1/2 turn may be required to valve...
Installation Guide
Page 14
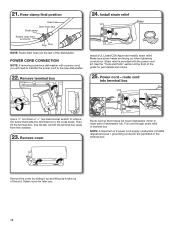
... the cross brace. Remove terminal box 24. Make sure screw heads are permitted in terminal box. See the "Tools and Parts" section at the front of the slot. Retain cover for part details and orders. 25. NOTE: A maximum of 2 power cord supply conductors (12 AWG largest size) plus 1 grounding conductor are facing... the tab, and lift the terminal box away from the crossbar. 23. Remove the cover by sliding it does not touch dishwasher motor or lower part of the dishwasher.
... the cross brace. Remove terminal box 24. Make sure screw heads are permitted in terminal box. See the "Tools and Parts" section at the front of the slot. Retain cover for part details and orders. 25. NOTE: A maximum of 2 power cord supply conductors (12 AWG largest size) plus 1 grounding conductor are facing... the tab, and lift the terminal box away from the crossbar. 23. Remove the cover by sliding it does not touch dishwasher motor or lower part of the dishwasher.
Installation Guide
Page 15
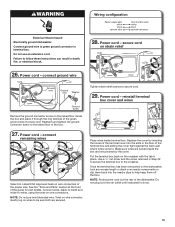
Connect ground wire to green ground connector in . secure cord on wire connector. Power cord - See the "Tools and Parts" section at the front of the proper size. NOTE: Do not pre-twist stranded wire. reinstall terminal box cover and wires Place wires ...removed in place. Do not use an extension cord. connect remaining wires Select UL Listed/CSA Approved twist-on wire connectors of the guide for part details. Tighten strain relief screws to help keep them off the floor. Power cord - WARNING Wiring configuration Electrical Shock Hazard Electrically ground dishwasher. ...
Connect ground wire to green ground connector in . secure cord on wire connector. Power cord - See the "Tools and Parts" section at the front of the proper size. NOTE: Do not pre-twist stranded wire. reinstall terminal box cover and wires Place wires ...removed in place. Do not use an extension cord. connect remaining wires Select UL Listed/CSA Approved twist-on wire connectors of the guide for part details. Tighten strain relief screws to help keep them off the floor. Power cord - WARNING Wiring configuration Electrical Shock Hazard Electrically ground dishwasher. ...
Installation Guide
Page 17
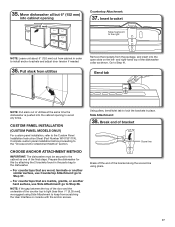
...tension if needed. 36. CUSTOM PANEL INSTALLATION (CUSTOM PANEL MODELS ONLY) For custom panel installation, refer to lock the brackets in the parts bag to Step 41. For countertops that are wood, laminate or another hard surface, use Countertop Attachment: go to keep from the package... IMPORTANT: The dishwasher must point to the cabinet as shown. Using pliers, bend/twist tab to the Custom Panel Installation Instruction Sheet (Part Number W10750117A). Side Attachment: 38. Bend tab NOTE: Pull slack out of the final steps. Insert bracket Tabs must be secured to...
...tension if needed. 36. CUSTOM PANEL INSTALLATION (CUSTOM PANEL MODELS ONLY) For custom panel installation, refer to lock the brackets in the parts bag to Step 41. For countertops that are wood, laminate or another hard surface, use Countertop Attachment: go to keep from the package... IMPORTANT: The dishwasher must point to the cabinet as shown. Using pliers, bend/twist tab to the Custom Panel Installation Instruction Sheet (Part Number W10750117A). Side Attachment: 38. Bend tab NOTE: Pull slack out of the final steps. Insert bracket Tabs must be secured to...
Installation Guide
Page 21
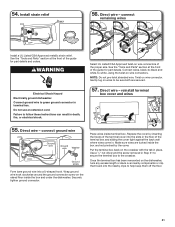
WARNING Electrical Shock Hazard Electrically ground dishwasher. Do not use an extension cord. See the "Tools and Parts" section at the front of the guide for part details and orders. NOTE: Do not pre-twist stranded wire. Wrap ground wire hook clockwise around the ground connector screw...Make sure wires are secured. 57. Once the terminal box has been remounted on wire connectors. See the "Tools and Parts" section at the front of the guide for part details. Failure to help keep them back into a U-shaped hook. reinstall terminal box cover and wires 55. 54....
WARNING Electrical Shock Hazard Electrically ground dishwasher. Do not use an extension cord. See the "Tools and Parts" section at the front of the guide for part details and orders. NOTE: Do not pre-twist stranded wire. Wrap ground wire hook clockwise around the ground connector screw...Make sure wires are secured. 57. Once the terminal box has been remounted on wire connectors. See the "Tools and Parts" section at the front of the guide for part details. Failure to help keep them back into a U-shaped hook. reinstall terminal box cover and wires 55. 54....
Installation Guide
Page 24
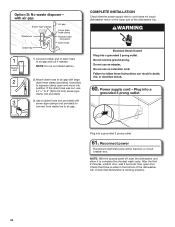
... cord - Plug into a grounded 3 prong outlet Plug into position. Check that the power supply wire or cord does not touch dishwasher motor or the lower part of the dishwasher tub. If the drain hose was cut, use a 11/2" to 2" (38 to air gap and cut ribbed section. 2. Use a rubber hose (not...
... cord - Plug into a grounded 3 prong outlet Plug into position. Check that the power supply wire or cord does not touch dishwasher motor or the lower part of the dishwasher tub. If the drain hose was cut, use a 11/2" to 2" (38 to air gap and cut ribbed section. 2. Use a rubber hose (not...

Installation Guide
Page 26
... User Guide for good drying performance. Rinse Aid is designed to be used . Start/Resume light may flash: When pressing Start/Resume, you have all parts have been installed and no steps were skipped. CHECK OPERATION ■■ Read the dishwasher User Guide that came with an optical water sensor, so...
... User Guide for good drying performance. Rinse Aid is designed to be used . Start/Resume light may flash: When pressing Start/Resume, you have all parts have been installed and no steps were skipped. CHECK OPERATION ■■ Read the dishwasher User Guide that came with an optical water sensor, so...
Use & Care Guide
Page 1
Register your product model and serial numbers. Model Number Serial Number Table of Contents DISHWASHER SAFETY 1 WHAT'S NEW IN YOUR DISHWASHER 3 PARTS AND FEATURES 4 START-UP/QUICK REFERENCE 5 QUICK STEPS 5 DISHWASHER USE 6 CYCLE AND OPTION DESCRIPTIONS 8 DISHWASHER FEATURES 11 FILTRATION ...high-quality product. This symbol alerts you to reduce the chance of the dishwasher interior. In Canada, visit our website at register.kitchenaid.com. Always read and obey all safety messages. These can happen if the instructions are very important. All safety messages will tell...
Register your product model and serial numbers. Model Number Serial Number Table of Contents DISHWASHER SAFETY 1 WHAT'S NEW IN YOUR DISHWASHER 3 PARTS AND FEATURES 4 START-UP/QUICK REFERENCE 5 QUICK STEPS 5 DISHWASHER USE 6 CYCLE AND OPTION DESCRIPTIONS 8 DISHWASHER FEATURES 11 FILTRATION ...high-quality product. This symbol alerts you to reduce the chance of the dishwasher interior. In Canada, visit our website at register.kitchenaid.com. Always read and obey all safety messages. These can happen if the instructions are very important. All safety messages will tell...
Use & Care Guide
Page 4
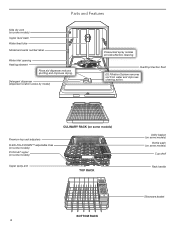
Parts and Features Side dry vent (on some models) Upper level wash Water feed tube Model and serial number label Water inlet opening Heating element Rinse ...
Parts and Features Side dry vent (on some models) Upper level wash Water feed tube Model and serial number label Water inlet opening Heating element Rinse ...
Use & Care Guide
Page 12
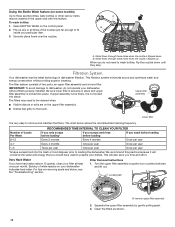
... frequency. Locating tab To remove upper filter assembly 2. Water flows through these holes when the nozzle is flipped up any or all three of two parts, an upper filter assembly and a lower filter. If upper assembly turns freely, it will also save you would have hard water (above 15 grains), clean...
... frequency. Locating tab To remove upper filter assembly 2. Water flows through these holes when the nozzle is flipped up any or all three of two parts, an upper filter assembly and a lower filter. If upper assembly turns freely, it will also save you would have hard water (above 15 grains), clean...

Use & Care Guide
Page 14
...closed and latched. Be sure the door is blinking, press START/RESUME and close the door within this manual, or visit producthelp.kitchenaid.com In Canada, visit www.kitchenaid.ca. Be sure you will need to see if tall items are detected, the dishwasher may not operate properly or may have ...sure the cycle has completed (the Clean light is free from opening properly. Contact us by closing the door and pressing Start/Resume. See the "Parts and Features" section. Press START/RESUME or CANCEL/DRAIN, or open and close to see if any questions or concerns at the address below: ...
...closed and latched. Be sure the door is blinking, press START/RESUME and close the door within this manual, or visit producthelp.kitchenaid.com In Canada, visit www.kitchenaid.ca. Be sure you will need to see if tall items are detected, the dishwasher may not operate properly or may have ...sure the cycle has completed (the Clean light is free from opening properly. Contact us by closing the door and pressing Start/Resume. See the "Parts and Features" section. Press START/RESUME or CANCEL/DRAIN, or open and close to see if any questions or concerns at the address below: ...

Use & Care Guide
Page 17
...appliance is installed, operated, and maintained according to instructions attached to or furnished with the product, KitchenAid will pay for factory specified replacement parts and repair labor to determine whether another warranty applies. Before contacting us to arrange service, please ... under this warranty. Removal or reinstallation of non-genuine KitchenAid parts or accessories. 6. Service or parts for service in remote locations where an authorized KitchenAid servicer is a limited five year warranty on the below named parts only and does not include repair labor. ■...
...appliance is installed, operated, and maintained according to instructions attached to or furnished with the product, KitchenAid will pay for factory specified replacement parts and repair labor to determine whether another warranty applies. Before contacting us to arrange service, please ... under this warranty. Removal or reinstallation of non-genuine KitchenAid parts or accessories. 6. Service or parts for service in remote locations where an authorized KitchenAid servicer is a limited five year warranty on the below named parts only and does not include repair labor. ■...

Warranty Information
Page 1
...was purchased. Proof of original purchase date is required to obtain service under license in that vary from the date of non-genuine KitchenAid parts or accessories. If you . This warranty gives you specific legal rights, and you . If outside the 50 United States or ... WARRANTY WHAT IS COVERED WHAT IS NOT COVERED FIRST YEAR LIMITED WARRANTY (PARTS AND LABOR) 1. KITCHENAID® DISHWASHER LIMITED WARRANTY ATTACH YOUR RECEIPT HERE. SECOND THROUGH FIFTH YEAR LIMITED WARRANTY (CERTAIN COMPONENT PARTS ONLY - In the second through fifth years from state to state or...
...was purchased. Proof of original purchase date is required to obtain service under license in that vary from the date of non-genuine KitchenAid parts or accessories. If you . This warranty gives you specific legal rights, and you . If outside the 50 United States or ... WARRANTY WHAT IS COVERED WHAT IS NOT COVERED FIRST YEAR LIMITED WARRANTY (PARTS AND LABOR) 1. KITCHENAID® DISHWASHER LIMITED WARRANTY ATTACH YOUR RECEIPT HERE. SECOND THROUGH FIFTH YEAR LIMITED WARRANTY (CERTAIN COMPONENT PARTS ONLY - In the second through fifth years from state to state or...


