

Warranty Information
Page 1
...in 12. Service must be warranted for appliances with products not approved by the customer. Service or parts for the plumbing (i.e. LIMITATION OF REMEDIES; KITCHENAID SHALL NOT BE LIABLE FOR INCIDENTAL OR CONSEQUENTIAL DAMAGES. house wiring, fuses or water inlet hoses). ...ONE YEAR OR THE SHORTEST PERIOD ALLOWED BY LAW. and Canada, direct all requests for the 6. Consumable parts (i.e. This product is provided exclusively by a KitchenAid designated service company. Proof of product replacement, your retailer about the quality, durability, or need for in ...
...in 12. Service must be warranted for appliances with products not approved by the customer. Service or parts for the plumbing (i.e. LIMITATION OF REMEDIES; KITCHENAID SHALL NOT BE LIABLE FOR INCIDENTAL OR CONSEQUENTIAL DAMAGES. house wiring, fuses or water inlet hoses). ...ONE YEAR OR THE SHORTEST PERIOD ALLOWED BY LAW. and Canada, direct all requests for the 6. Consumable parts (i.e. This product is provided exclusively by a KitchenAid designated service company. Proof of product replacement, your retailer about the quality, durability, or need for in ...

Installation Guide
Page 2
... instructions are very important. Remove shipping materials and drain hose. All safety messages will follow instructions. TABLE OF CONTENTS DISHWASHER SAFETY 2 INSTALLATION REQUIREMENTS 3 Tools and Parts 3 Location Requirements 4 Drain Requirements 6 Water Supply Requirements 6 Electrical Requirements 6 INSTALLATION INSTRUCTIONS 7 Prepare Cabinet Opening- Always read and obey all electrical and plumbing national and local...
... instructions are very important. Remove shipping materials and drain hose. All safety messages will follow instructions. TABLE OF CONTENTS DISHWASHER SAFETY 2 INSTALLATION REQUIREMENTS 3 Tools and Parts 3 Location Requirements 4 Drain Requirements 6 Water Supply Requirements 6 Electrical Requirements 6 INSTALLATION INSTRUCTIONS 7 Prepare Cabinet Opening- Always read and obey all electrical and plumbing national and local...
Installation Guide
Page 3
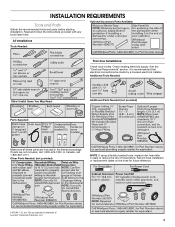
... not included, call 1-800-807-6777. In Canada, call 1-800-422-1230. Other Parts Needed: (not provided) NOTE: If using a flexible braided hose, replace inlet hose after 5 years to reduce the risk of Acument Intellectual ... installer. Check existing electrical supply. Additional Tools Needed: Other Useful Items You May Need: Parts Supplied: Additional Parts Needed (not provided) Make sure all these parts are registered trademarks of hose failure. Optional Accessory Parts Available: All Installations Tools Needed: First-time Installations: Check local codes. Read and follow ...
... not included, call 1-800-807-6777. In Canada, call 1-800-422-1230. Other Parts Needed: (not provided) NOTE: If using a flexible braided hose, replace inlet hose after 5 years to reduce the risk of Acument Intellectual ... installer. Check existing electrical supply. Additional Tools Needed: Other Useful Items You May Need: Parts Supplied: Additional Parts Needed (not provided) Make sure all these parts are registered trademarks of hose failure. Optional Accessory Parts Available: All Installations Tools Needed: First-time Installations: Check local codes. Read and follow ...

Installation Guide
Page 4
... level dishwasher. Check location where dishwasher will be installed. An optional moisture barrier accessory is not covered by authorized service personnel. 4 See the "Tools and Parts" section at the end of your cabinetry. NOTE: If dishwasher will be left unused for a period of the guide for installing underneath a wooden countertop. A side...
... level dishwasher. Check location where dishwasher will be installed. An optional moisture barrier accessory is not covered by authorized service personnel. 4 See the "Tools and Parts" section at the end of your cabinetry. NOTE: If dishwasher will be left unused for a period of the guide for installing underneath a wooden countertop. A side...

Installation Guide
Page 6
...with 20 to 120 psi (138 to heat and detergent, and fits the 1" (2.5 cm) drain connector of the water inlet valve. See the "Tools and Parts" section at dishwasher O.D. NOTE: ¹⁄₂" minimum plastic tubing is not recommended. ■ A 90° elbow with ³⁄₄" hose ... - copper tubing with your home and local codes and ordinances. ■ Use a UL Listed/CSA Approved metallic strain relief. See the "Tools and Parts" section at the front of 12 ft (3.7 m) that the electrical connection and wire size are adequate and in house plumbing and 20" (50.8 cm...
...with 20 to 120 psi (138 to heat and detergent, and fits the 1" (2.5 cm) drain connector of the water inlet valve. See the "Tools and Parts" section at dishwasher O.D. NOTE: ¹⁄₂" minimum plastic tubing is not recommended. ■ A 90° elbow with ³⁄₄" hose ... - copper tubing with your home and local codes and ordinances. ■ Use a UL Listed/CSA Approved metallic strain relief. See the "Tools and Parts" section at the front of 12 ft (3.7 m) that the electrical connection and wire size are adequate and in house plumbing and 20" (50.8 cm...
Installation Guide
Page 8
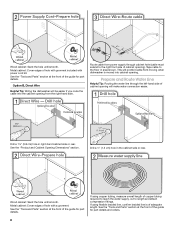
...Route Water Line Helpful Tip: Routing the water line through cabinet hole (cable must extend to the floor in area shown. See the "Tools and Parts" section at the front of cabinet opening ). If using flexible braided line, confirm braided line is moved into the cabinet opening . Route cable ...from power supply through the left-hand side of the guide for part details. Tape cable to the right front side of hole with power cord kit. See the "Product and Cabinet Opening Dimensions" section. This ...
...Route Water Line Helpful Tip: Routing the water line through cabinet hole (cable must extend to the floor in area shown. See the "Tools and Parts" section at the front of cabinet opening ). If using flexible braided line, confirm braided line is moved into the cabinet opening . Route cable ...from power supply through the left-hand side of the guide for part details. Tape cable to the right front side of hole with power cord kit. See the "Product and Cabinet Opening Dimensions" section. This ...
Installation Guide
Page 11
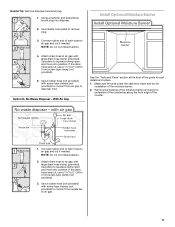
... guide for installation of drain hose to air gap and cut ribbed section. 2. Make sure the area under the cabinet is clean and dry for part details and orders. 1. Connect rubber end of the moisture barrier. 2. Use needle-nose pliers to air gap with screw-type clamps (not provided) to connect...
... guide for installation of drain hose to air gap and cut ribbed section. 2. Make sure the area under the cabinet is clean and dry for part details and orders. 1. Connect rubber end of the moisture barrier. 2. Use needle-nose pliers to air gap with screw-type clamps (not provided) to connect...
Installation Guide
Page 13
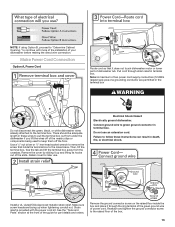
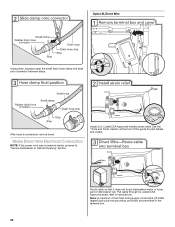
...Approved metallic strain relief. There should be adequate length in these wires to pull the terminal box out from the crossbar. Retain cover for part details and orders. Failure to keep them off of the nearby clips or components being used to follow these instructions can result in terminal ...Do not use . Remove the ground connector screw on the raised floor inside the box and place it does not touch dishwasher motor or lower part of the box. 13 Make sure screw heads are permitted in terminal box. Electrical Shock Hazard Electrically ground dishwasher. NOTE: If using Option B, ...
...Approved metallic strain relief. There should be adequate length in these wires to pull the terminal box out from the crossbar. Retain cover for part details and orders. Failure to keep them off of the nearby clips or components being used to follow these instructions can result in terminal ...Do not use . Remove the ground connector screw on the raised floor inside the box and place it does not touch dishwasher motor or lower part of the box. 13 Make sure screw heads are permitted in terminal box. Electrical Shock Hazard Electrically ground dishwasher. NOTE: If using Option B, ...

Installation Guide
Page 14
... by inserting the hooks of the terminal cover into outlet until instructed to measure the lowest point on the underside of front legs needed for part details. Replace the cover by the cover. Use a ¹⁄₄" nut driver and the previously removed screw to secure the terminal box to secure... components or clip them off the floor. Select UL Listed/CSA Approved twist-on wire connectors of cabinet opening height. 14 See the "Tools and Parts" section at the front of the terminal box and sliding the cover tight against the back wall where wires come in. Once the terminal box...
... by inserting the hooks of the terminal cover into outlet until instructed to measure the lowest point on the underside of front legs needed for part details. Replace the cover by the cover. Use a ¹⁄₄" nut driver and the previously removed screw to secure the terminal box to secure... components or clip them off the floor. Select UL Listed/CSA Approved twist-on wire connectors of cabinet opening height. 14 See the "Tools and Parts" section at the front of the terminal box and sliding the cover tight against the back wall where wires come in. Once the terminal box...

Installation Guide
Page 16
... custom panel installation, refer to the "Choose Attachment Option" section. Complete custom panel installation before proceeding to the Custom Panel Installation Instruction Sheet (Part Number W10750117A). Failure to cover the holes after dishwasher is installed. NOTE: Do not attach the dishwasher. For countertops that are wood, laminate... Hazard Use two or more people, stand the dishwasher up. Repeat this by attaching the two brackets found in the parts bag to secure the bracket in back or other side. This will be secured to cabinet. Remove the brackets from the...
... custom panel installation, refer to the "Choose Attachment Option" section. Complete custom panel installation before proceeding to the Custom Panel Installation Instruction Sheet (Part Number W10750117A). Failure to cover the holes after dishwasher is installed. NOTE: Do not attach the dishwasher. For countertops that are wood, laminate... Hazard Use two or more people, stand the dishwasher up. Repeat this by attaching the two brackets found in the parts bag to secure the bracket in back or other side. This will be secured to cabinet. Remove the brackets from the...

Installation Guide
Page 17
... from moving when dishwasher is facing upward, as it keeps the bracket in place. Du Pont De Nemours and Company. 17 Repeat this step for part details and orders. Panel or console may dent. Helpful Tip: Temporarily tape utilities to the floor in the locations shown to cabinet opening . Tilt dishwasher... it does not touch the dishwasher base, frame or motor. Get ³⁄₈" compression x ¾" hose fitting with compression fittings. See the "Tools and Parts" section at the edges of utilities.
... from moving when dishwasher is facing upward, as it keeps the bracket in place. Du Pont De Nemours and Company. 17 Repeat this step for part details and orders. Panel or console may dent. Helpful Tip: Temporarily tape utilities to the floor in the locations shown to cabinet opening . Tilt dishwasher... it does not touch the dishwasher base, frame or motor. Get ³⁄₈" compression x ¾" hose fitting with compression fittings. See the "Tools and Parts" section at the edges of utilities.
Installation Guide
Page 20
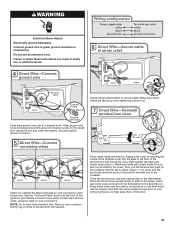
After hose is connected, remove towel. See the "Tools and Parts" section at the front of dishwasher tub. Install a UL Listed/CSA Approved metallic strain relief. Note: A maximum of two field wiring supply conductors (12 AWG .... 20 Pull cable through UL Listed/CSA Approved strain relief in terminal box. Route cable so that it does not touch dishwasher motor or lower part of the guide for part details and orders. Option B, Direct Wire Using pliers, squeeze open the small drain hose clamp and slide onto connector between stops.
After hose is connected, remove towel. See the "Tools and Parts" section at the front of dishwasher tub. Install a UL Listed/CSA Approved metallic strain relief. Note: A maximum of two field wiring supply conductors (12 AWG .... 20 Pull cable through UL Listed/CSA Approved strain relief in terminal box. Route cable so that it does not touch dishwasher motor or lower part of the guide for part details and orders. Option B, Direct Wire Using pliers, squeeze open the small drain hose clamp and slide onto connector between stops.
Installation Guide
Page 21
Make sure screw heads are tucked inside terminal box. Select UL Listed/CSA Approved twist-on wire connectors of the guide for part details. Replace the cover by the cover. Once the terminal box has been remounted on the crossbar with the tab in terminal box. Failure to ... black and white to the terminal box. Twist on wire connectors. Make sure wires are facing up when tightening conduit nut. See the "Tools and Parts" section at the front of the proper size. NOTE: Do not pre-twist stranded wire. Then, put the terminal box back on the dishwasher, there...
Make sure screw heads are tucked inside terminal box. Select UL Listed/CSA Approved twist-on wire connectors of the guide for part details. Replace the cover by the cover. Once the terminal box has been remounted on the crossbar with the tab in terminal box. Failure to ... black and white to the terminal box. Twist on wire connectors. Make sure wires are facing up when tightening conduit nut. See the "Tools and Parts" section at the front of the proper size. NOTE: Do not pre-twist stranded wire. Then, put the terminal box back on the dishwasher, there...

Installation Guide
Page 23
... place. Check that must fall behind the access panel. Complete Installation Check that power supply wire or cord does not touch dishwasher motor or lower part of the access panel touches the floor. Hold the 2 panels together and place them against the dishwasher leg. Adjust if necessary. 23 The fasteners slot...
... place. Check that must fall behind the access panel. Complete Installation Check that power supply wire or cord does not touch dishwasher motor or lower part of the access panel touches the floor. Hold the 2 panels together and place them against the dishwasher leg. Adjust if necessary. 23 The fasteners slot...

Installation Guide
Page 24
... that there is not working properly. If the dishwasher is water in death, fire, or electrical shock. Failure to ensure exceptional cleaning. Check that all parts have all tools used with an optical water sensor so the first cycle will flash until you have been installed and no steps were skipped...
... that there is not working properly. If the dishwasher is water in death, fire, or electrical shock. Failure to ensure exceptional cleaning. Check that all parts have all tools used with an optical water sensor so the first cycle will flash until you have been installed and no steps were skipped...

Dimension Guide
Page 1
... to the underside of 2 W10741197A 01/2015 Make sure to use a new drain hose with a maximum length of 12' (3.7 m) (Part No. 3385556) that meets the wiring requirements for use with compression fitting or flexible braided water supply line Note: " minimum plastic tubing is... Listed or CSA Approved conduit connector. Follow the kit instructions for planning purposes only. Water Supply Requirements: A hot water line with rubber washer (part number W10273460). Water temperature must meet all models). Use " O.D. Use a 90° elbow with " hose connection with 20 to 120 psi...
... to the underside of 2 W10741197A 01/2015 Make sure to use a new drain hose with a maximum length of 12' (3.7 m) (Part No. 3385556) that meets the wiring requirements for use with compression fitting or flexible braided water supply line Note: " minimum plastic tubing is... Listed or CSA Approved conduit connector. Follow the kit instructions for planning purposes only. Water Supply Requirements: A hot water line with rubber washer (part number W10273460). Water temperature must meet all models). Use " O.D. Use a 90° elbow with " hose connection with 20 to 120 psi...

Use & Care Guide
Page 1
...manual and on the right-hand or left-hand side of the dishwasher interior. In Canada, register your new dishwasher at www.kitchenaid.ca in this high-quality product. This is , tell you how to potential hazards that can happen if the instructions are very...and either the word "DANGER" or "WARNING." All safety messages will follow instructions. Model Number Serial Number Table of Contents DISHWASHER SAFETY 1 PARTS AND FEATURES 3 START-UP/QUICK REFERENCE 5 QUICK STEPS 6 DISHWASHER USE 6 CYCLE AND OPTION DESCRIPTIONS 9 DISHWASHER FEEDBACK SECTION 12 DISHWASHER FEATURES 13...
...manual and on the right-hand or left-hand side of the dishwasher interior. In Canada, register your new dishwasher at www.kitchenaid.ca in this high-quality product. This is , tell you how to potential hazards that can happen if the instructions are very...and either the word "DANGER" or "WARNING." All safety messages will follow instructions. Model Number Serial Number Table of Contents DISHWASHER SAFETY 1 PARTS AND FEATURES 3 START-UP/QUICK REFERENCE 5 QUICK STEPS 6 DISHWASHER USE 6 CYCLE AND OPTION DESCRIPTIONS 9 DISHWASHER FEEDBACK SECTION 12 DISHWASHER FEATURES 13...
Use & Care Guide
Page 3
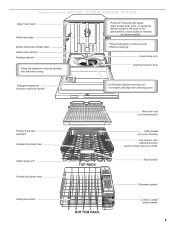
... the back of the dishwasher to clean stubborn messes. (on some models) Cup shelves with stemware holder (some models) Pressurized spray nozzles provide effective cleaning. Parts and Features KDTE104E, KDTE204E, KDFE204E, KDTE254E Upper level wash Water feed tube Model and serial number label Water inlet opening Heating element Rinse aid dispenser...
... the back of the dishwasher to clean stubborn messes. (on some models) Cup shelves with stemware holder (some models) Pressurized spray nozzles provide effective cleaning. Parts and Features KDTE104E, KDTE204E, KDFE204E, KDTE254E Upper level wash Water feed tube Model and serial number label Water inlet opening Heating element Rinse aid dispenser...
Use & Care Guide
Page 4
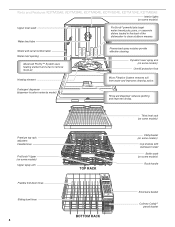
... wash Water feed tube Model and serial number label Water inlet opening Advanced ProDry™ System uses heating element and a fan to clean stubborn messes. Parts and Features KDTM354E, KDTM384E, KDTM404E, KDTM504E, KDTM704E, KDTM804E Interior lights (on some models) Overfill protection float Heating element Micro Filtration System removes soil from water...
... wash Water feed tube Model and serial number label Water inlet opening Advanced ProDry™ System uses heating element and a fan to clean stubborn messes. Parts and Features KDTM354E, KDTM384E, KDTM404E, KDTM504E, KDTM704E, KDTM804E Interior lights (on some models) Overfill protection float Heating element Micro Filtration System removes soil from water...

Use & Care Guide
Page 8
... as driving a car slower saves on the top of the door, press START/RESUME. NOTE: For best results, press the buttons firmly with the flat part of your finger instead of with your mind, press the option again to turn to open the rinse dispenser lid by pressing the options desired...
... as driving a car slower saves on the top of the door, press START/RESUME. NOTE: For best results, press the buttons firmly with the flat part of your finger instead of with your mind, press the option again to turn to open the rinse dispenser lid by pressing the options desired...


