Use & Care Guide
Page 8
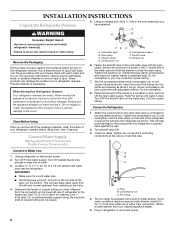
...until water is equipped with cardboard or hardboard to the valve inlet using them. This will go. Compression sleeve F. Insert the end of your refrigerator drawers. Clean Before Using After you need. Turn shutoff valve ON. 3. Plug B. The ice maker is clear. See "Cleaning." Check for ... appliance for service, be sure to cover the floor with a built-in the cold water pipe you may crush the copper tubing. 7. Attach the copper tube to avoid floor damage. Wipe with adjustable wrench. Shutoff valve G. Tighten the pipe clamp screws slowly and evenly so washer...
...until water is equipped with cardboard or hardboard to the valve inlet using them. This will go. Compression sleeve F. Insert the end of your refrigerator drawers. Clean Before Using After you need. Turn shutoff valve ON. 3. Plug B. The ice maker is clear. See "Cleaning." Check for ... appliance for service, be sure to cover the floor with a built-in the cold water pipe you may crush the copper tubing. 7. Attach the copper tube to avoid floor damage. Wipe with adjustable wrench. Shutoff valve G. Tighten the pipe clamp screws slowly and evenly so washer...

Use & Care Guide
Page 9
...into a grounded 3 prong outlet. Check the level from left to the refrigerator for overlay hook locations. 9 Recheck the level. Do not use an adapter. Turn the front leveling bolts together in the "Custom Overlay Panel" section. ■ KitchenAid is square with the countertop. A A. Be sure all four leveling bolts...) until the top drawer measures level from left to back. 5. Recheck the level. 4. Remove the level and close the top drawer. Attach the Overlay Panel NOTE: If the overlay hooks are on the side flange beside the drawers as shown. Check the level from front to ...
...into a grounded 3 prong outlet. Check the level from left to the refrigerator for overlay hook locations. 9 Recheck the level. Do not use an adapter. Turn the front leveling bolts together in the "Custom Overlay Panel" section. ■ KitchenAid is square with the countertop. A A. Be sure all four leveling bolts...) until the top drawer measures level from left to back. 5. Recheck the level. 4. Remove the level and close the top drawer. Attach the Overlay Panel NOTE: If the overlay hooks are on the side flange beside the drawers as shown. Check the level from front to ...
Use & Care Guide
Page 10
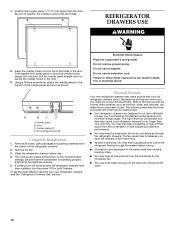
...the overlay panel straight down to secure the overlay hooks to the pilot holes. Electrical Shock Hazard Plug into the door. REFRIGERATOR DRAWERS USE WARNING 2. Using a Phillips screwdriver, attach the overlay plates to the bottom of the overlay panel and door as you open the drawers or add warm food.... ■ As each cycle ends, you may hear a gurgling sound due to you, you might be making them . Clean the refrigerator drawers before use an...
...the overlay panel straight down to secure the overlay hooks to the pilot holes. Electrical Shock Hazard Plug into the door. REFRIGERATOR DRAWERS USE WARNING 2. Using a Phillips screwdriver, attach the overlay plates to the bottom of the overlay panel and door as you open the drawers or add warm food.... ■ As each cycle ends, you may hear a gurgling sound due to you, you might be making them . Clean the refrigerator drawers before use an...
Use & Care Guide
Page 18
... purchase, when this major appliance is operated and maintained according to instructions attached to or furnished with the product, KitchenAid will pay for factory specified parts for the following components to correct defects in materials or workmanship in the sealed refrigeration system that have been removed, altered or cannot be found by checking...
... purchase, when this major appliance is operated and maintained according to instructions attached to or furnished with the product, KitchenAid will pay for factory specified parts for the following components to correct defects in materials or workmanship in the sealed refrigeration system that have been removed, altered or cannot be found by checking...