Owners Manual
Page 2
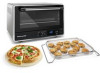
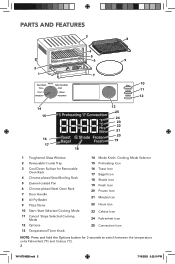
... 20 19 1 Toughened Glass Window 2 Removable Crumb Tray 3 Cool Down Surface for Removable Oven Rack 4 Chrome-plated Steel Broiling Rack 5 Enamel-coated Pan 6 Chrome-plated Steel Oven Rack 7 Door Handle 8 Air Fry Basket 9 Pizza Stone 10 Start: Start Selected Cooking Mode 11 Cancel: Stops Selected Cooking Mode 12 Options 13 Temperature/Timer Knob 14 Mode Knob: Cooking Mode Selector 15 Preheating Icon 16 Toast Icon 17 Bagel Icon 18 Shade Icon...
... 20 19 1 Toughened Glass Window 2 Removable Crumb Tray 3 Cool Down Surface for Removable Oven Rack 4 Chrome-plated Steel Broiling Rack 5 Enamel-coated Pan 6 Chrome-plated Steel Oven Rack 7 Door Handle 8 Air Fry Basket 9 Pizza Stone 10 Start: Start Selected Cooking Mode 11 Cancel: Stops Selected Cooking Mode 12 Options 13 Temperature/Timer Knob 14 Mode Knob: Cooking Mode Selector 15 Preheating Icon 16 Toast Icon 17 Bagel Icon 18 Shade Icon...
Owners Manual
Page 3
... used when moving an appliance containing hot oil or other liquid. 4. Close supervision is necessary when any parts of hot grease. 11. Do not let cord hang over edge of appliance may create a fire or risk of experience and knowledge. Use extreme caution when removing Multipurpose Pan, Oven Rack, or disposing of the Countertop Oven in operation. Read all instructions...
... used when moving an appliance containing hot oil or other liquid. 4. Close supervision is necessary when any parts of hot grease. 11. Do not let cord hang over edge of appliance may create a fire or risk of experience and knowledge. Use extreme caution when removing Multipurpose Pan, Oven Rack, or disposing of the Countertop Oven in operation. Read all instructions...

Owners Manual
Page 4
... pulled on or taking off parts. Do not store any materials, other than KitchenAid recommended accessories, in this Countertop Oven when not in use and before putting on by pressing Cancel button, then remove plug from outlet when not in any way. Do not place any part of electric shock. 14. Do not cover crumb drawer or any of the...
... pulled on or taking off parts. Do not store any materials, other than KitchenAid recommended accessories, in this Countertop Oven when not in use and before putting on by pressing Cancel button, then remove plug from outlet when not in any way. Do not place any part of electric shock. 14. Do not cover crumb drawer or any of the...

Owners Manual
Page 5
... present. 1 2 Make sure all parts and accessories (see "Countertop Oven Rack Position" section). 3 Plug into a grounded 3 prong outlet. Open the door and align the rack with at least 4" (10 cm) distance. Your Countertop Oven is normal. This is now ready to use. ENGLISH GETTING STARTED Before first use, clean all sides are positioned with the grooves for desired positions (see "Care and Cleaning" section). NOTE: Upon first...
... present. 1 2 Make sure all parts and accessories (see "Countertop Oven Rack Position" section). 3 Plug into a grounded 3 prong outlet. Open the door and align the rack with at least 4" (10 cm) distance. Your Countertop Oven is normal. This is now ready to use. ENGLISH GETTING STARTED Before first use, clean all sides are positioned with the grooves for desired positions (see "Care and Cleaning" section). NOTE: Upon first...
Owners Manual
Page 6
... know that cannot be turned off by the Options button. Preheating is important for consistent and even results. Pushing the Options button will show on the LCD. Follow Toaster Oven instructions from the food. COOKING FUNCTIONS PREHEATING Preheating your desired cooking mode or any other settings, and press "Start". Once the oven has reached the set temperature, a tone will sound to...
... know that cannot be turned off by the Options button. Preheating is important for consistent and even results. Pushing the Options button will show on the LCD. Follow Toaster Oven instructions from the food. COOKING FUNCTIONS PREHEATING Preheating your desired cooking mode or any other settings, and press "Start". Once the oven has reached the set temperature, a tone will sound to...

Owners Manual
Page 7
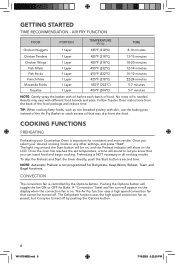
...Pizza function. TOASTING FUNCTIONS Toast Bagel RECOMMEND RACK POSITION Lower Lower PRESET SHADE SHADE RANGE (LIGHT TO DARK) ELEMENTS RUN 4 1-8 Runs 4 elements 4 1-8 Runs 4 elements W11670365B.indd 7 7 7/19/2023 5:22:21 PM Cook all foods to minimum safe internal temperatures. ENGLISH COOKING FUNCTIONS COOKING FUNCTION RECOMMEND RACK POSITION PRESET TEMP. °F (°C) TEMPERATURE...(205 °C) 150-450°F (66-232°C) 17 minutes Auto Bake Broil Reheat Keep Warm Frozen Pizza Fresh Pizza Lower Upper Lower Lower Lower Lower 350°F (176°C) 450°...
...Pizza function. TOASTING FUNCTIONS Toast Bagel RECOMMEND RACK POSITION Lower Lower PRESET SHADE SHADE RANGE (LIGHT TO DARK) ELEMENTS RUN 4 1-8 Runs 4 elements 4 1-8 Runs 4 elements W11670365B.indd 7 7 7/19/2023 5:22:21 PM Cook all foods to minimum safe internal temperatures. ENGLISH COOKING FUNCTIONS COOKING FUNCTION RECOMMEND RACK POSITION PRESET TEMP. °F (°C) TEMPERATURE...(205 °C) 150-450°F (66-232°C) 17 minutes Auto Bake Broil Reheat Keep Warm Frozen Pizza Fresh Pizza Lower Upper Lower Lower Lower Lower 350°F (176°C) 450°...
Owners Manual
Page 8
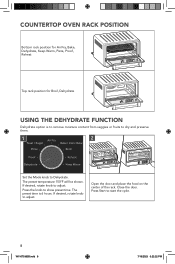
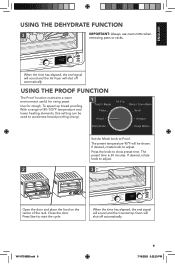
Press the knob to Dehydrate. Close the door. COUNTERTOP OVEN RACK POSITION Bottom rack position for Air Fry, Bake, Dehydrate, Keep Warm, Pizza, Proof, Reheat Top rack position for Broil, Dehydrate USING THE DEHYDRATE FUNCTION Dehydrate option is 6 hours. The preset time is to remove moisture content from veggies or fruits to dry and preserve them. 1 2 Set the Mode knob to show preset time. The preset temperature 150°...
Press the knob to Dehydrate. Close the door. COUNTERTOP OVEN RACK POSITION Bottom rack position for Air Fry, Bake, Dehydrate, Keep Warm, Pizza, Proof, Reheat Top rack position for Broil, Dehydrate USING THE DEHYDRATE FUNCTION Dehydrate option is 6 hours. The preset time is to remove moisture content from veggies or fruits to dry and preserve them. 1 2 Set the Mode knob to show preset time. The preset temperature 150°...
Owners Manual
Page 9
... up bread proofing. With a range of the rack. If desired, rotate knob to start the cycle. If desired, rotate knob to adjust. 2 3 Open the door and place the food on the center of 80-100°F temperature and lower heating elements, this setting can be shown. Close the door. USING THE PROOF FUNCTION The Proof function maintains a warm environment useful for rising yeast. 1 Use for...
... up bread proofing. With a range of the rack. If desired, rotate knob to start the cycle. If desired, rotate knob to adjust. 2 3 Open the door and place the food on the center of 80-100°F temperature and lower heating elements, this setting can be shown. Close the door. USING THE PROOF FUNCTION The Proof function maintains a warm environment useful for rising yeast. 1 Use for...
Owners Manual
Page 10
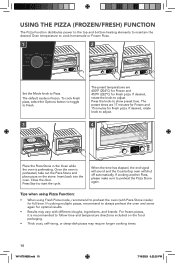
... time and temperature directions included on the stone. Close the door. If cooking another Pizza, please make sure to start the cycle. For frozen pizzas, it is Frozen. Press Start to preheat the Pizza Stone again. USING THE PIZZA (FROZEN/FRESH) FUNCTION The Pizza Function distributes power to the top and bottom heating elements to maintain the desired Oven temperature to cook homemade or Frozen Pizza. 1 2 Set the Mode knob to...
... time and temperature directions included on the stone. Close the door. If cooking another Pizza, please make sure to start the cycle. For frozen pizzas, it is Frozen. Press Start to preheat the Pizza Stone again. USING THE PIZZA (FROZEN/FRESH) FUNCTION The Pizza Function distributes power to the top and bottom heating elements to maintain the desired Oven temperature to cook homemade or Frozen Pizza. 1 2 Set the Mode knob to...

Owners Manual
Page 11
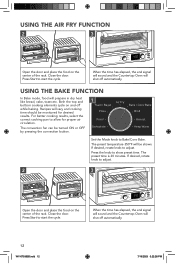
... the center of the rack. USING THE AIR FRY FUNCTION The Air Fry function uses a combination of cut bagels while gently warming the outside. 1 2 Set the Mode knob to prepare 1 crispy foods. The preset temperature 400°F will be flashing. Press the knob to Bagel option. In Bagel mode, the oven distributes power between the top and bottom heating elements to nicely brown...
... the center of the rack. USING THE AIR FRY FUNCTION The Air Fry function uses a combination of cut bagels while gently warming the outside. 1 2 Set the Mode knob to prepare 1 crispy foods. The preset temperature 400°F will be flashing. Press the knob to Bagel option. In Bagel mode, the oven distributes power between the top and bottom heating elements to nicely brown...
Owners Manual
Page 12
..., the end signal will sound and the Countertop Oven will shut off while baking. USING THE BAKE FUNCTION In Bake mode, food will vary and cooking time should be monitored for proper air circulation. The convection fan can be shown. Recipes will prepare in dry heat like bread, cake, toast etc. The preset temperature 350°F will be turned ON or OFF by pressing the...
..., the end signal will sound and the Countertop Oven will shut off while baking. USING THE BAKE FUNCTION In Bake mode, food will vary and cooking time should be monitored for proper air circulation. The convection fan can be shown. Recipes will prepare in dry heat like bread, cake, toast etc. The preset temperature 350°F will be turned ON or OFF by pressing the...
Owners Manual
Page 13
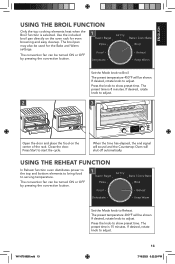
... time is 15 minutes. USING THE REHEAT FUNCTION In Reheat function oven distributes power to the top and bottom elements to bring food 1 to Broil. The preset temperature 300°F will be turned ON or OFF by pressing the convection button. Press the knob to adjust. 2 3 Open the door and place the food on the oven rack for the Bake and Warm settings. When the time...
... time is 15 minutes. USING THE REHEAT FUNCTION In Reheat function oven distributes power to the top and bottom elements to bring food 1 to Broil. The preset temperature 300°F will be turned ON or OFF by pressing the convection button. Press the knob to adjust. 2 3 Open the door and place the food on the oven rack for the Bake and Warm settings. When the time...
Owners Manual
Page 14
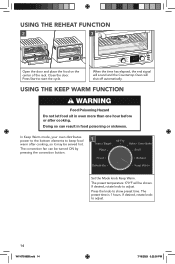
... and the Countertop Oven will be turned ON by pressing the convection button. In Keep Warm mode, your oven distributes power to the bottom elements to keep food 1 warm after cooking. The preset temperature 170°F will shut off automatically. Press the knob to adjust. 14 W11670365B.indd 14 7/19/2023 5:22:30 PM USING THE REHEAT FUNCTION 2 3 Open the door and place...
... and the Countertop Oven will be turned ON by pressing the convection button. In Keep Warm mode, your oven distributes power to the bottom elements to keep food 1 warm after cooking. The preset temperature 170°F will shut off automatically. Press the knob to adjust. 14 W11670365B.indd 14 7/19/2023 5:22:30 PM USING THE REHEAT FUNCTION 2 3 Open the door and place...
Owners Manual
Page 15
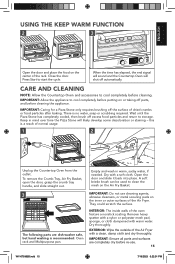
... surface. INTERIOR: The inside walls of the Air Fryer. ENGLISH USING THE KEEP WARM FUNCTION 2 3 Open the door and place the food on the center of normal usage. 1 2 Unplug the Countertop Oven from the outlet. Close the door. Empty and wash in mind over time the Pizza Stone will shut off excess food particles and return to clean the mesh...
... surface. INTERIOR: The inside walls of the Air Fryer. ENGLISH USING THE KEEP WARM FUNCTION 2 3 Open the door and place the food on the center of normal usage. 1 2 Unplug the Countertop Oven from the outlet. Close the door. Empty and wash in mind over time the Pizza Stone will shut off excess food particles and return to clean the mesh...
Owners Manual
Page 16
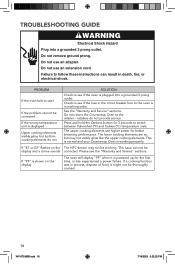
... see if the fuse in death, fire, or electrical shock. This is normal and your Countertop Oven is plugged into a grounded 3 prong outlet. Do not use an adapter. Do not return the Countertop Oven to start If the problem cannot be working properly. The upper cooking elements use higher power for 3 seconds to the oven is powered up for the first time, or has experienced...
... see if the fuse in death, fire, or electrical shock. This is normal and your Countertop Oven is plugged into a grounded 3 prong outlet. Do not use an adapter. Do not return the Countertop Oven to start If the problem cannot be working properly. The upper cooking elements use higher power for 3 seconds to the oven is powered up for the first time, or has experienced...
Owners Manual
Page 17
.... Damages, defects, or repairs caused by an Authorized KitchenAid Service Center. Consumable parts or accessories. Service be provided by unauthorized servicers or use inconsistent with original, factory-installed model/serial numbers removed, altered or not easily determined. Commercial, non-residential, or multiple family use or use of non-genuine or third-party parts; J. HOW STATE LAW APPLIES This warranty gives you specific legal rights, and...
.... Damages, defects, or repairs caused by an Authorized KitchenAid Service Center. Consumable parts or accessories. Service be provided by unauthorized servicers or use inconsistent with original, factory-installed model/serial numbers removed, altered or not easily determined. Commercial, non-residential, or multiple family use or use of non-genuine or third-party parts; J. HOW STATE LAW APPLIES This warranty gives you specific legal rights, and...
Owners Manual
Page 18
... your original Countertop Oven and send it back to : Customer eXperience Center, KitchenAid Small Appliances, P.O. HASSLE-FREE REPLACEMENT WARRANTY-CANADA We're so confident the quality of our products meets the exacting standards of the KitchenAid brand that , if your product should fail within the first year of ownership , KitchenAid will replace your product with an identical or comparable replacement. Please have your original sales receipt...
... your original Countertop Oven and send it back to : Customer eXperience Center, KitchenAid Small Appliances, P.O. HASSLE-FREE REPLACEMENT WARRANTY-CANADA We're so confident the quality of our products meets the exacting standards of the KitchenAid brand that , if your product should fail within the first year of ownership , KitchenAid will replace your product with an identical or comparable replacement. Please have your original sales receipt...

Owners Manual
Page 56
DESCUBRA MÁS. KITCHENAID.COM/QUICKSTART PRODUCT QUESTIONS OR RETURNS QUESTIONS SUR LE PRODUIT OU LES RETOURS PREGUNTAS SOBRE EL PRODUCTO O DEVOLUCIÓNES USA: 1.800.541.6390 | KitchenAid.com CANADA: 1.800.807.6777 | KitchenAid.ca MEXICO: KitchenAid.com.mx LATIN AMERICA: KitchenAid-Latam.com ®/™ ©2023 KitchenAid. Used under license in Canada. All rights reserved. DÉCOUVREZ PLUS. DISCOVER MORE. W11670365B 07/23 W11670365B.indd 56 7/19/2023 5:22:55 PM
DESCUBRA MÁS. KITCHENAID.COM/QUICKSTART PRODUCT QUESTIONS OR RETURNS QUESTIONS SUR LE PRODUIT OU LES RETOURS PREGUNTAS SOBRE EL PRODUCTO O DEVOLUCIÓNES USA: 1.800.541.6390 | KitchenAid.com CANADA: 1.800.807.6777 | KitchenAid.ca MEXICO: KitchenAid.com.mx LATIN AMERICA: KitchenAid-Latam.com ®/™ ©2023 KitchenAid. Used under license in Canada. All rights reserved. DÉCOUVREZ PLUS. DISCOVER MORE. W11670365B 07/23 W11670365B.indd 56 7/19/2023 5:22:55 PM


