Use & Care Guide
Page 6
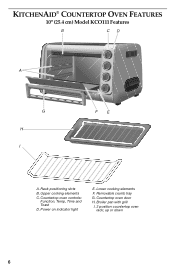
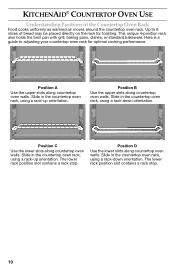
Lower cooking elements F. Broiler pan with grill I FE A. Power on indicator light E. Upper cooking elements C. Countertop oven door H. KITCHENAID® COUNTERTOP OVEN FEATURES 10" (25.4 cm) Model KCO111 Features B CD A G H I . 2 position countertop oven rack; Removable crumb tray G. Countertop oven controls: Function, Temp, Time and Toast D. up or down 6 Rack-positioning slots B.
Lower cooking elements F. Broiler pan with grill I FE A. Power on indicator light E. Upper cooking elements C. Countertop oven door H. KITCHENAID® COUNTERTOP OVEN FEATURES 10" (25.4 cm) Model KCO111 Features B CD A G H I . 2 position countertop oven rack; Removable crumb tray G. Countertop oven controls: Function, Temp, Time and Toast D. up or down 6 Rack-positioning slots B.
Use & Care Guide
Page 8
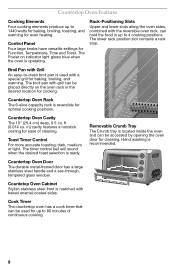
...heating. The Power on the oven rack in up to 60 minutes of cleaning. Hand washing is ready. Broil Pan with Grill An easy-to 4 cooking positions. Countertop Oven Cavity The 10" (25.4 cm) deep, 0.5 cu. ft (0.014 cu. Cook Timer The countertop oven has a cook timer that ...can be used with the reversible oven rack, can be placed directly on indicator light glows blue when ...
...heating. The Power on the oven rack in up to 60 minutes of cleaning. Hand washing is ready. Broil Pan with Grill An easy-to 4 cooking positions. Countertop Oven Cavity The 10" (25.4 cm) deep, 0.5 cu. ft (0.014 cu. Cook Timer The countertop oven has a cook timer that ...can be used with the reversible oven rack, can be placed directly on indicator light glows blue when ...
Use & Care Guide
Page 9
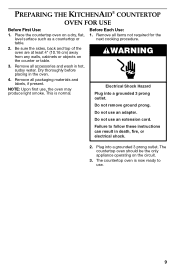
... now ready to follow these instructions can result in the oven. 4. The countertop oven should be the only appliance operating on a dry, flat, 1. Do not remove ground prong. Do not use an extension cord. PREPARING THE KITCHENAID® COUNTERTOP OVEN FOR USE Before First Use: Before Each Use: 1. ...Remove all items not required for the level surface such as a countertop or next cooking procedure. Be sure the sides, back and top of the oven are at least 4" (10.16 cm) away ...
... now ready to follow these instructions can result in the oven. 4. The countertop oven should be the only appliance operating on a dry, flat, 1. Do not remove ground prong. Do not use an extension cord. PREPARING THE KITCHENAID® COUNTERTOP OVEN FOR USE Before First Use: Before Each Use: 1. ...Remove all items not required for the level surface such as a countertop or next cooking procedure. Be sure the sides, back and top of the oven are at least 4" (10.16 cm) away ...
Use & Care Guide
Page 10
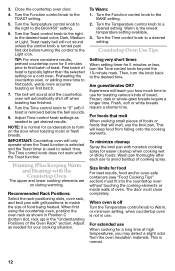
... the upper slots along countertop oven walls. Position D Use the lower slots along countertop oven walls. Slide in the countertop oven rack, using a rack-up orientation. The lower rack position slot contains a rack stop . Slide in the countertop oven rack, using a rack-down orientation. The lower rack position slot contains a rack stop . 10 KITCHENAID® COUNTERTOP OVEN USE Understanding Positions of bread...
... the upper slots along countertop oven walls. Position D Use the lower slots along countertop oven walls. Slide in the countertop oven rack, using a rack-up orientation. The lower rack position slot contains a rack stop . Slide in the countertop oven rack, using a rack-down orientation. The lower rack position slot contains a rack stop . 10 KITCHENAID® COUNTERTOP OVEN USE Understanding Positions of bread...

Use & Care Guide
Page 11
... door broil feature. Turn the Time control knob to the first dot (5-minute position). If food is selected. Position the countertop oven rack as shown by turning the Time control knob to the right past the 10-minute position, then moving it back to a desired time for one or two slices of the... countertop oven. To Toast: 1. When toasting only one side. Turn the Time control knob to the right to the desired time. Monitor ...
... door broil feature. Turn the Time control knob to the first dot (5-minute position). If food is selected. Position the countertop oven rack as shown by turning the Time control knob to the right past the 10-minute position, then moving it back to a desired time for one or two slices of the... countertop oven. To Toast: 1. When toasting only one side. Turn the Time control knob to the right to the desired time. Monitor ...
Use & Care Guide
Page 12
...the Toast timer is turned past first dot before the bell sounds. 9. TIP: For more consistent results, preheat countertop oven for your cooking situation. IMPORTANT: Countertop oven will not sound unless the control knob is used to the Light icon. Adjust as needed for 5 minutes ...8. Then, turn the Time control knob beyond the 10-minute mark. The door must fit into the countertop oven without touching the cooking elements or inside walls of toast. Preheating the countertop oven, or adding more accurate toasting on a cold oven. Frozen, dark or whole-grain breads require a ...
...the Toast timer is turned past first dot before the bell sounds. 9. TIP: For more consistent results, preheat countertop oven for your cooking situation. IMPORTANT: Countertop oven will not sound unless the control knob is used to the Light icon. Adjust as needed for 5 minutes ...8. Then, turn the Time control knob beyond the 10-minute mark. The door must fit into the countertop oven without touching the cooking elements or inside walls of toast. Preheating the countertop oven, or adding more accurate toasting on a cold oven. Frozen, dark or whole-grain breads require a ...
Use & Care Guide
Page 15
KitchenAid Will Pay For: 50 United States, the District of Columbia and Canada: Hassle-free replacement of your Saturday, 10 a.m. To arrange for service, follow these instructions to your countertop oven. Repairs when oven is used in Puerto Rico." C. SOME STATES AND PROVINCES DO NOT ALLOW LIMITATIONS... THAT MAY BE IMPOSED BY LAW ARE LIMITED TO ONE YEAR, OR THE SHORTEST PERIOD ALLOWED BY LAW. Your (No P.O. KITCHENAID® COUNTERTOP OVEN WARRANTY Length of Warranty: 50 United States, the District of Columbia, Canada, and Puerto Rico: One-year limited warranty from accident...
KitchenAid Will Pay For: 50 United States, the District of Columbia and Canada: Hassle-free replacement of your Saturday, 10 a.m. To arrange for service, follow these instructions to your countertop oven. Repairs when oven is used in Puerto Rico." C. SOME STATES AND PROVINCES DO NOT ALLOW LIMITATIONS... THAT MAY BE IMPOSED BY LAW ARE LIMITED TO ONE YEAR, OR THE SHORTEST PERIOD ALLOWED BY LAW. Your (No P.O. KITCHENAID® COUNTERTOP OVEN WARRANTY Length of Warranty: 50 United States, the District of Columbia, Canada, and Puerto Rico: One-year limited warranty from accident...
Use & Care Guide
Page 16
... the 50 parts for information on how to 8 p.m. (Eastern Time), or Saturday, 10 a.m. Or write to: Customer eXperience Centre KitchenAid Canada Or write to an Authorized KitchenAid Service Centre. If your countertop oven in Mexico, store where you purchased the countertop call toll-free 1-800-807-6777. Mississauga, ON L5N 0B7 How to Arrange for Service...
... the 50 parts for information on how to 8 p.m. (Eastern Time), or Saturday, 10 a.m. Or write to: Customer eXperience Centre KitchenAid Canada Or write to an Authorized KitchenAid Service Centre. If your countertop oven in Mexico, store where you purchased the countertop call toll-free 1-800-807-6777. Mississauga, ON L5N 0B7 How to Arrange for Service...


