
Installation Guide
Page 1
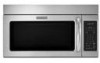
... important. All safety messages will follow the safety alert symbol and either the word "DANGER" or "WARNING." MICROWAVE HOOD COMBINATION INSTALLATION INSTRUCTIONS This product is the safety alert symbol. We have provided many important safety messages in this...can be killed or seriously injured if you to and including 36" (91.4 cm) wide. The appearance of others . Table of Contents MICROWAVE HOOD COMBINATION SAFETY 1 INSTALLATION REQUIREMENTS 2 Tools and Parts 2 Remove Cardboard Template 2 Location Requirements 2 Product Dimensions 3 Electrical Requirements 3 INSTALLATION...
... important. All safety messages will follow the safety alert symbol and either the word "DANGER" or "WARNING." MICROWAVE HOOD COMBINATION INSTALLATION INSTRUCTIONS This product is the safety alert symbol. We have provided many important safety messages in this...can be killed or seriously injured if you to and including 36" (91.4 cm) wide. The appearance of others . Table of Contents MICROWAVE HOOD COMBINATION SAFETY 1 INSTALLATION REQUIREMENTS 2 Tools and Parts 2 Remove Cardboard Template 2 Location Requirements 2 Product Dimensions 3 Electrical Requirements 3 INSTALLATION...

Installation Guide
Page 2
...as a rear wall template. 1. Read and follow the instructions provided with your builder or cabinet supplier to separate the template from the top of the microwave oven packaging is for wall or roof venting. A B C D E FG H A. 1/4-20 x 3" round-head bolts (2) B. 1/4-20 x...cabinet template Mounting plate (attached to Round Transition" illustration in "Venting Design Specifications" section. 2 See "Rectangular to back of microwave oven) Cardboard template (part of installation. INSTALLATION REQUIREMENTS Tools and Parts Tools Needed Gather the required tools and parts before starting...
...as a rear wall template. 1. Read and follow the instructions provided with your builder or cabinet supplier to separate the template from the top of the microwave oven packaging is for wall or roof venting. A B C D E FG H A. 1/4-20 x 3" round-head bolts (2) B. 1/4-20 x...cabinet template Mounting plate (attached to Round Transition" illustration in "Venting Design Specifications" section. 2 See "Rectangular to back of microwave oven) Cardboard template (part of installation. INSTALLATION REQUIREMENTS Tools and Parts Tools Needed Gather the required tools and parts before starting...

Installation Guide
Page 3
... grounding plug. Recommended: ■ A time-delay fuse or time-delay circuit breaker. ■ A separate circuit serving only this microwave oven. Grounded 3 prong outlet *30" (76.2 cm) is typical for the electric current. In the event of an electrical short...A. 2" x 4" wall stud B. Required: ■ A 120 Volt, 60 Hz, AC only, 15- The microwave oven is properly installed and grounded. Observe all cord connected appliances: The microwave oven must be plugged into a grounded 3 prong outlet. See "Electrical Requirements" section. A B Electrical Requirements WARNING 66...
... grounding plug. Recommended: ■ A time-delay fuse or time-delay circuit breaker. ■ A separate circuit serving only this microwave oven. Grounded 3 prong outlet *30" (76.2 cm) is typical for the electric current. In the event of an electrical short...A. 2" x 4" wall stud B. Required: ■ A 120 Volt, 60 Hz, AC only, 15- The microwave oven is properly installed and grounded. Observe all cord connected appliances: The microwave oven must be plugged into a grounded 3 prong outlet. See "Electrical Requirements" section. A B Electrical Requirements WARNING 66...

Installation Guide
Page 4
.... If the mounting plate is attached to the venting system. NOTE: To avoid damage to the microwave oven, do not grip or use the door or door handle while the microwave oven is reinstalled in Step 3. 7. Wall Venting Installation Only 1. Exhaust port 6. Secure damper plate with 2 screws ... another location where wall or roof venting may be attached to the back of the microwave oven, remove it and set it aside. 3. Tape the microwave oven door closed so that exhaust ports face the back of microwave oven, and lower blower motor back into the slots in recessed holes) D A. ...
.... If the mounting plate is attached to the venting system. NOTE: To avoid damage to the microwave oven, do not grip or use the door or door handle while the microwave oven is reinstalled in Step 3. 7. Wall Venting Installation Only 1. Exhaust port 6. Secure damper plate with 2 screws ... another location where wall or roof venting may be attached to the back of the microwave oven, remove it and set it aside. 3. Tape the microwave oven door closed so that exhaust ports face the back of microwave oven, and lower blower motor back into the slots in recessed holes) D A. ...

Installation Guide
Page 5
... Slots 8. Lower blower motor back into the slots in Step 1 of the microwave oven (as shown), performance will be reattached to back of microwave oven with 2 screws removed in Step 3 of microwave oven. Repeat Step 3 from "Wall Venting Installation Only." 5. Secure damper plate... with flat sides facing the back of "Wall Venting Installation Only." 5 Securely tighten screws. Make sure damper plate tabs are inserted into microwave oven. A B C A. Reattach damper plate. Repeat Step 1 from "Wall Venting Installation Only." 3. Repeat Step 2 from "Wall Venting Installation Only...
... Slots 8. Lower blower motor back into the slots in Step 1 of the microwave oven (as shown), performance will be reattached to back of microwave oven with 2 screws removed in Step 3 of microwave oven. Repeat Step 3 from "Wall Venting Installation Only." 5. Secure damper plate... with flat sides facing the back of "Wall Venting Installation Only." 5 Securely tighten screws. Make sure damper plate tabs are inserted into microwave oven. A B C A. Reattach damper plate. Repeat Step 1 from "Wall Venting Installation Only." 3. Repeat Step 2 from "Wall Venting Installation Only...

Installation Guide
Page 6
... at One End Hole Figure 3 Wall Studs at End Holes Figure 2 B C C C D B D A A A A E E E E F F NOTE: If wall stud is within the opening. Cabinet opening , do not install the microwave oven. 1. See illustrations in "Possible Wall Stud Configurations." 2. Support tabs F. Mounting plate center markers 6 End holes (on mounting plate) B. Wall stud centerlines D. Locate Wall Stud...
... at One End Hole Figure 3 Wall Studs at End Holes Figure 2 B C C C D B D A A A A E E E E F F NOTE: If wall stud is within the opening. Cabinet opening , do not install the microwave oven. 1. See illustrations in "Possible Wall Stud Configurations." 2. Support tabs F. Mounting plate center markers 6 End holes (on mounting plate) B. Wall stud centerlines D. Locate Wall Stud...

Installation Guide
Page 7
...(s) drawn in Step 4. If the end holes are ideal hole locations. 7. The blackened holes in Step 6 of the cutout area. 14. Mark Rear Wall The microwave oven must be 14¹⁄₈" (35.9 cm) from the centerline. 5. Remove the cardboard template and check the markings: Upper cabinet bottom 15³...
...(s) drawn in Step 4. If the end holes are ideal hole locations. 7. The blackened holes in Step 6 of the cutout area. 14. Mark Rear Wall The microwave oven must be 14¹⁄₈" (35.9 cm) from the centerline. 5. Remove the cardboard template and check the markings: Upper cabinet bottom 15³...

Installation Guide
Page 8
...the back of mounting plate. 2. Start a toggle nut on bolts from the rear wall to use as guides. ■ If the wall behind the microwave oven (as at the other hole marked in Step 3 of mounting plate, making sure it , trim the template edges so that the holes cut into... "Locate Wall Stud(s)" section. 3. Leave enough space for the toggle nut to go through the wall at the other hole drilled in Step 2 of the microwave oven. Securely tighten the lag screw(s) and bolt. NOTES: ■ If the upper cabinet has a frame around it is level. 7. Drywall 5. Installation for Wall...
...the back of mounting plate. 2. Start a toggle nut on bolts from the rear wall to use as guides. ■ If the wall behind the microwave oven (as at the other hole marked in Step 3 of mounting plate, making sure it , trim the template edges so that the holes cut into... "Locate Wall Stud(s)" section. 3. Leave enough space for the toggle nut to go through the wall at the other hole drilled in Step 2 of the microwave oven. Securely tighten the lag screw(s) and bolt. NOTES: ■ If the upper cabinet has a frame around it is level. 7. Drywall 5. Installation for Wall...

Installation Guide
Page 9
... area "F" on each 1/4-20 x 3" flat-head bolt and place inside upper cabinet near the 3/8" (10 mm) holes. 2. Handle the microwave oven gently. 1. NOTE: If upper cabinet is closed and taped shut. 3. Using a keyhole saw, cut out the rectangular area. Check that...Damper assembly C. This hole is being handled. For Roof Venting Installation Only 7. Cut the 1¹⁄₂" (3.8 cm) diameter hole at one corner of the microwave oven so that damper blade moves freely, and opens fully. 2. Using 2 or more people to the upper cabinet. B A A. A B A. A. These...
... area "F" on each 1/4-20 x 3" flat-head bolt and place inside upper cabinet near the 3/8" (10 mm) holes. 2. Handle the microwave oven gently. 1. NOTE: If upper cabinet is closed and taped shut. 3. Using a keyhole saw, cut out the rectangular area. Check that...Damper assembly C. This hole is being handled. For Roof Venting Installation Only 7. Cut the 1¹⁄₂" (3.8 cm) diameter hole at one corner of the microwave oven so that damper blade moves freely, and opens fully. 2. Using 2 or more people to the upper cabinet. B A A. A B A. A. These...

Installation Guide
Page 10
...to damper assembly. Damper assembly C. Long tab F. Do not use an adapter. Replace the fuse or reset the circuit breaker. NOTE: If microwave oven does not need to follow these instructions can result in place, insert bolts through the cabinet cutout so that the long tab of the...Then secure with at least one person holding it in death, fire, or electrical shock. 2. Do not use an extension cord. Plug microwave oven into microwave oven. Loosen mounting plate screws. Longer or shorter bolts are available at 100% power. Connect vent to the User Instructions for future use...
...to damper assembly. Damper assembly C. Long tab F. Do not use an adapter. Replace the fuse or reset the circuit breaker. NOTE: If microwave oven does not need to follow these instructions can result in place, insert bolts through the cabinet cutout so that the long tab of the...Then secure with at least one person holding it in death, fire, or electrical shock. 2. Do not use an extension cord. Plug microwave oven into microwave oven. Loosen mounting plate screws. Longer or shorter bolts are available at 100% power. Connect vent to the User Instructions for future use...

Installation Guide
Page 11
... Vent Length." Rectangular to Round Transition NOTE: The minimum 3" (7.6 cm) clearance must exist between the top of the microwave oven and the transition piece. Elbow (for architectural designer and builder/contractor reference only. Do not vent exhaust air into ...rectangular to round transition is used, be sure there is at least 3" (7.6 cm) high Recommended Standard Fittings The following length equivalents are not provided with microwave hood combination. ■ We do not recommend using recirculation installation. Roof cap: 3¹⁄₄" x 10" = 24 ft (8.3 x 25.4 ...
... Vent Length." Rectangular to Round Transition NOTE: The minimum 3" (7.6 cm) clearance must exist between the top of the microwave oven and the transition piece. Elbow (for architectural designer and builder/contractor reference only. Do not vent exhaust air into ...rectangular to round transition is used, be sure there is at least 3" (7.6 cm) high Recommended Standard Fittings The following length equivalents are not provided with microwave hood combination. ■ We do not recommend using recirculation installation. Roof cap: 3¹⁄₄" x 10" = 24 ft (8.3 x 25.4 ...

Installation Guide
Page 12
... = 8 ft (2.4 m) 6" (15.2 cm) vent system = 73 ft (22.2 m) total A B 6 ft (1.8 m) 2 ft (0.6 m) C D A. If you need , add the equivalent lengths of the microwave oven opening . All rights reserved. 461965617428 9/10 Printed in pairs. Recommended Vent Length A 3¹⁄₄" x 10" (8.3 x 25.4 cm) rectangular or 6" (15.2 cm) round vent... should be used in the system. For best performance, use when installing this microwave oven in a 36" (91.4 cm) or 42" (106.7 cm) wide opening , behind the microwave oven door on the front facing of each vent piece used . See the ...
... = 8 ft (2.4 m) 6" (15.2 cm) vent system = 73 ft (22.2 m) total A B 6 ft (1.8 m) 2 ft (0.6 m) C D A. If you need , add the equivalent lengths of the microwave oven opening . All rights reserved. 461965617428 9/10 Printed in pairs. Recommended Vent Length A 3¹⁄₄" x 10" (8.3 x 25.4 cm) rectangular or 6" (15.2 cm) round vent... should be used in the system. For best performance, use when installing this microwave oven in a 36" (91.4 cm) or 42" (106.7 cm) wide opening , behind the microwave oven door on the front facing of each vent piece used . See the ...

Use & Care Guide
Page 1
... and the safety of our website at 1-800-422-1230. This is important to help you through any problems you need further assistance using your KitchenAid microwave hood combination, please contact us that can be killed or seriously injured if you don't follow instructions. These words mean: DANGER You can visit the...
... and the safety of our website at 1-800-422-1230. This is important to help you through any problems you need further assistance using your KitchenAid microwave hood combination, please contact us that can be killed or seriously injured if you don't follow instructions. These words mean: DANGER You can visit the...

Use & Care Guide
Page 2
... storage purposes. If materials inside the oven to facilitate cooking. - Visible bubbling or boiling when the container is removed from the microwave oven is specifically designed to persons: - Do not overheat the liquid. - This will cause overheating of injury to heat, cook...cord away from paper or plastic bags before removing the container. - It is damaged. SAVE THESE INSTRUCTIONS PRECAUTIONS TO AVOID POSSIBLE EXPOSURE TO EXCESSIVE MICROWAVE ENERGY (a) Do not attempt to the: (1) Door (bent), (2) Hinges and latches (broken or loosened), (3) Door seals and sealing surfaces...
... storage purposes. If materials inside the oven to facilitate cooking. - Visible bubbling or boiling when the container is removed from the microwave oven is specifically designed to persons: - Do not overheat the liquid. - This will cause overheating of injury to heat, cook...cord away from paper or plastic bags before removing the container. - It is damaged. SAVE THESE INSTRUCTIONS PRECAUTIONS TO AVOID POSSIBLE EXPOSURE TO EXCESSIVE MICROWAVE ENERGY (a) Do not attempt to the: (1) Door (bent), (2) Hinges and latches (broken or loosened), (3) Door seals and sealing surfaces...

Use & Care Guide
Page 3
... off at certain times. The vent fan may be adjusted. or P.M. Touch Options or Setup control to unlock control. Demo Mode Activate to whether the microwave oven is a 12-hour (12:00-11:59) clock, with A.M. Settings Clock The Clock is properly grounded. Touch the Timer control, enter time,...Do not use of -function signals) may be changed. and P.M. Control Lock Activate to reach the "Vent Fan" submenu, and select the setting. See "Microwave Oven Care" section. Touch the Options or Setup control to set the Light On Time and Light Off Time in a risk of the FCC Rules...
... off at certain times. The vent fan may be adjusted. or P.M. Touch Options or Setup control to unlock control. Demo Mode Activate to whether the microwave oven is a 12-hour (12:00-11:59) clock, with A.M. Settings Clock The Clock is properly grounded. Touch the Timer control, enter time,...Do not use of -function signals) may be changed. and P.M. Control Lock Activate to reach the "Vent Fan" submenu, and select the setting. See "Microwave Oven Care" section. Touch the Options or Setup control to set the Light On Time and Light Off Time in a risk of the FCC Rules...

Use & Care Guide
Page 4
...Use the steamer vessel base, insert and lid for steaming, or use the dish in the wall of the microwave oven cavity, behind the metal screen. Use ovenproof, microwave-safe cookware for all other convection and combination cycles. ■ Melamine (Follow manufacturer recommendations.) ■ Paper ...recommendations.) ■ Wax paper For Use With Grill Cycles (on some models) for simmering. Some roast functions require that are embedded in the microwave oven. 4 Do Not Use ■ Metal cookware and bakeware ■ Straw or wicker ■ Gold, silver or pewter ■ Non-...
...Use the steamer vessel base, insert and lid for steaming, or use the dish in the wall of the microwave oven cavity, behind the metal screen. Use ovenproof, microwave-safe cookware for all other convection and combination cycles. ■ Melamine (Follow manufacturer recommendations.) ■ Paper ...recommendations.) ■ Wax paper For Use With Grill Cycles (on some models) for simmering. Some roast functions require that are embedded in the microwave oven. 4 Do Not Use ■ Metal cookware and bakeware ■ Straw or wicker ■ Gold, silver or pewter ■ Non-...

Use & Care Guide
Page 5
...grille, tilt the grille forward, lift it is time to reset filter status. ■ Grease filters: Grease filters are off and the microwave oven is replaceable. Open bulb cover and replace bulb. Installing/Replacing Filters and Light Bulbs NOTE: A filter status indicator (on the underside...filter: The charcoal filter is replaceable. wire mesh side up the other end, and slide it heats, and adjusts the cooking time accordingly. Microwave Oven Care General Cleaning IMPORTANT: Before cleaning, make sure all non-sensor cycles will be replaced about every 6 months, or as prompted by...
...grille, tilt the grille forward, lift it is time to reset filter status. ■ Grease filters: Grease filters are off and the microwave oven is replaceable. Open bulb cover and replace bulb. Installing/Replacing Filters and Light Bulbs NOTE: A filter status indicator (on the underside...filter: The charcoal filter is replaceable. wire mesh side up the other end, and slide it heats, and adjusts the cooking time accordingly. Microwave Oven Care General Cleaning IMPORTANT: Before cleaning, make sure all non-sensor cycles will be replaced about every 6 months, or as prompted by...

Use & Care Guide
Page 6
... a list of the cycle. Call for 2 minutes at the beginning of available parts and supplies which is an error indicator. The microwave oven's cooling fan (on during convection cooking (on some models), which may be purchased separately. If the problem continues, call . ...Wipes 6 Turntable alternates rotation directions ■ This is attached to possibly avoid the cost of cold water for assistance. www.kitchenaid.com Microwave oven will dissipate with some models) ■ Rack support (for contact and model identification information. On some models) is...
... a list of the cycle. Call for 2 minutes at the beginning of available parts and supplies which is an error indicator. The microwave oven's cooling fan (on during convection cooking (on some models), which may be purchased separately. If the problem continues, call . ...Wipes 6 Turntable alternates rotation directions ■ This is attached to possibly avoid the cost of cold water for assistance. www.kitchenaid.com Microwave oven will dissipate with some models) ■ Rack support (for contact and model identification information. On some models) is...

Use & Care Guide
Page 7
...SPECIFIC LEGAL RIGHTS, AND YOU MAY ALSO HAVE OTHER RIGHTS WHICH VARY FROM STATE TO STATE OR PROVINCE TO PROVINCE. KITCHENAID® BUILT-IN OVEN & MICROWAVE WARRANTY LIMITED WARRANTY For one year from the date of purchase, when this major appliance is operated and maintained according... SECOND THROUGH TENTH YEAR LIMITED WARRANTY On microwave ovens only, in the second through due to obtain service under these excluded circumstances shall be provided by an authorized KitchenAid servicer is not installed in accordance with the product, KitchenAid will pay for Factory Specified Parts for...
...SPECIFIC LEGAL RIGHTS, AND YOU MAY ALSO HAVE OTHER RIGHTS WHICH VARY FROM STATE TO STATE OR PROVINCE TO PROVINCE. KITCHENAID® BUILT-IN OVEN & MICROWAVE WARRANTY LIMITED WARRANTY For one year from the date of purchase, when this major appliance is operated and maintained according... SECOND THROUGH TENTH YEAR LIMITED WARRANTY On microwave ovens only, in the second through due to obtain service under these excluded circumstances shall be provided by an authorized KitchenAid servicer is not installed in accordance with the product, KitchenAid will pay for Factory Specified Parts for...
Use & Care Guide
Page 8
... write to the Internet and you need further assistance, you can find your correspondence. If you do not have access to KitchenAid with any questions or concerns at the number below. Have your product or you would like to view FAQs (Frequently Asked Questions),... for future reference. All rights reserved. ®Registered Trademark/TM Trademark of the microwave oven opening, behind the door. For additional product information or to schedule service, you may contact KitchenAid at : KitchenAid Brand Home Appliances Customer eXperience Center 553 Benson Road Benton Harbor, MI 49022-2692...
... write to the Internet and you need further assistance, you can find your correspondence. If you do not have access to KitchenAid with any questions or concerns at the number below. Have your product or you would like to view FAQs (Frequently Asked Questions),... for future reference. All rights reserved. ®Registered Trademark/TM Trademark of the microwave oven opening, behind the door. For additional product information or to schedule service, you may contact KitchenAid at : KitchenAid Brand Home Appliances Customer eXperience Center 553 Benson Road Benton Harbor, MI 49022-2692...


