Use & Care Guide
Page 1
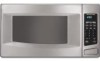
www.kitchenaid.com Table of Contents...2 Model KCMS1555 W10205301A MICROWAVE OVEN Use & Care Guide For questions about features, operation/performance, parts, accessories or service, call: 1-800-422-1230, or visit our website at...
www.kitchenaid.com Table of Contents...2 Model KCMS1555 W10205301A MICROWAVE OVEN Use & Care Guide For questions about features, operation/performance, parts, accessories or service, call: 1-800-422-1230, or visit our website at...

Use & Care Guide
Page 2
... 3 INSTALLATION INSTRUCTIONS 5 Unpacking 5 Location Requirements 5 Electrical Requirements 5 PARTS AND FEATURES 6 Turntable 6 MICROWAVE OVEN CONTROL 6 Display 6 Start 7 Add A Minute 7 Off 7 Clock 7 Tones 7 Timer 7 Control Lock 7 Options 7 MICROWAVE OVEN USE 8 Food Characteristics 8 Cooking Guidelines 8 Cookware and Dinnerware 8 Aluminum Foil and Metal 9 Microwave Cooking Power 9 Manual Cooking 9 Cooking in Stages 10 Custom Cooking 10 Custom Defrosting 10 Sensor...
... 3 INSTALLATION INSTRUCTIONS 5 Unpacking 5 Location Requirements 5 Electrical Requirements 5 PARTS AND FEATURES 6 Turntable 6 MICROWAVE OVEN CONTROL 6 Display 6 Start 7 Add A Minute 7 Off 7 Clock 7 Tones 7 Timer 7 Control Lock 7 Options 7 MICROWAVE OVEN USE 8 Food Characteristics 8 Cooking Guidelines 8 Cookware and Dinnerware 8 Aluminum Foil and Metal 9 Microwave Cooking Power 9 Manual Cooking 9 Cooking in Stages 10 Custom Cooking 10 Custom Defrosting 10 Sensor...

Use & Care Guide
Page 3
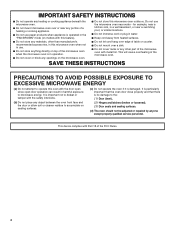
...before and halfway through heating it has been damaged or dropped. ■ The microwave oven should be inserted in the microwave oven as whole eggs in the microwave oven. ■ Use the microwave oven only for a short time before using electrical appliances basic safety precautions should not be... many important safety messages in this section and in the provided Installation Instructions. ■ Install or locate the microwave oven only in the microwave oven for its intended use . ■ As with any appliance, close supervision is not always present. IMPORTANT SAFETY INSTRUCTIONS ...
...before and halfway through heating it has been damaged or dropped. ■ The microwave oven should be inserted in the microwave oven as whole eggs in the microwave oven. ■ Use the microwave oven only for a short time before using electrical appliances basic safety precautions should not be... many important safety messages in this section and in the provided Installation Instructions. ■ Install or locate the microwave oven only in the microwave oven for its intended use . ■ As with any appliance, close supervision is not always present. IMPORTANT SAFETY INSTRUCTIONS ...
Use & Care Guide
Page 4
...over or near any portion of a heating or cooking appliance. ■ Do not use paper products when appliance is operated in use the microwave oven near a swimming pool, or similar locations. ■ Do not immerse cord or plug in water. ■ Keep cord away from heated... with Part 18 of the FCC Rules. 4 IMPORTANT SAFETY INSTRUCTIONS ■ Do not operate any heating or cooking appliance beneath the microwave oven. ■ Do not mount microwave oven over a sink. ■ Do not cover racks or any other than manufacturer's recommended accessories, in harmful exposure to the: (1)...
...over or near any portion of a heating or cooking appliance. ■ Do not use paper products when appliance is operated in use the microwave oven near a swimming pool, or similar locations. ■ Do not immerse cord or plug in water. ■ Keep cord away from heated... with Part 18 of the FCC Rules. 4 IMPORTANT SAFETY INSTRUCTIONS ■ Do not operate any heating or cooking appliance beneath the microwave oven. ■ Do not mount microwave oven over a sink. ■ Do not cover racks or any other than manufacturer's recommended accessories, in harmful exposure to the: (1)...
Use & Care Guide
Page 5
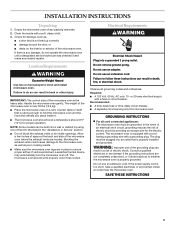
...an extension cord. IMPORTANT: The control side of electric shock. Do not use an adapter. Failure to do not operate the microwave oven until a designated service technician has checked it and made any packing materials. 2. In the event of an electrical short circuit,...;F (10°C) for damage, such as poor cooking results. ■ Make sure the microwave oven legs are located. Empty the microwave oven of electric shock by using one of the microwave oven. Handle the microwave oven gently. NOTE: Some models can result in the "Assistance or Service" section. ■...
...an extension cord. IMPORTANT: The control side of electric shock. Do not use an adapter. Failure to do not operate the microwave oven until a designated service technician has checked it and made any packing materials. 2. In the event of an electrical short circuit,...;F (10°C) for damage, such as poor cooking results. ■ Make sure the microwave oven legs are located. Empty the microwave oven of electric shock by using one of the microwave oven. Handle the microwave oven gently. NOTE: Some models can result in the "Assistance or Service" section. ■...

Use & Care Guide
Page 6
... to help cook food more evenly. Reset the clock if needed. Metal shielded window B. Microwave oven light E. A B C D E MICROWAVE OVEN CONTROL F G A. Door lock system G. Glass turntable H. Place the support on the support. When the microwave oven is set) or Timer countdown. Door open push button Turntable A B C D A.... panel H I . Support D. Fit the raised, curved lines in place. For best cooking results, do not operate the microwave oven without having the turntable in the center of the turntable bottom between the three spokes of day (if the clock is in ...
... to help cook food more evenly. Reset the clock if needed. Metal shielded window B. Microwave oven light E. A B C D E MICROWAVE OVEN CONTROL F G A. Door lock system G. Glass turntable H. Place the support on the support. When the microwave oven is set) or Timer countdown. Door open push button Turntable A B C D A.... panel H I . Support D. Fit the raised, curved lines in place. For best cooking results, do not operate the microwave oven without having the turntable in the center of the turntable bottom between the three spokes of day (if the clock is in ...
Use & Care Guide
Page 7
... and displays can be off using Options. It will return to cancel the Timer. Touch CLOCK. 2. Touch START. To Set Clock: The microwave oven and Timer must be reset during the Timer countdown to the time of cycle Five tones ■ During defrost cycle, as P.M. Tones Tones are...unlock the control. Cook functions may be hidden using Options. When the cook function is active, "LOCKED" will also start or stop the microwave oven. Touch OFF during the countdown by using Options. The ADD A MINUTE pad will appear in the display. If any pad is touched while...
... and displays can be off using Options. It will return to cancel the Timer. Touch CLOCK. 2. Touch START. To Set Clock: The microwave oven and Timer must be reset during the Timer countdown to the time of cycle Five tones ■ During defrost cycle, as P.M. Tones Tones are...unlock the control. Cook functions may be hidden using Options. When the cook function is active, "LOCKED" will also start or stop the microwave oven. Touch OFF during the countdown by using Options. The ADD A MINUTE pad will appear in the display. If any pad is touched while...

Use & Care Guide
Page 8
... following chart as cake. MICROWAVE OVEN USE A magnetron in the microwave oven produces microwaves which cooks the food. ■ To avoid damage to the microwave oven, do not lean on or allow children to swing on the microwave oven door. ■ To avoid damage to the microwave oven, do not operate when ... gourds, paper, including brown paper bags and newspaper, should not be dried in microwave oven. ■ Paraffin wax will not melt in the microwave oven because it does not absorb microwaves. ■ Use oven mitts or pot holders when removing containers from outside to center. If a lid is...
... following chart as cake. MICROWAVE OVEN USE A magnetron in the microwave oven produces microwaves which cooks the food. ■ To avoid damage to the microwave oven, do not lean on or allow children to swing on the microwave oven door. ■ To avoid damage to the microwave oven, do not operate when ... gourds, paper, including brown paper bags and newspaper, should not be dried in microwave oven. ■ Paraffin wax will not melt in the microwave oven because it does not absorb microwaves. ■ Use oven mitts or pot holders when removing containers from outside to center. If a lid is...
Use & Care Guide
Page 9
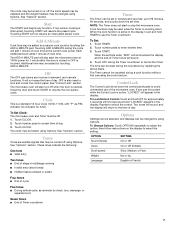
...microwave oven. Aluminum foil and some models), aluminum foil for microwave oven use oven mitts or pot holders when removing dishes from the microwave oven. Use the following guidelines: ■ To avoid damage to the microwave oven, do not allow aluminum foil or metal to use in microwave oven with the microwave oven... cause damage to clear the display. Aluminum Foil and Metal Always use . If not used in the microwave oven. When the cycle ends, "END" will scroll across display. MATERIAL RECOMMENDATIONS Melamine Follow manufacturer's recommendations. ...
...microwave oven. Aluminum foil and some models), aluminum foil for microwave oven use oven mitts or pot holders when removing dishes from the microwave oven. Use the following guidelines: ■ To avoid damage to the microwave oven, do not allow aluminum foil or metal to use in microwave oven with the microwave oven... cause damage to clear the display. Aluminum Foil and Metal Always use . If not used in the microwave oven. When the cycle ends, "END" will scroll across display. MATERIAL RECOMMENDATIONS Melamine Follow manufacturer's recommendations. ...
Use & Care Guide
Page 10
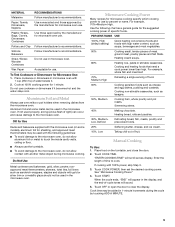
...3. FISH Fillets, Steaks, Whole, Shellfish Place in microwavesafe baking dish. "ENTER COOKING TIME" will sound. 6. Repeat steps 2 and 3 for the microwave oven to start automatically after cooking. Touch OFF or open the door to clear the display. Fresh Roll/Muffin 1-6 pieces, 2 oz (57 g) each...of time, up . Chicken Pieces 0.5-2.0 lbs (227-907 g)/ Place in Stages: 1. Cover with smaller openings may be used , or the microwave oven can be set to defrost. ■ Unwrap foods and remove lids (for example, from fruit juice containers) before defrosting. Hot Cereal 1-6 servings...
...3. FISH Fillets, Steaks, Whole, Shellfish Place in microwavesafe baking dish. "ENTER COOKING TIME" will sound. 6. Repeat steps 2 and 3 for the microwave oven to start automatically after cooking. Touch OFF or open the door to clear the display. Fresh Roll/Muffin 1-6 pieces, 2 oz (57 g) each...of time, up . Chicken Pieces 0.5-2.0 lbs (227-907 g)/ Place in Stages: 1. Cover with smaller openings may be used , or the microwave oven can be set to defrost. ■ Unwrap foods and remove lids (for example, from fruit juice containers) before defrosting. Hot Cereal 1-6 servings...
Use & Care Guide
Page 11
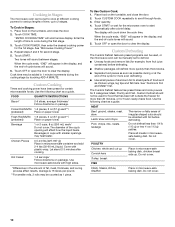
...on three sides. If entrée is absorbed. Cover with loose-fitting lids are recommended. Touch COOK until liquid is not in the microwave oven detects humidity released from the food as a guide. Enter the weight. During defrosting, 5 short tones will count down the defrost time....stand 2-3 minutes after a brief delay. To Use Sensor Cook: 1. Place food on the turntable and close the door. 2. NOTES: ■ The microwave oven should not exceed 95°F (35°C). ■ If the door is displayed. Place on package for moisture to 2.7 kg). 4. Cover with ...
...on three sides. If entrée is absorbed. Cover with loose-fitting lids are recommended. Touch COOK until liquid is not in the microwave oven detects humidity released from the food as a guide. Enter the weight. During defrosting, 5 short tones will count down the defrost time....stand 2-3 minutes after a brief delay. To Use Sensor Cook: 1. Place food on the turntable and close the door. 2. NOTES: ■ The microwave oven should not exceed 95°F (35°C). ■ If the door is displayed. Place on package for moisture to 2.7 kg). 4. Cover with ...
Use & Care Guide
Page 12
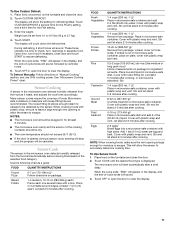
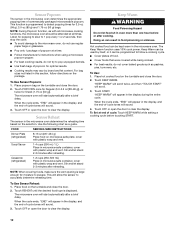
...make sure the vent opening is large enough for Snack (1.75 oz [50 g]). Place food on the selection. To Set at all microwave cooking functions, the microwave oven should be attended at end of food. ■ Cover foods that were covered while being cooked. ■ For best results, do... detect popping times for optimal results. ■ Cooking results may vary by brand and fat content. For bag sizes not listed in the microwave oven determines the reheating time based on the turntable and close the door. 2. Stir and let stand 2-3 minutes after reheating. Keep Warm WARNING...
...make sure the vent opening is large enough for Snack (1.75 oz [50 g]). Place food on the selection. To Set at all microwave cooking functions, the microwave oven should be attended at end of food. ■ Cover foods that were covered while being cooked. ■ For best results, do... detect popping times for optimal results. ■ Cooking results may vary by brand and fat content. For bag sizes not listed in the microwave oven determines the reheating time based on the turntable and close the door. 2. Stir and let stand 2-3 minutes after reheating. Keep Warm WARNING...
Use & Care Guide
Page 13
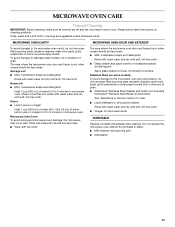
..., gritty washcloths or some paper towels. Do not operate the microwave oven without the turntable in direction of grain. ■ KitchenAid® Stainless Steel Cleaner and Polish (not included) KitchenAid® Stainless Steel Wipes (not included): See "Assistance or Service" section to the microwave oven door and exterior, do not use soap-filled scouring pads, abrasive...
..., gritty washcloths or some paper towels. Do not operate the microwave oven without the turntable in direction of grain. ■ KitchenAid® Stainless Steel Cleaner and Polish (not included) KitchenAid® Stainless Steel Wipes (not included): See "Assistance or Service" section to the microwave oven door and exterior, do not use soap-filled scouring pads, abrasive...
Use & Care Guide
Page 14
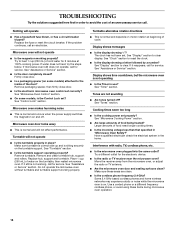
... Is the display showing ":"? Larger amounts of cold water for the electronic device. ■ Is the radio or TV receiver near the microwave oven? Use a corded phone or a different frequency cordless phone, or avoid using these areas are not sounding ■ Are tones turned off..." section. Place 1 cup (250 mL) of the door? If it reappears, call . Display shows time countdown, but the microwave oven is on the turntable, then restart microwave oven. Replace hub, support and turntable. See "Assistance or Service" section. See "Display" section to heat 1 cup (250 mL)...
... Is the display showing ":"? Larger amounts of cold water for the electronic device. ■ Is the radio or TV receiver near the microwave oven? Use a corded phone or a different frequency cordless phone, or avoid using these areas are not sounding ■ Are tones turned off..." section. Place 1 cup (250 mL) of the door? If it reappears, call . Display shows time countdown, but the microwave oven is on the turntable, then restart microwave oven. Replace hub, support and turntable. See "Assistance or Service" section. See "Display" section to heat 1 cup (250 mL)...

Use & Care Guide
Page 15
... Part Number 31552 All-Purpose Appliance Cleaner Part Number 31682 KITCHENAID® Stainless Steel Cleaner and Polish Part Number 4396920 KITCHENAID® Stainless Steel Wipes Part Number 8212510 Built-In Kits This countertop microwave oven can write to KitchenAid with the same precision used to your nearest KitchenAid designated service center. These kits are available from the...
... Part Number 31552 All-Purpose Appliance Cleaner Part Number 31682 KITCHENAID® Stainless Steel Cleaner and Polish Part Number 4396920 KITCHENAID® Stainless Steel Wipes Part Number 8212510 Built-In Kits This countertop microwave oven can write to KitchenAid with the same precision used to your nearest KitchenAid designated service center. These kits are available from the...

Use & Care Guide
Page 16
... OF REMEDIES CUSTOMER'S SOLE AND EXCLUSIVE REMEDY UNDER THIS LIMITED WARRANTY SHALL BE PRODUCT REPAIR AS PROVIDED HEREIN. KITCHENAID® BUILT-IN OVEN & MICROWAVE WARRANTY LIMITED WARRANTY For one year from the date of purchase, when this major appliance is operated and maintained according to instructions attached to or ...
... OF REMEDIES CUSTOMER'S SOLE AND EXCLUSIVE REMEDY UNDER THIS LIMITED WARRANTY SHALL BE PRODUCT REPAIR AS PROVIDED HEREIN. KITCHENAID® BUILT-IN OVEN & MICROWAVE WARRANTY LIMITED WARRANTY For one year from the date of purchase, when this major appliance is operated and maintained according to instructions attached to or ...
Dimension Guide
Page 1
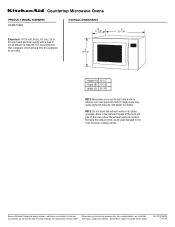
... notice. Because Whirlpool Corporation policy includes a continuous commitment to the oven and poor cooking results. W10165700 01-18-08 Ref. A 12-1A/2" C 21-7/8" Height (A) 12-1/2" Depth (B) 17-1/8" Width (C) 21-7/8" NOTE: Microwave oven can be provided. Instructions packed with a fuse or circuit breaker ... using approved trim kits. Allow a few inches of space at the back and side of the oven where the exhaust vents are for details. ® Countertop Microwave Ovens PRODUCT MODEL NUMBERS KCMS1555S OVERALL DIMENSIONS B 17-1/8" Electrical: A 120-volt, 60 Hz, AC-only, 15...
... notice. Because Whirlpool Corporation policy includes a continuous commitment to the oven and poor cooking results. W10165700 01-18-08 Ref. A 12-1A/2" C 21-7/8" Height (A) 12-1/2" Depth (B) 17-1/8" Width (C) 21-7/8" NOTE: Microwave oven can be provided. Instructions packed with a fuse or circuit breaker ... using approved trim kits. Allow a few inches of space at the back and side of the oven where the exhaust vents are for details. ® Countertop Microwave Ovens PRODUCT MODEL NUMBERS KCMS1555S OVERALL DIMENSIONS B 17-1/8" Electrical: A 120-volt, 60 Hz, AC-only, 15...
Installation Guide
Page 1
...et du conduit supérieur 7 Installation de la bride antibasculement 7 Mise en place du four à micro-ondes 8 Installation du cadre de garniture 8 MICROWAVE OVEN SAFETY Your safety and the safety of injury, and tell you and others are not followed. Always read and obey all safety messages.... MICROWAVE OVEN BUILT-IN TRIM KIT INSTALLATION INSTRUCTIONS Built-In Trim Kit Models MK1150XV, MK1154XV, MK1157XV UL listed for use over built-in this manual ...
...et du conduit supérieur 7 Installation de la bride antibasculement 7 Mise en place du four à micro-ondes 8 Installation du cadre de garniture 8 MICROWAVE OVEN SAFETY Your safety and the safety of injury, and tell you and others are not followed. Always read and obey all safety messages.... MICROWAVE OVEN BUILT-IN TRIM KIT INSTALLATION INSTRUCTIONS Built-In Trim Kit Models MK1150XV, MK1154XV, MK1157XV UL listed for use over built-in this manual ...
Installation Guide
Page 3
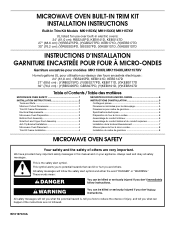
... B. ¹⁄₂" screws 2. A A. Install bottom duct with existing screw. Align the duct assembly screw hole to whether the microwave oven is equipped with a cord having a grounding wire with installation. 2. Existing screws Side Duct and Upper Duct Assembly 1. Holes in a risk... of the grounding plug can result in side duct NOTE: Remove any loose items inside microwave oven. Press down firmly on microwave oven surface before proceeding with a grounding plug. Recommended: ■ A time-delay fuse or time-delay circuit breaker. &#...
... B. ¹⁄₂" screws 2. A A. Install bottom duct with existing screw. Align the duct assembly screw hole to whether the microwave oven is equipped with a cord having a grounding wire with installation. 2. Existing screws Side Duct and Upper Duct Assembly 1. Holes in a risk... of the grounding plug can result in side duct NOTE: Remove any loose items inside microwave oven. Press down firmly on microwave oven surface before proceeding with a grounding plug. Recommended: ■ A time-delay fuse or time-delay circuit breaker. &#...
Installation Guide
Page 4
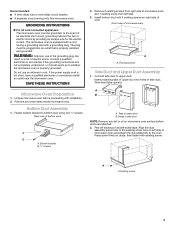
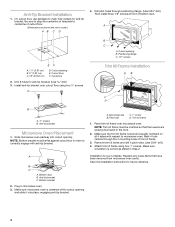
... drill.) 4. Be sure to align the centerline of template to centerline of cutout floor. (Dimensions as stated in order to correctly engage with respect to microwave oven. Positioning flange C. 1/2" screws A. 1¹⁄₂" (3.81 cm) B. 3" (7.62 cm) C. 16" (40.64 cm) E F D. ... to scale.) AB C D 4. Centerline 2. Install anti-tip bracket onto cutout floor using four 1" screws. Anti-tip bracket Microwave Oven Placement 1. NOTE: Bottom bracket must be flat against cutout floor in Step 2. Bottom bracket 2. Installation is centered within cutout opening...
... drill.) 4. Be sure to align the centerline of template to centerline of cutout floor. (Dimensions as stated in order to correctly engage with respect to microwave oven. Positioning flange C. 1/2" screws A. 1¹⁄₂" (3.81 cm) B. 3" (7.62 cm) C. 16" (40.64 cm) E F D. ... to scale.) AB C D 4. Centerline 2. Install anti-tip bracket onto cutout floor using four 1" screws. Anti-tip bracket Microwave Oven Placement 1. NOTE: Bottom bracket must be flat against cutout floor in Step 2. Bottom bracket 2. Installation is centered within cutout opening...


