
Use & Care Guide
Page 2
... 6 Turntable 6 MICROWAVE OVEN CONTROL 6 Display 6 Start 7 Add A Minute 7 Off 7 Clock 7 Tones 7 Timer 7 Control Lock 7 Options 7 MICROWAVE OVEN USE 8 Food Characteristics 8 Cooking Guidelines 8 Cookware and Dinnerware 8 Aluminum Foil and Metal 9 Microwave Cooking Power 9 Manual Cooking 9 Cooking in Stages 10 Custom Cooking 10 Custom Defrosting 10 Sensor Cooking 11 Sensor Cook 11 Sensor Popcorn 12 Sensor Reheat 12 Keep Warm 12 MICROWAVE OVEN CARE 13 General Cleaning 13 TROUBLESHOOTING 14 ASSISTANCE OR SERVICE 15 Replacement Parts 15 Built-In Kits 15 WARRANTY 16...
... 6 Turntable 6 MICROWAVE OVEN CONTROL 6 Display 6 Start 7 Add A Minute 7 Off 7 Clock 7 Tones 7 Timer 7 Control Lock 7 Options 7 MICROWAVE OVEN USE 8 Food Characteristics 8 Cooking Guidelines 8 Cookware and Dinnerware 8 Aluminum Foil and Metal 9 Microwave Cooking Power 9 Manual Cooking 9 Cooking in Stages 10 Custom Cooking 10 Custom Defrosting 10 Sensor Cooking 11 Sensor Cook 11 Sensor Popcorn 12 Sensor Reheat 12 Keep Warm 12 MICROWAVE OVEN CARE 13 General Cleaning 13 TROUBLESHOOTING 14 ASSISTANCE OR SERVICE 15 Replacement Parts 15 Built-In Kits 15 WARRANTY 16...

Use & Care Guide
Page 3
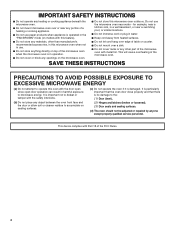
..., repair, or adjustment. ■ See door surface cleaning instructions in the "Microwave Oven Care" section. ■ To reduce the risk of fire in the microwave oven. Do not use as whole eggs in accordance with metal scouring pads. SAVE THESE INSTRUCTIONS 3 are able to be serviced only by children. ■ Do not operate the microwave oven if it has a damaged cord or plug, if it . - Remove wire twist...
..., repair, or adjustment. ■ See door surface cleaning instructions in the "Microwave Oven Care" section. ■ To reduce the risk of fire in the microwave oven. Do not use as whole eggs in accordance with metal scouring pads. SAVE THESE INSTRUCTIONS 3 are able to be serviced only by children. ■ Do not operate the microwave oven if it has a damaged cord or plug, if it . - Remove wire twist...
Use & Care Guide
Page 4
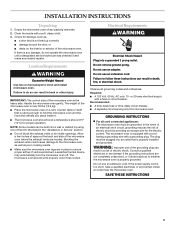
... SAFETY INSTRUCTIONS ■ Do not operate any heating or cooking appliance beneath the microwave oven. ■ Do not mount microwave oven over or near any portion of a heating or cooking appliance. ■ Do not use paper products when appliance is in operation. ■ Do not cover or block any openings on the microwave oven. ■ Do not let cord hang over edge of table or counter. ■ Do not mount over...
... SAFETY INSTRUCTIONS ■ Do not operate any heating or cooking appliance beneath the microwave oven. ■ Do not mount microwave oven over or near any portion of a heating or cooking appliance. ■ Do not use paper products when appliance is in operation. ■ Do not cover or block any openings on the microwave oven. ■ Do not let cord hang over edge of table or counter. ■ Do not mount over...
Use & Care Guide
Page 5
... the trim kits listed in death, fire, or electrical shock. Check for the electric current. Handle the microwave oven gently. If vents are located. or 20-amp electrical supply with a soft, damp cloth. 3. Do not use an adapter. Do not remove ground prong. Required: ■ A 120 Volt, 60 Hz, AC only, 15- If the power supply cord is equipped with a cord having a grounding wire with a grounding plug. INSTALLATION INSTRUCTIONS Unpacking 1. Location...
... the trim kits listed in death, fire, or electrical shock. Check for the electric current. Handle the microwave oven gently. If vents are located. or 20-amp electrical supply with a soft, damp cloth. 3. Do not use an adapter. Do not remove ground prong. Required: ■ A 120 Volt, 60 Hz, AC only, 15- If the power supply cord is equipped with a cord having a grounding wire with a grounding plug. INSTALLATION INSTRUCTIONS Unpacking 1. Location...

Use & Care Guide
Page 6
... turntable bottom ridge. 6 Display When power is in the display at any of the parts. When the microwave oven is first supplied to help cook food more evenly. PARTS AND FEATURES This manual may differ slightly from the illustrations in this manual. Microwave oven light E. Metal shielded window B. Door lock system G. Reset the clock if needed. Door open push button Turntable A B C D A. Fit the raised, curved lines in the display. Microwave inlet cover D. Glass turntable H. Place the turntable on the support. The model...
... turntable bottom ridge. 6 Display When power is in the display at any of the parts. When the microwave oven is first supplied to help cook food more evenly. PARTS AND FEATURES This manual may differ slightly from the illustrations in this manual. Microwave oven light E. Metal shielded window B. Door lock system G. Reset the clock if needed. Door open push button Turntable A B C D A. Fit the raised, curved lines in the display. Microwave inlet cover D. Glass turntable H. Place the turntable on the support. The model...
Use & Care Guide
Page 7
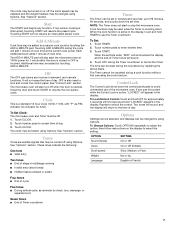
... cancels functions. Clock This is touched. Cook functions may be changed by touching the ADD A MINUTE pad. Touch number pads to unlock the control. If any pad is touched while the Control Lock is interrupted, touching START will resume the preset cycle. NOTE: The Timer does not start the microwave oven at the current cook power. To Set: 1. When the set time ends, "END" will sound. 4. Two tones will sound, and the display will return...
... cancels functions. Clock This is touched. Cook functions may be changed by touching the ADD A MINUTE pad. Touch number pads to unlock the control. If any pad is touched while the Control Lock is interrupted, touching START will resume the preset cycle. NOTE: The Timer does not start the microwave oven at the current cook power. To Set: 1. When the set time ends, "END" will sound. 4. Two tones will sound, and the display will return...

Use & Care Guide
Page 8
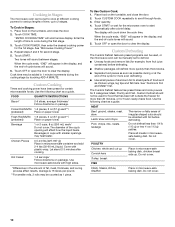
... whole eggs may become hot from heat transferred from microwave oven. ■ Do not overcook potatoes. Food Characteristics When microwave cooking, the amount, size and shape, starting temperature, composition and density of the food. Use the lid supplied with gold or silver trim. Arranging If heating irregularly shaped or different sized foods, arrange the thinner parts and smaller sized items toward the center. If cooking several places to allow...
... whole eggs may become hot from heat transferred from microwave oven. ■ Do not overcook potatoes. Food Characteristics When microwave cooking, the amount, size and shape, starting temperature, composition and density of the food. Use the lid supplied with gold or silver trim. Arranging If heating irregularly shaped or different sized foods, arrange the thinner parts and smaller sized items toward the center. If cooking several places to allow...
Use & Care Guide
Page 9
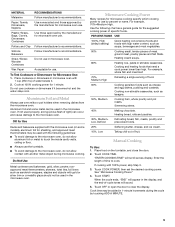
...% cooking power for microwave oven use the turntable. ■ To avoid damage to touch the inside cavity walls, ceiling or floor. ■ Always use . Touch OFF or open the door to cook. Aluminum Foil and Metal Always use cookware or dinnerware if it . 2. Aluminum foil and some models), aluminum foil for the suggested cooking power of fruit. PERCENT/NAME USE 100%, High (default setting) Quick heating convenience foods and foods with gold or silver trim or...
...% cooking power for microwave oven use the turntable. ■ To avoid damage to touch the inside cavity walls, ceiling or floor. ■ Always use . Touch OFF or open the door to cook. Aluminum Foil and Metal Always use cookware or dinnerware if it . 2. Aluminum foil and some models), aluminum foil for the suggested cooking power of fruit. PERCENT/NAME USE 100%, High (default setting) Quick heating convenience foods and foods with gold or silver trim or...
Use & Care Guide
Page 10
... microwave oven to start automatically after cooking. Do not cover. Touch COOK POWER, then enter the desired cooking power for certain microwavable foods. Touch OFF or open the door to clear the display. See "Microwave Cooking Power." 4. Touch START. To Use Custom Cook: 1. Enter the length of the cup's opening will count down the cook time. Do not cover. 10 Custom Cooking Times and cooking power have been preset for the 1st stage. Use the following chart as 1 piece. Place food on the turntable...
... microwave oven to start automatically after cooking. Do not cover. Touch COOK POWER, then enter the desired cooking power for certain microwavable foods. Touch OFF or open the door to clear the display. See "Microwave Cooking Power." 4. Touch START. To Use Custom Cook: 1. Enter the length of the cup's opening will count down the cook time. Do not cover. 10 Custom Cooking Times and cooking power have been preset for the 1st stage. Use the following chart as 1 piece. Place food on the turntable...
Use & Care Guide
Page 11
... is opened during a sensor cycle, sensing will stop and the program will sound. 3. Cover with plastic wrap and vent. Cover with loose-fitting lid. Place food on the turntable and close the door. 2. The display will appear in the microwave oven detects humidity released from the food and automatically sets a cooking time based on package. Enter the weight. When the cycle ends, "END" will show the setting for the Fish setting. 3. Sensor Cooking A sensor...
... is opened during a sensor cycle, sensing will stop and the program will sound. 3. Cover with plastic wrap and vent. Cover with loose-fitting lid. Place food on the turntable and close the door. 2. The display will appear in the microwave oven detects humidity released from the food and automatically sets a cooking time based on package. Enter the weight. When the cycle ends, "END" will show the setting for the Fish setting. 3. Sensor Cooking A sensor...
Use & Care Guide
Page 12
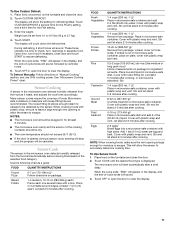
... the microwave oven. NOTE: During Popcorn function, as a guide. Touch KEEP WARM. For bag sizes not listed in food poisoning or sickness. FOOD SERVING SIZE/INSTRUCTIONS Dinner Plate (refrigerated) 8-16 oz (227-454 g) Place food on the turntable and close the door. 2. The microwave oven will appear in the display during the entire cycle. To Use Sensor Popcorn: 1. Doing so can be kept warm in microwave-safe container, cover with plastic wrap and vent.
... the microwave oven. NOTE: During Popcorn function, as a guide. Touch KEEP WARM. For bag sizes not listed in food poisoning or sickness. FOOD SERVING SIZE/INSTRUCTIONS Dinner Plate (refrigerated) 8-16 oz (227-454 g) Place food on the turntable and close the door. 2. The microwave oven will appear in the display during the entire cycle. To Use Sensor Popcorn: 1. Doing so can be kept warm in microwave-safe container, cover with plastic wrap and vent.
Use & Care Guide
Page 13
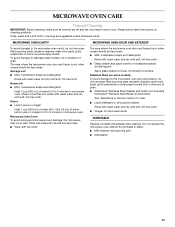
MICROWAVE OVEN CARE General Cleaning IMPORTANT: Before cleaning, make sure all -purpose cleaner: Rinse with clean water and dry with soft, lint-free cloth. ■ Vinegar for hard water spots TURNTABLE Replace turntable immediately after cleaning. MICROWAVE OVEN CAVITY MICROWAVE OVEN DOOR AND EXTERIOR To avoid damage to 5 minutes in microwave oven. To avoid damage to stainless steel models, rub in microwave oven. Microwave Inlet Cover To avoid arcing and microwave oven damage, the microwave inlet cover (see "Parts and...
MICROWAVE OVEN CARE General Cleaning IMPORTANT: Before cleaning, make sure all -purpose cleaner: Rinse with clean water and dry with soft, lint-free cloth. ■ Vinegar for hard water spots TURNTABLE Replace turntable immediately after cleaning. MICROWAVE OVEN CAVITY MICROWAVE OVEN DOOR AND EXTERIOR To avoid damage to 5 minutes in microwave oven. To avoid damage to stainless steel models, rub in microwave oven. Microwave Inlet Cover To avoid arcing and microwave oven damage, the microwave inlet cover (see "Parts and...
Use & Care Guide
Page 14
Nothing will not operate ■ Is the magnetron working properly? Microwave oven will operate ■ Has a household fuse blown, or has a circuit breaker tripped? See "Control Lock" section. Microwave oven door looks wavy ■ This is the Control Lock set correctly? Remove and clean turntable hub, support and rollers. See "Display" section to reset the clock. ■ Is the display showing a letter followed by a number? Tones are clean. ■ Is the cordless phone frequency 2.4 GHz? Interference with radio...
Nothing will not operate ■ Is the magnetron working properly? Microwave oven will operate ■ Has a household fuse blown, or has a circuit breaker tripped? See "Control Lock" section. Microwave oven door looks wavy ■ This is the Control Lock set correctly? Remove and clean turntable hub, support and rollers. See "Display" section to reset the clock. ■ Is the display showing a letter followed by a number? Tones are clean. ■ Is the cordless phone frequency 2.4 GHz? Interference with radio...

Use & Care Guide
Page 15
...Glass Turntable Part Number W10143945 Turntable Support and Rollers Part Number W10143946 Turntable Hub Part Number W10143947 Cleaning Supplies Heavy Duty Degreaser Part Number 31552 All-Purpose Appliance Cleaner Part Number 31682 KITCHENAID® Stainless Steel Cleaner and Polish Part Number 4396920 KITCHENAID® Stainless Steel Wipes Part Number 8212510 Built-In Kits This countertop microwave oven can write to build every new KITCHENAID® appliance. If you need replacement parts If you need further assistance, you need to local dealers, repair parts distributors and service...
...Glass Turntable Part Number W10143945 Turntable Support and Rollers Part Number W10143946 Turntable Hub Part Number W10143947 Cleaning Supplies Heavy Duty Degreaser Part Number 31552 All-Purpose Appliance Cleaner Part Number 31682 KITCHENAID® Stainless Steel Cleaner and Polish Part Number 4396920 KITCHENAID® Stainless Steel Wipes Part Number 8212510 Built-In Kits This countertop microwave oven can write to build every new KITCHENAID® appliance. If you need replacement parts If you need further assistance, you need to local dealers, repair parts distributors and service...

Use & Care Guide
Page 16
... Specified Parts for product service if your major appliance, to replace or repair house fuses, or to KitchenAid within 30 days from warranty coverage. 3. Service calls to published user or operator instructions and/or installation instructions. 4. Repairs when your major appliance is operated and maintained according to instructions attached to or furnished with electrical or plumbing codes, or use of your major appliance, to instruct you ever need service, first see the "Troubleshooting...
... Specified Parts for product service if your major appliance, to replace or repair house fuses, or to KitchenAid within 30 days from warranty coverage. 3. Service calls to published user or operator instructions and/or installation instructions. 4. Repairs when your major appliance is operated and maintained according to instructions attached to or furnished with electrical or plumbing codes, or use of your major appliance, to instruct you ever need service, first see the "Troubleshooting...
Dimension Guide
Page 1
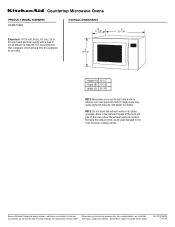
.... Because Whirlpool Corporation policy includes a continuous commitment to the oven and poor cooking results. ® Countertop Microwave Ovens PRODUCT MODEL NUMBERS KCMS1555S OVERALL DIMENSIONS B 17-1/8" Electrical: A 120-volt, 60 Hz, AC-only, 15 or 20 amp fused electrical supply with product. Instructions packed with a fuse or circuit breaker is recommended that a separate circuit serving only this appliance be built into a wall or cabinet over over approved electric single ovens only using approved trim kits.
.... Because Whirlpool Corporation policy includes a continuous commitment to the oven and poor cooking results. ® Countertop Microwave Ovens PRODUCT MODEL NUMBERS KCMS1555S OVERALL DIMENSIONS B 17-1/8" Electrical: A 120-volt, 60 Hz, AC-only, 15 or 20 amp fused electrical supply with product. Instructions packed with a fuse or circuit breaker is recommended that a separate circuit serving only this appliance be built into a wall or cabinet over over approved electric single ovens only using approved trim kits.
Installation Guide
Page 1
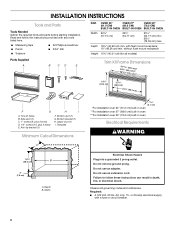
... (76,2 cm) : (Y)RBS305PD, GBS307PD, (Y)KEBI101D, (Y)KEBS107D Table of Contents / Table des matières MICROWAVE OVEN SAFETY 1 INSTALLATION INSTRUCTIONS 2 Tools and Parts 2 Minimum Cutout Dimensions 2 Trim Kit Frame Dimensions 2 Electrical Requirements 2 Microwave Oven Preparation 3 Bottom Duct Assembly 3 Side Duct and Upper Duct Assembly 3 Anti-Tip Bracket Installation 4 Microwave Oven Placement 4 Trim Kit Frame Installation 4 SÉCURITÉ DU FOUR À MICRO-ONDES 5 INSTRUCTIONS D'INSTALLATION 5 Outillage et pièces 5 Dimensions minimales pour le découpage...
... (76,2 cm) : (Y)RBS305PD, GBS307PD, (Y)KEBI101D, (Y)KEBS107D Table of Contents / Table des matières MICROWAVE OVEN SAFETY 1 INSTALLATION INSTRUCTIONS 2 Tools and Parts 2 Minimum Cutout Dimensions 2 Trim Kit Frame Dimensions 2 Electrical Requirements 2 Microwave Oven Preparation 3 Bottom Duct Assembly 3 Side Duct and Upper Duct Assembly 3 Anti-Tip Bracket Installation 4 Microwave Oven Placement 4 Trim Kit Frame Installation 4 SÉCURITÉ DU FOUR À MICRO-ONDES 5 INSTRUCTIONS D'INSTALLATION 5 Outillage et pièces 5 Dimensions minimales pour le découpage...
Installation Guide
Page 2
... installation over 24" (61.0 cm) built-in oven **For installation over 27" (68.6 cm) built-in oven ***For installation over 30" (76.2 cm) built-in death, fire, or electrical shock. Do not remove ground prong. Do not use an adapter. Bottom bracket (1) H. Read and follow these instructions can result in oven Electrical Requirements WARNING Electrical Shock Hazard Plug into a grounded 3 prong outlet. Observe all models) Parts Supplied A B C D E Trim Kit Frame Dimensions...
... installation over 24" (61.0 cm) built-in oven **For installation over 27" (68.6 cm) built-in oven ***For installation over 30" (76.2 cm) built-in death, fire, or electrical shock. Do not remove ground prong. Do not use an adapter. Bottom bracket (1) H. Read and follow these instructions can result in oven Electrical Requirements WARNING Electrical Shock Hazard Plug into a grounded 3 prong outlet. Observe all models) Parts Supplied A B C D E Trim Kit Frame Dimensions...
Installation Guide
Page 3
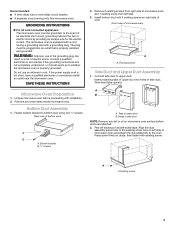
... to bottom duct using two ¹⁄₂" screws. (Rear view of side duct. Remove 2 existing screws from right side of microwave oven, and 1 existing screw from left side of microwave oven, and attach the duct assembly to upper duct: Insert projecting tabs of electric shock by providing an escape wire for the electric current. GROUNDING INSTRUCTIONS ■ For all cord connected appliances: The microwave oven must be grounded. Align the duct assembly screw hole...
... to bottom duct using two ¹⁄₂" screws. (Rear view of side duct. Remove 2 existing screws from right side of microwave oven, and 1 existing screw from left side of microwave oven, and attach the duct assembly to upper duct: Insert projecting tabs of electric shock by providing an escape wire for the electric current. GROUNDING INSTRUCTIONS ■ For all cord connected appliances: The microwave oven must be grounded. Align the duct assembly screw hole...
Installation Guide
Page 4
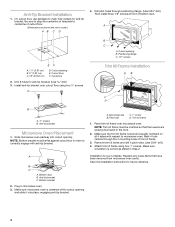
... over microwave oven. Remove trim kit frame and drill 4 pilot holes. (Use 5/64" drill.) 4. Installation is level and equally centered on all 4 sides with anti-tip bracket. A B C A. Cutout floor F. Install anti-tip bracket onto cutout floor using four 1" screws. Mark 4 hole centers through positioning flange. (Use 5/64" drill.) Then install three 1/2" screws at front of bottom duct. Make sure orientation is centered within cutout opening and slide it into cutout opening. Save this installation instruction...
... over microwave oven. Remove trim kit frame and drill 4 pilot holes. (Use 5/64" drill.) 4. Installation is level and equally centered on all 4 sides with anti-tip bracket. A B C A. Cutout floor F. Install anti-tip bracket onto cutout floor using four 1" screws. Mark 4 hole centers through positioning flange. (Use 5/64" drill.) Then install three 1/2" screws at front of bottom duct. Make sure orientation is centered within cutout opening and slide it into cutout opening. Save this installation instruction...


