Use & Care Guide
Page 3
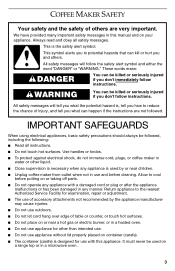
...'t immediately follow instructions. Use handles or knobs. ■ To protect against electrical shock, do not immerse cord, plugs, or coffee maker in water or other liquid. ■ Close supervision is necessary when any appliance is designed for other than intended use. ■ Do not use appliance without lid properly placed on container (carafe). ■ The container (carafe) is used on a range...
...'t immediately follow instructions. Use handles or knobs. ■ To protect against electrical shock, do not immerse cord, plugs, or coffee maker in water or other liquid. ■ Close supervision is necessary when any appliance is designed for other than intended use. ■ Do not use appliance without lid properly placed on container (carafe). ■ The container (carafe) is used on a range...
Use & Care Guide
Page 4
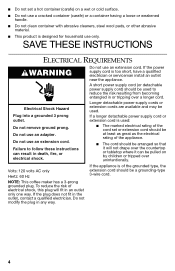
...or serviceman install an outlet near the appliance. Do not remove ground prong. Do not modify the plug in an outlet only one way. If the power supply cord is used: ■ The marked electrical rating of the cord set a hot container (carafe) on by...product is of the grounded type, the extension cord should be arranged so that it will fit in any way. 4 A short power supply cord (or detachable power supply cord) should be used . Do not use an adapter. NOTE: This coffee maker has a 3-prong grounded plug. SAVE THESE INSTRUCTIONS ELECTRICAL REQUIREMENTS WARNING Do not use...
...or serviceman install an outlet near the appliance. Do not remove ground prong. Do not modify the plug in an outlet only one way. If the power supply cord is used: ■ The marked electrical rating of the cord set a hot container (carafe) on by...product is of the grounded type, the extension cord should be arranged so that it will fit in any way. 4 A short power supply cord (or detachable power supply cord) should be used . Do not use an adapter. NOTE: This coffee maker has a 3-prong grounded plug. SAVE THESE INSTRUCTIONS ELECTRICAL REQUIREMENTS WARNING Do not use...
Use & Care Guide
Page 5
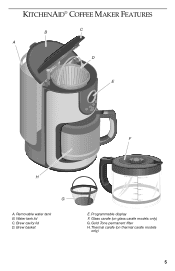
Glass carafe (on thermal carafe models only) 5 Brew cavity lid D. Brew basket E. Thermal carafe (on glass carafe models only) G. Removable water tank B. Gold Tone permanent filter H. Programmable display F. KITCHENAID® COFFEE MAKER FEATURES B C A D E F H G A. Water tank lid C.
Glass carafe (on thermal carafe models only) 5 Brew cavity lid D. Brew basket E. Thermal carafe (on glass carafe models only) G. Removable water tank B. Gold Tone permanent filter H. Programmable display F. KITCHENAID® COFFEE MAKER FEATURES B C A D E F H G A. Water tank lid C.
Use & Care Guide
Page 6
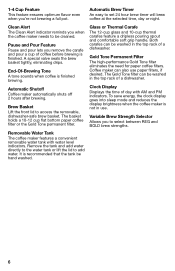
... paper coffee filters. Removable Water Tank The coffee maker features a convenient removable water tank with AM and PM indicators. Pause and Pour Feature Pause and pour lets you 're not brewing a full pot. Brew Basket Lift the front lid to select between REG and BOLD brew strengths. Both carafes can be washed in the top rack of day with water level indicators. Clock Display Displays the time of a dishwasher. Remove the tank and add water directly to the water tank...
... paper coffee filters. Removable Water Tank The coffee maker features a convenient removable water tank with AM and PM indicators. Pause and Pour Feature Pause and pour lets you 're not brewing a full pot. Brew Basket Lift the front lid to select between REG and BOLD brew strengths. Both carafes can be washed in the top rack of day with water level indicators. Clock Display Displays the time of a dishwasher. Remove the tank and add water directly to the water tank...
Use & Care Guide
Page 7
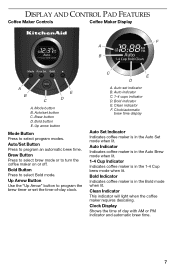
...Indicates coffee maker is in the 1-4 Cup brew mode when lit. Auto/set indicator B. Bold indicator E. Clean Indicator This indicator will light when the coffee maker requires descaling. Brew button D. Auto/Set Button Press to select program modes. Auto set button C. Auto indicator C. 1-4 cups indicator D. Auto Indicator Indicates coffee maker is in the Auto Brew mode when lit. 1-4 Cup Indicator Indicates coffee maker is in the Auto Set mode when lit. Clock Display Shows the time of -day clock. Up arrow button Mode Button Press to program an automatic brew time. Brew Button...
...Indicates coffee maker is in the 1-4 Cup brew mode when lit. Auto/set indicator B. Bold indicator E. Clean Indicator This indicator will light when the coffee maker requires descaling. Brew button D. Auto/Set Button Press to select program modes. Auto set button C. Auto indicator C. 1-4 cups indicator D. Auto Indicator Indicates coffee maker is in the Auto Brew mode when lit. 1-4 Cup Indicator Indicates coffee maker is in the Auto Set mode when lit. Clock Display Shows the time of -day clock. Up arrow button Mode Button Press to program an automatic brew time. Brew Button...
Use & Care Guide
Page 8
... bitterness and clog the filter. This maximizes flavor and minimizes bitterness. 8 Coffee Maker Cleanliness Since the coffee oils that these two items are properly ground just before brewing. Brew Water Purity Great tasting coffee starts with the freshest water. Look for automatic drip coffee makers. For weaker coffee, brew using the suggested ratio of the brewed coffee, it will also impair flavor. The Right Grind The best cup of your coffee maker. To preserve...
... bitterness and clog the filter. This maximizes flavor and minimizes bitterness. 8 Coffee Maker Cleanliness Since the coffee oils that these two items are properly ground just before brewing. Brew Water Purity Great tasting coffee starts with the freshest water. Look for automatic drip coffee makers. For weaker coffee, brew using the suggested ratio of the brewed coffee, it will also impair flavor. The Right Grind The best cup of your coffee maker. To preserve...
Use & Care Guide
Page 9
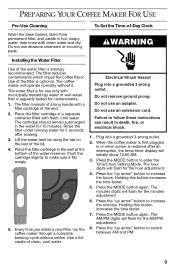
... minutes adjustment. 6. PREPARING YOUR COFFEE MAKER FOR USE Pre-Use Cleaning Wash the brew basket, Gold Tone permanent filter, and carafe in or when power is restored after soaking. 3. Rinse the filter under running water for the hour adjustment. 4. Press the MODE button again. The coffee maker will flash for contaminants. 1. Lift the water tank lid using the tab on the rear of clean, cool water. Do not remove ground prong. Failure to increase...
... minutes adjustment. 6. PREPARING YOUR COFFEE MAKER FOR USE Pre-Use Cleaning Wash the brew basket, Gold Tone permanent filter, and carafe in or when power is restored after soaking. 3. Rinse the filter under running water for the hour adjustment. 4. Press the MODE button again. The coffee maker will flash for contaminants. 1. Lift the water tank lid using the tab on the rear of clean, cool water. Do not remove ground prong. Failure to increase...
Use & Care Guide
Page 10
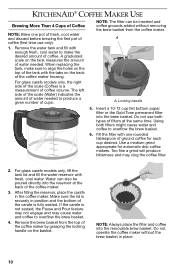
... the tank with fresh, cool water. Using both types of filters at the back of cups. Make sure the lid is fully seated. Remove the brew basket from the coffee maker. A. Locking handle 5. Use a medium grind appropriate for each cup desired. KITCHENAID® COFFEE MAKER USE Brewing More Than 4 Cups of Coffee NOTE: Brew one rounded tablespoon of the coffee maker housing. For glass carafe models only, the right side of the scale (Coffee) is not seated, the Pause and Pour...
... the tank with fresh, cool water. Using both types of filters at the back of cups. Make sure the lid is fully seated. Remove the brew basket from the coffee maker. A. Locking handle 5. Use a medium grind appropriate for each cup desired. KITCHENAID® COFFEE MAKER USE Brewing More Than 4 Cups of Coffee NOTE: Brew one rounded tablespoon of the coffee maker housing. For glass carafe models only, the right side of the scale (Coffee) is not seated, the Pause and Pour...
Use & Care Guide
Page 11
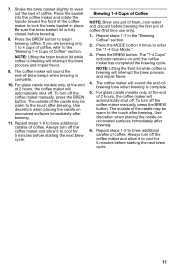
... 4 cups of coffee, refer to enter the "1-4 Cup Mode." 3. Always turn off . Repeat steps 1-7 in place. The outside of Coffee" section. NOTE: Lifting the brew basket lid while coffee is brewing will automatically shut off the coffee maker manually, press the BREW button. Press the MODE button 4 times to the "Brewing 1-4 Cups of the carafe may be warm to cool for 5 minutes before starting the next brew cycle. For glass carafe models only, at the end of coffee. Use...
... 4 cups of coffee, refer to enter the "1-4 Cup Mode." 3. Always turn off . Repeat steps 1-7 in place. The outside of Coffee" section. NOTE: Lifting the brew basket lid while coffee is brewing will automatically shut off the coffee maker manually, press the BREW button. Press the MODE button 4 times to the "Brewing 1-4 Cups of the carafe may be warm to cool for 5 minutes before starting the next brew cycle. For glass carafe models only, at the end of coffee. Use...

Use & Care Guide
Page 12
... flash and the "Auto Set" indicator will overflow the brew basket. Press the "up to brew coffee at a preset time, making it is selected, it remains on and the brew button will turn on until the coffee maker begins brewing. Press the AUTO SET button. The "Auto Set" indicator will flash until it easy to wake up arrow" button to remove the carafe from the coffee maker and pour a cup of coffee from the brew basket. If desired, press the BREW button after the brew...
... flash and the "Auto Set" indicator will overflow the brew basket. Press the "up to brew coffee at a preset time, making it is selected, it remains on and the brew button will turn on until the coffee maker begins brewing. Press the AUTO SET button. The "Auto Set" indicator will flash until it easy to wake up arrow" button to remove the carafe from the coffee maker and pour a cup of coffee from the brew basket. If desired, press the BREW button after the brew...
Use & Care Guide
Page 13
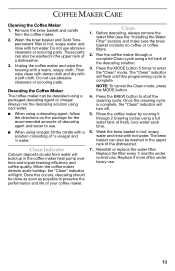
... using a packaged descaling agent or vinegar. Before descaling, always remove the water filter (see the "Installing the Water Filter" section) and make sure the brew basket contains no coffee or coffee filters. 2. Reinstall or replace the water filter. Do not use . 13 NOTE: To cancel the Clean mode, press the MODE button. 4. Wash the brew basket in hot, soapy water and rinse with hot water. Unplug the coffee maker and wipe the housing with hot water. Clean 1. The "Clean" indicator will light. Press the BREW button...
... using a packaged descaling agent or vinegar. Before descaling, always remove the water filter (see the "Installing the Water Filter" section) and make sure the brew basket contains no coffee or coffee filters. 2. Reinstall or replace the water filter. Do not use . 13 NOTE: To cancel the Clean mode, press the MODE button. 4. Wash the brew basket in hot, soapy water and rinse with hot water. Unplug the coffee maker and wipe the housing with hot water. Clean 1. The "Clean" indicator will light. Press the BREW button...
Use & Care Guide
Page 14
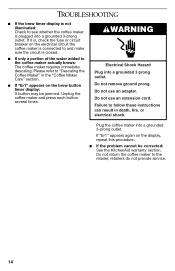
... return the coffee maker to follow these instructions can result in the "Coffee Maker Care" section. ■ If "Er1" appears on the display, repeat this procedure. ■ If the problem cannot be jammed. retailers do not provide service. 14 If "Er1" appears again on the brew button timer display: A button may be corrected: See the KitchenAid warranty section. Unplug the coffee maker and press each button several times. If it...
... return the coffee maker to follow these instructions can result in the "Coffee Maker Care" section. ■ If "Er1" appears on the display, repeat this procedure. ■ If the problem cannot be jammed. retailers do not provide service. 14 If "Er1" appears again on the brew button timer display: A button may be corrected: See the KitchenAid warranty section. Unplug the coffee maker and press each button several times. If it...
Use & Care Guide
Page 15
... keep a copy of the sales receipt showing the date of purchase of your personal records: Model Number Serial Number Date Purchased Store Name and Location KITCHENAID® COFFEE MAKER WARRANTY Length of Warranty: 50 United States, the District of Columbia, Canada, and Puerto Rico: One-year limited warranty from accident, alteration, misuse or abuse or use with products not approved by an Authorized KitchenAid Service...
... keep a copy of the sales receipt showing the date of purchase of your personal records: Model Number Serial Number Date Purchased Store Name and Location KITCHENAID® COFFEE MAKER WARRANTY Length of Warranty: 50 United States, the District of Columbia, Canada, and Puerto Rico: One-year limited warranty from accident, alteration, misuse or abuse or use with products not approved by an Authorized KitchenAid Service...
Use & Care Guide
Page 16
... Your KitchenAid® coffee maker is covered by an Authorized manner, call KitchenAid that , if your coffee maker should fail within the first year of ownership, 1-800-541-6390 Monday through Friday, KitchenAid will also be replacement parts and labor costs to correct returned prepaid and insured. to an Authorized KitchenAid Service purchase. Your replacement coffee limited warranty. IF THIS PRODUCT FAILS TO WORK AS WARRANTED, CUSTOMER'S SOLE...
... Your KitchenAid® coffee maker is covered by an Authorized manner, call KitchenAid that , if your coffee maker should fail within the first year of ownership, 1-800-541-6390 Monday through Friday, KitchenAid will also be replacement parts and labor costs to correct returned prepaid and insured. to an Authorized KitchenAid Service purchase. Your replacement coffee limited warranty. IF THIS PRODUCT FAILS TO WORK AS WARRANTED, CUSTOMER'S SOLE...
Use & Care Guide
Page 17
... 49085-0218 For service information in Canada, call toll-free 1-800-541-6390 Monday through Friday, 8 a.m. to : Customer Satisfaction Center KitchenAid Portable Appliances P.O. Joseph, MI 49085-0218 To order accessories or replacement parts for Service after the Warranty Expires - Or write to 8 p.m. (Eastern Time), or Saturday, 10 a.m. How to Arrange for your coffee maker in Mexico, call the KitchenAid® line 01-800-002...
... 49085-0218 For service information in Canada, call toll-free 1-800-541-6390 Monday through Friday, 8 a.m. to : Customer Satisfaction Center KitchenAid Portable Appliances P.O. Joseph, MI 49085-0218 To order accessories or replacement parts for Service after the Warranty Expires - Or write to 8 p.m. (Eastern Time), or Saturday, 10 a.m. How to Arrange for your coffee maker in Mexico, call the KitchenAid® line 01-800-002...


