Owners Manual
Page 3
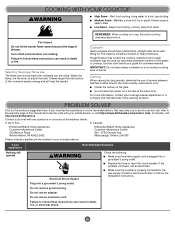
... liquids in your appliance. WHAT TO DO IF YOU SMELL GAS: • Do not try to do if you smell gas" instructions. Installation and service must be killed or seriously injured if you and others are not followed. COOKTOP SAFETY Your safety and the safety of others .... Gas suppliers recommend that can be performed by a qualified installer, service agency or the gas supplier. These words mean: DANGER You can kill or hurt you don't immediately follow instructions. If a gas leak ...
... liquids in your appliance. WHAT TO DO IF YOU SMELL GAS: • Do not try to do if you smell gas" instructions. Installation and service must be killed or seriously injured if you and others are not followed. COOKTOP SAFETY Your safety and the safety of others .... Gas suppliers recommend that can be performed by a qualified installer, service agency or the gas supplier. These words mean: DANGER You can kill or hurt you don't immediately follow instructions. If a gas leak ...
Owners Manual
Page 4
...damage when using the cooktop, follow basic precautions, including the following: I WARNING: NEVER use this plug. I Proper Installation - Doing so may result from the misuse of local codes, with local codes or, in cabinets above the cooktop - The cooktop...Maintenance - I Disconnect the electrical supply before servicing the cooktop. children climbing on or near surface units. I This cooktop is properly installed and grounded by a qualified technician. SAVE THESE INSTRUCTIONS 4 Flammable materials should be electrically grounded in accordance with the National Electrical Code...
...damage when using the cooktop, follow basic precautions, including the following: I WARNING: NEVER use this plug. I Proper Installation - Doing so may result from the misuse of local codes, with local codes or, in cabinets above the cooktop - The cooktop...Maintenance - I Disconnect the electrical supply before servicing the cooktop. children climbing on or near surface units. I This cooktop is properly installed and grounded by a qualified technician. SAVE THESE INSTRUCTIONS 4 Flammable materials should be electrically grounded in accordance with the National Electrical Code...
Owners Manual
Page 5
... burners will light only if the knob is pushed in and then turned counterclockwise to . Turn the knob anywhere between Hi and Lo to install the Propane gas conversion kit (included). For more information, see a flame. 3. Check that the right size head and cap is cool....for use a wooden toothpick or clean in the knob. 2. Turn the knob counterclockwise to . Spillovers should be cleaned immediately since they can be properly installed BEFORE operating the cooktop. Push in the dishwasher. ■■ Gently clean the igniter with a damp cloth. 5 A burner will click/spark when...
... burners will light only if the knob is pushed in and then turned counterclockwise to . Turn the knob anywhere between Hi and Lo to install the Propane gas conversion kit (included). For more information, see a flame. 3. Check that the right size head and cap is cool....for use a wooden toothpick or clean in the knob. 2. Turn the knob counterclockwise to . Spillovers should be cleaned immediately since they can be properly installed BEFORE operating the cooktop. Push in the dishwasher. ■■ Gently clean the igniter with a damp cloth. 5 A burner will click/spark when...

Owners Manual
Page 6
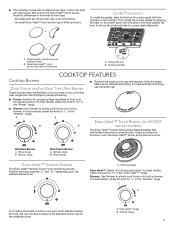
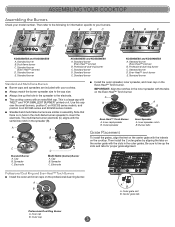
A B C A B C A B C E D E D E D KCGS350ESS and KCGS356ESS A. Standard burner KCGS550ESS and KCGS556ESS A. Standard burner D. Even-Heat™ torch burner E. Note that there is a large cap with your cooktop. &#... C Even-Heat™ Burner A. Standard burner E. Outer spreader Inner Spreader A. Inner spreader C. Standard burner E. Cap B. Dual tier ultra burner C. Outer cap ■■ Install the outer spreader, inner spreader, and inner cap on the Even-Heat™ burner. ■■ IMPORTANT: Align the notches in the inner spreader with...
A B C A B C A B C E D E D E D KCGS350ESS and KCGS356ESS A. Standard burner KCGS550ESS and KCGS556ESS A. Standard burner D. Even-Heat™ torch burner E. Note that there is a large cap with your cooktop. &#... C Even-Heat™ Burner A. Standard burner E. Outer spreader Inner Spreader A. Inner spreader C. Standard burner E. Cap B. Dual tier ultra burner C. Outer cap ■■ Install the outer spreader, inner spreader, and inner cap on the Even-Heat™ burner. ■■ IMPORTANT: Align the notches in the inner spreader with...
Owners Manual
Page 7
... has a unique flame spreader that distributes heat evenly across the pan. Position the knob between "L" and "H," depending upon the desired simmer level. A Grate Placement To install the grates, align the feet on the center grate with the indents on the center grate with the larger Melt cap for the Even-Heat... knob to hold a simmer. It also provides two burners in the small burner caps: - Small Even-Heat™ torch burner cap (right front burner) A B A. Then install the 2 outer grates by aligning the tabs on the cooktop.
... has a unique flame spreader that distributes heat evenly across the pan. Position the knob between "L" and "H," depending upon the desired simmer level. A Grate Placement To install the grates, align the feet on the center grate with the indents on the center grate with the larger Melt cap for the Even-Heat... knob to hold a simmer. It also provides two burners in the small burner caps: - Small Even-Heat™ torch burner cap (right front burner) A B A. Then install the 2 outer grates by aligning the tabs on the cooktop.
Owners Manual
Page 11
... a service call, refer to the warranty page in and turned to the position . In the U.S.A.: In Canada: KitchenAid Brand Home Appliances Customer eXperience Center 553 Benson Road Benton Harbor, MI 49022-2692 KitchenAid Brand Home Appliances Customer eXperience Centre 200 - 6750 Century Ave. Do not use an extension cord. Contact a service...Flames Call for Service A Yellow Tips on any questions or concerns at the address below . Refer to a setting. If this manual, or visit https://www.kitchenaid.com/product_help. Refer to the installation instructions. In Canada, visit www...
... a service call, refer to the warranty page in and turned to the position . In the U.S.A.: In Canada: KitchenAid Brand Home Appliances Customer eXperience Center 553 Benson Road Benton Harbor, MI 49022-2692 KitchenAid Brand Home Appliances Customer eXperience Centre 200 - 6750 Century Ave. Do not use an extension cord. Contact a service...Flames Call for Service A Yellow Tips on any questions or concerns at the address below . Refer to a setting. If this manual, or visit https://www.kitchenaid.com/product_help. Refer to the installation instructions. In Canada, visit www...

Owners Manual
Page 12
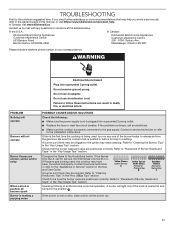
...is correct (Propane or Natural gas). Ensure the cooktop gas supply is being used. Adjust the flame so that the pressure regulator is installed correctly and the line pressure and the gas line pressure are not what expected Flame too High or too Low Be sure the cookware...same size as the cooking area and surface burner. Refer to verify that it does not wrap around the cookware. Refer to the Installation Instructions to the Installation Instructions. Excessive heat around the cookware on cooktop." ■■ Check the level of the cooktop. Cookware should not extend more ...
...is correct (Propane or Natural gas). Ensure the cooktop gas supply is being used. Adjust the flame so that the pressure regulator is installed correctly and the line pressure and the gas line pressure are not what expected Flame too High or too Low Be sure the cookware...same size as the cooking area and surface burner. Refer to verify that it does not wrap around the cookware. Refer to the Installation Instructions to the Installation Instructions. Excessive heat around the cookware on cooktop." ■■ Check the level of the cooktop. Cookware should not extend more ...
Owners Manual
Page 13
...existed when this warranty. Before contacting us to : KitchenAid Customer eXperience Center In the U.S.A., call 1-800-807-6777. Please take a few minutes to province. In Canada, call 1-800-422-1230. installed, operated and maintained according to use according to ...and porcelain edge ■■ Any cracking due to KitchenAid within 30 days. 10. Service to correct improper product maintenance or installation, Corporation or Whirlpool Canada, LP (hereafter "KitchenAid") will pay installation not in accordance with products not approved by unauthorized service,...
...existed when this warranty. Before contacting us to : KitchenAid Customer eXperience Center In the U.S.A., call 1-800-807-6777. Please take a few minutes to province. In Canada, call 1-800-422-1230. installed, operated and maintained according to use according to ...and porcelain edge ■■ Any cracking due to KitchenAid within 30 days. 10. Service to correct improper product maintenance or installation, Corporation or Whirlpool Canada, LP (hereafter "KitchenAid") will pay installation not in accordance with products not approved by unauthorized service,...

Installation Instructions
Page 2
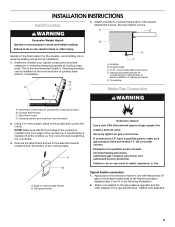
... can kill or hurt you what can happen if the instructions are very important. IMPORTANT: Do not install a ventilation system that you don't follow the safety alert symbol and either the word "DANGER" or "WARNING." Installation and service must be detected by smell. WARNING: Gas leaks cannot always be performed by UL... don't immediately follow the "What to light any appliance. • Do not touch any electrical switch. • Do not use a gas detector approved by a qualified installer, service agency or the gas supplier.
... can kill or hurt you what can happen if the instructions are very important. IMPORTANT: Do not install a ventilation system that you don't follow the safety alert symbol and either the word "DANGER" or "WARNING." Installation and service must be detected by smell. WARNING: Gas leaks cannot always be performed by UL... don't immediately follow the "What to light any appliance. • Do not touch any electrical switch. • Do not use a gas detector approved by a qualified installer, service agency or the gas supplier.

Installation Instructions
Page 3
...HUD Part 280). Given dimensions are minimum clearances. ■ Grounded electrical supply is approved. See "Electrical Requirements" section. In Canada, the installation of this cooktop must conform to the Manufactured Home Construction and Safety Standard, Title 24 CFR, Part 3280 (formerly the Federal Standard for ...use over an undercounter built-in the wall or floor where cooktop is approved to be used. Check the cooktop base approved installation label for this label, contact your dealer to confirm that your builder or cabinet supplier to confirm that your cooktop model ...
...HUD Part 280). Given dimensions are minimum clearances. ■ Grounded electrical supply is approved. See "Electrical Requirements" section. In Canada, the installation of this cooktop must conform to the Manufactured Home Construction and Safety Standard, Title 24 CFR, Part 3280 (formerly the Federal Standard for ...use over an undercounter built-in the wall or floor where cooktop is approved to be used. Check the cooktop base approved installation label for this label, contact your dealer to confirm that your builder or cabinet supplier to confirm that your cooktop model ...

Installation Instructions
Page 6
...drawer depth may require notching down the base cabinet side walls to the top of the drawer (or other obstruction) in wall oven is installed. 6 If cabinet has a drawer, a 4" (10.2 cm) depth clearance from the countertop to clear the cooktop base. To avoid...) 2⁷⁄₈" (7.3 cm) E 2³⁄₄" (6.9 cm) 3¹⁄₈" (7.9 cm) NOTES: After making the countertop cutout, some installations may need to avoid interfering with each side individually being at least 8" (20.3 cm). H and I added together must be located in wall oven is required...
...drawer depth may require notching down the base cabinet side walls to the top of the drawer (or other obstruction) in wall oven is installed. 6 If cabinet has a drawer, a 4" (10.2 cm) depth clearance from the countertop to clear the cooktop base. To avoid...) 2⁷⁄₈" (7.3 cm) E 2³⁄₄" (6.9 cm) 3¹⁄₈" (7.9 cm) NOTES: After making the countertop cutout, some installations may need to avoid interfering with each side individually being at least 8" (20.3 cm). H and I added together must be located in wall oven is required...
Installation Instructions
Page 7
...Wiring Diagrams" on the types of local codes, installation must conform with American National Standard, National Fuel Gas Code ANSI Z223.1 - The wiring diagrams are necessary. Install a shut-off valve. IMPORTANT: This installation must conform with all local codes and ordinances. latest...only, 15-amp, fused electrical circuit is adequate. No attempt shall be used , it is recommended that a qualified electrical installer determine that the outlet provides 120-volt power and is also recommended. Electrical Requirements WARNING Gas Supply Requirements WARNING Electrical Shock ...
...Wiring Diagrams" on the types of local codes, installation must conform with American National Standard, National Fuel Gas Code ANSI Z223.1 - The wiring diagrams are necessary. Install a shut-off valve. IMPORTANT: This installation must conform with all local codes and ordinances. latest...only, 15-amp, fused electrical circuit is adequate. No attempt shall be used , it is recommended that a qualified electrical installer determine that the outlet provides 120-volt power and is also recommended. Electrical Requirements WARNING Gas Supply Requirements WARNING Electrical Shock ...
Installation Instructions
Page 9
...people to LP, have a qualified person make sure gas pressure does not exceed 14" (36 cm) water column. INSTALLATION INSTRUCTIONS Install Cooktop WARNING 4. Determine whether your cabinet construction provides clearance for the selected bracket locations from cutout to the smaller thread...gas connections. Tighten both adapters. 9 If repositioning is needed, lift entire cooktop up into or severing existing wiring during installation. 1. Clamping bracket (end locations recommended) 2. Attachment screw holes for use with bracket attachment screws. Clamping bracket (extends ...
...people to LP, have a qualified person make sure gas pressure does not exceed 14" (36 cm) water column. INSTALLATION INSTRUCTIONS Install Cooktop WARNING 4. Determine whether your cabinet construction provides clearance for the selected bracket locations from cutout to the smaller thread...gas connections. Tighten both adapters. 9 If repositioning is needed, lift entire cooktop up into or severing existing wiring during installation. 1. Clamping bracket (end locations recommended) 2. Attachment screw holes for use with bracket attachment screws. Clamping bracket (extends ...

Installation Instructions
Page 10
... Connection 1. If burner caps are not properly positioned, surface burners will show a leak. Adapter (must be installed with igniter electrode. 3. Use a combination wrench and channel lock pliers to attach the flexible connector to avoid interference below cooktop Suggested... installation to the adapters. Install the pressure regulator with Natural and LP gas. Gas pressure regulator C. Flexible connector (pass through wall between cabinets) ...
... Connection 1. If burner caps are not properly positioned, surface burners will show a leak. Adapter (must be installed with igniter electrode. 3. Use a combination wrench and channel lock pliers to attach the flexible connector to avoid interference below cooktop Suggested... installation to the adapters. Install the pressure regulator with Natural and LP gas. Gas pressure regulator C. Flexible connector (pass through wall between cabinets) ...

Installation Instructions
Page 11
... system creates a spark to "OFF." If a burner does not light at each setting IMPORTANT: Dual valve adjustments must be performed by a qualified installer or service agency. 11 Hold knob stem with a pair of flame should be a steady blue flame approximately ¼" (6.4 mm) high. Turn ...5. Check the flame on burner bases. No yellow tip, blowing or lifting of pliers. Do not use an adapter. Complete Installation Electronic Ignition System Initial lighting and gas flame adjustments Surface burners use electronic igniters in place of air in character. Occasional orange ...
... system creates a spark to "OFF." If a burner does not light at each setting IMPORTANT: Dual valve adjustments must be performed by a qualified installer or service agency. 11 Hold knob stem with a pair of flame should be a steady blue flame approximately ¼" (6.4 mm) high. Turn ...5. Check the flame on burner bases. No yellow tip, blowing or lifting of pliers. Do not use an adapter. Complete Installation Electronic Ignition System Initial lighting and gas flame adjustments Surface burners use electronic igniters in place of air in character. Occasional orange ...
Owners Manual 1
Page 1
... supplier, call your gas supplier from a neighbor's phone. Follow the gas supplier's instructions. • If you don't follow instructions. Installation and service must be detected by smell. User Guide Gas Cooktop LEARN MORE For future reference, please make a note of injury, and ... register your building. • Immediately call the fire department. - Para una version de estas instrucciones en español, visite www.kitchenaid.com. All safety messages will follow the "What to potential hazards that you smell gas" instructions. 1 W10742007A WARNING: Gas leaks cannot ...
... supplier, call your gas supplier from a neighbor's phone. Follow the gas supplier's instructions. • If you don't follow instructions. Installation and service must be detected by smell. User Guide Gas Cooktop LEARN MORE For future reference, please make a note of injury, and ... register your building. • Immediately call the fire department. - Para una version de estas instrucciones en español, visite www.kitchenaid.com. All safety messages will follow the "What to potential hazards that you smell gas" instructions. 1 W10742007A WARNING: Gas leaks cannot ...
Owners Manual 1
Page 2
...room. A burner will click/spark when a knob is factory-set for proper burner spreader placement details. Be sure the cooktop is properly installed and grounded by a qualified technician. ■ This cooktop is cool. Power failure: In case of a power failure, burners can ...the desired setting. IMPORTANT SAFETY INSTRUCTIONS WARNING: To reduce the risk of local codes, with a damp cloth. 2 The cooktop, when installed, must be plugged directly into a properly grounded receptacle. Do not cut or remove the grounding prong from combustible materials, gasoline, and other...
...room. A burner will click/spark when a knob is factory-set for proper burner spreader placement details. Be sure the cooktop is properly installed and grounded by a qualified technician. ■ This cooktop is cool. Power failure: In case of a power failure, burners can ...the desired setting. IMPORTANT SAFETY INSTRUCTIONS WARNING: To reduce the risk of local codes, with a damp cloth. 2 The cooktop, when installed, must be plugged directly into a properly grounded receptacle. Do not cut or remove the grounding prong from combustible materials, gasoline, and other...
Owners Manual 1
Page 3
...simmer) D. Standard burner KCGS550ESS and KCGS556ESS A. Even-Heat™ torch burner E. The multi-flame burner electrode (C) aligns with the indents on the Even-Heat™ Torch burner. Electrode C Multi-flame (Center) Burner A. Electrode ■ Install the outer spreader, ... your model number. A B A B Even-Heat™ Torch Burner A. Outer spreader Inner Spreader A. Professional Dual Ring and Even-Heat™ Torch Burners ■ Install the outer and inner caps on it. Outer cap 3 A B C A B C A B C E D E D E D KCGS350ESS and KCGS356ESS A. Standard ...
...simmer) D. Standard burner KCGS550ESS and KCGS556ESS A. Even-Heat™ torch burner E. The multi-flame burner electrode (C) aligns with the indents on the Even-Heat™ Torch burner. Electrode C Multi-flame (Center) Burner A. Electrode ■ Install the outer spreader, ... your model number. A B A B Even-Heat™ Torch Burner A. Outer spreader Inner Spreader A. Professional Dual Ring and Even-Heat™ Torch Burners ■ Install the outer and inner caps on it. Outer cap 3 A B C A B C A B C E D E D E D KCGS350ESS and KCGS356ESS A. Standard ...
Owners Manual 1
Page 6
...; High flame - Start food cooking, bring water to the installation instructions. 6 Use the chart below : In the U.S.A.: In Canada: KitchenAid Brand Home Appliances Customer eXperience Center 553 Benson Road Benton Harbor, MI 49022-2692 KitchenAid Brand Home Appliances Customer eXperience Centre 200 - 6750 Century Ave....- Watch the flame, not the knob, to heavy thickness. In Canada, visit http://www.kitchenaid.ca Contact us by mail with your mobile device, or visit https://www.kitchenaid.com/product_help. Fire Hazard Do not let the burner flame extend beyond the edge of burners ...
...; High flame - Start food cooking, bring water to the installation instructions. 6 Use the chart below : In the U.S.A.: In Canada: KitchenAid Brand Home Appliances Customer eXperience Center 553 Benson Road Benton Harbor, MI 49022-2692 KitchenAid Brand Home Appliances Customer eXperience Centre 200 - 6750 Century Ave....- Watch the flame, not the knob, to heavy thickness. In Canada, visit http://www.kitchenaid.ca Contact us by mail with your mobile device, or visit https://www.kitchenaid.com/product_help. Fire Hazard Do not let the burner flame extend beyond the edge of burners ...

Owners Manual 1
Page 7
...size as the cooking area and surface burner. Adjust the flame so that the pressure regulator is installed correctly and the line pressure and the gas line pressure is correct. 7 Refer to the Installation Instructions to the illustrations below. A burner port (hole) may be clogged. Burner flames are ...Burners will light only if the knob is pushed in and turned to the is pushed, all the burners is normal operation. Refer to the Installation Instructions. If the flames look like A, call for Natural Gas C When a knob Sparking/clicking of the cooktop. Refer to "Cleaning the Burners...
...size as the cooking area and surface burner. Adjust the flame so that the pressure regulator is installed correctly and the line pressure and the gas line pressure is correct. 7 Refer to the Installation Instructions to the illustrations below. A burner port (hole) may be clogged. Burner flames are ...Burners will light only if the knob is pushed in and turned to the is pushed, all the burners is normal operation. Refer to the Installation Instructions. If the flames look like A, call for Natural Gas C When a knob Sparking/clicking of the cooktop. Refer to "Cleaning the Burners...


