Owners Manual
Page 2
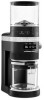
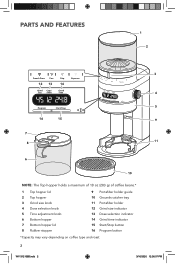
... Drip Espresso 12 13 14 Grind Cups/ Grind Size Shots Time 4 Program Start/Stop 5 16 15 9 7 8 11 6 10 NOTE: The Top hopper holds a maximum of 10 oz (283 g) of coffee beans.* 1 Top hopper lid 2 Top hopper 3 Grind size knob 4 Dose selection knob 5 Time adjustment knob 6 Bottom hopper 7 Bottom hopper lid 8 Rubber stopper 9 Portafilter holder guide 10 Grounds catcher tray...
... Drip Espresso 12 13 14 Grind Cups/ Grind Size Shots Time 4 Program Start/Stop 5 16 15 9 7 8 11 6 10 NOTE: The Top hopper holds a maximum of 10 oz (283 g) of coffee beans.* 1 Top hopper lid 2 Top hopper 3 Grind size knob 4 Dose selection knob 5 Time adjustment knob 6 Bottom hopper 7 Bottom hopper lid 8 Rubber stopper 9 Portafilter holder guide 10 Grounds catcher tray...

Owners Manual
Page 3
.... 9. Check the Top hopper for examination, repair or electrical or mechanical adjustment. 3. Do not use of electrical shock, do not play with the appliance. 8. SAVE THESE INSTRUCTIONS This product is used by the manufacturer may ...parts. 10. Close supervision is necessary when any manner. PRODUCT SAFETY ENGLISH IMPORTANT SAFEGUARDS Before using . 5. Do not let cord hang over edge of experience and knowledge, unless they do not put the Coffee Grinder in any appliance is designed for their safety. Children should always be supervised to the nearest authorized service...
.... 9. Check the Top hopper for examination, repair or electrical or mechanical adjustment. 3. Do not use of electrical shock, do not play with the appliance. 8. SAVE THESE INSTRUCTIONS This product is used by the manufacturer may ...parts. 10. Close supervision is necessary when any manner. PRODUCT SAFETY ENGLISH IMPORTANT SAFEGUARDS Before using . 5. Do not let cord hang over edge of experience and knowledge, unless they do not put the Coffee Grinder in any appliance is designed for their safety. Children should always be supervised to the nearest authorized service...
Owners Manual
Page 4
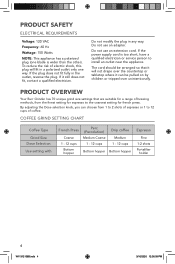
... outlet only one blade is too short, have a qualified electrician or service person to install an outlet near the appliance. Do not use an adapter. If the power supply cord is wider than the other). COFFEE GRIND SETTING CHART Coffee Type Grind Size Dose Selection Use setting with French Press Coarse 1 - 12 cups Bottom hopper Perc...: 120 VAC Frequency: 60 Hz Wattage: 150 Watts NOTE: This appliance has a polarized plug (one way. PRODUCT OVERVIEW Your Burr Grinder has 70 unique grind size settings that it still does not fit, contact a qualified electrician. To reduce the risk of...
... outlet only one blade is too short, have a qualified electrician or service person to install an outlet near the appliance. Do not use an adapter. If the power supply cord is wider than the other). COFFEE GRIND SETTING CHART Coffee Type Grind Size Dose Selection Use setting with French Press Coarse 1 - 12 cups Bottom hopper Perc...: 120 VAC Frequency: 60 Hz Wattage: 150 Watts NOTE: This appliance has a polarized plug (one way. PRODUCT OVERVIEW Your Burr Grinder has 70 unique grind size settings that it still does not fit, contact a qualified electrician. To reduce the risk of...

Owners Manual
Page 5
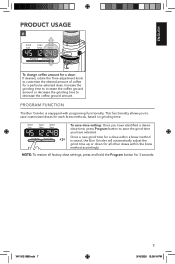
...Top hopper until it clicks into Portafilter holder guide. Place the Top hopper lid onto the Top hopper. Insert Portafilter holder into place. ENGLISH PRODUCT ASSEMBLY First, clean all parts and accessories. (See "Care and Cleaning" section). For grinding into the Portafilter: If using a standard ...slide the Bottom hopper into position. 3 4 For grinding into the middle guides of the Portafilter holder. Add whole coffee beans. W11312158B.indb 5 5 3/16/2020 12:36:12 PM Replace the Grounds catcher tray. 5 For grinding into the Portafilter: If using a commercial Portafilter (...
...Top hopper until it clicks into Portafilter holder guide. Place the Top hopper lid onto the Top hopper. Insert Portafilter holder into place. ENGLISH PRODUCT ASSEMBLY First, clean all parts and accessories. (See "Care and Cleaning" section). For grinding into the Portafilter: If using a standard ...slide the Bottom hopper into position. 3 4 For grinding into the middle guides of the Portafilter holder. Add whole coffee beans. W11312158B.indb 5 5 3/16/2020 12:36:12 PM Replace the Grounds catcher tray. 5 For grinding into the Portafilter: If using a commercial Portafilter (...

Owners Manual
Page 6
... size to begin grinding. Espresso: Select between 1 - 2 shots. 4 Grind Size Cups/ Shots Grind Time Program Start/Stop Program Start/Stop To start grinding: Press Start/Stop to remove any coffee grounds caught between 1 - 12 cups. TIP: If Grind size knob is fine). 3 Grind Size Cups/ Shots Grind Time Select Coffee Dose: Rotate the Dose selection knob for the number of cups or shots. NOTE: Grinder can remain...
... size to begin grinding. Espresso: Select between 1 - 2 shots. 4 Grind Size Cups/ Shots Grind Time Program Start/Stop Program Start/Stop To start grinding: Press Start/Stop to remove any coffee grounds caught between 1 - 12 cups. TIP: If Grind size knob is fine). 3 Grind Size Cups/ Shots Grind Time Select Coffee Dose: Rotate the Dose selection knob for the number of cups or shots. NOTE: Grinder can remain...
Owners Manual
Page 7
... The Burr Grinder is saved, the Burr Grinder will automatically adjust the grind time up or down for a particular selected dose. W11312158B.indb 7 7 3/16/2020 12:36:16 PM Increase the grinding time to increase the coffee ground amount or decrease the grinding time to decrease the coffee ground amount. Grind Size Cups/ Shots Grind Time Program Start/Stop To save dose setting: Once...
... The Burr Grinder is saved, the Burr Grinder will automatically adjust the grind time up or down for a particular selected dose. W11312158B.indb 7 7 3/16/2020 12:36:16 PM Increase the grinding time to increase the coffee ground amount or decrease the grinding time to decrease the coffee ground amount. Grind Size Cups/ Shots Grind Time Program Start/Stop To save dose setting: Once...

Owners Manual
Page 8
... to this Burr expands the grind size range, allowing you to customize even further to meet your taste preference. 1 2 1 Bottom lock 2 2 1 Twist and lift the Top hopper to unlock and lift the Upper burr by using the Wire handle. 5 2 Lift the Upper burr micro adjustment latch... remaining coffee beans in place. Twist to remove. Press Start/Stop to lock into position. 1 Return the Upper burr to the machine and twist to run the grinder until empty. 4 Upper burr Unplug the Burr Grinder. PRODUCT USAGE MICRO-ADJUSTING THE CONICAL BURRS The Burr Grinder is equipped with Lid and ...
... to this Burr expands the grind size range, allowing you to customize even further to meet your taste preference. 1 2 1 Bottom lock 2 2 1 Twist and lift the Top hopper to unlock and lift the Upper burr by using the Wire handle. 5 2 Lift the Upper burr micro adjustment latch... remaining coffee beans in place. Twist to remove. Press Start/Stop to lock into position. 1 Return the Upper burr to the machine and twist to run the grinder until empty. 4 Upper burr Unplug the Burr Grinder. PRODUCT USAGE MICRO-ADJUSTING THE CONICAL BURRS The Burr Grinder is equipped with Lid and ...
Owners Manual
Page 9
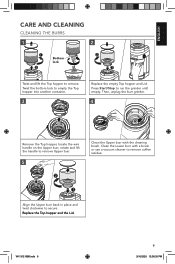
... Upper burr, rotate and lift the handle to run the grinder until empty. Press Start/Stop to remove Upper burr. 5 2 1 Clean the Upper burr with a brush or use a vacuum cleaner to remove. Replace the Top hopper and the Lid. Clean the Lower burr with the cleaning brush. ENGLISH CARE AND CLEANING CLEANING THE BURRS 1 2 1 Bottom lock 2 2 1 Twist and lift the Top hopper to remove coffee...
... Upper burr, rotate and lift the handle to run the grinder until empty. Press Start/Stop to remove Upper burr. 5 2 1 Clean the Upper burr with a brush or use a vacuum cleaner to remove. Replace the Top hopper and the Lid. Clean the Lower burr with the cleaning brush. ENGLISH CARE AND CLEANING CLEANING THE BURRS 1 2 1 Bottom lock 2 2 1 Twist and lift the Top hopper to remove coffee...
Owners Manual
Page 10
TROUBLESHOOTING GUIDE Problem Solution The Burr Grinder display is not to "Care and Cleaning" section for 10 minutes before turning it back on and display shows "Er3". See product assembly instructions for reference. Unplug the Burr Grinder, clean the burrs, reassemble the machine and securely plug into a grounded outlet. Stop the Burr Grinder. The automatic dosing quantity is not illuminated. Doses of coffee are in the...
TROUBLESHOOTING GUIDE Problem Solution The Burr Grinder display is not to "Care and Cleaning" section for 10 minutes before turning it back on and display shows "Er3". See product assembly instructions for reference. Unplug the Burr Grinder, clean the burrs, reassemble the machine and securely plug into a grounded outlet. Stop the Burr Grinder. The automatic dosing quantity is not illuminated. Doses of coffee are in the...
Owners Manual
Page 11
... specific legal rights and you may also have other than normal single family home use. ENGLISH WARRANTY AND SERVICE KITCHENAID® BURR GRINDER WARRANTY FOR THE 50 UNITED STATES, THE DISTRICT OF COLUMBIA, PUERTO RICO, AND CANADA This warranty extends to the purchaser and any succeeding owner for Burr Grinders operated in materials and workmanship. OR The replacement parts and repair...
... specific legal rights and you may also have other than normal single family home use. ENGLISH WARRANTY AND SERVICE KITCHENAID® BURR GRINDER WARRANTY FOR THE 50 UNITED STATES, THE DISTRICT OF COLUMBIA, PUERTO RICO, AND CANADA This warranty extends to the purchaser and any succeeding owner for Burr Grinders operated in materials and workmanship. OR The replacement parts and repair...
Owners Manual
Page 12
... replacement. Give the consultant your original Burr Grinder and send it back to : Customer eXperience Center, KitchenAid Small Appliances, P.O. When you call toll-free at 1-800-541-6390 or write to KitchenAid. Your replacement unit will be covered by our one year limited warranty. Proof of purchase will also be required to order accessories or replacement parts, call . ARRANGING FOR SERVICE...
... replacement. Give the consultant your original Burr Grinder and send it back to : Customer eXperience Center, KitchenAid Small Appliances, P.O. When you call toll-free at 1-800-541-6390 or write to KitchenAid. Your replacement unit will be covered by our one year limited warranty. Proof of purchase will also be required to order accessories or replacement parts, call . ARRANGING FOR SERVICE...