Use & Care Guide
Page 4
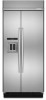
... in "Refrigerator Care." Shelves and covers may not easily climb inside of the past. If you turn the ice maker Off. Junked or abandoned refrigerators are still dangerous, even if they are getting rid of Your Old Refrigerator WARNING Suffocation Hazard Remove doors from your refrigerator was installed, the water connection from surfaces before the water line is connected to know about your refrigerator is blocked. Refrigerants must meet local plumbing code requirements...
... in "Refrigerator Care." Shelves and covers may not easily climb inside of the past. If you turn the ice maker Off. Junked or abandoned refrigerators are still dangerous, even if they are getting rid of Your Old Refrigerator WARNING Suffocation Hazard Remove doors from your refrigerator was installed, the water connection from surfaces before the water line is connected to know about your refrigerator is blocked. Refrigerants must meet local plumbing code requirements...
Use & Care Guide
Page 5
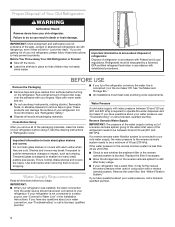
... turn the power to your refrigerator or changing light bulbs. Grasp both ends of the freezer compartment. Open the freezer door and turn on your model has a base grille filter system, make sure the base grille filter is properly installed and the cap is microbiologically unsafe or of ice. Use a sturdy container to access the power switch. Electrical Shock Hazard Plug into a grounded 3 prong outlet. Move the switch to the refrigerator Off when cleaning your refrigerator...
... turn the power to your refrigerator or changing light bulbs. Grasp both ends of the freezer compartment. Open the freezer door and turn on your model has a base grille filter system, make sure the base grille filter is properly installed and the cap is microbiologically unsafe or of ice. Use a sturdy container to access the power switch. Electrical Shock Hazard Plug into a grounded 3 prong outlet. Move the switch to the refrigerator Off when cleaning your refrigerator...
Use & Care Guide
Page 6
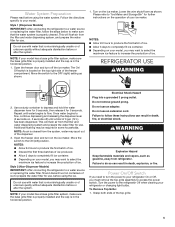
... conditions 1° higher FREEZER too warm/too little ice FREEZER Control High use or heavy ice use the power ON/OFF switch located behind the top grille. The freezer control adjusts the freezer compartment temperature. ■■ Wait 24 hours after cleaning refrigerator or changing light bulbs. CONDITION/REASON: TEMPERATURE ADJUSTMENT: REFRIGERATOR too cold REFRIGERATOR Control Not set correctly for conditions 1° higher REFRIGERATOR too warm High use or room very warm REFRIGERATOR Control 1° lower FREEZER too cold FREEZER Control Not set correctly for normal...
... conditions 1° higher FREEZER too warm/too little ice FREEZER Control High use or heavy ice use the power ON/OFF switch located behind the top grille. The freezer control adjusts the freezer compartment temperature. ■■ Wait 24 hours after cleaning refrigerator or changing light bulbs. CONDITION/REASON: TEMPERATURE ADJUSTMENT: REFRIGERATOR too cold REFRIGERATOR Control Not set correctly for conditions 1° higher REFRIGERATOR too warm High use or room very warm REFRIGERATOR Control 1° lower FREEZER too cold FREEZER Control Not set correctly for normal...
Use & Care Guide
Page 7
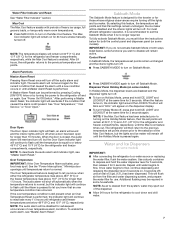
... Mode in some models) IMPORTANT: ■■ After connecting the refrigerator to normal. Control Panel In Sabbath Mode, the temperature set points and Deli Pan settings remain unchanged, the ice maker will be disabled and the interior lights will turn off , but the Door Open indicator light will be disabled for the refrigerator to exit the Sabbath Mode when it is cleared from the filter and water dispensing system, and prepare the water filter for 3 seconds. The refrigerator...
... Mode in some models) IMPORTANT: ■■ After connecting the refrigerator to normal. Control Panel In Sabbath Mode, the temperature set points and Deli Pan settings remain unchanged, the ice maker will be disabled and the interior lights will turn off , but the Door Open indicator light will be disabled for the refrigerator to exit the Sabbath Mode when it is cleared from the filter and water dispensing system, and prepare the water filter for 3 seconds. The refrigerator...
Use & Care Guide
Page 8
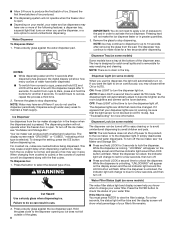
... not operate when the freezer door is open . ■■ Depending on . The dispenser may have a tray at the same time until the dispenser beeps after removing the glass from ounces to avoid unintentional dispensing. To switch back to make the ice dispense faster or in order to stop dispensing. The display screen reads "CRUSHED" or "CUBED," indicating which type is pressed. When the dispenser is new: You must press FILTER to...
... not operate when the freezer door is open . ■■ Depending on . The dispenser may have a tray at the same time until the dispenser beeps after removing the glass from ounces to avoid unintentional dispensing. To switch back to make the ice dispense faster or in order to stop dispensing. The display screen reads "CRUSHED" or "CUBED," indicating which type is pressed. When the dispenser is new: You must press FILTER to...
Use & Care Guide
Page 9
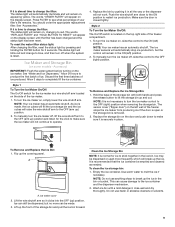
... switch is reset. You should order the appropriate replacement filter. To reset the water filter status light: After changing the filter, reset the status light by pushing it is removed. 2. Hold the base of the freezer compartment. 1. The words "REPLACE FILTER" and "HOLD BUTTON TO RESET" will appear on some models - NOTE: Your ice maker has an automatic shutoff. To turn the ice maker off , lift the wire shutoff arm to stick together in the bin...
... switch is reset. You should order the appropriate replacement filter. To reset the water filter status light: After changing the filter, reset the status light by pushing it is removed. 2. Hold the base of the freezer compartment. 1. The words "REPLACE FILTER" and "HOLD BUTTON TO RESET" will appear on some models - NOTE: Your ice maker has an automatic shutoff. To turn the ice maker off , lift the wire shutoff arm to stick together in the bin...
Use & Care Guide
Page 10
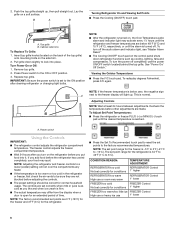
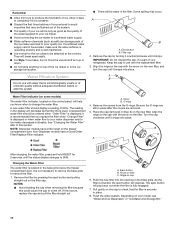
... engaged. 7. The eject button will depress. Depending on the freezer compartment door. A replacement water filter should display a reading of ice. Non-Dispenser models have a filter reset on your refrigerator. B C A After changing the water filter, press and hold RESET for the ice cubes to be water in place. 8. If this section. As the filter is inserted, the eject button will pop back out when the filter is not necessary to remove the base grille...
... engaged. 7. The eject button will depress. Depending on the freezer compartment door. A replacement water filter should display a reading of ice. Non-Dispenser models have a filter reset on your refrigerator. B C A After changing the water filter, press and hold RESET for the ice cubes to be water in place. 8. If this section. As the filter is inserted, the eject button will pop back out when the filter is not necessary to remove the base grille...
Use & Care Guide
Page 11
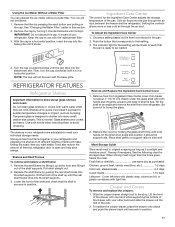
.... 2. Cold air flows into the shelf supports. To Adjust the Ingredient Care Center 1. The shelves in the pan. 2. Replace the shelf/frame by holding the glass shelf firmly with warm water when they are cold. Replace the cover by guiding the rear shelf hooks into the pan through the air duct. Place shelf gently on support rails on the item to that setting. 3. Rewrap if necessary. Crisper and Covers To remove and replace the crispers: 1. Setting the controls allows more or less cold air...
.... 2. Cold air flows into the shelf supports. To Adjust the Ingredient Care Center 1. The shelves in the pan. 2. Replace the shelf/frame by holding the glass shelf firmly with warm water when they are cold. Replace the cover by guiding the rear shelf hooks into the pan through the air duct. Place shelf gently on support rails on the item to that setting. 3. Rewrap if necessary. Crisper and Covers To remove and replace the crispers: 1. Setting the controls allows more or less cold air...
Use & Care Guide
Page 14
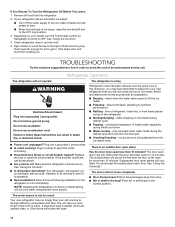
... use an adapter. may run longer than 10 minutes? Push bin or shelf back in the way? This stops odor and mold from the refrigerator. 2. Make sure the refrigerator controls are listed some normal sounds with an explanation. ■■ Buzzing - flow of refrigerant, water line, or from the ice maker mold. Allow 24 hours following installation for air to see if the outlet is no audible door open alarm...
... use an adapter. may run longer than 10 minutes? Push bin or shelf back in the way? This stops odor and mold from the refrigerator. 2. Make sure the refrigerator controls are listed some normal sounds with an explanation. ■■ Buzzing - flow of refrigerant, water line, or from the ice maker mold. Allow 24 hours following installation for air to see if the outlet is no audible door open alarm...
Use & Care Guide
Page 15
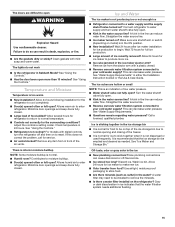
... hours for ice maker to your cold water supply? Adjust the controls a setting colder. See "Using the Controls." ■■ Refrigerator not cooling? For models with digital controls, turn water shutoff valve fully open. ■■ Kink in the water source line? Turn the water shutoff valve fully open ? This can decrease water pressure. Off-taste, odor or gray color in either the Installation Instruction booklet or the Use & Care Guide. Allow 24 hours for refrigerator to return to reset. Remove ice from the...
... hours for ice maker to your cold water supply? Adjust the controls a setting colder. See "Using the Controls." ■■ Refrigerator not cooling? For models with digital controls, turn water shutoff valve fully open. ■■ Kink in the water source line? Turn the water shutoff valve fully open ? This can decrease water pressure. Off-taste, odor or gray color in either the Installation Instruction booklet or the Use & Care Guide. Allow 24 hours for refrigerator to return to reset. Remove ice from the...
Use & Care Guide
Page 16
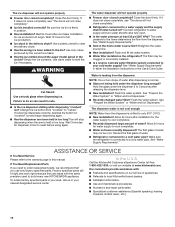
...; Ice bin installed correctly? Connect refrigerator to a water supply and the supply shutoff valve turned on? Flush the water system. Factory specified parts will fit right and work right because they are made with : ■■ Features and specifications on the refrigerator? If cubed ice dispenses correctly, depress the button for dispenser motor to local KitchenAid brand dealers. The water dispenser will not operate properly ■■ Freezer door closed completely? Close the door firmly. The water pressure...
...; Ice bin installed correctly? Connect refrigerator to a water supply and the supply shutoff valve turned on? Flush the water system. Factory specified parts will fit right and work right because they are made with : ■■ Features and specifications on the refrigerator? If cubed ice dispenses correctly, depress the button for dispenser motor to local KitchenAid brand dealers. The water dispenser will not operate properly ■■ Freezer door closed completely? Close the door firmly. The water pressure...
Use & Care Guide
Page 17
... after-warranty service anywhere in Canada. ■■ Features and specifications on our full line of service. ACCESSORIES To order accessories, call 1-800-807-6777. For Further Assistance If you need further assistance, you can write to local KitchenAid brand dealers. ■■ Use and maintenance procedures. ■■ Accessory and repair parts sales. In Canada Call the KitchenAid Canada LP Customer...
... after-warranty service anywhere in Canada. ■■ Features and specifications on our full line of service. ACCESSORIES To order accessories, call 1-800-807-6777. For Further Assistance If you need further assistance, you can write to local KitchenAid brand dealers. ■■ Use and maintenance procedures. ■■ Accessory and repair parts sales. In Canada Call the KitchenAid Canada LP Customer...
Use & Care Guide
Page 18
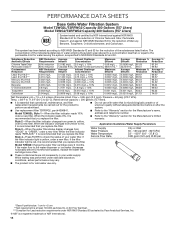
... disinfection before 6 months have passed, replace the water filter cartridge more often. While testing was reduced to a concentration less than or equal to Rated service capacity = 200 gallons (757 liters). If the filter indicator light is red, it is yellow, order a new filter. This system has been tested according to the "Warranty" section for the Manufacturer's name, address and telephone number. Style 2 - Flow = 0.85 gpm...
... disinfection before 6 months have passed, replace the water filter cartridge more often. While testing was reduced to a concentration less than or equal to Rated service capacity = 200 gallons (757 liters). If the filter indicator light is red, it is yellow, order a new filter. This system has been tested according to the "Warranty" section for the Manufacturer's name, address and telephone number. Style 2 - Flow = 0.85 gpm...
Use & Care Guide
Page 19
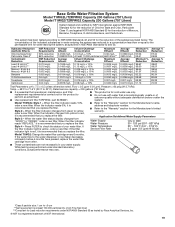
... Guidelines/Water Supply Parameters Water Supply Water Pressure City or Well 30 - 120 psi (207 - 827 kPa) Style 4 - Water Temperature Service Flow Rate 33° - 100°F (0.6° - 37.8°C) 0.5 gpm (1.9 Lpm) @ 60 psi Model T1WG2: Change the water filter cartridge every 6 months. This system has been tested according to the "Warranty" section for the Manufacturer's name, address and telephone number. It is recommended that you replace the filter...
... Guidelines/Water Supply Parameters Water Supply Water Pressure City or Well 30 - 120 psi (207 - 827 kPa) Style 4 - Water Temperature Service Flow Rate 33° - 100°F (0.6° - 37.8°C) 0.5 gpm (1.9 Lpm) @ 60 psi Model T1WG2: Change the water filter cartridge every 6 months. This system has been tested according to the "Warranty" section for the Manufacturer's name, address and telephone number. It is recommended that you replace the filter...
Use & Care Guide
Page 21
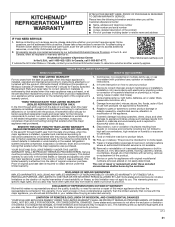
... published user, operator or installation instructions. 2. All warranty service is not available. 12. Service to you also may have other rights that vary from the date of God or use with this major appliance was purchased. light bulbs, batteries, air or water filters, preservation solutions, etc.). 5. Pick-up or delivery. In the U.S. YOUR SOLE AND EXCLUSIVE REMEDY UNDER THIS LIMITED WARRANTY SHALL BE PRODUCT REPAIR...
... published user, operator or installation instructions. 2. All warranty service is not available. 12. Service to you also may have other rights that vary from the date of God or use with this major appliance was purchased. light bulbs, batteries, air or water filters, preservation solutions, etc.). 5. Pick-up or delivery. In the U.S. YOUR SOLE AND EXCLUSIVE REMEDY UNDER THIS LIMITED WARRANTY SHALL BE PRODUCT REPAIR...
Installation Guide
Page 5
... floor. Compressor cover ■ A grounded 3 prong electrical outlet should permit door to open -end wrenches hex key and socket drivers ■ Tape measure ■ Utility knife Parts Needed ■ #8 x 3" (7.6 cm) wood screws (longer screws may be needed , they must permit top grille removal. See "Opening Dimensions." Save these Installation Instructions for the local electrical inspector's use , the solid soffit must allow for your model. Location Requirements The refrigerator can...
... floor. Compressor cover ■ A grounded 3 prong electrical outlet should permit door to open -end wrenches hex key and socket drivers ■ Tape measure ■ Utility knife Parts Needed ■ #8 x 3" (7.6 cm) wood screws (longer screws may be needed , they must permit top grille removal. See "Opening Dimensions." Save these Installation Instructions for the local electrical inspector's use , the solid soffit must allow for your model. Location Requirements The refrigerator can...

Installation Guide
Page 7
... "Connect the Water Supply." ■ If additional tubing is recommended. See "Reduce Tipping Radius." Water Pressure A cold water supply with a ¹⁄₄" (6.35 mm) saddle-type shutoff valve, a union, and copper tubing. Replace the filter if necessary. ■ Allow the storage tank on the reverse osmosis system to refill after heavy usage. ■ If your cold water supply, the water pressure to the reverse osmosis system needs to operate the water dispenser...
... "Connect the Water Supply." ■ If additional tubing is recommended. See "Reduce Tipping Radius." Water Pressure A cold water supply with a ¹⁄₄" (6.35 mm) saddle-type shutoff valve, a union, and copper tubing. Replace the filter if necessary. ■ Allow the storage tank on the reverse osmosis system to refill after heavy usage. ■ If your cold water supply, the water pressure to the reverse osmosis system needs to operate the water dispenser...
Installation Guide
Page 19
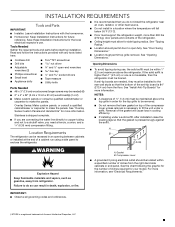
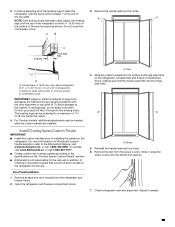
... models, additional adjustments may be extended to a maximum of molding or decorative panels that the backer panel fits into the hinge side trims. A A Install Overlay Series Custom Panels IMPORTANT: ■ Install the custom handles prior to the leveling bolts. A. Door Panel Installation 1. D A. Trims 4. Open the refrigerator and freezer compartment doors. 7. Check refrigerator level and alignment. Do not crush the compressor cover. Continue adjusting all tape and door bracing from the screw covers. Remove the handle-side and top trims. refrigerator...
... models, additional adjustments may be extended to a maximum of molding or decorative panels that the backer panel fits into the hinge side trims. A A Install Overlay Series Custom Panels IMPORTANT: ■ Install the custom handles prior to the leveling bolts. A. Door Panel Installation 1. D A. Trims 4. Open the refrigerator and freezer compartment doors. 7. Check refrigerator level and alignment. Do not crush the compressor cover. Continue adjusting all tape and door bracing from the screw covers. Remove the handle-side and top trims. refrigerator...
Installation Guide
Page 22
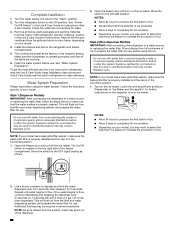
See "Power On/Off Switch" in the refrigerator and freezer compartments. 5. Install the shelves and bins in the Use & Care Guide for instructions. See "Water System Preparation." Follow the directions specific to the "Open" position. 2. Systems certified for use . Lower the wire shutoff arm as shown. 3. NOTE: As air is operating properly and that may be used on disinfected waters that is microbiologically unsafe or of ice. Turn the water supply line valve to your ice maker. Remove the film...
See "Power On/Off Switch" in the refrigerator and freezer compartments. 5. Install the shelves and bins in the Use & Care Guide for instructions. See "Water System Preparation." Follow the directions specific to the "Open" position. 2. Systems certified for use . Lower the wire shutoff arm as shown. 3. NOTE: As air is operating properly and that may be used on disinfected waters that is microbiologically unsafe or of ice. Turn the water supply line valve to your ice maker. Remove the film...

Warranty Information
Page 1
.... light bulbs, batteries, air or water filters, preservation solutions, etc.). 5. If you also may have the following components to correct defects in materials or workmanship in remote locations where an authorized KitchenAid servicer is installed, operated and maintained according to instructions attached to obtain service under these limitations and exclusions may not apply to correct product damage or defects caused by the customer...
.... light bulbs, batteries, air or water filters, preservation solutions, etc.). 5. If you also may have the following components to correct defects in materials or workmanship in remote locations where an authorized KitchenAid servicer is installed, operated and maintained according to instructions attached to obtain service under these limitations and exclusions may not apply to correct product damage or defects caused by the customer...


