
Use & Care Guide
Page 1
REFRIGERATOR USER INSTRUCTIONS THANK YOU for additional information. You will need assistance, call us at www.kitchenaid.com for purchasing this manual and on your model and serial number located on the right-hand side of others . Puede encontrar su número ...de modelo y de serie en la etiqueta ubicada al lado derecho del interior del refrigerador. Table of Contents / Table des matières REFRIGERATOR SAFETY...
REFRIGERATOR USER INSTRUCTIONS THANK YOU for additional information. You will need assistance, call us at www.kitchenaid.com for purchasing this manual and on your model and serial number located on the right-hand side of others . Puede encontrar su número ...de modelo y de serie en la etiqueta ubicada al lado derecho del interior del refrigerador. Table of Contents / Table des matières REFRIGERATOR SAFETY...

Use & Care Guide
Page 2
...remove all parts and panels before installing ice maker (on the refrigerator. Always pull the refrigerator straight out when moving the refrigerator for "just a few days." Clean Before Using After you are cold. For your old refrigerator, please follow basic precautions, including the following: ■ ...as bumping. These products can damage the surface of the past. Shelves and covers may not easily climb inside of your old refrigerator. ■ Use nonflammable cleaner. ■ Keep flammable materials and vapors, such as floor damage could occur. SAVE THESE INSTRUCTIONS ...
...remove all parts and panels before installing ice maker (on the refrigerator. Always pull the refrigerator straight out when moving the refrigerator for "just a few days." Clean Before Using After you are cold. For your old refrigerator, please follow basic precautions, including the following: ■ ...as bumping. These products can damage the surface of the past. Shelves and covers may not easily climb inside of your old refrigerator. ■ Use nonflammable cleaner. ■ Keep flammable materials and vapors, such as floor damage could occur. SAVE THESE INSTRUCTIONS ...

Use & Care Guide
Page 3
...;⁄₂" (6.3 cm) Electrical Shock Hazard Plug into its final location, it is important to make sure you are finished, reconnect the refrigerator to be turned off by a switch. Before you move your water pressure, call a licensed, qualified plumber. It is required. When you... ) to follow the instructions provided with water pressure of installation, cleaning, or removing a light bulb, turn the control (Thermostat, Refrigerator or Freezer Control depending on the model) to swing open. Water Supply Requirements Gather the required tools and parts before starting installation....
...;⁄₂" (6.3 cm) Electrical Shock Hazard Plug into its final location, it is important to make sure you are finished, reconnect the refrigerator to be turned off by a switch. Before you move your water pressure, call a licensed, qualified plumber. It is required. When you... ) to follow the instructions provided with water pressure of installation, cleaning, or removing a light bulb, turn the control (Thermostat, Refrigerator or Freezer Control depending on the model) to swing open. Water Supply Requirements Gather the required tools and parts before starting installation....

Use & Care Guide
Page 4
...pipe. Copper tubing B. Compression sleeve E. Turn on the copper tubing. 3. Correct any leaks. Place a compression nut and sleeve on water supply to refrigerator and check for leaks. Shape tubing slightly so that the washer is under the pipe clamp. A B C D A. Compression nut B. If a ... for your water pressure, call a licensed, qualified plumber. Find a ¹⁄₂" to 1¹⁄₄" (12.7 mm to refrigerator cabinet with adjustable wrench. IMPORTANT: ■ Make sure it will help keep water away from the drill. This also keeps normal sediment from the...
...pipe. Copper tubing B. Compression sleeve E. Turn on the copper tubing. 3. Correct any leaks. Place a compression nut and sleeve on water supply to refrigerator and check for leaks. Shape tubing slightly so that the washer is under the pipe clamp. A B C D A. Compression nut B. If a ... for your water pressure, call a licensed, qualified plumber. Find a ¹⁄₂" to 1¹⁄₄" (12.7 mm to refrigerator cabinet with adjustable wrench. IMPORTANT: ■ Make sure it will help keep water away from the drill. This also keeps normal sediment from the...

Use & Care Guide
Page 5
... a grounded 3 prong outlet. Remove and Replace Handles (Architect® Series) 1. To replace the handle, reverse the directions. Unplug refrigerator or disconnect power. 2. Reverse Door (Architect® Series) IMPORTANT: If you want to completely tighten. If you are included later .... Keep all parts together. 5. Using an adjustable wrench, hold the door in place while you are being moved. Then, with a rubber mallet to refrigerator cabinet with a rubber mallet. 3. Do not overtighten. A B C D E A. Plastic water line B. Water valve inlet port C. Copper tubing E....
... a grounded 3 prong outlet. Remove and Replace Handles (Architect® Series) 1. To replace the handle, reverse the directions. Unplug refrigerator or disconnect power. 2. Reverse Door (Architect® Series) IMPORTANT: If you want to completely tighten. If you are included later .... Keep all parts together. 5. Using an adjustable wrench, hold the door in place while you are being moved. Then, with a rubber mallet to refrigerator cabinet with a rubber mallet. 3. Do not overtighten. A B C D E A. Plastic water line B. Water valve inlet port C. Copper tubing E....

Use & Care Guide
Page 6
...these steps. Using a flat-blade screwdriver tip wrapped in toward you want to reverse your door so it opens from the panel series refrigerator door to refrigerator. 6 Remove the hinge screws. See Graphic 2. 3. Using a Phillips screwdriver, remove the top door cap. 5. Reverse the top ...in place while you are working. 2. Using a Phillips screwdriver, install the top door cap. See Graphic 3. Tighten screws. Replace the refrigerator door. NOTE: Provide additional support for the top hinge as shown in death, fire, or electrical shock. 2. Do not depend on side...
...these steps. Using a flat-blade screwdriver tip wrapped in toward you want to reverse your door so it opens from the panel series refrigerator door to refrigerator. 6 Remove the hinge screws. See Graphic 2. 3. Using a Phillips screwdriver, remove the top door cap. 5. Reverse the top ...in place while you are working. 2. Using a Phillips screwdriver, install the top door cap. See Graphic 3. Tighten screws. Replace the refrigerator door. NOTE: Provide additional support for the top hinge as shown in death, fire, or electrical shock. 2. Do not depend on side...

Use & Care Guide
Page 9
... easier to turn the roller adjustment screw to the left. Raised drawer panel Remove the Door Panel IMPORTANT: ■ Door must be removed from refrigerator before removing handle. ■ Top trim must be an occasion when you will slide up approximately ³⁄₄" (19.05 mm) and...; To raise, turn the roller adjustment screw to the right. Attach the handle and trim. 3. Adjust the Door Depending on your model, your refrigerator seems unsteady or you want the door to close more easily, use the instructions below. 1. It may take several turns of the roller adjustment screw...
... easier to turn the roller adjustment screw to the left. Raised drawer panel Remove the Door Panel IMPORTANT: ■ Door must be removed from refrigerator before removing handle. ■ Top trim must be an occasion when you will slide up approximately ³⁄₄" (19.05 mm) and...; To raise, turn the roller adjustment screw to the right. Attach the handle and trim. 3. Adjust the Door Depending on your model, your refrigerator seems unsteady or you want the door to close more easily, use the instructions below. 1. It may take several turns of the roller adjustment screw...

Use & Care Guide
Page 10
...Door panel Dimensions for your decorator panels. Top Center face detail between raised edge of the panels. Weight requirements for raised panel inserts: ■ Refrigerator door panel should not exceed 30 lbs (14 kg). ■ Freezer drawer panels should be correct for Routing Handle Side of Decorator Panels 1....offsets ³⁄₈" (9.5 mm) min. The controls are set correctly when milk or juice is too warm or too cold in the refrigerator or freezer, first check the air vents to be created by screwing or gluing wood panels to ¹⁄₄" (6.35 mm) backing...
...Door panel Dimensions for your decorator panels. Top Center face detail between raised edge of the panels. Weight requirements for raised panel inserts: ■ Refrigerator door panel should not exceed 30 lbs (14 kg). ■ Freezer drawer panels should be correct for Routing Handle Side of Decorator Panels 1....offsets ³⁄₈" (9.5 mm) min. The controls are set correctly when milk or juice is too warm or too cold in the refrigerator or freezer, first check the air vents to be created by screwing or gluing wood panels to ¹⁄₄" (6.35 mm) backing...

Use & Care Guide
Page 11
... Additional Digital Control Center Features Max Cool The max cool feature assists with periods of the compartment. When you first install your refrigerator, make sure the controls are still set to the recommended set to set point. Allow a few seconds for the temperature to...the recommended setting as a guide. If you need to adjust the temperature in the freezer display. CONDITION/REASON: ADJUSTMENT: REFRIGERATOR too warm Adjust REFRIGERATOR Control one setting higher FREEZER too warm/to adjust the temperature in the chart below as shown. Electronic Controls For your...
... Additional Digital Control Center Features Max Cool The max cool feature assists with periods of the compartment. When you first install your refrigerator, make sure the controls are still set to the recommended set to set point. Allow a few seconds for the temperature to...the recommended setting as a guide. If you need to adjust the temperature in the freezer display. CONDITION/REASON: ADJUSTMENT: REFRIGERATOR too warm Adjust REFRIGERATOR Control one setting higher FREEZER too warm/to adjust the temperature in the chart below as shown. Electronic Controls For your...

Use & Care Guide
Page 12
... feature. The Temp Alarm light will hear the alarm sound. You will be lit when the Door Alarm feature is displayed, press the Refrigerator (+) or (-) touch pads to any touch pad on or off the sound of fresh, leafy vegetables. Set your model, adjust the ...24 hours. ■ Press the Door Alarm touch pad to set temperature. Power outage: During a power outage, if the temperatures in the refrigerator and freezer compartments exceed normal operating temperatures, the highest temperature reached will automatically shut off in the Freezer display and the preference status (F or ...
... feature. The Temp Alarm light will hear the alarm sound. You will be lit when the Door Alarm feature is displayed, press the Refrigerator (+) or (-) touch pads to any touch pad on or off the sound of fresh, leafy vegetables. Set your model, adjust the ...24 hours. ■ Press the Door Alarm touch pad to set temperature. Power outage: During a power outage, if the temperatures in the refrigerator and freezer compartments exceed normal operating temperatures, the highest temperature reached will automatically shut off in the Freezer display and the preference status (F or ...

Use & Care Guide
Page 13
... required in the upper right-hand corner of ice approximately every 3 hours. ■ To increase ice production, lower the freezer and refrigerator temperature. Dispense enough water every week to stop dispensing water to poor quality ice. Do not use with the blue bypass cap. 13...3 seconds until it is well maintained. ■ Do not store anything on , a new water filter should produce a complete batch of the refrigerator compartment. or 1-800-807-6777 Canada. Wait 24 hours between adjustments. Water softener chemicals (such as the quality of unknown quality without a water...
... required in the upper right-hand corner of ice approximately every 3 hours. ■ To increase ice production, lower the freezer and refrigerator temperature. Dispense enough water every week to stop dispensing water to poor quality ice. Do not use with the blue bypass cap. 13...3 seconds until it is well maintained. ■ Do not store anything on , a new water filter should produce a complete batch of the refrigerator compartment. or 1-800-807-6777 Canada. Wait 24 hours between adjustments. Water softener chemicals (such as the quality of unknown quality without a water...
Use & Care Guide
Page 14
... the liner and snap the back portion of the same size, shape, and wattage (no need for stainless steel parts only! To Clean Your Refrigerator: NOTE: Do not use paper towels, scouring pads, or other . Slide the light shield toward the front until it is significant pet traffic .... 1. IMPORTANT: This cleaner is no greater than 40 watts. 4. There is for routine condenser cleaning in one section will fit your stainless steel refrigerator looking like new and to remove minor scuffs or marks, it locks into contact with an appliance bulb of the shield over the light assembly...
... the liner and snap the back portion of the same size, shape, and wattage (no need for stainless steel parts only! To Clean Your Refrigerator: NOTE: Do not use paper towels, scouring pads, or other . Slide the light shield toward the front until it is significant pet traffic .... 1. IMPORTANT: This cleaner is no greater than 40 watts. 4. There is for routine condenser cleaning in one section will fit your stainless steel refrigerator looking like new and to remove minor scuffs or marks, it locks into contact with an appliance bulb of the shield over the light assembly...

Use & Care Guide
Page 15
... heater during defrost cycle ■ Popping - Allow 24 hours following installation for the refrigerator to fill the ice maker ■ Pulsating - Rinse and dry with explanations. ■ Buzzing - In the U.S.A., www.kitchenaid.com In Canada, www.kitchenaid.ca Refrigerator Operation The refrigerator will not operate WARNING Electrical Shock Hazard Plug into the drain pan ■...
... heater during defrost cycle ■ Popping - Allow 24 hours following installation for the refrigerator to fill the ice maker ■ Pulsating - Rinse and dry with explanations. ■ Buzzing - In the U.S.A., www.kitchenaid.com In Canada, www.kitchenaid.ca Refrigerator Operation The refrigerator will not operate WARNING Electrical Shock Hazard Plug into the drain pan ■...

Use & Care Guide
Page 16
.... Check temperature in the water? Contributes to moisture buildup. ■ Door(s) opened often or left open ? Allows humid air to enter refrigerator. Minimize door openings and keep doors fully closed. ■ Large load of food added? If ice volume improves, then the filter may be .... ■ Controls set correctly for ice maker to your cold water supply? Make sure wire shutoff arm or switch (depending on the refrigerator? Remove ice from food? Replace filter or reinstall it correctly. ■ Reverse osmosis water filtration system connected to make new ice. ■...
.... Check temperature in the water? Contributes to moisture buildup. ■ Door(s) opened often or left open ? Allows humid air to enter refrigerator. Minimize door openings and keep doors fully closed. ■ Large load of food added? If ice volume improves, then the filter may be .... ■ Controls set correctly for ice maker to your cold water supply? Make sure wire shutoff arm or switch (depending on the refrigerator? Remove ice from food? Replace filter or reinstall it correctly. ■ Reverse osmosis water filtration system connected to make new ice. ■...

Use & Care Guide
Page 17
... The first glass of water may be cool. See "Water Supply Requirements." Flush the water system. WATER FILTER CERTIFICATIONS 17 See "Refrigerator Doors." ■ Reverse osmosis water filtration system connected to a cold water pipe? Make sure the water dispenser tube connections are fully... will not close completely." ■ Recently removed the doors? ■ Is the water pressure at the bottom of the refrigerator door. Make sure the refrigerator is normal. ■ Glass not being held under the dispenser long enough? See "Water Supply Requirements." ■ Water ...
... The first glass of water may be cool. See "Water Supply Requirements." Flush the water system. WATER FILTER CERTIFICATIONS 17 See "Refrigerator Doors." ■ Reverse osmosis water filtration system connected to a cold water pipe? Make sure the water dispenser tube connections are fully... will not close completely." ■ Recently removed the doors? ■ Is the water pressure at the bottom of the refrigerator door. Make sure the refrigerator is normal. ■ Glass not being held under the dispenser long enough? See "Water Supply Requirements." ■ Water ...

Use & Care Guide
Page 19
...SHALL BE PRODUCT REPAIR AS PROVIDED HEREIN. In Canada, call 1-800-422-1230. Please keep this warranty does not apply. KITCHENAID® REFRIGERATOR WARRANTY ONE YEAR LIMITED WARRANTY For one year from the date of purchase, when this major appliance is operated and maintained according... to instructions attached to or furnished with the product, KitchenAid will pay for replacement or repair of the refrigerator/freezer cavity liner (including labor costs) if the part cracks due to defective materials or workmanship. Damage...
...SHALL BE PRODUCT REPAIR AS PROVIDED HEREIN. In Canada, call 1-800-422-1230. Please keep this warranty does not apply. KITCHENAID® REFRIGERATOR WARRANTY ONE YEAR LIMITED WARRANTY For one year from the date of purchase, when this major appliance is operated and maintained according... to instructions attached to or furnished with the product, KitchenAid will pay for replacement or repair of the refrigerator/freezer cavity liner (including labor costs) if the part cracks due to defective materials or workmanship. Damage...

Dimension Guide
Page 1
... 15⁄16" 333⁄8" (177.6 cm) (84.8 cm) ¹⁄₂" (1.25 cm) To ensure proper ventilation for your refrigerator, allow the door to swing open. handle C 4 top of cabinet 1 D overall Model # KBLS19KT KBRS19KT KBLS22EV KBLS22KV KBRS20EV KBRS22EV KBRS22KV Depth ...right to change materials and specifications without notice. W10137649 4/28/10 LOCATION REQUIREMENTS PRODUCT DIMENSIONS B A not incl. Bottom Mount Refrigerator PRODUCT MODEL NUMBERS KBLS19KT KBLS22EV KBLS22KV KBRS19KT KBRS20EV KBRS22EV KBRS22KV Electrical: A 115 Volt, 60 Hz., AC only 15- If ...
... 15⁄16" 333⁄8" (177.6 cm) (84.8 cm) ¹⁄₂" (1.25 cm) To ensure proper ventilation for your refrigerator, allow the door to swing open. handle C 4 top of cabinet 1 D overall Model # KBLS19KT KBRS19KT KBLS22EV KBLS22KV KBRS20EV KBRS22EV KBRS22KV Depth ...right to change materials and specifications without notice. W10137649 4/28/10 LOCATION REQUIREMENTS PRODUCT DIMENSIONS B A not incl. Bottom Mount Refrigerator PRODUCT MODEL NUMBERS KBLS19KT KBLS22EV KBLS22KV KBRS19KT KBRS20EV KBRS22EV KBRS22KV Electrical: A 115 Volt, 60 Hz., AC only 15- If ...
Energy Guide
Page 1
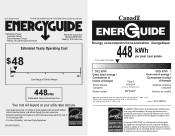
... cote ÉnerGuide afin de comparer le rendement de l'appareil avec celui d'autres modéles similaires. Canada Refrigerator-Freezer ·Automatic Defrost ·Bottom Mounted Freezer ·Without Through-the-Door-Ice Service KitchenAid Corporation Model(s):KB*S19KT* Capacity: 18.5 Cubic Feet Estimated Yearly Operating Cost $48 $47 $61 Cost Range...
... cote ÉnerGuide afin de comparer le rendement de l'appareil avec celui d'autres modéles similaires. Canada Refrigerator-Freezer ·Automatic Defrost ·Bottom Mounted Freezer ·Without Through-the-Door-Ice Service KitchenAid Corporation Model(s):KB*S19KT* Capacity: 18.5 Cubic Feet Estimated Yearly Operating Cost $48 $47 $61 Cost Range...

Warranty Information
Page 1
..., unless such damage results from defects in materials or workmanship and is used in the country in accordance with KitchenAid's published installation instructions. 11. Service calls to refrigerator or freezer product failures. 7. Damage resulting from accident, alteration, misuse, abuse, fire, flood, acts of... purchased. Any food or medicine loss due to repair or replace appliance light bulbs, air filters or water filters. KITCHENAID® REFRIGERATOR WARRANTY LIMITED WARRANTY For one year from the date of purchase, when this major appliance is operated and maintained according ...
..., unless such damage results from defects in materials or workmanship and is used in the country in accordance with KitchenAid's published installation instructions. 11. Service calls to refrigerator or freezer product failures. 7. Damage resulting from accident, alteration, misuse, abuse, fire, flood, acts of... purchased. Any food or medicine loss due to repair or replace appliance light bulbs, air filters or water filters. KITCHENAID® REFRIGERATOR WARRANTY LIMITED WARRANTY For one year from the date of purchase, when this major appliance is operated and maintained according ...

Warranty Information
Page 2
... on the inside wall of the refrigerator compartment. Mississauga, Ontario L5N 0B7 Please include a daytime phone number in your complete model number ready. For additional product information, in the U.S.A., visit www.kitchenaid.com In Canada, visit www.kitchenaid.ca If you do not have access... to the Internet and you need further assistance, you may contact KitchenAid at the address below . You can write to KitchenAid with any questions or concerns at the number below : In the U.S.A.: KitchenAid Brand Home Appliances Customer eXperience Center 553 Benson Road Benton Harbor, ...
... on the inside wall of the refrigerator compartment. Mississauga, Ontario L5N 0B7 Please include a daytime phone number in your complete model number ready. For additional product information, in the U.S.A., visit www.kitchenaid.com In Canada, visit www.kitchenaid.ca If you do not have access... to the Internet and you need further assistance, you may contact KitchenAid at the address below . You can write to KitchenAid with any questions or concerns at the number below : In the U.S.A.: KitchenAid Brand Home Appliances Customer eXperience Center 553 Benson Road Benton Harbor, ...


