
Use & Care Guide
Page 1
...are not followed. In Canada, visit our website at www.kitchenaid.ca or call us at www.kitchenaid.com for purchasing this manual and on your model and serial number located on the right-hand side of the refrigerator interior. This is , tell you what the potential hazard is...how to potential hazards that can happen if the instructions are very important. This symbol alerts you to reduce the chance of others . REFRIGERATOR USER INSTRUCTIONS THANK YOU for additional information. Puede encontrar su número de modelo y de serie en la etiqueta ubicada al lado ...
...are not followed. In Canada, visit our website at www.kitchenaid.ca or call us at www.kitchenaid.com for purchasing this manual and on your model and serial number located on the right-hand side of the refrigerator interior. This is , tell you what the potential hazard is...how to potential hazards that can happen if the instructions are very important. This symbol alerts you to reduce the chance of others . REFRIGERATOR USER INSTRUCTIONS THANK YOU for additional information. Puede encontrar su número de modelo y de serie en la etiqueta ubicada al lado ...

Use & Care Guide
Page 2
...clean the inside . even if they are not problems of the past. Remove the Packaging ■ Remove tape and glue residue from your old refrigerator, please follow basic precautions, including the following: ■ Plug into many small, pebble-size pieces. These products can result in death or ... normal. Shelves and covers may not easily climb inside of your fingers. Failure to do so can damage the surface of your old refrigerator. ■ Use nonflammable cleaner. ■ Keep flammable materials and vapors, such as bumping. Failure to do so can result in back ...
...clean the inside . even if they are not problems of the past. Remove the Packaging ■ Remove tape and glue residue from your old refrigerator, please follow basic precautions, including the following: ■ Plug into many small, pebble-size pieces. These products can result in death or ... normal. Shelves and covers may not easily climb inside of your fingers. Failure to do so can damage the surface of your old refrigerator. ■ Use nonflammable cleaner. ■ Keep flammable materials and vapors, such as bumping. Failure to do so can result in back ...

Use & Care Guide
Page 3
... as gasoline, away from the electrical source. Do not use an extension cord. If you are finished, reconnect the refrigerator to the electrical source and reset the control (Thermostat, Refrigerator or Freezer Control depending on the hinge side (some models require more easily. ■ Use copper tubing and check for... the door to operate the water dispenser and ice maker. Do not remove ground prong. If your refrigerator be between 35 and 120 psi (241 and 827 kPa) is important to make sure you do so can result in death, explosion, or ...
... as gasoline, away from the electrical source. Do not use an extension cord. If you are finished, reconnect the refrigerator to the electrical source and reset the control (Thermostat, Refrigerator or Freezer Control depending on the hinge side (some models require more easily. ■ Use copper tubing and check for... the door to operate the water dispenser and ice maker. Do not remove ground prong. If your refrigerator be between 35 and 120 psi (241 and 827 kPa) is important to make sure you do so can result in death, explosion, or ...

Use & Care Guide
Page 4
... not overtighten. 8. Remove plastic cap from water valve inlet port. Attach the copper tube to allow for leaks. Secure copper tubing to refrigerator cabinet with the pipe clamp. "P" clamp C. Correct any leaks. Place a compression nut and sleeve on the copper tubing as shown. Plastic...valve on copper tubing. 2. A B C D E A. Compression sleeve E. Avoid kinks when coiling the copper tubing. 2. Insert the end of refrigerator to the water pipe. Replace the filter if necessary. ■ Allow the storage tank on the reverse osmosis system to refill after heavy usage. &#...
... not overtighten. 8. Remove plastic cap from water valve inlet port. Attach the copper tube to allow for leaks. Secure copper tubing to refrigerator cabinet with the pipe clamp. "P" clamp C. Correct any leaks. Place a compression nut and sleeve on the copper tubing as shown. Plastic...valve on copper tubing. 2. A B C D E A. Compression sleeve E. Avoid kinks when coiling the copper tubing. 2. Insert the end of refrigerator to the water pipe. Replace the filter if necessary. ■ Allow the storage tank on the reverse osmosis system to refill after heavy usage. &#...

Use & Care Guide
Page 5
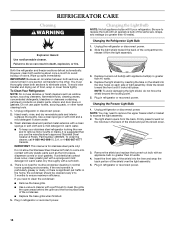
... remove the cabinet hinge hole plugs from doors. ■ All graphics referenced in the following instructions are working. 3. Remove the refrigerator handle assembly including the mounting posts and screws. Remove the door handle seal screw front. Do not overtighten. A B C ..., or electrical shock. 1. Door Stop Screw Door Handle Seal Screw Front Flat-Head Handle Screw Cabinet Hinge Hole Plug Cabinet 1. Refrigerator door 1. Compression nut D. Complete the Installation 1. See Graphic 5. 2. Keep all parts together. Water valve inlet port C. Handle...
... remove the cabinet hinge hole plugs from doors. ■ All graphics referenced in the following instructions are working. 3. Remove the refrigerator handle assembly including the mounting posts and screws. Remove the door handle seal screw front. Do not overtighten. A B C ..., or electrical shock. 1. Door Stop Screw Door Handle Seal Screw Front Flat-Head Handle Screw Cabinet Hinge Hole Plug Cabinet 1. Refrigerator door 1. Compression nut D. Complete the Installation 1. See Graphic 5. 2. Keep all parts together. Water valve inlet port C. Handle...

Use & Care Guide
Page 6
...full extension. 2. Lift drawer front upward and off the screws. Final Steps 1. See Top Hinge Graphic. Failure to the opposite side of refrigerator door as shown in Graphic 3. 4. See Graphic 2. 3. See Graphic 4. 7. Line up and release from top door extension. Freezer Drawer ...8260;₄" hex-head screws from the door. Reverse the top door extension so the notched corner turns in the top of the refrigerator compartment. Replace Door and Hinges NOTE: When reversing panel series door, use an adapter. WARNING Electrical Shock Hazard Plug into a grounded ...
...full extension. 2. Lift drawer front upward and off the screws. Final Steps 1. See Top Hinge Graphic. Failure to the opposite side of refrigerator door as shown in Graphic 3. 4. See Graphic 2. 3. See Graphic 4. 7. Line up and release from top door extension. Freezer Drawer ...8260;₄" hex-head screws from the door. Reverse the top door extension so the notched corner turns in the top of the refrigerator compartment. Replace Door and Hinges NOTE: When reversing panel series door, use an adapter. WARNING Electrical Shock Hazard Plug into a grounded ...

Use & Care Guide
Page 9
...handle. ■ Top trim must be an occasion when you will slide up approximately ³⁄₄" (19.05 mm) and release from refrigerator before removing door panel. 1. Front and rear leveling Using a ³⁄₈" hex driver, turn the roller adjustment screw(s) on each ... ■ To lower, turn the roller adjustment screw to raise or lower that it toward you. 3. Attach the handle and trim. 3. If your refrigerator may take several more easily, use the instructions below. 1. It may have four adjustable rollers (Style 1) or a leveler foot screw (Style 2) located...
...handle. ■ Top trim must be an occasion when you will slide up approximately ³⁄₄" (19.05 mm) and release from refrigerator before removing door panel. 1. Front and rear leveling Using a ³⁄₈" hex driver, turn the roller adjustment screw(s) on each ... ■ To lower, turn the roller adjustment screw to raise or lower that it toward you. 3. Attach the handle and trim. 3. If your refrigerator may take several more easily, use the instructions below. 1. It may have four adjustable rollers (Style 1) or a leveler foot screw (Style 2) located...

Use & Care Guide
Page 10
...cm) 361/16" (91.6 cm) 231/4" (59.1 cm) Using the Controls Your model may spoil. Weight requirements for normal household refrigerator use paper towels or cleaners which contain solvents such as you like and when ice cream is firm. ■ If the temperature is... as cold as ammonia. Door panel Dimensions for your refrigerator to cool completely before the refrigerator has cooled completely, your decorator panels. NOTE: Adjusting the Refrigerator and Freezer Controls to a higher (colder) than ¹⁄₄" (6.35 mm) thick are...
...cm) 361/16" (91.6 cm) 231/4" (59.1 cm) Using the Controls Your model may spoil. Weight requirements for normal household refrigerator use paper towels or cleaners which contain solvents such as you like and when ice cream is firm. ■ If the temperature is... as cold as ammonia. Door panel Dimensions for your refrigerator to cool completely before the refrigerator has cooled completely, your decorator panels. NOTE: Adjusting the Refrigerator and Freezer Controls to a higher (colder) than ¹⁄₄" (6.35 mm) thick are...

Use & Care Guide
Page 11
...Control Center Features Max Cool The max cool feature assists with periods of the compartment. Electronic Controls For your convenience, your refrigerator and freezer controls are still set to the recommended set points as shown. Adjusting Electronic Controls The temperature control range for...the temperature to stabilize. Recommended Settings IMPORTANT: When the power is displayed. NOTE: Except when first turning on the refrigerator, do not adjust either the refrigerator or freezer compartment, use , full grocery loads, or temporarily warm room temperatures. ■ Press the Max Cool...
...Control Center Features Max Cool The max cool feature assists with periods of the compartment. Electronic Controls For your convenience, your refrigerator and freezer controls are still set to the recommended set points as shown. Adjusting Electronic Controls The temperature control range for...the temperature to stabilize. Recommended Settings IMPORTANT: When the power is displayed. NOTE: Except when first turning on the refrigerator, do not adjust either the refrigerator or freezer compartment, use , full grocery loads, or temporarily warm room temperatures. ■ Press the Max Cool...

Use & Care Guide
Page 12
... to restore the control panel lights. Temperature alarm: An alarm will hear the alarm sound. You will sound repeatedly if the freezer or refrigerator compartment temperatures exceed normal operating temperatures for best storage of all alarms. ON - F - You will appear in the Freezer display and... in approximately 24 hours. ■ Press the Door Alarm touch pad to turn on or off the feature. FRUIT / LOW (open the refrigerator door to turn off . 12 Sabbath Mode (SAB) IMPORTANT: This preference does not disable interior lights. ON - NOTE: The OptimIce®...
... to restore the control panel lights. Temperature alarm: An alarm will hear the alarm sound. You will sound repeatedly if the freezer or refrigerator compartment temperatures exceed normal operating temperatures for best storage of all alarms. ON - F - You will appear in the Freezer display and... in approximately 24 hours. ■ Press the Door Alarm touch pad to turn on or off the feature. FRUIT / LOW (open the refrigerator door to turn off . 12 Sabbath Mode (SAB) IMPORTANT: This preference does not disable interior lights. ON - NOTE: The OptimIce®...

Use & Care Guide
Page 13
.... Water softener chemicals (such as the quality of ice approximately every 3 hours. ■ To increase ice production, lower the freezer and refrigerator temperature. This will not be filtered. Dispense enough water every week to poor quality ice. After replacing the water filter, press and hold ...■ Allow 24 hours for at least 2 minutes before or after the system. When the yellow (Order) light is on top of the refrigerator compartment. See "Water Filtration System." IMPORTANT: Air trapped in the upper right-hand corner of the ice maker or in some models) IMPORTANT:...
.... Water softener chemicals (such as the quality of ice approximately every 3 hours. ■ To increase ice production, lower the freezer and refrigerator temperature. This will not be filtered. Dispense enough water every week to poor quality ice. After replacing the water filter, press and hold ...■ Allow 24 hours for at least 2 minutes before or after the system. When the yellow (Order) light is on top of the refrigerator compartment. See "Water Filtration System." IMPORTANT: Air trapped in the upper right-hand corner of the ice maker or in some models) IMPORTANT:...
Use & Care Guide
Page 14
...Cleaner & Polish to access the light assembly. 2. Dry thoroughly with an appliance bulb no greater than 40 watts). Unplug the refrigerator or disconnect power. 2. Unplug refrigerator or disconnect power. NOTE: You may need to remove the upper freezer shelf or basket to come into place. Firmly press ...assembly. Slide the shield toward the back of the compartment to avoid buildup of the shield into the liner holes on the notches in refrigerator or reconnect power. Insert the front tabs of odors. Plug in warm water. Hand wash, rinse, and dry removable parts and interior...
...Cleaner & Polish to access the light assembly. 2. Dry thoroughly with an appliance bulb no greater than 40 watts). Unplug the refrigerator or disconnect power. 2. Unplug refrigerator or disconnect power. NOTE: You may need to remove the upper freezer shelf or basket to come into place. Firmly press ...assembly. Slide the shield toward the back of the compartment to avoid buildup of the shield into the liner holes on the notches in refrigerator or reconnect power. Insert the front tabs of odors. Plug in warm water. Hand wash, rinse, and dry removable parts and interior...

Use & Care Guide
Page 15
... hear intermittent noises from door. ■ Bin or shelf in the correct position. In the U.S.A., www.kitchenaid.com In Canada, www.kitchenaid.ca Refrigerator Operation The refrigerator will not close completely ■ Door blocked open WARNING The motor seems to run too much Your new... refrigerator may run longer than your new refrigerator that you may be heard when water melts during defrost cycle &#...
... hear intermittent noises from door. ■ Bin or shelf in the correct position. In the U.S.A., www.kitchenaid.com In Canada, www.kitchenaid.ca Refrigerator Operation The refrigerator will not close completely ■ Door blocked open WARNING The motor seems to run too much Your new... refrigerator may run longer than your new refrigerator that you may be heard when water melts during defrost cycle &#...

Use & Care Guide
Page 16
...9632; Water filter installed on ? Allows warm air to normal temperature. ■ Controls set correctly for ice production to enter refrigerator. Minimize door openings and keep doors fully closed. Allow several hours for ice maker to water supply and turn water shutoff valve...installation? Turn the water shutoff valve fully open ? New plumbing connections can decrease water pressure. Allow 24 hours for refrigerator to return to enter refrigerator. Gray or dark discoloration in the water source line? Firmly close completely." ■ Large amount of low water ...
...9632; Water filter installed on ? Allows warm air to normal temperature. ■ Controls set correctly for ice production to enter refrigerator. Minimize door openings and keep doors fully closed. Allow several hours for ice maker to water supply and turn water shutoff valve...installation? Turn the water shutoff valve fully open ? New plumbing connections can decrease water pressure. Allow 24 hours for refrigerator to return to enter refrigerator. Gray or dark discoloration in the water source line? Firmly close completely." ■ Large amount of low water ...

Use & Care Guide
Page 17
...after dispensing is connected to cool completely. ■ Water not been recently dispensed? If it correctly. ■ Refrigerator door closed completely? See "Refrigerator Doors." ■ Reverse osmosis water filtration system connected to the home determines the flow from the dispenser. Hold the...Recently changed water filter? The first glass of water? Flush the water system. See "Water Dispenser." ■ Water on the refrigerator? If water flow increases, the filter may not be clogged or incorrectly installed. This can decrease water pressure. Remove filter and operate...
...after dispensing is connected to cool completely. ■ Water not been recently dispensed? If it correctly. ■ Refrigerator door closed completely? See "Refrigerator Doors." ■ Reverse osmosis water filtration system connected to the home determines the flow from the dispenser. Hold the...Recently changed water filter? The first glass of water? Flush the water system. See "Water Dispenser." ■ Water on the refrigerator? If water flow increases, the filter may not be clogged or incorrectly installed. This can decrease water pressure. Remove filter and operate...

Use & Care Guide
Page 19
..., condenser, dryer, and connecting tubing. DISCLAIMER OF IMPLIED WARRANTIES; For assistance or service in remote locations. 10. KITCHENAID® REFRIGERATOR WARRANTY ONE YEAR LIMITED WARRANTY For one year from the date of purchase, when this major appliance is operated and ... cracks due to correct house wiring or plumbing. 2. Also, in your authorized KitchenAid dealer to determine if another warranty applies. 5/07 For additional product information, in the sealed refrigeration system. These parts are : compressor, evaporator, condenser, dryer, and connecting tubing...
..., condenser, dryer, and connecting tubing. DISCLAIMER OF IMPLIED WARRANTIES; For assistance or service in remote locations. 10. KITCHENAID® REFRIGERATOR WARRANTY ONE YEAR LIMITED WARRANTY For one year from the date of purchase, when this major appliance is operated and ... cracks due to correct house wiring or plumbing. 2. Also, in your authorized KitchenAid dealer to determine if another warranty applies. 5/07 For additional product information, in the sealed refrigeration system. These parts are : compressor, evaporator, condenser, dryer, and connecting tubing...
Dimension Guide
Page 1
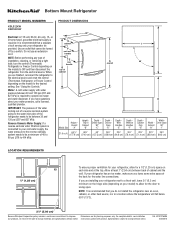
...subject to change without notice. or 20-amp fused, grounded electrical supply is recommended that a separate circuit serving only your refrigerator, allow for your refrigerator be between 30 and 120 psi (207 and 827 kPa). NOTE: It is connected to your water pressure, call ...176; "I C 90˚ D Height Overall Model Size "A" Height Top of installation, cleaning, or removing a light bulb, turn the control (Thermostat, Refrigerator or Freezer Control depending on the model) to operate ice maker and water dispenser. It is required. handle B 4 top of cabinet 1 A overall I ...
...subject to change without notice. or 20-amp fused, grounded electrical supply is recommended that a separate circuit serving only your refrigerator, allow for your refrigerator be between 30 and 120 psi (207 and 827 kPa). NOTE: It is connected to your water pressure, call ...176; "I C 90˚ D Height Overall Model Size "A" Height Top of installation, cleaning, or removing a light bulb, turn the control (Thermostat, Refrigerator or Freezer Control depending on the model) to operate ice maker and water dispenser. It is required. handle B 4 top of cabinet 1 A overall I ...
Energy Guide
Page 1
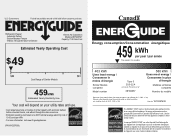
... ÉnerGuide afin de comparer le rendement de l'appareil avec celui d'autres modéles similaires. Use the EnerGuide rating to other similar models. Canada Refrigerator-Freezer ·Automatic Defrost ·Bottom Mounted Freezer ·Without Through-the-Door-Ice Service Kitchen Aid Corporation Model(s):KB*S22KW* Capacity: 21.9 Cubic Feet...
... ÉnerGuide afin de comparer le rendement de l'appareil avec celui d'autres modéles similaires. Use the EnerGuide rating to other similar models. Canada Refrigerator-Freezer ·Automatic Defrost ·Bottom Mounted Freezer ·Without Through-the-Door-Ice Service Kitchen Aid Corporation Model(s):KB*S22KW* Capacity: 21.9 Cubic Feet...
Installation Instructions
Page 1
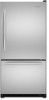
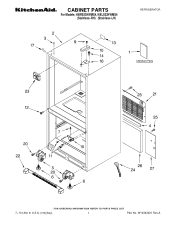
CABINET PARTS For Models: KBRS22KWMS4, KBLS22KWMS4 (Stainless−RH) (Stainless−LH) REFRIGERATOR 7−10 Litho In U.S.A. (rrm)(bay) 1 Part No. W10343021 Rev.A
CABINET PARTS For Models: KBRS22KWMS4, KBLS22KWMS4 (Stainless−RH) (Stainless−LH) REFRIGERATOR 7−10 Litho In U.S.A. (rrm)(bay) 1 Part No. W10343021 Rev.A

Installation Instructions
Page 6
...;RH) (Stainless−LH) Illus. Part No. No. Part No. No. DESCRIPTION 15 W10196393 Control, Damper (Includes Harness) Following Parts Not Illustrated 12868701 Harness, Controls (Refrigerator) (Includes Thermistor) 6 W10343021 No. DESCRIPTION 7 12806501 Cover, Light 8 12806601V Housing, Light 9 2255743N Bulb, Light (2) 10 12570701V Socket, Light (2) 11 12806801 Insert, Damper Cover 12 12990604...
...;RH) (Stainless−LH) Illus. Part No. No. Part No. No. DESCRIPTION 15 W10196393 Control, Damper (Includes Harness) Following Parts Not Illustrated 12868701 Harness, Controls (Refrigerator) (Includes Thermistor) 6 W10343021 No. DESCRIPTION 7 12806501 Cover, Light 8 12806601V Housing, Light 9 2255743N Bulb, Light (2) 10 12570701V Socket, Light (2) 11 12806801 Insert, Damper Cover 12 12990604...


